On VAZ-2114 cars, the ball joint is replaced when the suspension breaks down. The hinge is necessary for the normal operation of the front strut and its connection to the lower arm. Thanks to this simple design, the wheels on the car turn.
After all, the strut and hub are fixed at the bottom on a ball joint, at the top on a support bearing. Approximately in the middle of the rack there is a steering knuckle, which is connected to the steering rack via rods. By the way, the latter also have a ball joint - a tip.
Checking status
Before changing the ball joint, make sure that this element has actually failed and is the cause of the car's inappropriate behavior.
There are two ways to check - simple and more complex.
First way
To check you will need to do the following:
- When driving, listen for knocking noises coming from the front of the car. The malfunction of the ball joint becomes especially noticeable when the wheel falls into a hole;
- If, when hitting a hole, there is a dull impact from one of the front wheels, the ball joint should be changed;
- There is another way - put your foot on top of the front wheel, and then start pushing it towards the second front wheel. If you hear a dull thump during manipulation, it is better to check the condition of the ball in more detail using the second method.
Second way
The second testing method is more accurate, but will require a pit and additional equipment.
- Place the car over the inspection hole.
- Turn on the handbrake and place chocks under the wheels for your own safety.
- Raise the front of the car with a jack. Make sure the car is supported securely as you will have to wobble the car.
- After lifting the wheels off the ground with a jack, begin testing.
- Place one hand on the top point of the wheel, and the other, respectively, on the bottom.
- Using gentle but sharp movements, loosen the wheel from top to bottom.
- If you don't hear any knocks, check the second wheel as well.
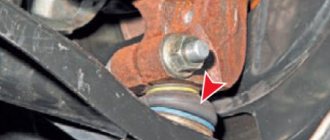
- If extraneous sounds appear, you need to ask a friend to place two fingers on the area where the suspension arm connects with the ball pin, as well as on the SHO body. If you feel with your fingers that the ball joint pin is moving inside the body, the ball joint has outlived its usefulness and requires replacement.
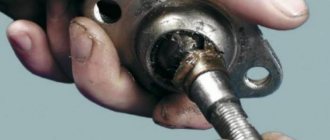
It is necessary to change the SHO when signs of wear are detected or when the boot breaks. With a deformed boot, the ball joint will not last long, plus it is dangerous for the driver and passengers.
- To work, you will need an inspection pit or a lift. But if they are not there, you can get by with a regular jack.
- Remove the wheel that has a ball joint problem.
- Thoroughly clean all elements from accumulated dirt, treat fastening components with WD40 so that the rust comes off and you can carry out dismantling work without any problems.
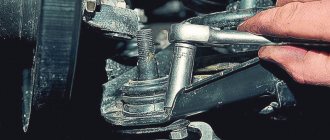
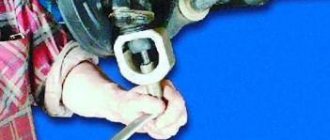
- Using a 19mm wrench, unscrew the nut securing the ball joint to the suspension arm of the VAZ 2109.
- Armed with a puller, press the SHO pin out of the suspension arm.
- If you don’t have a puller, you don’t need to go to a car service center. There is another way. You need to not completely unscrew the ball joint nut. The tension is created by a pry bar and several targeted, strong blows on the lever with a hammer. In 99% of cases, the finger comes out without any problems.
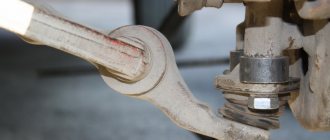
- Do not remove the pry bar too far, since it should now be used to move the suspension arm slightly downward, freeing the ball joint pin from the lever.
- Having picked up the 17 head, it is necessary to dismantle the pair of bolts responsible for connecting the steering wheel with the steering knuckle.
- Remove the worn ball joint.
- Check the condition of the boot and support. In some cases, it is enough to replace the boot. But if the ball joint is worn out and shows all signs of failure, install a new ball joint and reassemble the unit in the reverse order.
- Make sure there is a spacer on the pin. If it has been removed, do not forget to return the element to its place. Otherwise, the new support will not work properly.
- Be sure to lubricate the rubber boot with grease before reinstalling it. The lubricant is also applied to the place in the support where the boot is mounted.
An important point in replacement is the tension of the fastening nuts. After replacing the ball, tighten the nuts tightly, but not completely. Then you need to rock the car several times, and only then tighten the fasteners completely.
In this case, the lower SHO nut is tightened with a torque of 80-96 Nm, and a pair of bolts securing the support to the lever - with a torque of 50-63 Nm.
How to change it yourself: step-by-step instructions
There are two methods for replacing a ball joint on a Renault Logan - with and without removing the lever. In the first case, it is more convenient to dismantle the faulty ball joint, in the second - there is less assembly and disassembly work. In the instructions we consider both options. Basic steps:
- remove the wheel;
- remove the caliper;
- unscrew and knock out the ball joint;
- remove the lever (with the first method);
- press out the old support;
- press in a new one;
- assemble in reverse order.
Article on the topic: Repair and replacement of the gas tank on a VAZ 2108/09/14/15: how to do it quickly, accurately and with your own hands
Let's take a closer look at each point.
- There shouldn't be any problems removing the wheel.
But when removing the caliper, you need to unscrew the two 18mm mounting bolts, and then release the brake pads. This can be done using a screwdriver or a small pry bar. To decompress, rest not against the disc, but against the pad. After dismantling, hang the caliper higher on the suspension spring using wire or rope. Remove the caliper - Now we have access to the ball joint.
It is secured with a bolt and nut. Immediately unscrew the nut and knock out the bolt or gradually unscrew it, pressing from the reverse side. At the mounting point on the steering knuckle there is a special slot into which you need to drive a large screwdriver (like a wedge). After which you can pull out the ball. Drive a screwdriver into the slot of the steering knuckle and remove the ball - The next step depends on the replacement method you choose.
If you decide to try to pull out the support without removing the lever, then you need to select a suitable piece of pipe or other spacer. The main conditions are that the length allows one end of the device to rest against the ground, and the other end against the suspension arm. And the diameter should be slightly larger than the bottom of the ball, so that when knocked out it will fall inward. If the boot remains intact, it is better to remove it. It may come in handy in the future, since the anthers are not supplied separately (some install them from the Gazelle, but you will have to struggle with installation). If the old boot is intact, it is better to keep it - Next, knock out the old part with a hammer. Be sure to check for the presence of a retaining ring on the ball housing. The original supports do not have them, but some “analogs” are included. If any are found, remove the ring and then knock it out.
- To install a new spare part, a 34 or 36 head is suitable. Use it as a spacer, resting it on the lower part of the support.
The splines of the ball must match the splines of the lever. There is no need to rush at this stage. If the new support enters the lever at an angle, you will not be able to press it in correctly. What’s worse is that in this case the seat in the lever is deformed, and you will have to buy the lever assembly. Therefore, proceed carefully. Be careful when working with the ball seat - The replacement procedure is much more convenient to do with the lever removed. To do this, you will have to unscrew the nut and pull out the bolt securing the lever to the subframe, front and rear silent block. And also unscrew and pull out the connecting rod and stabilizer link.
- We reassemble in reverse order, not forgetting to check the condition of the fastening bolts. If they are damaged (mechanically or by corrosion), be sure to replace them with new ones.
- Don't forget to put the plastic washer that is installed on top of the boot. Without it, the service life of the ball joint is reduced by a third.
Article on the topic: Replacing the cylinder head gasket with your own hands
Replacing the support
To replace the VAZ-2114 ball joint, you will need to perform just a few simple steps:
- Using a "17" wrench, unscrew the two bolts that secure the ball joint race to the steering knuckle of the hub.
- It is advisable to turn the steering wheel to the side in advance to make it convenient to dismantle and install the element. During the repair process, you can rotate the stand, just turn on the ignition so that the steering wheel does not lock.
- Using a “22” wrench, you need to unscrew the nut located on the ball joint pin.
- Replacing a VAZ-2114 ball joint without a puller is problematic - too much force must be applied to get the pin out of the cone. Therefore, install a ball puller on the lever as well.
- Rotate the puller bolt to remove the pin.
That's all, disassembly of the unit is completed. Clean the seats and install a new ball joint, filling a sufficient amount of lubricant under the boot. Assembly is carried out in reverse order. To get the ball pin into the hub hole, you need to bend the lower arm with a crowbar.
Good day. This article will discuss how to understand that the ball joint on a VAZ 2109 - 2114 is faulty, and how to replace the ball joint on a VAZ 2109 - 2114.
Signs of ball failure
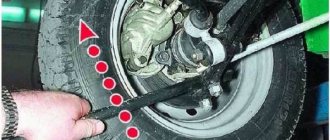
There is only one symptom of a faulty ball joint - a characteristic knocking sound. Moreover, it can be confused with the one coming from grenades. It’s just that the CV joints crunch when turning (only with severe wear will they constantly make unpleasant sounds). And the ball joints knock when driving slowly, even on a flat road. When hitting bumps, the sound intensifies. To make sure that the element is faulty, you need to place a crowbar between the lever and the steering knuckle of the hub and make several jerks - a knock will appear immediately.
Support design
The nine ball joint is simple and unprepossessing, and the suspension design no longer allows the support to collapse as quickly as in classic Zhiguli cars. However, its design is the same - it is a ball pin molded with metal cups. As a rule, a plastic (maybe polyurethane) liner is installed between the finger and the cups, which reduces the coefficient of friction and increases the support life.
For old Zhiguli models, dismountable ball joints were sold, in which the liner was simply replaced. How economically feasible this is is unclear, since the support pin remained old, it could wear out the new liner in about five thousand km. Then - replacement again. If you install a non-removable high-quality support, then its service life can reach one hundred thousand or more, if you do not overload the suspension on bad roads.
Useful tips
As practice shows, restoring ball joints and other suspension components using the methods discussed above is a solution that should be used only in extreme cases.
In other words, it is necessary to restore balls or ends only when, for one reason or another, it is not possible to immediately replace the faulty part with a new one.
However, in this case, the opportunity to save money due to repairs is not a plus
It doesn’t matter which car has problems (the ball parts of a premium car require replacement or the ball parts of a VAZ 2107 have failed), it is better to immediately look towards new original parts or high-quality analogues. The reason is that any repair is initially working with a faulty part and the lack of guarantees
It is also necessary to separately take into account that ball joints experience heavy loads, and safety on the road directly depends on their structural condition.
The reason is that any repair is initially working with a faulty part and there is no warranty. It is also necessary to separately take into account that ball joints experience heavy loads, and safety on the road directly depends on their structural condition.
It is quite logical that no repair can completely restore the performance and reliability of a part compared to a new unit of the same quality.
Purpose of ball joints VAZ 2107
A ball joint (BJ) is an ordinary hinge built into the VAZ 2107 suspension and allows the wheel to move only in a horizontal plane. At the same time, it limits the possibility of wheel movement in the vertical direction.
Ball joints on the latest versions of the VAZ 2107 have become more compact
Ball joints of the VAZ 2107 are very short-lived, so they have to be changed often.
Design of ball joints VAZ 2107
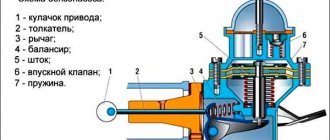
Previously, passenger cars did not have ball joints. They were replaced by bulky king pins that had to be lubricated frequently. The mobility of such compounds left much to be desired. This, in turn, negatively affected the car's handling. The designers of the VAZ 2107 abandoned the kingpins and installed ball joints. The first SHO consisted of:
- housings;
- ball pin;
- springs;
- anther
The finger was pressed into a fixed eye, fixed with a powerful spring and covered with a boot. This structure also needed to be lubricated periodically, but quite rarely (about twice a year). The lubricant on the pins had to be changed every week.
Modern ball joints do not use springs
Subsequently, the VAZ 2107 SHO was constantly improved:
- the spring disappeared from the structure;
- the steel boot was replaced with a plastic one;
- the fixed eyelet in which the finger was fixed became more compact and received a plastic external finish;
- SHOs have become non-separable, that is, practically disposable.
One driver I know assured me that he had found a great way to extend the life of plastic boots. Before installing new ball joints, he always applied a thick layer of silicone ointment to the boots, which car owners use to prevent the rubber bands on car doors from freezing in winter. From his words, it turned out that the anthers after such a procedure become practically “indestructible.” When I asked how an ointment intended for rubber could improve the quality of plastic, I was recommended to just try it and see for myself. Unfortunately, we never got around to it. So I leave it to the reader to check this driver’s find.
Reasons for failure of VAZ 2107 ball joints
The main reasons for SHO failure are as follows:
- Alternating shock load. As a result, the ball pin pressed into the suspension eye is destroyed. The support is designed in such a way that the shock loads on the pin ball are very high. When the quality of roads is poor, these loads increase manifold. In such conditions, even a high-quality SHO will not be able to fully exhaust its resource.
- Lack of lubrication. Under the influence of shock loads, the lubricant is gradually squeezed out of the SHO. In addition, over time, the lubricant loses its original properties.
- Anther destruction. The boot protects the hinge joint from dirt. If a crack appears in it, the dirt that gets into the joint turns into an abrasive material and grinds down the surface of the ball pin.
Signs of malfunction of VAZ 2107 ball joints
The main symptoms of a VAZ 2107 SHO malfunction include:
- Extraneous sounds. While driving, a knocking or grinding noise begins to be heard from the wheel. This is especially pronounced on uneven roads at a speed of about 30 km/h and is usually a consequence of partial destruction of the ball on the support pin.
- Wheel rocking. When accelerating, the wheel begins to sway slightly in different directions. This happens due to the backlash that occurs in the SHO due to its wear. The situation is quite dangerous, and the backlash must be eliminated quickly. Otherwise, the wheel may turn at a right angle to the body at speed.
- Grinding and squeaking noise when turning the steering wheel left or right. The reason is the lack of lubrication in one of the SHOs (usually only one of the supports fails).
- Uneven wear on front and rear tires. This can happen not only due to faulty SHOs. The cause of uneven wear may be incorrectly adjusted camber and toe-in, insufficient or excessive air pressure in individual wheels, etc.
Fault diagnosis.
To determine if the ball joint is faulty, just listen to the knocking sounds of the suspension when the car moves over uneven road surfaces. Ideally, there should be no knocking, but if the ball joint is faulty, then when driving at a relatively high speed along potholes, you can hear a rather unpleasant sound, which indicates the occurrence of play between the hinge, lever and wheel hub.
To verify this fact, you can do a simple test, which is not anything complicated. To do this, install wheel chocks under the rear wheels, and lift the front wheel, where the noise is coming from, using a jack. Now grab it vertically with both hands and try to swing it in the horizontal axis. For the purity of the experiment, it is recommended to ask your partner to press the brake pedal at this moment. If the wheel wobbles accompanied by slight play, the ball joint needs to be replaced.
It is strongly recommended not to delay this process. The fact is that a worn ball joint can create trouble for the driver when cornering. As a rule, it breaks and breaks the connection between the hub and the lever. Thus, the wheel turns out together with the levers, and the car becomes uncontrollable. In the best case, you can limit yourself to repairing the suspension, in the worst case, you can get into an accident.
Device and purpose
The ball joint allows for a reliable movable connection between the wheel hub and the suspension arm. The assembly includes a housing, a ball pin, and an insert made of plastic. The body most often has a welded structure - two parts with a stamped spherical recess for the finger are connected using spot welding.
Essentially, this element is a thick-walled glass made of metal into which an insert with a finger is then inserted. To make the housing structure non-separable, its edges are flared. Often the liner is not manufactured separately, but the area between the walls of the housing and the ball surface of the finger is filled with a special polymer material. To protect the unit from dirt and water, a boot is placed on top.
It should be noted that active wear of the ball joint begins after the boot is damaged. Until this happens, the unit is practically not subject to wear. Thus, if you monitor the condition of this element and replace it in a timely manner, you can significantly increase the life of the unit.
Replacement of ball joints VAZ 2107
If when driving over bumps you are haunted by an unpleasant sound in the front of the car, then there is no need to bring the matter to a critical moment. To find the cause of the knocking, you need to understand the structure of the suspension, both as a whole and its individual parts. In this article I will talk about one of the causes of knocking and how to replace ball joints on a VAZ 2107.
Ball joint device for VAZ 2107
The ball joint consists of a pin inserted into the body. Between them there is a plastic liner, which wears out over time. A rubber cover placed on the body and fits tightly to the finger protects against dust getting inside the insert. The ball joint housing has a hole for lubrication and checking the condition of the part. But not all manufacturers do this.
Diagnostics of ball joints VAZ 2107
If there is a knocking sound on bumps in the front part of the car and a beating in the steering wheel, as well as increased sensitivity of the car to the ruts, you should check the condition of the suspension and one of the points will be checking the ball joint of the VAZ 2107. How to check the ball joint on the VAZ 2107? Very easy! There are several ways to check ball joints.
If you have an inspection hole or overpass, then we go there and begin inspecting the car
First of all, you should pay attention to the condition of the ball joint boots. Using them you can determine the first signs of a malfunction of the ball joint of the VAZ 2107
If they are torn, then most likely this is the reason for abrasive getting into the body and increased wear of the part.
If the boot is intact, and you have a ball with a technological hole in the body, as in the diagram above, then cut a piece of thin straight wire, mark 11.8 mm on it and insert it into this hole. If the tag is immersed in the ball, then it’s time to change it.
If you do not have access to the overpass, simply turn the steering wheel and hang the wheels on the jack one by one. Next, we hold one hand at the junction of the body with the finger, and with the other we shake the wheel.
To check the upper ball joint, you should rock the wheel while holding its upper part, and to check the lower ball joint, you should apply force to the very bottom part of the wheel.
You can also simply rock the upper and lower parts of the wheel toward and away from you, but this may not give accurate results, since in this case the silent blocks of the levers may still make a sound.
Replacement of ball joints VAZ 2107
When, during the diagnostics of the suspension, a faulty ball joint was identified, we are faced with the question of how to replace the ball joint on a VAZ 2107? I will answer it for you now. But before repairing, you need to decide on the tool.
A long and painful replacement of ball joints on a VAZ 2107 without a puller is possible, because almost no one manages to do this without a puller.
Advice
Or you can immediately buy a special tool and then I will show you how to use a VAZ 2107 ball joint puller.
We will look at how to dismantle the upper ball joint of a VAZ 2107 without a puller, and I will show how to remove the lower ball joint of a VAZ 2107 in a version with a device designed for this.
Replacing the upper ball joint of a VAZ 2107
Replacement of VAZ 2107 ball joints occurs with the wheel removed.
To remove the upper ball joint, for example, on the left side without a puller, we must perform the following actions: turn the steering wheel as far as possible to the left, loosen the ball nut, put something under the hub, so that when lowering the car from the jack, the hub fits tightly on this object, take a hammer and point it at the tide on the fist (just below the ball nut) and with a sledgehammer or an ax we hit the hammer sharply, but not too hard. After a few tries the ball will come out. To make the process go faster, you can pour hot water on the hub in the ball area.
As soon as the pin comes out of the hub, unscrew the 3 bolts and dismantle the part.
But this case does not help in all cases. It happens that the ball simply rusts to the hub and there is no way to remove it except a puller.
Replacing the lower ball joint of a VAZ 2107
Using a puller, the balls can be pressed out of the hub in less than 5 minutes. To do this, unscrew both ball pin nuts a couple of turns. Next, we insert the puller between the upper and lower ball pins and begin to unscrew the puller bolt as shown in the photo below.
Next, all we have to do is unscrew the bolts securing the balls to the arms and install new balls.
Assembly is carried out in reverse order.
During assembly, it happens that when you tighten the nut onto the ball pin, it begins to rotate. To avoid this situation, wipe the ball pin and its seat in the hub with a dry rag. And after inserting the ball into the hub, lightly but firmly hit the ball with a hammer a couple of times. After these procedures, the finger will not turn when screwing the nut.
How to change: step-by-step instructions
Ball joint Lada Largus
It is better to work in a pit.
Use a jack to lift the front of the car from the problematic side. Unscrew the fastening nuts and remove the wheel. Unscrew the nut that secures the ball pin. Then remove the bolts located along the edges of the support - the fastening to the steering knuckle. Insert the puller and squeeze the finger out of the lever (see
photo). Ask a friend to carefully press the lower end of the lever with a pry bar. Remove the old part. They put a new one in its place and bolt it to the steering knuckle. Manually pointing your finger into the eyelet, ask a friend to slowly lower the lever. Secure the nut that secures the pin. Return the wheel to its place and lower the car. The ball joint on modern VAZs from 2108 to Granta is also changed.
The ball joint on modern Vases from 2108 to Granta also changes.
Video of replacement for VAZ 2110
The operation, which is often performed at a service station, can be done at home even by one car owner. But if you have a friend, the operation will take up to an hour, and the cost will be several times cheaper.
The design itself and the installation location of the ball joints imply the most severe operating conditions. Almost the entire load of the vehicle's mass falls on one small point in the form of a finger ball surface. And if you take into account the weight of luggage and passengers, overloads during aggressive driving and the disgusting quality of roads, it immediately becomes clear why this unit requires such close attention. Fortunately, on a VAZ 2110 car you can do the replacement yourself.
Preparation for replacement and tools
To carry out the repair you will need the following tools:
- Ball joint remover. The price of such a tool is about 350-400 rubles. I advise you to purchase it, as it will definitely be useful to you in the future.
- Standard set of wrenches and screwdrivers.
- Litol type lubricant.
- Jack and reliable supports.
- Wheel chocks, which are placed under the rear wheels to prevent the car from rolling away.
That's all, now you need to prepare the car for repair. To do this, you need to install wheel chocks, loosen the wheel bolts, lift the side being repaired using a jack and install it on a support. Wooden blocks can be used as support, but it is not advisable to use materials such as bricks, cinder blocks, and the like. They are fragile and the car can simply fall during repairs. If necessary, treat all threaded connections with a penetrating lubricant such as WD-40.
Problems when paying with bank cards
Sometimes difficulties may arise when paying with Visa/MasterCard bank cards. The most common of them:
- There is a restriction on the card for paying for online purchases
- A plastic card is not intended for making payments online.
- The plastic card is not activated for making payments online.
- There are not enough funds on the plastic card.
In order to solve these problems, you need to call or write to the technical support of the bank where you are served. Bank specialists will help you resolve them and make payments.
That's basically it. The entire process of paying for a book in PDF format on car repair on our website takes 1-2 minutes.
If you still have any questions, you can ask them using the feedback form, or write us an email at
Replacing ball joints VAZ 2107 2106 with pictures, best description
Knock in the suspension of a VAZ 2107.
If when driving over bumps you are haunted by an unpleasant sound in the front of the car, then there is no need to bring the matter to a critical moment. To find the cause of the knocking, you need to understand the structure of the suspension, both as a whole and its individual parts. In this article I will talk about one of the causes of knocking and how to replace ball joints on a VAZ 2107.
Ball joint device for VAZ 2107.
The ball joint consists of a pin inserted into the body. Between them there is a plastic liner, which wears out over time. A rubber cover placed on the body and fits tightly to the finger protects against dust getting inside the insert. The ball joint housing has a hole for lubrication and checking the condition of the part. But not all manufacturers do this.
Recovery
Replacing the ball joint for VAZ 2109, 2114
Necessary equipment:
- Emery or grinder.
- Extruder.
- An electric drill with a large chuck (so you can hold your finger in it to sand the ball with sandpaper).
- Metalwork yews.
- Welding machine (preferably semi-automatic).
- Compressor.
Restoration of supports can occur in two ways:
- Converting a non-separable hinge into a collapsible one, grinding the pin ball and replacing the liners.
- Repair by injecting softened plastic into the gap between the ball and the body using an extruder.
Of course, you shouldn’t buy equipment for a one-time repair, but you can quickly make a simple extruder with your own hands from an old brake master cylinder by attaching a lever to it to press the piston. You can heat it to soften the plastic with a torch or blowtorch.
Carrying out work
Repair and restoration in the first way begins with dismantling the supports. To disassemble a body welded from two cups, you need to drill out welding points on one of the cups and separate the cups using a chisel and hammer. On a body with an inserted bottom, grind off the flared edges using emery or a grinder, and knock out the bottom with a hammer to the end of the finger. An insert with a finger is inserted into the body of two cups, the halves are pressed against each other and several tack welds are made, trying not to overheat the insert. For a case with the bottom removed, measure the outer and inner diameters and make a steel ring in accordance with these dimensions, about 10 mm high with a thread inside and a plug screwed into it. Weld the ring to the body, cool, insert the insert with the pin into the body, screw in the plug, press the liner with it, drill a Ø 2 mm hole in the ring close to the plug and secure it with a cotter pin.
Article on the topic: Rating of the best batteries for cars
Do-it-yourself repair and restoration using the second method usually takes place without disassembling the unit.
A hole with a diameter of about 6 mm is drilled in the bottom of the body, its size depends on which extruder is available to you. The gap between the ball and the liners is cleared of dirt and blown with compressed air to remove sand and chips. Through a hole drilled in the bottom, using an extruder, softened plastic is injected into the gap between the pin ball and the body. Let it cool and the repair is ready. The disadvantage of this method is that you cannot see whether the geometry of the ball has been preserved and you cannot polish it to remove traces of corrosion, so the restoration results will be short-lived.
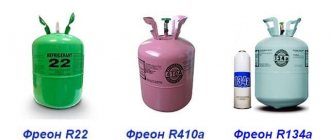
Choosing the right new ball joints
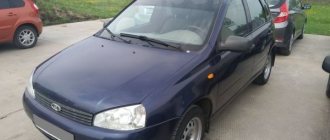
The chassis of Lada Kalina cars of both generations (models 1117, 1118, 1119, 2192 and 2194) is built on a complete base, which is for the most part unified with earlier and later cars of the Volzhsky Automobile Plant. In particular, all Kalinas are equipped with the same ball joints that were used on the Samara family (VAZ-2108, 2109, 21099) and Samara 2 (VAZ-2113, 2114 and 2115), Lada 110 (VAZ- 2110, 2111, 2112), as well as on the current Priora and Granta models.
Ball joints for these model series have the original catalog number 21100-2904192-82, the same supports complete with fasteners have the number 21100-2904192-86.
Moreover, today the market offers two modifications of ball joints - standard welded and reinforced stamped ones. Hinges differ in production technology and the thickness of the metal used, which affects their strength characteristics, durability and price, but their installation dimensions and characteristics are the same. Therefore, it’s up to you to decide which supports to buy for your car.