The front suspension of a passenger car is one of the most loaded devices. It is she who takes all the blows, she “eats up” small unevenness in the road surface, and she also keeps the car from tipping over on sharp turns. One of the most critical elements of the suspension is the front beam, which, despite the massive structure, can also fail. Can I repair it myself? Yes. Let's figure out how this is done.
- Description and fastening of the beam
Main faults of the beam
- Sequence of work
Fastening the beam to a VAZ 2107
The front beam of the VAZ 2107, due to its transverse location in the engine compartment, is also called a “cross member”. The car engine and lower suspension arms are attached to it. If the beam has fatigue cracks, damage, or is deformed in such a way that it allows the required wheel alignment angles to be set, it needs to be replaced. This is a very labor-intensive procedure that requires dismantling, subsequent installation and adjustment of front suspension parts. During the operation, the engine must be suspended on a traverse or hoists. It is better to carry out the work with a partner, and the replacement should be done in a pit or a lift.
Preparatory work
Before removing the beam, it is necessary to remove the shock absorbers and suspension springs. For this operation, in addition to standard keys and heads, you will need a pry bar, a jack and spring ties.
The order of operation is as follows:
- Drive the car into the pit, put the handbrake on, and install wheel chocks under the rear wheels.
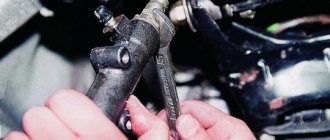
- Loosen the upper nuts of the front shock absorbers located in the engine compartment (to prevent the shock absorber rod from turning, it should be held with an open-end wrench).
- Unscrew the top nuts and remove them along with the washers and springs (the location of the elements must be remembered, this will be useful during assembly).
- Unscrew the nuts securing the shock absorbers to the lower arms.
- Pull out the shock absorbers.
- Loosen the front wheel mounting bolts.
- Raise the car on a jack, place the front part of the car on supports, remove the front wheels (special supports or ordinary bricks are located under the side members at the point where they connect to the body).
Further actions are performed sequentially for the right and left levers:
- Unscrew the nuts securing the lever two turns (otherwise it will be difficult to lift it with a jack).
- Raise the end of the lever with a jack and remove the stabilizer rubber bracket by unscrewing the fastening nuts.
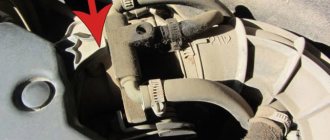
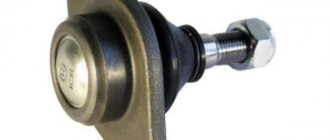
- Partially unscrew the nuts securing the lower ball joint and knock it out of the knuckle with a hammer (it is better to use a special puller instead of a hammer).
- Move the stabilizer through the top pin using a pry bar.
- Lower the lever and remove the jack.
- Lift the upper arm and pull out the suspension spring, prying it up with a pry bar from below.
Reinstalling the parts is done in the reverse order. Before installing the springs, they should be compressed with ties.
Beam dismantling
The VAZ 2107 beam serves as the basis for attaching the lower suspension arms, so before removing it, the arms must be unscrewed. To dismantle the lever, simply unscrew the two nuts securing the lever axis to the beam.
The car engine is also attached to the beam. Before removing the beam, it is necessary to secure it to the hoist using the eye on the cylinder head located between the carburetor and the tee. Before hooking the engine onto the hoist, it is necessary to remove the air filter so as not to damage it. Once the engine is suspended, you can begin to remove the beam.
Unscrew the nuts securing the engine mounts to the beam.
Support the beam so that it remains in place after unscrewing from the side members. To do this, you can use a stack of boards, placing them under the part.
Unscrew the beam fastening bolts running in the horizontal plane, then the nuts of the bolts running vertically.
Dismantling the unit
The front beam of a VAZ 2107 car is removed using metalwork tools and lifting devices. To perform this operation you will need:
- Wrenches and sockets in a set with a wrench and an extension.
- Automotive or hydraulic jack of appropriate size and load capacity.
- Manual hoist and design for its fastening.
- Portable lamp for illuminating the work area.
Instead of a lifting mechanism, a special device can be used to allow the engine to be suspended with support from body parts. It is most convenient to carry out the work in an equipped garage box on a lift or above an inspection pit. The wizard's sequence of actions is as follows:
- The front part of the car is hung out, the front wheels are removed from it, and the body is placed on strong supports.
- We dismantle the steel sheet of engine protection and mudguards.
- It is advisable to remove the hood to avoid accidental damage. The power unit hooks onto an eye fixed to the body and is lifted with a hoist or using a special device.
- If there are no lifting mechanisms, the support can be placed directly under the engine crankcase, be sure to place a piece of board under it. This will avoid deformation of the part.
- We disassemble the front suspension on both sides of the car. We dismantle the springs and lower arms along with the axles.
- Unscrew the bolts securing the rubber-to-metal engine mounts.
- We unscrew the nuts on the spar studs that hold the structure in place and free it.
Now you can directly remove the beam from the fasteners and move it to the side. A specialist is recommended to inspect the engine mounts; if they are significantly deformed, they should be replaced with new parts.
Suspension faults
Malfunctions of the front suspension include wear of the rubber parts of the suspension, and wear of the ball joints is also possible. It is not uncommon for shock absorbers and springs to fail during operation.
In most cases, repairing the VAZ 2107 front suspension can be done at home. But to do this, first, you will need to conduct a visual inspection and diagnose its condition.
To do this, it is advisable to drive the car onto an overpass or inspection hole. During the inspection, the condition of all rubber parts is determined, the presence of gaps in the ball joints, the absence of oil leaks from the shock absorber and the integrity of the spring are checked.
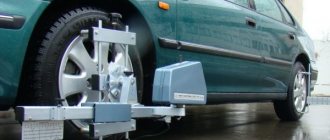
Why is it necessary to do a wheel alignment after replacing the front beam?
If it is quite possible to do the work of replacing the front beam with your own hands, then it is recommended to contact a service center regarding the adjustment of the wheel alignment. The fact is that when replacing the load-bearing elements of the body, or any manipulations with the steering mechanisms, the alignment of the camber will certainly be disrupted.
Wheel alignment adjustment - display of measurement results.
A timely request for camber adjustment will prevent premature tire wear and will ensure correct vehicle behavior in slippery road conditions.
Violations in wheel alignment parameters can be accurately determined only by using computer diagnostics, but the following symptoms may indicate the need to visit a car service center:
- the steering wheel is turned with variable effort
- the car “steals” while driving
- uneven tread wear on tires
- increasing the noise level generated by the wheels
Beam installation and suspension assembly
The new VAZ 2107 beam is installed in the reverse order of removal. When installing the engine on the beam, it is necessary to control the location of the pillow pins so that they fit into the mounting holes.
If there are no spring ties, they can be replaced with a jack and wire. To do this, you need a screw jack, used on Zhiguli and Muscovites, and steel wire. It is worth noting that this operation is very risky - if the wire breaks, the spring can “shoot”. The procedure itself looks like this:
- Raise the jack bar up so that a spring can be inserted between it and the base.
- Using two or three wire loops, tighten the spring to the jack so that it does not bend in an arc or jump out during compression.
- Compress the spring, gradually lowering the jack bar.
- Secure the spring with wire twists in a compressed state.
Things to remember:
- Extreme caution must be used when using this method.
- If possible, be sure to use a specialized spring tie and not a jack.
- The spring must be compressed enough so that it can be easily installed, but no more. Otherwise, problems will arise when removing twisted wires.
After installing the spring in place, the wire twists must be removed using pliers. They should be removed carefully and evenly so that the spring does not bend, but falls into place.
Self-locking differential
The most common way to increase the cross-country ability of a car is to install a self-locking differential. The main advantage of this device is that it prevents wheel locking “forever”
This is important because preventing lockup from engaging when not required helps protect the axle shafts from critical loads.
There are the following types of differential locks:
- Disc - implemented through the use of friction clutches. These clutches come into action as soon as the wheels begin to rotate at an uneven speed. The disadvantage of this mechanism is that it requires the use of expensive gear oil, and also requires quite frequent adjustment work to set up the unit. This is far from the best mechanism for a VAZ 2107 car.
- Viscous coupling blocking - the operation of such a device is based on the use of sticky discs immersed in a special liquid. It hardens when heated, allowing the gears to engage—that is, the differential locks. The liquid heats up when the angular speed of the wheels on the axle changes (when the speed of rotation of the wheels becomes different). The disadvantage of this mechanism is that they require complete sealing of the assembly, and work effectively only during short-term slipping.
- Screw locking or worm locking is the best option for automatic locking for the VAZ 2107. The mechanism is implemented using worm screws, which rotate when the car drives in a straight line, and when the angular speed of the wheels changes, they shift into grooves, thereby locking the differential. As soon as the car gets out of the mud captivity, the blocked mechanism resumes its normal operation by moving the worm screws to their places.
- Planetary - the operating principle is similar to a worm circuit, only instead of gears, balls are used. Due to the balls, the wheels are blocked, and they come into operation when the traction force between the engines and the axle changes. Compared to a self-locking worm gearbox, a planetary gearbox costs about 2 times less.
In addition to automatic differential locking, there is also a forced one, which is activated if necessary.
Tools and materials for work
To repair thresholds on a VAZ 2107, you will need a lot of different tools and processing materials. Below is a list of tools and materials without which it is impossible to make a high-quality replacement of thresholds.
- Semi-automatic welding machine with accessories;
- Power tools (grinder, drill and accessories);
- A set of keys and sockets (for disassembling the interior);
- Ratchet driver;
- Hammer;
- Knife for chopping metal;
- Kerner;
- Marker;
- Compressor;
- Pneumatic gun for applying anti-corrosion agents;
- Several body pliers;
- Spray gun;
- Epoxy primer;
- Degreaser;
- Putty (with fiberglass and finishing);
- Red scotch-brite;
- Solvent;
- Sealant for welds;
- External anti-corrosion agent for application with an air gun (for example, Teroson RB2000, Body 951);
- Internal anti-corrosion agent for application with an air gun (e.g. APP-F400, Dinitrol ML, TecTyl 210R).
DIY reinforcement
The most important indicator of body strengthening is torsional rigidity. It is measured in Nm/deg. And the higher this value, the stiffer the body is considered. In addition, this indicator is also affected by the type of car body. As you know, hatchbacks are much stiffer than 3-volume sedans, which is what our “seven” is.
Note. The number of doors is also important, as is the location of the internal combustion engine, which also greatly affects the rigidity of the body.
The body rigidity of the VAZ 2107 sedan is 7200 Nm/deg. For comparison, the Daewoo Lanos hatchback has the same figure of 10,500 Nm/deg. As for other modern foreign cars in the expensive segment, such as Alfa Romeo or Citroen C5, their body rigidity is equal to 20 thousand Nm/deg.
Spacers and braces
So, what can you do to increase body rigidity? The best method involves installing spacers and guy wires.
Installing spacers on the front pillars gives a good effect, although according to some motorists, they did not notice any real improvements. On the contrary, tests carried out more than once prove the opposite - with front struts, cornering and changing lanes on the road are much more confident, regardless of speed.
But most importantly, spacers help reduce the degree of deformation of the body, which will have a beneficial effect on the durability of the metal frame.
On the “seven” you can install stiffer (reinforced) struts, although it is believed that among VAZ models, the suspension on the VAZ 2107 is stiffer. In a general sense, this is still a soft suspension.
It is advisable to purchase spacers only from well-known companies; handmade models do not inspire confidence. Although they can be used, you just have to select them according to the “seven”, otherwise problems and difficulties may arise during installation.
And it makes sense to put spacers on the rear pillars. This will create reinforcement for the entire rear of the 7's metal frame. In principle, the “seven” does not need rear struts as much as, for example, the VAZ 2108 and modifications released later. On VAZ models, initially the rear seat is assigned the role of increasing body rigidity, but on the 2112, for example, the seats fold out, which indicates low rigidity.
Why do cracks appear in the front beam housing, what is the danger?
Since the cross beam is an all-metal part, it serves for many years. Does not require special maintenance. But when carrying out TO-2, a visual inspection of the part is required in order to identify deformations and cracks. The same check is required for parts that have direct contact with the beam.
Frequently encountered malfunctions that are detected during such inspections are deformations; they arise as a result of:
- increased static or shock loads
- metal fatigue stresses causing cracks
- wear of fasteners
What is the danger:
- the alignment accuracy of the front wheels is impaired
- the car's sensitivity to control decreases
- the safety of moving a car on the road decreases
- there is a threat of complete destruction of the part
Why do you need a threshold amplifier?
The thresholds on Zhiguli are reinforced with a metal plate, 0.8 mm thick, with perforations (holes) along the length. The cost of the part does not exceed 400 rubles; when replacing, a set of 2 pieces will be required.
The amplifier is designed for the stability of the entire body structure; the part accounts for up to 30% of the entire vibration load and up to 70% of the force load. The structure can be strengthened using a separate, non-production metal, and a plate of the required thickness and length can be selected for repair.
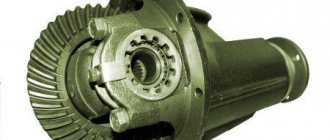
Differential device
The planetary gear is mounted on the differential housing. The differential consists of two axle gears, two satellites and a pin. The main, most common differential malfunctions are wear of the pinion pin (play) and wear of the splines on the axle gears.
On a car, the play of the pin of the satellites can be determined by turning the driveshaft by a quarter or more; if there is no play, then the shaft practically remains in place when you try to turn it in one direction or another.
It's also worth noting that there is never any noise coming from the differential. When moving forward (in a straight line), the differential rotates as one unit and it turns out that there is simply nothing to make noise there.
The cause of noise from the rear axle gearbox when gas is added and the noise disappears after releasing gas is (almost 99.9%) wear of the teeth of the main pair. This is clearly visible on the removed gearbox. The forward side of the teeth has significant wear, while the reverse side shows little wear.
If, after disassembling and troubleshooting the parts of the main pair, wear of the teeth is detected, then no repair will help and it will simply be a waste of time and money. Only the main pair needs to be replaced.