Malfunctions
Any driver experiences an unpleasant feeling when the clutch pedal sinks to the floor.
This can happen if the clutch cable breaks; it is also possible that the release fork breaks (this case is discussed in another article). The cable breaks more often on older cars that are used in extreme conditions or all year round. The cable may become frayed, which affects the smoothness of the pedal and the operation of the clutch. This cable also requires replacement.
If the clutch cable is broken, you can drive your car to the repair site. You need to start the car in first gear and shift while driving. The following situation is possible: the cable broke while the gear was engaged, and the car stalled.
There is a possibility that it will be difficult to engage the neutral position. Then your car won’t even be able to roll off the roadway. The transmission is disengaged by rocking the car forward and backward and disengaging the transmission at the same time. You can jack up one of the wheels and spin it by hand, this will also help.
Even if the cable is not replaced, gear shifting is possible. It is possible to get to the service station, but such driving has a negative impact on the service life of the gearbox.
The cost of the spare part is low, about 300 rubles. The cost of replacing a cable in a car service is 400 rubles.
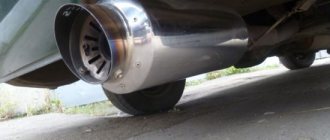
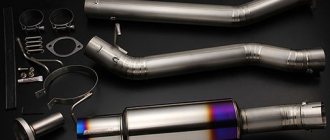
Powder fire extinguisher muffler
Modification of a standard muffler is possible on the basis of a powder fire extinguisher whose service life has expired.
Necessary materials
Additionally, you should prepare:
- welding electrodes 1.5 - 2.5 mm;
- electric welding machine;
- compact grinder with cutting wheels for metal;
- parts of the old muffler;
- two pieces of steel pipe with an internal diameter of two inches.
Stage-by-stage execution of work
The manufacturing process is as follows.
- Prepare a pipe of a suitable size with a diameter of 30 - 52 mm. It is unlikely that you will be able to find thin-walled factory-type pipe, so just use tap pipe.
- Unscrew the cap from the fire extinguisher and get rid of the remaining powder.
- Enlarge the hole until the pipe you prepared fits snugly into it.
- A similar hole must be made on the other side of the cylinder, but it should be slightly shifted towards the wall of the fire extinguisher.
- Use a grinder to create perforations on the end sections located inside the pipes (12 - 15 cm).
- Insert the pipes into the cylinder, calculating the opposite arrangement of the perforated sections opposite each other. The ends should be inserted 60% into the balloon.
- Weld the joints on both sides of the cylinder in a circular direction. Be careful not to burn the metal of the fire extinguisher.
- Remove the fasteners from the old fire extinguisher and weld them onto the resulting homemade structure. Please note that the water pipe is heavier than the factory car pipe, so provide reinforcement for the fastening. On the other hand, the heavier the pipe, the quieter the muffler.
- To reduce noise levels and increase the service life of the structure by two years, insert a flexible corrugation into place after the exhaust manifold. The housing can be filled with glass wool to further reduce noise.
- If you are making a muffler from stainless steel, provide for the possibility of disassembling the structure. It can be partially dismountable, and you will have the opportunity to periodically clean the cavities and make repairs if necessary.
- Be sure to check the tightness and reliability of the welds by plugging one of the pipes and filling it with water upside down. There should not be even a slight leak.
- Drain the water and use a compressor to blow out the product and remove any remaining moisture.
- The design is ready for installation on a car.
We also advise you to carefully read our expert’s article, which describes in detail how the muffler resonator is designed.
You may also be interested in an article by our specialist, in which he talks about how to choose a thermal tape for a muffler.
How to repair a muffler with your own hands
Before you begin repairing the muffler, you need to evaluate the feasibility of these actions. Not every car owner has the skills to work with a welding machine. In addition, the muffler cannot always be properly repaired - in cases of severe burnout, it is best to immediately replace it with a new one.
Reasons for failure
Most often, mufflers on the VAZ 2106/2107 lose their functionality for the following reasons:
- mechanical damage while driving on uneven roads, impacts;
- rapid changes in temperature conditions, especially in winter, when it is cold outside, and inside the case there are very high temperatures due to exhaust;
- impurities in gasoline that come out along with exhaust gases and affect the condition of the metal surfaces of the muffler.
It is unsafe to operate a car with such damage to the muffler.
However, how urgently do you need to repair the muffler if you suddenly notice some damage to its body or black exhaust from the pipe? What are the dangers of operating a Zhiguli with a burnt out or deformed muffler?
Firstly, if there are holes in the body of any element, then the generated gases will enter the cabin. The main danger is that the exhaust is colorless and odorless and cannot be felt. In this case, the driver begins to experience headaches, nausea and dizziness. If you stay inside a car with the engine running for a long time, you can lose consciousness and even die.
Secondly, if the exhaust system does not work properly, engine power is reduced. This is especially noticeable when accelerating, starting from a standstill, or overtaking.
Thirdly, if the plug is faulty, the engine begins to consume a lot of gasoline. The carelessness of the car owner will lead to the fact that the muffler will work worse and worse, and the displacement per 100 km will increase.
How to weld a muffler
Most often, the muffler loses its tightness and therefore cannot work normally. In this case, holes can appear both on the pipes themselves and on the welds.
It is recommended to clean the weld seam and paint the work area with heat-resistant paint
Using a welding machine and metal patches can be considered the most reliable way to repair mufflers.
In order to weld a “muffler”, you need to prepare electrodes of a suitable size (it all depends on how large the hole is burned in the muffler) and a sheet of metal of the required size. After which it is recommended to carry out welding as far as possible from the edge of the holes, since the thinned edges of the metal can quickly collapse:
- Clean the torn edges of the muffler from rust and dust.
- Degrease the metal with a solvent.
- Apply a metal patch to the body and grab it in several places around the perimeter of the hole.
- After this, you can begin to apply full welds.
- After the seams have hardened, it is recommended to clean the slag with a wire brush.
It is recommended to apply welds carefully so as not to burn through the muffler body
How to change the gasket
There is a reinforced gasket between the main muffler and the resonator part. Its purpose is to prevent the resonator from heating, so it is made of heat-resistant metal.
After dismantling the muffler, it is recommended to change the gasket. This does not take much time, since the element is inserted into the muffler pipe and clamped between its parts.
How to replace hanging rubber bands
This is perhaps the simplest procedure in repairing Zhiguli mufflers. The rear part of the pipe is attached to the body with three hanging rubber bands. During the ride, some of them may get lost or seriously deformed.
To change these rubber bands, you just need to drive the car into an inspection hole or overpass, remove the old products and install new ones in their place. Some car owners change suspension rubber bands without an overpass, simply crawling under the body from the rear left side.
Video: changing the resonator and muffler on a VAZ 2106/2107 car
The muffler in classic VAZ cars cannot, of course, be called a durable element. However, it is up to the owner to carry out the necessary repairs in a timely manner or change the plug if necessary. Moreover, the procedure is simplified as much as possible by the design of the VAZ 2106/2107 themselves. Therefore, any work on the muffler can be done with your own hands in a garage.
How to change the muffler on a “classic”
Replacing the muffler on a VAZ “classic” is not particularly difficult. It is necessary to first drive the car onto an inspection hole or overpass. If it is not possible to use the pit, you can raise the rear left side with a jack. The main thing is to make sure that the car is stably raised above the ground.
The easiest and most convenient way to get to the muffler is to drive the car onto an overpass
Preparing tools
In the matter of self-service or repair of a machine, a major role is played by the timely preparation of all those tools that may be needed in the work . To remove the muffler and install a new product in its place, you will need the following set of tools and auxiliary materials:
- hammer;
- chisel;
- two 13mm wrenches;
- screwdriver with a thin flat blade;
- brake fluid or WD-40.
How to remove a part
The order of work can cause difficulties only if the fastening joints are heavily rusted. Therefore, it is recommended to follow the following plan to make the work easier:
- Treat all nuts on the clamps with WD-40 or brake fluid. The nuts are exposed to high temperatures during engine operation and therefore quickly stick to the body. Let the lubricant saturate the metal well for 10–15 minutes.
- After this, you can try to unscrew the nuts with a wrench. In this case, it is enough to unscrew only one, since the other can simply be torn off.
- After that, you will need to very carefully tap the junction of the main muffler and the resonator with a hammer and chisel. This is the only way to separate them in the future and remove them.
- Use a screwdriver to press out part of the pipe so that the muffler can be pulled out of the resonator cavity.
- After this, you can remove the three hanging elastic bands. Exhaust pipes are attached directly to the exhaust and on the sides of the resonator barrel.
- Carefully remove all parts of the muffler from under the car.
Red arrows indicate bolted connections
How to install a new jammer
Accordingly, after dismantling, you can immediately install a new muffler. To do this, it is best to immediately buy new rubber rings and seals, since old ones are usually unsuitable for reuse:
- First, the rear part of the “silencer” is installed, which is attached to three hanging elastic bands.
- After this, fix the front part of the muffler with new bolts and make sure that the connection is securely fixed.
- All gaskets must be replaced with new ones.
Before installation, be sure to remove all stickers from the case, as they may catch fire when heated.
The procedure for removing and installing the muffler is very simple. The only problem is unscrewing or tearing off the bracket nuts.
How to replace the exhaust pipe, also known as the exhaust system pants, on a VAZ 2101-VAZ 2107?
Note! Replace this pipe, and indeed any part of the exhaust system, only on a cold engine, because if the engine is too hot, then this pipe will have a very decent temperature, it will definitely have about 300-500 degrees on a too hot engine, so It’s even pointless to talk about burns here, you’ll understand everything yourself!
We’ll also give you a couple of tips, many car shops now and in the future have and will sell a special sealant that is designed specifically for the exhaust system, so this sealant, if you want, of course, it can be applied to all joints of all three pipes, due to with which less air will leak through these pipes and the tightness of the entire exhaust system will increase at least a little!
Removal: 1) First, you will need to either disconnect or completely remove the rear part of the muffler from the car, the choice is generally yours. (You can find out how to remove and how to disconnect the rear part of the muffler from the resonator in the article entitled: “”)
2) Then completely remove the resonator from the car, disconnecting it from the exhaust pipe of the car and then removing it. (For information on how to remove this type of muffler, see the article: “”)
Note! If you are replacing the exhaust pipe on a fuel-injected car, then in this case you will also need to resolve the issue with the oxygen concentration sensor (It is also called a lambda probe), namely, you will only need to unscrew it and thereby disconnect it from the exhaust pipe of the car, o For information on how to unscrew this sensor, see the article: “” points 2-3)
3) Next, grab the wrench and use it to unscrew the single bolt that secures the clamp, which in turn secures the exhaust pipe to the bracket located on the box.
4) Next, get out from under the bottom of the car and then move to its engine compartment, and once there, use a screwdriver or a socket to unlock all four nuts that secure the exhaust pipe flange to the exhaust manifold, and after the nuts are loosened, are secured and nothing will hinder the unscrewing of these nuts, then take the extension cord from the union head in your hands and with its help (you will also need the help of a universal joint) unscrew all four nuts securing the pipe.
Note! Check all unscrewed nuts for their integrity; if you find broken nuts, then replace them with new ones!
5) After all the nuts are unscrewed and the bracket that secures this pipe to the box is freed from the bolt that secures it, then take it with both hands and carefully remove the exhaust pipe from the car.
Note! After removing this pipe, there should be a gasket left on it, or on the manifold to which it was attached with four nuts, but if it remains there, remove it!
6) After all the operations done, when the worn-out pipe is already on the ground, the first thing to do is remove the clamp from it that secured it to the bracket on the box and then transfer this clamp to the new pipe, if it is not there.
Installation: 1) First, apply a small layer of graphite grease to the new gasket you just purchased, on both sides of this gasket.
2) Then install a new gasket on the mating surface of the receiving pipe, and perform the entire operation of installing the new receiving pipe in the reverse order of removing it.
Additional video clip: So that you can at least clearly understand, then watch the video clip located just below:
Design and operation of the exhaust tract
The exhaust system includes 3 main elements (starting from the power unit):
- double exhaust pipe, in driver's jargon - “pants”;
- middle section equipped with one or two resonator tanks;
- the last section is the main muffler.
3 sections of the exhaust system are connected using clamps
According to the factory operating instructions for the car, the exhaust manifold is a part of the engine and does not belong to the flue gas exhaust system.
The number of resonators in the middle part of the tract depends on the type of engine installed on the VAZ 2107. If the car was equipped with a 2105 engine with a working volume of 1.3 liters, 1 tank was provided per section (modification of VAZ 21072). Cars with 1.5 and 1.6 liter power units (VAZ 2107-21074) were equipped with pipes for 2 resonators.
The length of the element is the same for all carburetor modifications of the VAZ 2107, but on cars with more powerful 1.5 and 1.6 liter engines, 2 resonator banks are provided
More information about the design of the carburetor: https://bumper.guru/klassicheskie-modeli-vaz/toplivnaya-sistema/karbyurator-ozon-2107-ustroystvo.html
On a VAZ 2107 with a 2105 engine, it is not advisable to install a section with 2 tanks - this reduces the power of the power unit. Dreaming of quiet operation of the 1.3 liter engine, I personally tried to change the 1-tank resonator to a 2-tank one. I didn’t notice a decrease in the exhaust sound, but I clearly felt a drop in traction under load.
The entire tract is attached at 5 points:
- the flange of the “pants” is screwed to the outlet manifold with 4 bronze M8 nuts;
- the end of the exhaust pipe is attached to the bracket on the gearbox;
- the flat muffler tank is hooked by 2 rubber hangers;
- The muffler outlet pipe is fixed with a rubber cushion screwed to a metal body bracket.
The principle of operation of the tract is quite simple: the gases pushed out by the pistons pass through the manifold and “pants”, then enter the resonator section. There, preliminary suppression of sound vibrations and a decrease in temperature occur, after which the combustion products enter the main muffler. The latter reduces the noise level as much as possible and releases gases to the outside. Heat transfer and cooling of the smoke occurs along the entire length of the exhaust elements.
On the injection “seven”, the gases undergo additional purification in the catalyst
On “sevens” with an injector, the exhaust design is supplemented with a catalytic converter and oxygen sensors. The element is located between the receiving pipe and the second section, the connection method is flange. The catalyst cleans flue gases from toxic compounds (nitrogen oxide and carbon), and lambda probes inform the electronic control unit about the completeness of fuel combustion based on the free oxygen content.
How to eliminate the smell of gasoline in the cabin: https://bumper.guru/klassicheskie-modeli-vaz/toplivnaya-sistema/zapah-benzina-v-salone-vaz-2107-inzhektor.html
Design and purpose of the exhaust gas system
The gas exhaust system of the VAZ 2114 consists of various functional parts. Folding into one solid chain, it contributes to the normal operation of the car. The system regulates the release of harmful chemicals concentrated in exhaust gases into the surrounding atmosphere. Schematically, this system looks like this, as shown in Fig. 1. The exhaust system of the car model in question includes the following main functional components.
- Exhaust manifold VAZ 2114. Serves to combine gas flows emanating from each cylinder into one common pipe. To withstand increased dynamic loads, the collector is equipped with the most rigid and durable fastening.
- Catalyst. This component of the system significantly reduces the level of toxicity of exhaust gases. To do this, highly toxic emissions are converted into less toxic gas impurities using a chemical reaction.
- Reception pipe. Designed to connect the VAZ 2114 exhaust manifold and the catalyst.
- Resonator. By means of several “acoustic mirrors” built into the body, it reduces the level of noise that occurs during strong exhaust.
- Silencers. Even more than the resonator, they enhance the noise absorption of the entire exhaust system of the VAZ 2114.
- Corrugation. Thanks to its elastic structure, it suppresses vibration transmitted from the engine to the exhaust system.
Why do they install forward flow?
The absence of partitions in the muffler provides a “growling” engine sound characteristic of sports cars. Therefore, a direct-flow muffler is often installed when “sporting” VAZ tuning. But there is another aspect. The partitions in the muffler not only reduce noise, but also prevent the free exit of exhaust gases and the pistons have to “push” them out of the cylinders. This reduces engine power by 10-15%. Accordingly, installing direct flow allows you to increase power, which is important for sports tuning, for example, for drag racing. Those who prefer “manual” finishing of their car make direct flows themselves.
What is needed to make a direct flow on a VAZ 2107
Making a direct flow yourself requires minimal plumbing skills and knowledge of how to make a forward flow on a VAZ 2107. You can make a forward flow in several ways. All of them can be divided into two categories: remaking an old muffler and making a direct flow “from scratch”. If you are going to convert the standard muffler of the “seven” to direct flow, before starting work you should stock up on the following devices and materials:
- pipe with a diameter of 52 mm;
- metal devices for cleaning burnt dishes (metal sponges), of which you will need about 50 pieces;
- angle grinder (“grinder”);
- circles for cutting metal;
- welding machine;
- set of locksmith tools.
To make forward flow on a VAZ 2107 with your own hands, you will need the following set of tools and materials:
- two flanges 130/42 millimeters;
- two pipes of similar diameters with a wall thickness of at least 2 mm;
- asbestos fabric, mineral wool or other fire-resistant sound-absorbing material;
- Bulgarian;
- drill;
- welding machine.
Where is it located and how does it work?
The muffler is installed on the underbody of the vehicle at the end of the exhaust system.
As a rule, a resonator is installed in front of it, closer to the engine, which reduces low-frequency vibrations and plays the role of an additional component in the exhaust system.
Despite the seemingly small size of the device, the sound wave travels through it for several kilometers. This is achieved by the presence of labyrinths inside the muffler, which attenuate sound waves.
The further a wave travels, the more energy it loses and the smaller the sound becomes.
To understand what a muffler consists of, you need to understand what types of devices there are and how they differ from each other.
Design and purpose of the VAZ 2107 resonator
The resonator is a cylindrical metal tank designed to preliminary reduce exhaust sound. Connecting pipes with a diameter of 40 mm are hermetically welded to it at the front and rear. The front pipe is equipped with a mating flange for the catalyst or exhaust pipe, and the rear pipe has two longitudinal slots for docking with the muffler section.
Resonator pipes for carburetor models VAZ 2106-2107 are equipped with one or two tanks. The first type was installed on cars with an engine displacement of up to 1.3 liters, the second - on modifications with more powerful engines of 1.5-1.6 liters.
The resonator consists of:
The operating principle of the resonator is based on the phenomenon of sound resonance. Getting inside the housing along with the exhaust gases, sound waves penetrate through the perforations in the pipe and are repeatedly reflected from the outer walls of the tank. Mutual damping of oscillations occurs, and the amplitude of the waves decreases. As a result, the volume of the exhaust sound is significantly reduced.
The VAZ 2107 resonator performs the following functions:
What materials are they made from?
Silencers of all types can be made from:
- Of stainless steel;
- Aluminized (alloy of aluminum and steel);
- Regular black steel.
A stainless steel product can last, during active vehicle use, from 6 to 10 years, as it is least susceptible to corrosion.
They are sold on the market in a high price range, their big advantage is that despite the high price, they are mass produced and can be matched to most car brands.
Products made from aluminized steel are sold in the middle price range, they are also quite durable, but they are difficult to match to a specific car brand, since the choice on the market is not large (only a few companies produce them).
It is problematic to make such a muffler in a garage. The main advantage is a long service life of up to 6 years, and are less susceptible to corrosion.
Products made of black steel are mass produced because they are the cheapest. They can be made in a garage for any brand of car, but they will serve for 3, maximum 5 years, then the aggressive environment and rust will do their dirty work.
Conversion of the VAZ 2107 muffler for direct flow
You can make forward flow on a VAZ 2107 from a standard muffler as follows:
- remove the muffler and resonator from the car or take a used part;
- Use a grinder to saw the resonator lengthwise to open the internal filling of the unit and remove the cover;
- cut out and remove 3 stiffening ribs and 2 sections of pipe located in the resonator, which prevent the free flow of exhaust gases;
Attention: parts must be removed carefully, leaving small surfaces for a new weld.
- cut a pipe with a diameter of 52 mm so that its length corresponds to the distance between the ends of the pipe sections that were in the resonator;
- using a grinder, make cuts in a section of pipe in increments of one and a half to two centimeters so that the pattern resembles a herringbone (instead, you can take a drill and drill many holes in the pipe);
- weld a pipe with holes to the edges of the cut pipes in the resonator (from inlet to outlet);
- fill the internal cavity of the resonator with metal jaws;
- install the cut resonator cover and weld it, carefully welding the longitudinal seam;
- cut off the noise-reducing element of the muffler by welding a piece of 52 mm pipe instead (a pipe about half a meter long is required);
- apply a heat-resistant paint coating that protects the muffler and resonator elements from corrosion;
- install the muffler and resonator on the car.
What does the price depend on?
To manufacture the body and tubes of high-quality components, special stainless and heat-resistant steels are used, designed to operate under constant thermal load with sudden temperature changes. These mufflers last longer, but they are the most expensive. Spare parts made of aluminized steel or aluminum-zinc will also last a long time. To reduce the cost, “ferrous” alloys are sometimes used.
The larger the muffler volume, the better. Other factors that increase the service life and increase the cost of the unit are thicker walls and complex internal design, as well as additional thermal protection.
Resonator
How to make forward flow on a VAZ 2107 with your own hands
Making a direct flow for a “seven” is not much different in complexity from remaking a standard muffler. To make forward flow on a VAZ 2107 with your own hands, you should follow these steps:
- cut a piece of pipe with a diameter of 42 millimeters and a length equal to the length of the muffler;
- drill many holes in a thinner pipe, leaving only 5-7 centimeters intact from its edges;
- install and weld a pair of flanges on the edges of the pipe so that 5-6 centimeters of pipe protrude from each edge;
- wrap the surface of the workpiece between the flanges with mineral wool, asbestos cloth, then with mineral wool;
- put a larger diameter pipe on top of the mineral wool, cutting it so that its length coincides with the interflange distance;
- weld the edges of the thick pipe to the flanges, making a sealed seam;
- paint the direct flow with heat-resistant paint.
Tip: To enhance the sound of the exhaust, emphasizing its low-frequency characteristics, you need to cut a small piece of 130mm pipe and weld it to the end of the muffler.
When altering a standard exhaust system or making a direct flow yourself, you must pay close attention to the quality of the welds that ensure the tightness of the structure, and pay special attention to the anti-corrosion coating of the product. Otherwise, rainwater and salt solution from winter roads will lead to the rapid appearance of through corrosion.
I've been wanting to do something with a jammer for a long time
after reading a little about modifications to the muffler I decided to digest it
In general, the muffler itself is from a Muscovite 407. The attachment is from a cardan from 407.
Only a small part of car enthusiasts would like to have a loud sports exhaust on their car. The vast majority of drivers, on the contrary, are puzzled by the question of how to make a quiet muffler. Driving can be comfortable only if as little extraneous sounds as possible enter the cabin. The muffler creates its own background noise, which can be significantly reduced. The effect of this cannot be ignored.
Basic ways to make a muffler quieter
Before you begin upgrading your exhaust system, you should understand the nature of the increased exhaust sound. With each working stroke of the piston, a micro-explosion occurs in the combustion chamber of the engine cylinder, which is accompanied by a significant sharp expansion of gases. Naturally, a kind of blast wave, after it has done its job and moved the piston down, rushes through the exhaust system with the opening of the exhaust valve.
Thus, the nature of exhaust system noise is twofold:
- sound from expansion of gases;
- noise from vibration of exhaust system elements.
How to adjust the gap between the valve and the cylinder block?
- We use a probe with a thickness of 0.15 (mm). It should fit under the valve with a slight tension (neither strong nor weak). If the dipstick falls into the gap or, on the contrary, does not fit, then from this moment the adjustment of the valves on the VAZ 2105 begins.
- We loosen the lower lock nut with one key, and with the second key we turn the valve stroke screw (up or down, depending on the result of checking with the feeler gauge).
- Tighten the locknut without much fanaticism.
- We do a control check with a feeler gauge at 0.15 (mm).
I hope the instructions are clear and understandable.
Related material: Replacing engine oil and oil filter on Lada Priora. Which oil to choose and how often to change
Additional Information
After adjustment, we assemble all the engine elements into place (valve covers, timing belt cover, air filter housing).
We make a test drive and listen to the sound. At this point, independent maintenance of timing valves can be considered successfully completed.
Please note that the VAZ 2105 is a classic of the bygone Soviet automobile industry. The classic line also includes the VAZ 2101, VAZ 2102, VAZ 2103, VAZ 2104 and VAZ 2106. Starting with the VAZ 2107, cars use an injection system for preparing the combustible mixture
That is, seven is no longer a classic. The procedure for adjusting valves 2105, as well as 2101, 2102, 2103, 2104 and 2106, is completely the same. That is, the classics are configured according to the same principle.
Starting with the VAZ 2107, cars use an injection system for preparing the combustible mixture. That is, seven is no longer a classic. The procedure for adjusting valves 2105, as well as 2101, 2102, 2103, 2104 and 2106, is completely the same. That is, the classics are configured according to the same principle.
Starting from the VAZ 2107, you need to configure the timing in a different way. Valve adjustment on the VAZ 2107 is carried out at a more subtle level. Only a properly qualified car mechanic can handle this work. Without solid experience in handling vehicles, it’s better not to go into the timing belt of VAZs, starting with the seven. It’s easier to take the car to the nearest service station.
I hope the article on how to adjust valves on a VAZ 2105 was useful. Have smooth roads and fewer breakdowns.
- Necessary tool
- Signs of poor valve clearance
- Procedure for checking valve clearance
- Adjusting valve clearance
- Video on the topic: Do-it-yourself valve adjustment on a Zhiguli
A feature of VAZ cars belonging to the “Classic” category, namely the VAZ-2101-2107 model, is the use of power plants that are structurally very similar. The engines of these models differ mainly in some technical characteristics. Thanks to this, many perform maintenance and repair work themselves.
For stable operation of the power unit of these cars, periodic adjustment of the valves is required. It is worth noting that this operation for VAZ “Classic” engines is performed by adjusting the gap between the valve drive lever and the camshaft cam. Since this operation is performed in the same way for different models on the Classic, let’s consider the sequence of work using the example of one model - VAZ-2105
The adjustment can be carried out both on a cold engine and on a warm one; for this, a 0.15 or 0.20 mm probe is used, respectively.
But for more precise adjustment of the valves, work must be carried out on a cold engine.
Problems with the muffler and other elements
The main noise reduction section of the VAZ 2107 lasts for 10-50 thousand kilometers. Such a wide range is explained by different product quality and operating conditions. The service life of the receiving pipe and resonator lies within the same limits.
The occurrence of muffler malfunctions is characterized by the following symptoms:
- the appearance of a rumble from the exhaust system, in advanced cases turning into a loud roar;
- constant dull knock - the pipe touches the bottom of the car;
- a more rare malfunction is a complete engine failure, the power unit does not start and shows no signs of “life”.
On injection VAZ 2107 models, malfunction of oxygen sensors causes increased fuel consumption, unstable operation of the power unit and loss of power.
Condensate accumulating in the tank provokes corrosion and the formation of through holes
A rumble and roar indicate burnout of the exhaust pipe or muffler tank, which occurs for the following reasons:
- natural wear and tear of metal;
- through damage from an impact or shot from the engine;
- the effects of corrosion caused by a large amount of condensate that accumulates at the bottom of the tank.
Typically, burnouts occur at the welded joints of pipes with muffler or resonator tanks. If the housing is leaky due to corrosion or mechanical stress, the defect is visible on the bottom of the element. Often the exhaust “cuts” - gases break through at the junction of two sections due to a loosening of the connecting clamp.
Loose pipe connections are sometimes indicated by leaks of condensate escaping along with smoke.
While teaching my wife to drive a 7, a friend of mine unsuccessfully chose a site with a low parapet instead of a curb. While backing up, the girl hit the road fence with her muffler. Since the part had already worked for a decent period of time, the impact was enough to pierce the body through.
The tank or pipe touching the bottom of the car occurs due to stretched or torn rubber hangers. Rocking and impacts cause a dull annoying knock, which can be eliminated by replacing the rubber bands.
Stretching or breaking of rubber suspensions causes dull knocks from the muffler
If the engine is absolutely “dead”, it is worth checking the catalyst of the injection “seven” or the tract itself for blockages. A completely blocked section of the pipe will not allow gases to be ejected from the cylinders and a new portion of the combustible mixture to be drawn in.
A clogged or clogged catalyst can be identified by a quiet hiss of air coming from one of the pipe joints. When you repeatedly try to start the engine, the pistons pump air into the clogged exhaust system, which, under pressure, begins to escape through leaks. If you unscrew the “pants” from the manifold and repeat the start, the engine will probably start.
I had a chance to see a completely clogged pipe personally when a friend asked me to start the car using the pushrod (the battery was discharged due to prolonged rotation of the starter). The attempt failed, we moved on to diagnosing the ignition and fuel supply systems. A quiet hiss of air from the manifold was noticed when checking the carburetor. It turned out that the owner added a “good” additive to the fuel, which caused the formation of soot, which completely clogged the exhaust tract.
A housing rupture occurs due to a strong impact or as a result of a shot from the exhaust manifold.
Repair of the exhaust system of VAZ 2104
Is it possible to avoid replacing the muffler, resonator or downpipe? In some cases, yes, it is possible. This is done by welding the place where you found a problem - a crack, a broken hole or rotten metal. You can weld the muffler with your own hands, but it is better to contact a professional welder. He will be able to determine the feasibility of this type of repair. Usually, metal allows it to be welded, but there are times when there is simply no need to weld it. That’s when you need to replace the muffler on the VAZ 2104. If the repair decision was approved, then there are several options:
- The first is to fix the problem directly on the car without removing the damaged part of the exhaust system. There is no need to explain anything here.
- The second method is when it is not possible to weld to the damaged area. In this case, see the tips on removing exhaust system parts provided in the instructions below.
You can try welding the muffler
Resonator malfunctions and repairs
Resonator malfunctions include:
An annoying knock coming from under the car's bottom is usually the result of a loose exhaust pipe beating against the body and other components. The reason for this is the rubber fasteners, which wear out and stretch over time and cannot provide rigid fixation of the exhaust tract when moving. The problem is solved by replacing these fasteners.
Typically, exhaust tract hangers last much less than the pipe itself. Check the condition of the rubber bands at intervals of 10 thousand km; if cracks are found, immediately install new suspension mounts.
Other problems can be resolved in the following ways:
Car enthusiasts with experience in welding can make a resonator tank with their own hands. To do this you should:
Video: malfunctions of the exhaust system of classic VAZ models
Instructions for replacing the muffler and more
Replacing the muffler on a Priora can be easily done by driving the car onto an overpass, or placing it above an inspection hole
Some car enthusiasts simply lift one side of the car with jacks, but in this case it is very important to use safety stands
Before you start replacing the muffler, it is worth understanding a few more parts of the exhaust system. The need to replace spacer rings, rubber hangers or corrugations may appear during the inspection or even dismantling of the muffler.
Changing the O-ring
The sealing ring is made of heat-resistant reinforced material and serves to lower the temperature of the exhaust gases. It burns out during use.
The muffler O-ring not only makes the connection airtight, but also reduces the temperature of the exhaust gases
It is most convenient to change the ring while installing a new muffler. To replace, you need to unscrew the bolts connecting the muffler and the resonator. By opening the muffler parts, you will see the O-ring and can replace it.
Installing new rubber suspensions
It is better to replace the rubber suspensions on which the muffler and resonator are mounted at the first signs of wear. This can save you from more serious problems with your exhaust system. To remove the mount, you first need to disconnect the muffler from it, and then remove the suspension itself from the hook. Before installing a new suspension, it is better to wash the hook from dirt so that the new elastic band holds securely.
Muffler hangers for Priora are sold in most spare parts stores
Changing the muffler corrugation
The muffler corrugation serves to reduce vibration of the exhaust system. This unit is usually made of stainless steel. It serves for quite a long time, but over time it still requires replacement. If you have argon welding skills, you can change the muffler corrugation on a Priora yourself.
Weld the corrugation carefully so as not to damage the muffler
First of all, you need to measure the old corrugation and select a new one of the appropriate size. Then you should carefully cut out the old corrugation, and insert and weld a new one in its place.
Instructions for replacing the muffler and resonator on the Lada Priora
To replace the muffler on a Priora, you will need the following tools:
- wrenches 7 and 13;
- flat blade screwdriver;
- chisel;
- hammer.
By following the instructions below, you can remove the old muffler yourself and install a new one. If necessary, you can change the resonator.
- Unscrew the bolts of the clamp connecting the muffler and resonator pipes.
- Open the pipes and remove the O-ring.
- If you need to change the resonator, unscrew the bolts securing the resonator pipe and remove the reinforced spacer.
- Remove the muffler and, if necessary, the resonator from the rubber suspensions.
- Place the main and additional mufflers under the vehicle in the position in which they will be installed.
- Secure the resonator with elastic bands.
- Insert a new spacer and screw the resonator to the exhaust pipe of the catalyst. Do not overtighten the nuts; screw them in until they are tight.
- Hang the muffler on rubber bands.
- Insert the O-ring and connect the muffler to the resonator pipe.
- Check all connections and hangers.
All spacer rings should be replaced with new ones when installing the muffler.
Video: replacing the muffler and resonator on a Lada Priora car
Changing a muffler is quite simple on almost any car, and Priora is no exception. A properly functioning muffler not only protects the environment, but also your peace of mind. When the car runs quietly, and there are no knocks or rattles coming from under the car, you can relax and fully concentrate on driving.
What to do if the muffler on a Zhiguli is knocking
You immediately need to figure out which part the muffler pipe is knocking on. On VAZ classic cars there can only be two options:
- o gas tank;
- about the body.
In each case, the order of work will be different. If the muffler loudly hits the gas tank while driving, this indicates that the connecting clamp between the muffler and the resonator was installed incorrectly, which is why the “muffler” moves to the side. That is, you need to drive the car into the inspection hole again and make sure that all the muffler connections are correct.
If the pipe knocks on the body while driving, the easiest way to prevent this sound is by replacing the rubber bands. During operation, they can stretch out or even fly off, causing the muffler to move back and forth. If all three rubber bands are in place, then it is recommended to line the junction of the muffler and the body with rubber. This will ensure that there is no knocking while driving and will make the muffler more stable.
Replacing the resonator on a VAZ 2110
Probably, many readers have had the opportunity to see a roaring car passing them on the road. Sometimes this phenomenon is caused by the car owner installing a pseudo-sports direct-flow muffler, but most often the problem lies in a malfunction of the resonator. What is a muffler resonator, we will find out below
The resonator is an important part of the exhaust system. Structurally, it is a cavity divided into several chambers
A pipe passes through them with holes made in it. Passing through them, the flow of exhaust gases is divided, which helps suppress sound waves, and as a result, exhaust noise is reduced.
Since all muffler elements are subject to severe thermal loads (exhaust gas temperature exceeds 600-650°C), they do not last very long. Since the resonator cannot be repaired, in case of malfunction it must be replaced with a new one. Today we will talk about this procedure using the example of a VAZ-2107 car.
Where is the resonator located and when should it be replaced?
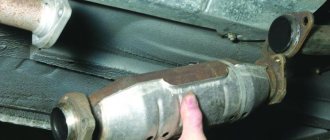
The resonator is installed under the bottom of the car, between the exhaust pipe and the rear of the muffler.
If we talk specifically about the “seven”, then below is the corresponding photograph (the blue arrow points to the resonator). It should be noted that some resonators have a 2-piece design. The first of them is a regular part, and the second is filled with sound-insulating material, as a result of which the exhaust becomes much quieter. But the VAZ-2107 is equipped with a simple, single-section resonator. As a rule, replacement of this part occurs upon its breakdown. The symptoms cannot be confused with anything: you will hear a characteristic roar and, perhaps, smell exhaust gases in the cabin. This will mean that a hole has formed in the resonator body and it is time to change it.
When purchasing a new resonator, you should give preference not to ordinary spare parts that are made of aluminum, but to their analogues made of stainless steel. Although they are noticeably more expensive, they also last much longer. Also try checking the part by knocking on it: if the sound is dull, the resonator has fairly thick walls, and this is good. The ringing sound indicates the opposite: it is better to refuse the purchase.
Tools and materials
To remove/install the resonator you will need:
- 2 wrenches (open-end or socket, no difference) wrenches 13;
- Flat screwdriver;
- Gas wrench and WD-40 (it is not necessary to use them, but sometimes the connections become completely sour, as a result of which the resonator cannot be disconnected from other exhaust elements manually. In this case, they will come in handy);
- New resonator.
What is a muffler for?
The exhaust system of any vehicle is based on the use of a special element called a muffler. Operating a car without a muffler is basically impossible.
The muffler is designed to perform two main tasks:
reduce exhaust noise;
transform the temperature and pulsation of the exhaust.
The rationale for using a muffler is explained by the fact that the exhaust gases, after exiting the engine cylinders, have very high pressure and temperature. At the same time, sound waves are launched ahead of the gases in the exhaust system, which can make very loud noise during the exhaust. The muffler converts sound waves into heat energy, thereby reducing the amount of noise created by the exhaust. However, all modern mufflers in some way affect engine performance, since the transformation creates counteraction, due to which engine power is reduced.
The end of the pipe should protrude no more than 5 cm beyond the car body
VAZ car mufflers use several different methodologies to reduce noise:
expansion/constriction of gas flow;
change in flow direction;
sound wave interference;
Mufflers use multiple chambers of varying volumes to expand or narrow the flow of gas exhaust.
On VAZ 2106/2107 cars, one muffler is installed. For comparison: modern foreign cars can have up to five mufflers.
Muffler on VAZ classic
The entire exhaust system on domestic Zhiguli cars of the sixth and seventh models consists of three parts: the exhaust pipe, the main muffler and the resonator. Each of them performs its own function: the pipe extracts exhaust gases from the engine, the muffler converts gases and sounds, and the resonator reduces the noise level.
Mufflers for VAZ 2106–2107 are “famous” for their fragility, since thin metal can burn out very quickly. Original factory products last for 60–70 thousand km, while homemade mufflers often do not last even 30 thousand km.
Traditionally, VAZ classics are equipped with mufflers manufactured by AvtoVAZAgregat. They are made of stainless steel with a thickened wall. Therefore, their service life can be considered durable. Silencers of more modern Zhiguli models can be considered alternative options, but not all of them are optimally suited to the “sixes” and “sevens”. However, craftsmen quickly remake the fastening elements and equalize the length of the mufflers in order to make them identical to the originals.
The modern muffler produced by AvtoVAZAgregat is an integral part of VAZ cars
Traditionally, the muffler on a VAZ classic is installed under the bottom of the car and is secured using bolted connections and special suspension rubber bands. The exhaust pipe exits from the rear of the body on the left side.
DIY exhaust system repair
Replacing the main muffler of a VAZ 2106 with your own hands
Before starting repairs, let the entire system cool down. Working with hot pipes is simply unsafe. From the tools we need two 13mm wrenches, as well as a straight screwdriver.
1. Using a wrench, loosen the clamp nut a little, and use a second wrench to hold the bolt from turning. Next, use a screwdriver to unclench the clamp, and then move it down the inlet pipe of the main muffler.
2. Now use a wrench to unscrew the bolt that secures the rubber cushion. After this, disconnect the pillow from the mounting bracket, push it out and remove it.
4. Remove the rubber muffler hangers by pressing the wire fasteners.
5. With some effort, rock the muffler and disconnect it from the additional muffler. After disconnecting, remove the main muffler.
We install the new muffler in the reverse order of removal.
How are knocking and muffler position related?
If the muffler suddenly starts knocking on some parts of the car, find the source of the extraneous sounds. Usually the reason lies in stretched rubber fasteners. After replacing them, the knocking will stop.
Sometimes a knock appears after work related to removing the muffler. In this case, extraneous sounds are a consequence of installation errors. Round pipes at the joints with clamps can be slightly rotated relative to the correct position: more or less than required, pushed into each other.
To eliminate knocking, restore the optimal position of the exhaust system elements.
Sagging mufflers can be “treated” using similar methods—by replacing rubber bands and correcting the position of joints.
Video: repairing a sagging VAZ 2106 muffler
DIY car muffler repair
Car muffler repairs have to be carried out quite often, given the low protection of the car exhaust system from external negative factors.
A number of different factors lead to breakdowns, including high temperatures in the muffler, ingress of moisture and reagents, and mechanical damage. The main enemy of the exhaust system is, of course, corrosion, which can easily destroy the muffler in just a few “salted” winters.
As a rule, when repairing a car muffler, car service workers mean its complete or partial replacement. However, in fact, it is possible to repair a burnt-out muffler without resorting to an expensive replacement.
The most effective way to repair a car muffler is, of course, welding. To do this, the exhaust system element is removed from the vehicle, cleaned of carbon deposits and rust, and the degree of damage is determined. After this, a sheet of suitable sheet metal is welded onto the holes.
When welding, it is important to ensure complete tightness of the seams and their strength.
By the way, it is quite a good idea, after completing the welding repair of the car muffler, to treat the entire surface with a rust converter containing zinc oxide. After drying, the repaired part can be additionally coated with heat-resistant paint, which will provide additional protection against corrosion.
Of course, welding is an ideal option for “budget” repairs. However, there are times when a welding machine is not available or the car enthusiast does not have sufficient skills to work with it. In this case, there are several other ways to seal the hole.
The simplest of them is to use special repair kits. However, if these are not available, you can get by with other means. So, for small areas of damage, the so-called “cold welding”, which is available for sale at any auto store, is perfect.
Repairing a car muffler is carried out using it in the following way: the surface around the hole is sanded, degreased, after which a repair compound is applied, which must be thoroughly dried. However, the best result can be achieved by placing a strip of fiberglass on top of the first layer of “cold welding”, on top of which a second layer must be applied. Fiberglass fabric performs a kind of reinforcing effect, due to which high strength is achieved.
It should be noted that fiberglass can be used in a wider scope when repairing a car muffler. So, a good repair method is to impregnate fiberglass with epoxy resin and tightly wrap the entire muffler in the area where it is damaged. For a better effect, you can apply a layer of the already mentioned “cold welding” on top.
Of course, such repair of a car muffler is less effective and reliable than welding. However, it is quite suitable as a temporary or “budget” repair measure that will allow the car to operate normally. And this, you see, is an important argument in favor of carrying out such repairs.
May be of interest:
Add your advertisement
Add your advertisement
Add your advertisement
Add your advertisement
What muffler can be installed on the “seven”
There are 4 options for replacement:
If you do not have welding skills, the fourth option is automatically eliminated. All that remains is to choose between stock and sports parts.
A straight-through muffler differs from a standard muffler in the following ways:
The forward flow resistance is significantly less than the factory model of the muffler. The design makes it possible to ventilate the cylinders more efficiently and increase engine power by up to 5 hp. With. A side effect is a higher noise level, which brings pleasure to fans of extreme driving.
The stock design muffles noise due to several internal partitions and additional perforated pipes, causing gases to change direction and be reflected repeatedly from obstacles. Hence the high resistance of the element and a small drop in power.
Tuning enthusiasts install forward flow in combination with other means - zero-resistance filters, turbines, and so on. Replacing a standard muffler with a direct-flow muffler without performing other measures will give one result - a loud rumble, you will not feel an increase in engine power.
It is not difficult for a car enthusiast who owns a welding machine to make a forward flow independently:
You can refine the outlet pipe using a nickel-plated decorative nozzle. The choice of products in size and shape is extremely wide, the prices are quite affordable.
Video: making a direct flow with your own hands
Exhaust system VAZ 2107 price and troubleshooting
A striking situation arises in many exhaust system repair services.
There is a list of services for the repair and replacement of individual components, but they offer to replace everything completely. It was as if everything had broken at once. Whether this is inexperience or other reasons is unknown.
Some breakdowns
The exhaust system of the VAZ 2107, the price of which can be impressive, does not always provide for the need to contact a car service if a breakdown occurs with it. There are malfunctions of the muffler itself, the exhaust manifold, corrugations, and neutralizer. The muffler most often fails due to low-quality gasoline and mechanical failures. On average, this unit lasts about three years.
Here we can advise you to refuel only at proven gas stations, and be careful when driving over obstacles in nature. When replacing, buy a quality product. A VAZ 2107 exhaust system diagram may be needed if you intend to make repairs
Many questions arise when the neutralizer fails. The replacement just costs a pretty penny. Many car owners simply throw it away. Even in this case, some work needs to be done. There is a way out of this situation. In place of the standard neutralizer, you can install parts from another manufacturer. They are much cheaper and have good quality. The main thing is to first find out what reviews there are about this part. This is not a problem when purchasing. Both the seller and other buyers will advise
A VAZ 2107 exhaust system diagram may be needed if you intend to make repairs. Many questions arise when the neutralizer fails. The replacement just costs a pretty penny. Many car owners simply throw it away. Even in this case, some work needs to be done. There is a way out of this situation. In place of the standard neutralizer, you can install parts from another manufacturer. They are much cheaper and have good quality. The main thing is to first find out what reviews there are about this part. This is not a problem when purchasing. Both the seller and other buyers will advise.
The exhaust system of the VAZ 2114, the price of which is 500 rubles, may require the installation of a flame arrester. One feature must be taken into account here. Not every flash arrester will fit your vehicle. You will have to look for one that is suitable for your brand. The metal catalyst is mostly praised. According to reviews, such failures are much less common.
Recommendations for tuning
Problems with the exhaust system, admittedly, occur quite rarely. But sometimes drivers need tuning. When remaking this unit, do not forget about the need to reprogram the ECU. If changes have been made to the design, then you need to inform him about it. Otherwise, interruptions will occur and the injector may behave inappropriately.
Many car owners like to install devices that change the exhaust sound. This is where your imagination can run wild. A device for every taste. You can make the car quiet, or you can turn your horse into a sports car. It will roar like at a race. Mostly young guys love such tricks. This does not bring any benefit to the car. Only the owner’s “rating” increases in the eyes of some public.
Alternative options for modifying the unit
If there are no problems with the exhaust system, then tuning can be done. The second tuning option, on the contrary, brings considerable benefits to the exhaust system. All parts from the exhaust manifold to the muffler are rigidly connected. When moving, vibration occurs, and therefore cracks and breaks occur. What can be done in this case? There is only one way out - installing corrugations. Then the entire structure is divided into two independent parts. Vibration will no longer have an effect. Frequent visits to a car service are eliminated.
To install the corrugation, you will have to contact the craftsmen. This work requires tools that the average car owner will not have in his garage. The VAZ exhaust system, the price of which should interest you before purchasing, can not only be repaired by the car enthusiast himself, but also tuned.
Choosing a resonator for VAZ 2107
Four types of resonators are installed on the VAZ 2107:
The last two types of resonators are shortened due to the addition of an additional element - a catalytic converter. Parts for Euro 2 and 3 differ in length (spare parts for Euro 3 are shorter) and the number of mounting bolts on the flange. The second tank is missing - its functions are performed by the catalyst.
The choice of resonator depends on the specific modification of the VAZ 2107. When purchasing, you need to keep in mind the following recommendations:
Once it was possible to modernize a 1.3 liter engine by increasing the displacement to 1.7 liters by replacing the crankshaft and boring the cylinders to size 82 mm. After which it was necessary to replace the “native” resonator with one barrel, because with an increase in engine power, the exhaust pipe began to roar more strongly, especially at speeds above 2500 rpm.
It makes no sense to install a resonator from other brands of cars and front-wheel drive VAZ models on the “seven”. You will have to strongly heat and bend a pipe made of refractory steel. An alternative option is to weld the resonator tank with your own hands based on the burnt-out element.
Installing long sections on the VAZ 2101-07 that comply with Euro 2 and 3 standards is advisable in cases where it is necessary to discard a failed catalyst. The latter is quite expensive, and not every car owner is ready to make a full replacement. In this case, after installing a long resonator pipe, you will have to install a snag instead of the second lambda probe or reprogram (reflash) the engine control controller.
Replacing the neutralizer
As you can see, the exhaust system of the VAZ 2110 car is designed quite standardly, its repair is not difficult even for a motorist with little experience.
When changing the muffler and resonator, it is likely that you may need to replace the converter. This operation is simple and can be done in a few steps.
The neutralizer serves to dampen vibrations from the engine and prevent them from occurring in the exhaust system of the domestically produced VAZ 2110 car.
If it needs to be replaced, it is done like this:
- If the old springs and bolts are intact and have no obvious damage, you can continue to use them. They show characteristic signs of wear, be sure to buy new elements.
- The ring should be replaced in any case, no matter how well the old one is preserved. If gases begin to leak through the old ring, this will lead to very rapid wear and damage to the converter flare and the exhaust pipe.
- After installing the neutralizer, new bolts are put on, they are carefully but firmly tightened. Moreover, the first thing you need to do is tighten the bolts that secure the resonator.
What is important to know about the resonator
Structurally, the pre-muffler is identical to the forward flow described above - a straight perforated pipe passes through the cylindrical body. The only difference is the partition that divides the tank space into 2 chambers.
The principle of operation of the element is based on the physical phenomenon of resonance - repeatedly reflecting from the partition and the inner walls of the can, sound waves cancel each other out.
The VAZ 2107 car is equipped with 3 types of resonators:
When operating resonators, the malfunctions described above occur - burnouts, rust and mechanical damage. Troubleshooting methods are similar to repairing a muffler - welding or temporary sealing with a bandage. Removing the resonator section is not difficult - you need to unscrew the fastening to the gearbox, then disconnect the muffler and “pants” pipes. On a VAZ 2107 with an injector, the flange is disconnected instead of the front clamp.
Differences between the exhaust systems of carburetor and injection VAZ models
Installation of an injection system on a VAZ 2107 required modernization of the exhaust system. Two additional details were added to it:
- an oxygen sensor that determines the composition of the mixture, which is embedded in the exhaust manifold;
- an exhaust gas catalyst (“catalyst”), which is installed in front of the resonator, in the central tunnel under the bottom.
In connection with the installation of the catalyst, the VAZ 2107 resonator (injector) was moved a little back.
The new exhaust system has become a little more complicated, but it allows for a reduction in the toxicity of the VAZ 2107 exhaust and ensures that the car complies with EURO-2 standards.
Advantages and disadvantages of the injection modification of the VAZ 2107
The “Seven” in injection version and with a modernized exhaust system has a number of advantages over the old “carburetor” model. They are as follows:
- thanks to the injector, the engine operates more stable in all modes;
- the specific power and torque of the injection engine are higher;
- the exhaust of a VAZ 2107 with an injection system is cleaner than smoke from a carburetor engine;
- Driving a car with an injection engine is easier, it is not so demanding on the driver’s qualifications and “forgiven” mistakes when operating the gas and clutch pedals.
But installing the injector at the same time worsened some performance characteristics:
- the clearance of the injection “seven” decreased to 7 cm, which worsened its cross-country ability;
- due to the installation of the catalyst, the “survivability” of the exhaust system has decreased;
- the high temperature of the catalyst sometimes causes grass and dry leaves to ignite when the car is stopped.
Advice: to avoid fires, it is necessary to park the injection vehicle so that there is no grass or other flammable debris under it. When stopping, it is better to turn off the engine to allow the catalyst to cool down.
Types of products
You can buy the following types of mufflers for the domestic brand:
- assembly model “Izh-Auto”, which is suitable for VAZ 2104, 2106 and 2107;
- model for a sedan body, which is suitable, in addition to the VAZ 2107, on varieties 2101, 2103, 2105 and 2106.
The following types of exhaust systems are available on the market:
stamped and welded. They involve stamping two metal parts of the product can, welding them and attaching them to the pipe. Initially, exhaust systems were made in this way, but then the more reliable rolling method replaced it;
sunset Involves wrapping sheet metal around the muffler. Despite the reliability of the method, factory parts are made only by the first method, so you can purchase roll-up exhaust systems separately.
Exhaust tract design
On all classic VAZ models, including the Four, the exhaust is designed the same and consists of three parts:
- a receiving section in the form of a double pipe is screwed to the exhaust manifold flange - the so-called pants;
- the middle part of the tract is a single pipe equipped with a resonator tank (on cars with 1.5 and 1.6 liter engines there are 2 such tanks);
- at the end of the tract the main muffler is located.
In the carburetor version of the “four”, the exhaust tract consists of 3 parts.
In the injection modifications of the “four”, a neutralizer tank is added, installed between the “pants” and the resonator section. The efficiency of the element is controlled by an oxygen sensor (otherwise known as a lambda probe), which sends signals to the electronic control unit.
Each part of the system performs its function. The receiving pipe dampens the primary noise, collects gases into a single channel and removes the lion's share of the heat. The resonator and the main muffler absorb sound waves and finally cool the combustion products. The entire structure is supported by 5 fasteners:
- The intake pipe is connected to the motor via a flange connection, fasteners are 4 nuts with M8 threads, made of heat-resistant bronze.
- The second end of the “pants” is screwed to a bracket located on the gearbox housing.
- The barrel of the main muffler is suspended from the bottom by 2 rubber struts.
- The rear end of the exhaust pipe is attached to the body using a rubber cushion.
VAZ 2104 injection models are equipped with an additional gas purification section and oxygen sensors
The middle resonator part is not attached to the bottom in any way and is held in place only by the adjacent sections - the muffler and the exhaust pipe. This point must be taken into account when disassembling the exhaust. Being an inexperienced car enthusiast, I changed the muffler myself and, in the process of disconnecting the pipes, I broke off the clamp securing the “pants”. I had to look for and buy a new clamp.
Lada 2107, 250 thousand without capital › Logbook › Replacing the VAZ-2107i injector resonator
Hello everyone, back in the winter on New Year’s Eve the resonator burned out, it was 4 years old, it was inherited from the previous owner, I changed the main muffler about a year and a half ago. I decided to wrap it with asbestos cord until spring, but after a month it burned out, so I wound it again.
Recently it became warmer, and the whipping started again - I decided to replace it.
I bought a resonator made in Tolyatti in advance; the main muffler was from the Seversky Pipe Plant, near St. Petersburg.
It turns out that there are 2 types of injector: Euro-2 and Euro-3. It differs in the bend of the flange and, it seems, in length. Before purchasing, I had to look under the car to make sure I have Euro-2, so the pipe with the flange has a bend, while for Euro-3 it is straight.
For some reason I bought a metal-graphite ring with bolts, which is used to connect the exhaust pipe and the catalyst, in my case they are not needed - the resonator with the catalytic converter has a rigid flange connection. But I think sooner or later they will also come in handy.
I prepared the tools, lubricant and sealant, there was an extra clamp left over from the last time.
With sin, I unscrewed two stuck bolts from the flanges; the clamp on the muffler came off easily, since it lubricated the threads even when replacing the muffler. During removal, the resonator flange completely came off - it was already held on by snot.
I had to unhook the muffler to disconnect the pipelines; the fastening belt broke, but fortunately I have a spare repair kit, also from last time.
The catalyst honeycomb is visible.
Just for fun, I decided to measure the thickness of the metal pipe of the new resonator - it is about 1.5 mm.
It looks well made, the seams are from an automatic machine, for some reason the article number comes from the “six”, although it seems that no injectors were installed on them.
Before reassembling, I lubricated the joints with a thin layer of graphite paste.
During installation, a problem immediately arose - the bend of the muffler began to rest against the bottom of the car - this is the geometry.
I tried this way and that, but still something stuck somewhere - either in the handbrake cable bracket, then in the cable itself, or in the shock absorber.
There was no autogen, to heat it up and bend it, I had to cut off a couple of centimeters from the tip of the resonator pipe with a grinder.
Somehow we managed to move it a couple of centimeters away from the bottom. Before the final tightening, I also lubricated all the bolts with copper grease, and on top of that with graphite grease, and installed new engravers.
I also lubricated the wire securing the muffler belt with pushsal, since everything there also rusts and you have to tear the belt with a mounting tool or saw it.
Upon inspection, it turned out that siphonage was coming from the new resonator at the place where the 2 halves were welded from a small hole of half a millimeter. It was discovered by the condensate coming out - such is the quality of production, they don’t even check the tightness of the seams.
I didn’t have time to drip it with electric welding or cover it with epoxy, I’ll fix it next time.
Subscribe! Good luck on the roads!
Exhaust System Mounting Parts
A clear understanding of the algorithm of actions when carrying out such an event as replacing a VAZ 2107 muffler will help every car enthusiast carry out his plans quickly and without errors. On the one hand, removing the old muffler and installing a new one seems simple, but on the other hand, you need to be prepared for some difficulties.
Why and how often is it necessary to change the VAZ 2107 muffler?
The exhaust system of a car, despite its relatively simple design, performs many functions. The main ones are:
- removal of fuel combustion products;
- significant reduction in exhaust sound level;
- maintaining air balance with the intake system;
- ensuring effective cleaning and ventilation of cylinders.
The VAZ 2107 muffler experiences enormous loads like no other part of the car. First of all, constant temperature changes have a destructive effect on the metal, which actively destroys not only the protective paint and varnish coatings, but also the structure of the metal itself.
Gases heated to a high temperature literally “eat up” the internal filling of the muffler, mixing with water condensate and oils, dissolving the metal walls, forming through corrosion. Externally, the muffler elements are also adversely affected by moisture, road sand and gravel; salt solutions in winter intensify the decomposition process.
As a result, after some time the driver can observe under the bottom of the car the pitiful remains of what was once called a muffler. Whether we like it or not, the muffler of a VAZ 21074 or any other model will have to be changed periodically. To the question of how often you should change the muffler, every car enthusiast must find the answer himself.
The service life of an exhaust system, like many others, depends on factors such as:
- activity of vehicle operation;
- quality of fuel used;
- the car owner’s attitude towards the condition of the car;
- frequency of use of the machine in adverse weather conditions;
- quality of previously installed exhaust system parts.
Having come to terms with the fact that the VAZ 2107 muffler will not last forever, you need to buy a new one and start replacing it.
Replacing the VAZ 2107 muffler - procedure
An inherently simple procedure can take a lot of effort and time. Before installing a new muffler, you must remove the old one. To do this you should:
- install the car on an overpass or above an inspection hole;
- prepare a set of tools, ensure good lighting under the machine;
- The muffler is connected by a pipe to the resonator pipe in front of the rear axle. The ends of pipes with a slot and a male-female connection are tightened from the outside with a coupling;
- Corrosion under the influence of lubricant and temperature can solder the joints so much that it becomes very difficult to remove them. It is better to moisten the pipes at the junction and the coupling in advance with a solution that corrodes corrosion. For this purpose, as a last resort, brake fluid or used oil is suitable.
The procedure for replacing the muffler is as follows:
- the crimp coupling is untwisted or cut off using a cutting tool (grinder) (in this case, a new coupling should be on hand);
- use a thin chisel or screwdriver to bend the flared edges of the pipe;
- the muffler is disconnected from the resonator (if it comes out tight, you can help yourself with a hammer by tapping on the pipe);
- hanging pillows are detachable. By the way, when buying a muffler, it is advisable to buy three suspension rubber bands (two in the center and one at the rear).
After this, the old muffler is in your hands and you can install the new one in the reverse order.
How to replace the muffler of a VAZ 21074 and other modifications of classics
Very often, car enthusiasts, seeing in the title of the article that the make of the car does not exactly match what is indicated in the registration certificate, continue to search for instructions. VAZ cars are charming because they differ from each other for the most part only in appearance, but the internal structure is completely identical.
It doesn’t matter what kind of car is in the garage: 2105, 2104, 2107 or 21074 - their exhaust system is completely the same. Having studied the repair instructions for one car, you can safely begin repairing another classic model.
What will be required for replacement?
1) New resonator (other names: first stage muffler or additional muffler).
Aluminized Transmaster Universal stainless steel resonator. (double barrel)
Which resonator to choose: one or two tanks (barrels)? Single barrel or double barrel?
The first Zhiguli models were equipped with additional mufflers with one barrel, and on cars with a more powerful engine with a volume of 1.5, 1.6 liters (VAZ 2105, 2106, 2107) - double-barrel ones.
There is no particular difference in installing a resonator with 1 or 2 barrels; they are interchangeable and will fit any model, with the exception of the VAZ 2102, 2104 station wagons.
As for the noise level, an additional muffler with one barrel is considered a little noisier, but it gives a slight increase in power to the car (there is no additional exhaust resistance). Although the increase in this power is barely noticeable.
A classical resonator consisting of two “cans” is less noisy. Usually, the first can is a fire extinguisher.
2) Two metal clamps (44 mm - for the junction with the main muffler, 46 mm - for the junction with the exhaust pipe). Slightly larger clamps are also suitable, for example, with a diameter of 44.5 mm. and 48 mm.
Muffler clamp d44.5 mm and d48.5 mm
3) Graphite grease
4) Medium-grain sandpaper (sanding) 5) Wrenches for “7”, “13” mm. 6) Universal fluid WD-40 (“vd”, “vedeshka”) 7) Hammer, wooden spacer, screwdriver.
Modification of mufflers for VAZ 2106
When the muffler begins to “tire” from work, the driver will begin to notice this on himself: increased noise when driving, the smell of exhaust gases in the cabin, a reduction in engine dynamics... Replacing the muffler with a new one is not the only way to eliminate all these problems. Fans of experiments often tune the exhaust system, because this way it lasts longer and works better.
Today, car enthusiasts distinguish three types of muffler modifications:
- Audio modification is the name of tuning, the purpose of which is to enhance the “growling” sounds in the muffler while driving. This modification really allows you to turn the quiet “six” into a roaring lion, but it has little effect on the performance of the exhaust system.
- Video modification is a tuning aimed at external decoration of the exhaust pipe rather than at creating improved performance characteristics. Video tuning usually includes replacing the exhaust pipe with a chrome one and using nozzles.
- Technical tuning is the most effective in terms of performance. It is aimed at improving the performance of the exhaust system and even increasing engine power by up to 10–15%.
How to make a sporty muffler
A sports muffler is a straight-through muffler. It is necessary to create additional dynamic properties and give the model a special sporty look. The straight-through muffler has an extremely simple design, so you can easily make it yourself, even from a standard VAZ 2106 muffler.
To make a sports forward flow you will need:
- standard muffler;
- a pipe of a suitable size (usually 52 mm);
- welding machine;
- angle grinder (grinder);
- drill;
- metal cutting discs;
- ordinary metal sponges for washing dishes (about 100 pieces).
Video: how forward flow works on a VAZ 2106
The procedure for manufacturing a direct-flow muffler boils down to the following work:
- Remove the old muffler from the car.
- Use a grinder to cut out a piece from its surface.
- Remove all internal parts.
- On a 52 mm pipe, make cuts in the form of a herringbone or drill many holes with a drill.
- Insert the perforated pipe into the muffler and weld it securely to the walls.
- Fill all empty space inside the muffler with metal sponges for washing dishes made of metal.
- Weld the cut piece to the muffler body.
- Cover the product with mastic or heat-resistant paint.
- Install direct flow to the car.
Photo: main stages of work
A direct-flow sports muffler of our own production optimizes engine performance and makes the VAZ 2106 more sporty and dynamic. There is a huge selection of such modifications of mufflers in stores, so if you have no manufacturing experience, you can buy a new one.
Do-it-yourself and purchased nozzles for Glushak
Attachments, which are usually used as a decorative element, allow you to modify the muffler and optimize its performance. Thus, a correctly made and installed nozzle is guaranteed to improve the following indicators:
- the fuel burns out completely;
- less carbon deposits form on the spark plugs;
- the power of the power unit increases by approximately 15%;
- fuel consumption is reduced (by about 20%).
That is, the use of an attachment can improve the basic indicators of vehicle convenience and efficiency. Today you can find attachments of various shapes on sale; the choice is limited only by the financial capabilities of the driver.
The nozzles create an attractive appearance for the body and also optimize the operation of the entire exhaust system.
However, you can make the attachment for the “six” muffler yourself. To do this you will need the simplest materials and tools:
- stainless steel sheet with a thickness of 1–1.2 mm;
- cardboard for template;
- Bulgarian;
- sandpaper and polishing materials;
- metal scissors.
A typical exhaust pipe nozzle has a round cross-section, so the easiest way to make just such an element is:
- Use cardboard to model the body of the future nozzle, taking into account the locations for fastening joints.
- Using a cardboard template, cut out a product blank from sheet material.
- Carefully bend the workpiece and fasten the joint with bolted connections or welding.
- Clean the future nozzle, you can polish it to a mirror shine.
- Install on the vehicle exhaust pipe.