I decided to write this article. A lot of people ask constantly, after one single comment left))) I came across a post on VK from a fellow clubber. All photos taken from Yellow. For which I thank him very much!
In general, I ordered this repair kit for myself at existential. ATTENTION! PRICE 900 RUR pcs!
This is not for you to cut the wings from the priors for 3000)))
Klokkerholm company, left and right part numbers 9521592 and 9521591
Personally, I haven’t cooked it for myself yet. I bought three more thresholds for myself from 2112, I will digest them too. All at once.
Issue price: 1,800 ₽
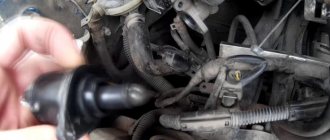
Removing the old wing
We make neat cuts along the cut line. At the same time, we try to avoid damage to the internal elements of the pillar and threshold. Next, we drill out all the welding points connecting the wing to other body elements. We begin careful dismantling. You may need a hair dryer to heat up the adhesive joints that hold the fender and mudguard in place.
After dismantling the old wing, it is necessary to adjust the new one. There are two ways to do this.
- Applying markings to each element followed by cutting.
- Simultaneous cutting of both joined parts.
Applying markings to each element followed by cutting
We apply markings to the rear wing and make cuts. We apply it to the surface of the body. The wing should slightly overlap the cut lines of the old wing. At the future joint we place marks on the new wing. We remove the wing and make cuts on the body. We reattach the wing, check the gaps, and, if necessary, make adjustments by processing the joints.
Simultaneous cutting of both joined parts
We install a new wing, while it overlaps the cut lines of the old wing. We set the gaps along the door and fix the wing with clamps. Approximately in the center of the floor lines, we cut two elements at once. In this case, we select a thin disk for cutting. When using this method, the joints are very smooth. The distance between the joined parts must correspond to the thickness of the metal being welded.
How to remove and install the wing on 2110, 2111, 2112
An article with photos and video materials for everyone who is faced with the need to replace the front wing on cars of the tenth LADA family.
1. Before you begin removing the front or rear wing from the VAZ 2110 , you need to disconnect the negative cable from the battery terminal.
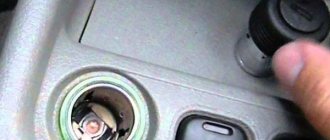
2. After this, you need to remove the lock from the wheel where you want to remove the wing. (see here).
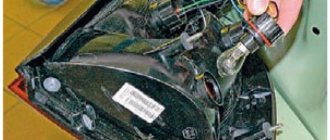
3. After this, you need to move the side turn signal towards the front of the car and remove it from the hole in the fender. The turn signal housing itself needs to be removed. We push the remaining socket with the lamp inward through the hole in the wing.
4. Unscrew the bolt for the side mounting of the buffer from the bottom on the corresponding side.
5. Now you need to loosen the five nuts securing the crankcase protection to the tens bumper from below.
6. After this, you can remove the radiator trim (see here) and loosen the two bolts securing the front buffer.
7. This will allow us to move the buffer in the direction we need to gain access to the bolt that is responsible for the front wing fastening. Unscrew this bolt completely.
8. After this, you can unscrew two more wing mounting bolts from below.
9. Unscrew the two rear fender mounting bolts through the wheel well.
10. Unscrew the four upper wing mounting bolts and remove the wing.
11. Install the wing in the reverse order of removal. In this case, it is recommended (especially when installing a new wing) to clean the surfaces mating with the wing on the body and install new insulating gaskets between the body and the upper wing flange and between the front pillar and the rear wing flange. If gaskets are not available, you can coat the mating surfaces with mastic.
12. Before final tightening of the fastening bolts, align the wing with the enlarged holes in order to align with the gaps and protrusion with the rest of the body panels. After installing the new fender, apply an anti-corrosion coating to the inner surface.
Repair process
VAZ 2112 rear right fender
- Raise the car on a jack.
- Press out the wing.
- You need to level the surface using a heavy tool (this could be a hammer). Take a nozzle with a sharp flat end and apply it to the other side of the dent. After this, hit the flat surface of the nozzle with a hammer. A slight leveling will be noticeable.
- The outside needs to be straightened with a flat object.
Note: it is better to straighten using an iron tool, since aluminum will not work. All actions must be performed quickly. However, you should not hit too hard. This can cause the metal to stretch, causing the wing to expand slightly.
- The edges need to be knocked out very carefully, along one line.
Partial replacement
Often the back panel is partially replaced. This avoids additional disassembly, for example, dismantling the rear window. It must be remembered that too long a joining seam is not desirable. It is better to choose a narrower place for the cut. It must be taken into account that the welding seam is invisible from the back of the rear wing.
Complete rear fender replacement
VAZ 2112 right rear fender
Modifications
VAZ-21120
Modification with a 16-valve injection engine with a volume of 1.5 liters and a power of 93 horsepower. 14-inch wheels were installed on the car.
This modification has a problem with valves bending when the timing belt breaks. The problem can be solved by increasing the depth of the grooves in the piston bottoms.
VAZ-21121
The car was equipped with a VAZ-21114 8-valve injection engine with a volume of 1.6 liters and a power of 81 horsepower.
VAZ-21122
Budget modification with an 8-valve injection engine VAZ-2111. The car was produced without electric windows, the wheels were 13 inches in size, and the brakes were unventilated from a VAZ-2108 car.
VAZ-21123 “Coupe”
A car with a three-door coupe body.
The only two doors for entering the car are 200 millimeters wider than those of the five-door hatchback, and they are mounted on new, durable hinges. The rear arches of the car have become wider. The spoiler is different from the usual one; it is now located on the roof of the car in the area of the trunk door. New rear view mirrors provide improved visibility. In general, the appearance of the car has become more sporty. For sitting in the rear seats, the backs of the front seats recline, as was the case on the VAZ-2108. The car body, due to the reduced number of doors, has become more rigid, much more rigid in torsion than that of the five-door model. The suspension has become stiffer, and the car's handling has also noticeably improved.
The engine was installed with a 16-valve injection engine with a volume of 1.6 liters and a power of 90 horsepower. The car was produced from 2002 to 2006 in small quantities, the reason for this was the high cost of the car.
VAZ-21124
Modification with a 16-valve injection engine VAZ-21124 with a volume of 1.6 liters. Produced from 2004 to 2008. For this type of engine, the problem with valve bending was solved. To do this, the depth of the grooves in the piston heads was increased (up to 6.5 mm). In addition, the design of the cylinder block was changed to achieve a working volume of 1.6 liters, for which its height was increased by 2.3 mm, and the radius of the crankshaft was increased by 2.3 mm accordingly. There were also a number of other minor changes.
VAZ-21128
The luxury version of the car, produced by Super-auto JSC, was equipped with a 16-valve VAZ-21128 engine with a volume of 1.8 liters and a power of 105 horsepower.
VAZ-2112-37
A racing modification of the VAZ-2112, prepared for the “ring” in the Lada Cup qualifying group. The car was equipped with a 1.5-liter VAZ-2112 engine with a power of 100 horsepower. The racing car was equipped with a safety cage, an external aerodynamic kit and a front extension of the strut support cups.
VAZ-2112-90 “Tarzan”
All-wheel drive modification with a VAZ-2112 body on a frame chassis with transmission and suspension parts from a VAZ-21213 Niva. It was also equipped with a 1.7 or 1.8 liter engine from the Niva.
If the rear wing arch begins to rot
Rear right wing for VAZ 2112
Iron very quickly undergoes corrosion, which, as it grows, can harm the entire car. It is advisable to start repairs when the rust has not yet seeped into the solon, as the consequences will be much worse. The arch of the front or rear wing is most often affected by this problem. To fix this problem you need to do the following:
- Disconnect the ground so that any welding work can be carried out without difficulty.
- The damaged part must be cut off, and the remaining parts must be cleaned properly.
- To seal the resulting hole, you need to attach a patch on the “wrong” side. This must be done by welding.
Note: before this, you need to treat the damaged area with acid to get rid of corrosion. And in order to make it easier to process this part in the future, you need to drill a small hole in it (preferably from the inside).
- The patch must be cut from stainless steel to prevent rust from appearing in the future.
Note: to make it easier to cut out the patch, you need to take a piece of cardboard, place it on the damaged part and press it so that its dimensions are transferred to the cardboard. You will get a “fingerprint”. You need to cut a patch along it, slightly larger than it. Transfer it to the metal and cut it out.
- Now the edges of the patch need to be welded to the wing so that it holds well.
Rear right wing for VAZ 2112
- Of course, all this will not look very nice, so you will need to clean it up.
- Now you need to remove everything inside the seams. To do this you need to use a special tool.
- Spray with zinc.
- You need to take sandpaper and smooth the entire surface. After this you need to degrease well. Remove the remaining zinc.
Note: it can be removed with a solution of baking soda and water.
- You need to wait a bit for the degreaser to evaporate.
- Cover with bauxite primer and allow to dry.
- After this, smooth the surface again with sandpaper.
- Now you need to make sure that the seams are not visible. Putty will help with this. First you need to apply it to the seams so that they fill. There is no need to level it completely right away, as air bubbles may appear. After this, you can apply putty to the entire area.
- All that remains is to paint.
How to repair arches on your car?
It's very simple, we need:
1) Masking tape;
2) Epoxy resin and hardener;
6) Primer, paint in color, varnish, transition varnish
7) Sandpaper and file
 Respirator and rubber gloves
Puttying
So, if we are talking about minor damage, the putty method is used. Step by step it looks like this:
- It is necessary to thoroughly wash and dry the car.
- Remove all bare metal rust from the damaged areas and sand them thoroughly.
- Treat areas with reactive primer and allow the surface to dry.
Car rear arch putty
- Place acrylic filler on top of the reactive layer - under no circumstances should putty be applied to acidic primer.
- After the acrylic has dried, apply putty and wait for it to dry.
- Thoroughly sand the dried putty, gradually reducing the grain size of the abrasive. Thus, level the surface, preparing it for painting.
- Paint those areas of the car that have been repaired.
- Carefully wash and dry the car.
- Using a grinder, we cut off all the affected areas of the wheel arches.
- Align and clean the edges (for making patches, it’s good to get arches that have been used and are no longer in use).
- We cut out suitable patches and bring them to the shape we need in order to obtain the correct wing configuration.
Welding method
If the surface is so corroded that puttying is not possible, you will need welding. Obviously, to carry out work of this kind with your own hands, you must have a welding machine and have the appropriate skills to handle it . So, repair by welding looks like this:
Rear arch repair using welding
VAZ-21124 engine control circuit
Connection diagram of the VAZ-21124 engine control system with distributed fuel injection to Euro-2 emission standards (controller M7.9.7): 1 - ignition coils; 2 — nozzles; 3 - controller; 4 - main relay; 5 - fuse connected to the main relay; 6 — cooling system electric fan relay; 7 - fuse connected to the cooling system electric fan relay; 8 - electric fuel pump relay; 9 - fuse connected to the electric fuel pump relay; 10 — mass flow and air temperature sensor; 11 — throttle position sensor; 12 — coolant temperature sensor; 13 — solenoid valve for purge of the adsorber; 14 — oxygen sensor; 15 — knock sensor; 16 — crankshaft position sensor; 17 — idle speed regulator; 18 — immobilizer control unit; 19 — immobilizer status indicator; 20 - phase sensor; 21 — vehicle speed sensor; 22 — electric fuel pump module with fuel level sensor; 23 — oil pressure warning lamp sensor; 24 — coolant temperature indicator sensor; A - block connected to the wiring harness of the ABS cabin group; B — diagnostic block; B - block connected to the air conditioner wiring harness; G - to the “+” terminal of the battery; D — to the side door wiring harness block; E - block connected to the instrument panel wiring harness; G1, G2 - grounding points; I - the order of conditional numbering of plugs in the block of the immobilizer control unit; II - the order of conditional numbering of contacts in the diagnostic block.
Connection diagram of the VAZ-21124 engine control system with distributed fuel injection under Euro-3 toxicity standards (controller M7.9.7): 1 - ignition coils; 2 — nozzles; 3 - controller; 4 - main relay; 5 - fuse connected to the main relay; 6 — cooling system electric fan relay; 7 - fuse connected to the cooling system electric fan relay; 8 - electric fuel pump relay; 9 - fuse connected to the electric fuel pump relay; 10 — mass flow and air temperature sensor; 11 — rough road sensor; 12 — throttle position sensor; 13 — coolant temperature sensor; 14 — idle speed regulator; 15 — control oxygen sensor; 16 — diagnostic oxygen sensor; 17 — solenoid valve for purge of the adsorber; 18 — knock sensor; 19 — crankshaft position sensor; 20 — immobilizer control unit; 21 — immobilizer status indicator; 22 - phase sensor; 23 — vehicle speed sensor; 24 — electric fuel pump module with fuel level sensor; 25 — oil pressure warning lamp sensor; 26 — coolant temperature indicator sensor; A - block connected to the wiring harness of the ABS cabin group; B — diagnostic block; B - block connected to the air conditioner wiring harness; G - to the “+” terminal of the battery; D — to the side door wiring harness block; E - block connected to the instrument panel wiring harness; G1, G2 - grounding points; I - the order of conditional numbering of plugs in the block of the immobilizer control unit; II - the order of conditional numbering of contacts in the diagnostic block.
How to remove rust from a fender
To remove rust stains from car fenders you will need:
- sandblaster or sander;
- anti-corrosion primer;
- degreaser;
- rust converter;
- putty;
- gloves.
Restoring the fenders begins with a thorough washing of the car. After this, the car is driven to a remote area so that when the sandblaster works, sand does not scatter throughout the garage and surrounding buildings.
Sandblasting machine
Removing corrosion with a sandblaster is a gentle way to remove plaque. The mechanism will quickly and without damaging the paintwork clean the wing, reaching hard-to-reach places. A jet of sand under pressure is directed at the rust-affected area and gently removes the damaged metal with the help of grains of sand.
Sanding machine
A sander will help you quickly get rid of corrosion on the wings of your car. This tool has a rotating disk that will carefully remove unsightly plaque from parts. You should work with the machine carefully, without pressing hard on the iron, sliding along the bottom of the wing and its entire surface. If done correctly there will be no damage.
Manually
In the absence of power tools, corrosion from car fenders is removed manually with a metal brush or special sandpaper. With sufficient experience, an abrasive disc is used. The method is time-consuming but economical. In addition, the brush allows you to reach the most difficult to reach places.
Chemically
Another repair option without replacing the arches is to remove them using special chemicals. A rust converter works great. It must be applied to the affected areas using a spray can or brush. Next, you should wait a while for the composition to be absorbed into the metal, then rinse with clean water and allow the surface to dry.
Tuning VAZ-2112: Milky Way is not for children
School dreams come true
When Vladimir was still going to school, the magazine “Car Tuning” had just begun to be published, and the boys were constantly looking at the pictures, dreaming that “I will have one like that too.” Later, in 2006, when the opportunity arose to buy a “boy’s car,” he chose between the VAZ-2108 and VAZ-2112. By chance, a neighbor’s acquaintance was just selling a “two-piece.” Vova went to see the car, he liked everything, and two days later he purchased his first car. And he immediately began to bring all his fantasies to life. First, it was fashionable at that time white forged wheels, shortened springs and equally fashionable Plaza Sport struts, then it was time to refine the engine and gearbox. Tuning is a constant thing; as you know, it cannot end. And at that moment, when everything in his VAZ began to seem banal to Vladimir, he decided... not to sell the car, but to move on.
Second wind
He wanted to build a really low “two-wheeler” and definitely on 17 wheels. I found, as I thought then, suitable 17th “skating rinks” and installed them (and they were narrow). The car naturally rose, and it became obvious that it lacked lowering and width. Suspension measurements and calculations began. Vladimir realized that even the shortest shock absorbers that he saw on sale were not enough to achieve a good lowering. Having studied the information in more detail on the Internet, he found out about the Custom Samara suspension, talked with the master himself, Artem Metra, explained to him what kind of result he wanted to see, and after some time the finished struts were already in Vova’s hands. Then the search began for wide wheels. Keskin KR1 wheels attracted attention with their design, and they were even found in Moscow, and for a very nice price.
Even before starting the search for suspension and “slippers,” Vladimir had already thoroughly thought through what his car would look like. After surfing foreign websites, he decided to make the VAZ-2112 in the direction of HellaFlush, the distinctive features of which are wide wheels and low-profile tires that are literally stretched over the wheel. In general, the whole point is that the arch is as close to the wheel as possible, the closer, the steeper, the tires are like a house, and all this needs to be “seasoned” with lowering and decent camber.
However, the “twin” cars purchased by Keskin did not fit into the standard arches. There was nothing left but to saw the wings, which Vladimir did. Leaving everything in the “draft version”, he immediately installed new wheels and suspension, adjusted it, made a test drive and realized that even on a flat road the subframe sometimes clings to the asphalt. Now this problem had to be solved. In order to move normally with such a lowering, it was necessary to raise the subframe, and for this it was necessary to raise the engine. In principle, there is nothing complicated in this procedure: I calculated the height to which the engine can be moved, and digested all the mounting pads for the engine and gearbox. As a result, the rise was 5 centimeters, and the subframe was moved by the same amount. By the way, in connection with this, everyone had to cut out a hole in the engine panel for the gear shift slide. Another problem was that the CV joint drives rested against the side members. Vova cut out the spars, opened them and strengthened them inside; the “windows” in the spars turned out to be around 5-7 cm.
Having finally raised the engine, the enthusiastic VAZ owner encountered another difficulty: the hood stopped closing, since the receiver and oil filler neck were now in the way. After some thought, Vladimir took the turbo receiver (it is smaller in size and is located at the front of the engine) and gave the oil filler neck to his friends for lowering (he could not do this himself, since he needed argon). After installing the converted parts, the hood closed!
In parallel with this, work was going on on the rear suspension, where everything was much simpler. With the help of special custom plates that move the hub higher (they are screwed onto the beam, and the hub itself is screwed onto them), the visual effect of lowering the car is achieved. The result was minus 9 centimeters and a camber of 5 degrees. Vova installed springs from Niva, since they are stiffer than both the “classic” and “Samara” springs, and the goal is to reduce the suspension travel as much as possible in order to fit the discs to the arches as close as possible. The shock absorbers are fitted with polyurethane bump stops to provide even greater rigidity.
After this, the owner began moving the gas tank, because with such a strong understatement it could simply be pierced or erased. The standard tank had to be replaced with a small rectangular one (additional from UAZ), which fit in the trunk in the niche for the spare wheel. Copper pipes now run from the gas tank to the engine, and throughout the cabin - again, so as not to rub them off on the asphalt.
Next it was the turn of the brake system. The front now has 15th Alnas brake discs and Volga calipers (for models 3102, 3110, 31105 and even Gazelle), and faceplates were used to put them on the VAZ fist. At the rear are 13th brake discs and calipers from a VAZ-2109, also installed through faceplates. Brake pipes were also installed throughout the cabin, and a Kreatech hydraulic handbrake was added to the brake system.
Then Vladimir welded a new exhaust system: he took a “Spider” “Subaru-sound” (I like the sound of it), and after that he welded the route, hiding it as much as possible in the floor tunnel; I took the resonator and muffler from 4-stars. At the same time, we managed to purchase all the seats from the Mitsubishi Lancer 9 practically for nothing. After remaking the mounting brackets, they fit like originals, so the interior of the VAZ-2112 was updated.
And only now, after all the adjustments and adjustments, Vladimir began to finish the arches. I thought for a long time about what to do, and one day, standing in a traffic jam, I noticed the rear arches of the Gazelle route - he liked their shape. A trip to the car market resulted in the purchase of a repair kit for Gazelle arches and fitting them onto the rear fenders of the Twelve. Of course, we had to saw, adjust and trim, but you can see the result in the photographs: the arches and rims with tires are very close to each other.
Everything turned out simpler at the front: we managed to find fenders from a VAZ-2112 coupe, and they come from the factory with blown arches. However, since the car is low and has 17 wheels, they would not fit without modifications; it was necessary to raise the arches in the wings themselves. Vova chose the option of sawing off the arches from the purchased wings and welding them onto his own. He also moved the license plate to the trunk lid, soldering a niche for the number on the bumper, and installed an old-style spoiler, giving the car some flair. After all this, the car was repainted in its original Milky Way color. Hence the nickname “twins” – Milky Way.
Painting the rear wing of a VAZ
Rear fender painting
If the car breaks down for any reason, it needs repairs. At the same time, if it is scratched, then it needs to be painted. After the repair, the wing will have to be painted in any case.
- First, you need to highlight the damaged parts with a marker so that you can pay the most attention to them during the painting process;
- Then - primer. It is necessary so that the paint adheres better to the car;
- The next step is to apply the first layer of base paint.
Note: you need to spray the paint in a thin layer, so the sprayer must be held approximately 20 cm from the wing.
- Leave for 5-7 minutes to dry.
- Next is the second layer of paint.
- Let it dry slightly again.
- Apply a third layer.
Note: You need to wait about 20 minutes before applying the polish. At the same time, if dust has slightly settled on the surface of the wing, it must be removed with a sticky cloth.
- Now you can start applying the varnish. The first layer is applied.
Note: Don't try to create a glossy finish with the first coat. This may cause the remaining varnish to bleed.
- Leave for 7-10 minutes to allow the varnish to dry slightly.
Note: after this you can check for tack (if it sticks a little, but does not rub off, then you can start applying another layer).
- Second coat of varnish. Leave to dry thoroughly.
- Wipe with a damp cloth.
- Polish the vases.
Photos and videos found on the Internet will help you replace, repair, or paint the rear fender yourself. Any instructions will help you do any work quickly and efficiently, although you need to try a lot. But the price of “home” repairs is noticeably lower than in a car service.
We cooperate with:
Delivery is carried out throughout Russia and the CIS.
Deadline for order delivery to T.K. from 1 to 4 business days from the date of receipt of funds. (orders are not processed on Saturday and Sunday).
Lead time for orders that include painting services: 5-10 business days.
The lead time for placing orders and “made to order” items is from 14 days; you can check with the manager for more detailed information.
Orders for pickup are placed on the website, the formation time is on average 1-4 business days, after the items arrive at the pickup point, the manager will notify you when you can receive your order.
ATTENTION! All fragile goods (headlights, plastic products, glass, etc.), by default, are sent in additional paid packaging from TK. If you take responsibility for the integrity, we can ship without it. To do this, you need to make a note in the comments when placing your order. For additional information, please contact the managers.
Marking and joining of the new wing
To ensure that the connection between the new rear wing and the remains of the old one on the body is smooth, two marking methods are used.
The most common places to cut when replacing a rear fender
Method with marking and cutting of joined panels separately:
- Take measurements and cut the rear fender section on the body and the new fender to size. The remaining metal on the C-pillar needs to be a little longer and overlap the edge of the new rear fender.
- Try the new wing in place and secure it with special clips. If everything is measured and cut correctly, the rest of the panel on the body will overlap the line of joining with the new wing.
- Draw a line on the remains of the old panel along the edge of the new wing.
- Remove the wing and make a cut.
- So the two parts must match. If necessary, you can slightly adjust one of the joined parts by grinding with a grinder.
Method for simultaneous cutting of two joined panels on a body:
- Take measurements and cut off the old panel and the new one, just like with the first method, the remainder of the panel on the body should overlap the edge of the new panel.
- Try on the new wing and attach it using special clips.
- Make a cut down the center of the area where one panel overlaps another. This way, both panels will be cut off at the same time, the remainder of the old one and the new one. The result will be a very precise joint of two parts with a gap size equal to the thickness of the disk that was used to make the cut. It is better to cut with a thin disk so that the gap is minimal.
General information about the structure and functional purpose of car arches
Arches on the wings of the VAZ 2110
Many motorists mistakenly believe that car arches are part of the overall decor and do not have any functions. In fact, this is not the case at all, because each element of the car performs a specific function. Main functions of the wing arch:
- protection of the wheelbase from external influences;
- is part of the body, maintaining its integrity;
- is a partial fastening element of a car, etc.
Reasons that violate the integrity of the car wing:
- low quality of the base alloy of the arch;
- improper manufacturing installation or replacement;
- rare use of anti-corrosion metal protection agents;
- passive care, etc.
Arches for wings of VAZ 2110
And indeed, in practice everything looks very different than it might seem in theory. Most motorists, when they notice visual arch rotting, do absolutely nothing. They motivate their actions by the fact that when it completely falls off, they will simply change it. To begin with, it is objectively necessary to understand the negative consequences of replacing the arch:
- additional economic costs, and quite significant ones at that;
- installation complexity due to a number of specific features;
- multiple losses of time for forced repairs, etc.
Note. The anti-corrosion substance costs a small amount of money, and its constant use can extend the service life of the arches by at least 2-3 times. Prevention is always better than complete replacement later.
Wing arches of VAZ 2110
If traces of rust are visible visually on the car's wing arches, then this rust must be cleaned off and then coated with an anti-corrosion substance. This can significantly extend the final service life.
Note. It is possible to carry out restoration work on arches if they have local rather than general damage in the form of rotting. If there is an extensive corrosion process, then the only and most rational option would be to completely replace all damaged car arches.