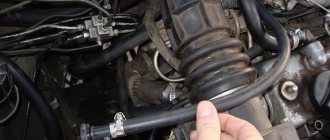
Modern car enthusiasts rarely use this socket for its intended purpose. Additional devices such as phone chargers are connected to the cigarette lighter socket. However, over time the device breaks down.
If you have the necessary knowledge and tools, replacing the cigarette lighter on a Lada Kalina car is a simple procedure. For repairs, you only need a standard set of hexagons, a screwdriver, pliers and a soldering iron. Read the article about why a malfunction occurs, how to identify it and replace the device, and why you should pay attention to the fuse.
Reasons why the cigarette lighter does not work on Kalina
This device on the car may break down over time. The main causes of cigarette lighter malfunctions are:
- Short circuit in the VAZ Kalina wiring circuit. A short circuit can appear due to various nuances: incorrect connection of the alarm system, faulty battery, “fatigue” wiring or moisture on the contacts. The fuse trips.
- Overheating of the heating element itself. The spiral may burst.
- The cigarette lighter on Kalina sometimes does not work due to poor contact in the socket itself.
- When connecting additional devices, the cigarette lighter fuse may blow. You need to disassemble the front panel and get to the block to check the serviceability of the circuit.
Design and purpose of the cigarette lighter
The device is designed simply:
- metal cartridge with a nichrome spiral;
- button;
- plastic handle.
There is a special socket on the dashboard into which the cigarette lighter is inserted. When you press the handle, the device connects to the vehicle's on-board network. A current passes through the nichrome spiral and it heats up. As soon as the temperature reaches its maximum, the thermostat is activated, a click occurs, and the cigarette lighter returns to its original position.
Heated coil for lighting
In the first car models, the device was used directly for lighting cigarettes, but with the development of technology its use has expanded significantly. Currently, all external electronic devices are connected through it: vacuum cleaners, navigators, chargers, radar detectors, mobile phones.
Today, the 12-volt socket of a car has become indispensable; its breakdown immediately causes a number of inconveniences.
Replacing the cigarette lighter on Kalina 1st or 2nd generation
The repair process is practically the same for these Lada models. It is also relevant for the Grant or Priora family. To replace the cigarette lighter with your own hands on Kalina 1st or 2nd generation, just follow the following procedure.
- Open the hood, find the battery and disconnect the negative terminal from it. It is recommended to remove it, because the mass is powered through the car body. If you turn off the plus, it will touch the body.
- We unscrew the three mounting bolts around the parking brake handle, which is located on top of the central tunnel. We dismantle the hand brake limit switch.
- We unscrew the rear fastening screw and additional screws on the sides.
- Remove the cover from the gear lever, and then lift the tunnel cover. Now you can remove the Kalina cigarette lighter itself.
- We disconnect the power plug coming to the electrical wiring circuit.
- We press the special latches that hold the cigarette lighter. After it pops out, it can be replaced.
- We install a new part on the Lada Kalina. After replacement, we carry out the assembly process. We perform all steps in reverse order.
Diagnostics and fuse replacement
In addition to the cigarette lighter, additional components are connected to the circuit. On Kalina 2 of the second generation, seat heaters have been introduced into the circuit. In this case, both devices stop working at the same time.
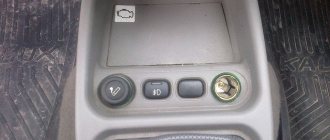
Where is the cigarette lighter fuse located?
The fuse box in a domestic car is located on the left side of the center console. Next to it is a backlight control. The block is protected by a decorative overlay. To remove it, snap off the plastic fasteners holding the cover in place. On the reverse side there is a control module with relays and protective elements. The layout of these parts on the 1st generation Kalina is as follows:
- fuse 1 is responsible for the operation of the turn signals, the dashboard, and also regulates the operation of the engine blocker;
- No. 2 is involved in the operation of window regulators, it is necessary to prevent an increase in the load on the electric motor;
- under No. 3 there is an alarm relay;
- 4 fuse protects the windshield cleaning and washer system;
- part No. 5 regulates the operation of the furnace;
- Terminal 6 is intended to indicate the horn fuse;
- 7 part is involved in the operation of interior lighting devices;
- under No. 8 there is a glass heating relay;
- 9 and 10 - fuses for the right and left side lights;
- 11 — rear fog lights;
- 12, 13 — right and left low beam;
- 14, 15 — left and right high beam;
- 16 and 17 - right and left fog lights.
- 18 — seat heating;
- No. 19 is the ABS unit;
- part No. 20 - cigarette lighter fuse.
The arrangement of elements in cars of other modifications may differ.
Examination
To check the functionality of the fuse and the cigarette lighter unit, remove the protective element. If a break in the fusible core is detected, the part requires replacement. If there are no signs of malfunction, inspect the wires going to the cigarette lighter. They should not have abrasions or bends.
When using the car for a long time or using electronic devices incorrectly, short circuits occur and cables burn out.
The wires are ringing, measuring resistance. When a zero or one appears, it means a breakdown.
Why does it burn so often?
The main reason for frequent fuse blowing is improper use of the cigarette lighter socket. The fuse constantly fails when connecting too powerful devices. An equally common malfunction is considered to be short circuits that periodically occur in the circuit.
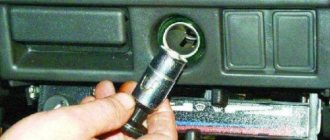
Replacing the socket in the Kalina cigarette lighter
The device may not work due to a faulty seat. You should replace the socket of a broken cigarette lighter on a Lada Kalina by following the same procedure.
- Disconnect the terminals from the battery.
- Remove the gearshift lever casing and the central tunnel cover by unscrewing the screws holding the decorative plastic.
- Disconnect the contact chip and then remove the socket.
- Replace the part with a new one.
- Reassemble in reverse order.
Detailed step-by-step instructions are presented in the profile video.
Where is and how to remove the cigarette lighter fuse for Lada Granta
- Why doesn't the cigarette lighter work?
- Fuse problem
- Where is
- Which one can I put in place?
- Cigarette lighter repair
- How to remove the cigarette lighter
- Diagnostics
- How to replace with a new one
If problems arise with the car cigarette lighter, first check the cigarette lighter fuses on the Grant. Burnt out parts are replaced with new ones, but before this the cause of their burnout is established.
Why doesn't the cigarette lighter work?
The cigarette lighter on a Lada Granta car may not work for various reasons. The most common faults are:
- blown cigarette lighter fuse;
- poor contact;
- broken wiring.
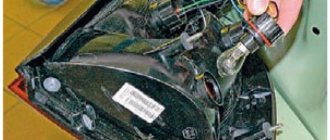
How to change the Kalina cigarette lighter lamp
The heating element itself has additional lighting around the socket. The backlight sometimes burns out when the fuse trips. Therefore, it is necessary to replace the cigarette lighter bulb on Kalina. The order of procedures begins in a similar way.
- Remove the contacts from the battery.
- We get to the fuse block, where we take out number F20.
- We unscrew all the screws holding the gearbox housing and lift it. It will be most convenient to put the box in 4th gear.
- We hook the device by the green filter and pull it out along with it.
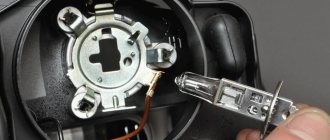
- Turn it clockwise to disconnect the clamps.
- We dismantle the metal base.
- We take out the plastic green case.
- We find a cartridge with a paw. We take it out and replace it with a new one.
- We assemble in reverse order.
The video will help you replace the Kalina lamp.
Mounting block Kalina
The relay and fuse mounting block is located to the left of the steering column on the instrument panel.
Before replacing relays or fuses, be sure to disconnect the negative terminal of the battery.
| Mounting block fuses | |
| Fuse designation (rated current. A) | Protected elements |
| F1(10) | Immobilizer, warning lights and arrow indicators of the instrument cluster, switch circuits and reverse lamps, turn signal circuits |
| F2 (30) | Power window circuits |
| F3 (10) | Alarm circuits |
| F4 (20) | Windshield Wiper, Rear Window Defogger Switch Circuit |
| F5 (25) | Heater motor, electric power steering control unit, windshield washer |
| F6 (20) | Sound signal |
| F7 (10) | LCD instrument cluster indicator, brake switch and lamps, interior lighting |
| F8 (20) | Rear window heating element |
| F9 (5) | Side light lamps in the right headlight and right headlight, glove box lighting lamp |
| F10 (5) | Side light lamps in the left block headlight and left lamp, outdoor lighting indicator in the instrument cluster, license plate lamps |
| F11 (7.5) | Rear fog lamp circuits |
| F12 (7.5) | Low beam lamp (right headlight), gear motor for right headlight corrector |
| F13 (7.5) | Low beam lamp (left headlight), gear motor for light corrector of the left headlight |
| F14 (10) | High beam lamp (right headlight), high beam indicator in the instrument cluster |
| F15 (10) | High beam lamp (left headlight) |
| F16, 17 (10) | Fog lamps (optional) |
| F18 (15) | Seat heating elements (optional) |
| F19 (10) | ABS electrical circuits (optional) |
| F20 (15) | Cigarette lighter heating element |
| F21(10) | Transmission reverse lock chain |
| F22 (15) | Security alarm control unit |
| F23 | Reserve |
| F24 | Reserve |
| F25 | Reserve |
| F26 (25) | ABS electrical circuits (optional) |
| F27 (5) | Spare |
| F28 (7.5) | Spare |
| F29 (10) | Spare |
| F30 (20) | Spare |
| F31(50) | Electric power steering |
| Mounting block relay | ||
| Designation | Name | Powered consumers |
| K1 (optional) | Headlight washer relay | Headlight washer motor |
| K2 | Power window relay | Power window motors |
| short circuit | Starter relay | Starter traction relay |
| K4 | Additional relay | Rear window defroster switch and relay coil, heater motor switch, windshield wiper and washer switch |
| K5 | Relay-breaker for direction indicators and hazard warning lights | Turn signal and hazard warning lamps |
| K6 | Windshield wiper relay | Windshield wiper motor |
| K7 | High beam headlight relay | High beam lamps for headlights |
| K8 | Horn relay | Sound signal |
| K9 (optional) | Fog light relay | Fog lamps |
| K10 | Heated rear window relay | Rear window heating element |
| K11 (optional) | Seat heating relay | Seat heating elements |
| K12 (reserve) | — | — |
Cigarette lighter repair
If the device on a Kalina car does not work, this is not always evidence of a breakdown of the part itself. Therefore, before replacing the cigarette lighter, it is necessary to check the most common locations of other faults. It is worth making sure that the appropriate fuse is intact or that there is constant contact with the ignition. These places should be checked before proceeding with replacement or full repair.
Frequent malfunctions
There are certain reasons why the Kalina device may not work. The most common of them.
- Burnt fuse. The block with it is located under the front panel. We are interested in the fuse element number F20.
- Broken filament.
- Triggered fuse protection against overheating and fire.
- Corroded contacts responsible for the terminals and ground connections.
Cigarette lighter splitter: types and connection
Sometimes it becomes necessary to connect 2-3 devices to the cigarette lighter, which cannot be done without a splitter, and, given the design features, it is not always possible to connect even a telephone charger normally. Well, since Lada Kalina does not provide other alternatives, it is better to use this one.
The most common type of splitter has 3 sockets plus one USB port. By connecting an inverter (converter of on-board current to 220 V), you can easily charge devices such as an e-reader, tablet computer or laptop on the road. The price of the device in question ranges from 170 to 300 rubles. Buying a power strip is much cheaper and easier than replacing a cigarette lighter.
You can, of course, connect the necessary devices to the ignition without touching the cigarette lighter. But here you cannot do without the hands and knowledge of an experienced auto electrician, and installation will take more time. There will be a lot of extra wires and additional fuses will be needed. However, some car owners consider this method more reliable for Lada Kalina.
It is, of course, better to use an inverter with direct wiring. But without it, a high-quality splitter will be enough. The only question is to find a really high-quality device. The splitters are structurally similar to any extension cords used in everyday life for sockets. But there are differences between different models, which do not always have a good effect on both their operation and the condition of the Lada Kalina’s electrics. Cigarette lighter socket splitters can be divided into three types:
- those in which the block with sockets is made in a single housing with a central plug;
- those in which the plug and socket are connected by a flexible connection;
- connected via a power cord.
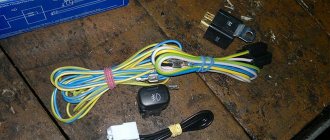
Installing an additional cigarette lighter (12 V) in Kalina
This is a convenient device. It is often used to connect various chargers for mobile gadgets or laptops. There are even splitters with USB connectors. Therefore, installing an additional cigarette lighter is a popular procedure. Already now there are devices on the market with a standard socket input, but with an output for several connections.
The cost of such devices for Kalina is 1 – 1.5 thousand rubles. When replacing, you need to remember that you do not need to overload the car’s wiring by connecting several devices at once - the fuse will blow under increased load. Some “craftsmen” solve the problem differently. A more powerful fuse is placed, but this is dangerous due to wiring burnout and fire. Therefore, everything should be done according to the instructions.
Components of the Lada electrical network.
The Lada Kalina vehicle has three working groups responsible for the safety of the wiring: installation, main and additional. It is customary to place fuses in a certain group. Group arrangement of devices allows for greater security of the on-board network. In the event of a malfunction of one of the devices, the rest of the on-board network continues to operate without interruption.
Important! Before carrying out work, it is necessary to turn off the battery power to avoid injury. During diagnostics, strictly follow the safety requirements when working with the vehicle’s on-board network. The mounting block is located near the steering column
On a Lada Kalina car, the mounting block is located on the left side of the dashboard. In order to correctly diagnose the unit, it is necessary to analyze in detail the diagram provided by the manufacturer. The block diagram allows you to determine the dependence of a specific on-board network device on a specific fuse. Having identified the fuse responsible for the correct operation of a particular device, it is necessary to begin diagnostics. If during the inspection it was revealed that the fuse is faulty, it should be replaced with a new one.
The mounting block is located near the steering column. On a Lada Kalina car, the mounting block is located on the left side of the dashboard. In order to correctly diagnose the unit, it is necessary to analyze in detail the diagram provided by the manufacturer. The block diagram allows you to determine the dependence of a specific on-board network device on a specific fuse. Having identified the fuse responsible for the correct operation of a particular device, it is necessary to begin diagnostics. If during the inspection it was revealed that the fuse is faulty, it should be replaced with a new one.
The installation group is the most important part of the power supply to vehicle consumers. Among the devices for the correct operation of which the mounting block is responsible are the following: power mirrors, light and sound alarm signals, windshield wipers, dimensions, fog lights, low and high beams, security system controller and electric power steering (if equipped) .
In the main group there are fuses responsible for the electronic control system of the internal combustion engine. The main fuse group diagram includes the following elements: test connector, fuses - main relay, electric fuel pump relay and ECU fuse.
An additional group is located in the Lada Kalina car under the dashboard. For ease of work, you can unscrew the fasteners of the block and dismantle it. The additional group circuit includes the following components: electric cooling fan relay, electric fuel pump relay, electric cooling fan safety element and main relay.
Faulty Lada Kalina relays require replacement just like other network components. Relays and network safety devices should only be replaced after the causes of the malfunction have been identified. When replacing, it is necessary to use elements recommended by the Lada Kalina manufacturer. Since each component of a safety electrical network is designed to carry an optimal amount of current, the use of a foreign element can lead to malfunction of the electrical appliance.
The power supply unit of the Lada Kalina has a fairly simple and understandable design. If you have the appropriate diagram, any car enthusiast can handle servicing the power system. Replacing block elements is a simple but very important procedure. After all, the successful operation of all electrical devices in the car directly depends on the safety of the fuses. Timely replacement of the unit elements will restore the operation of the device and restore the safety of the machine’s on-board network.
Happy fuse replacement!
No car owner is insured against problems with the electrical equipment of his car. At least once such a problem can arise for anyone, even the most attentive car owner. Most likely, it is associated with the failure of the fuses.
Replacement instructions
First you need to remove the instrument panel on the center console, then remove the lower part of the dashboard trim under the steering wheel. Now you need to unscrew the fuse box and turn it so that it takes a horizontal position. You need to stick your hand into the freed space until it comes into contact with the shelf on which the TsBKE is installed.
By unscrewing the fixing bolt, you can pull up the control unit and, after disconnecting the two electrical connectors, carefully pull it out. After dismantling the device, it is repaired or replaced with a new one. Installation of the device is carried out strictly in reverse order.
The introduction of modern technologies in the field of control of electronic equipment of a car makes the driver’s work easier, frees him from unnecessary loads and reduces the likelihood of road accidents. Along with the positive aspects of the implementation of CBKE, there are also a number of disadvantages associated with the unreliability of some nodes. Factory engineers are working hard on this problem. According to recent reviews from car enthusiasts, the number of malfunctions of the central unit of body electronics and the frequency of their occurrence are decreasing.
Mounting block in the engine compartment
A set of fuses is indicated for the “luxury” version. In other versions, individual fuses from this set may not be used.
| Fuse no. | Current strength | Protected Circuits |
| FF1 | 50A | Heated windshield |
| FF2 | 60A | Generator |
| FF3 | 60A | Generator |
| FF4 | 40A (without air conditioning - 30A) | Electric radiator cooling fan |
| FF5 | 50A | Electromechanical power steering |
| FF6 | 40A | Anti-lock brake control unit |
Fuses located in the fuse box of the engine compartment of a car with the ERA-GLONASS function (in a variant):
| # | Denomination | Protected circuit |
| FF1 | 60A | Generator |
| FF2 | 60A | Generator |
| FF3 | 30A | Electric radiator cooling fan |
| 40A | Electric radiator cooling fan (version with air conditioning or climate control) | |
| FF4 | 40A | Anti-Lock Brake Controller / Stability Control Controller |
| FF5 | 25A | Anti-Lock Brake Controller / Stability Control Controller |
| FF6 | 50A | Electric Power Steering Controller |
Attention! The relay and fuse diagram may differ depending on the configuration and production date of the vehicle. Current diagrams of the mounting block are presented in the operating manual for the date of manufacture of the vehicle (download from
site for a hatchback or station wagon).
Let us remind you that you will find other useful instructions in the section Repair and operation of Lada Kalina 2.
Keywords: mounting block Lada Kalina | Lada Kalina torpedo
14
5
Found an error? Select it and press Ctrl+Enter..
Other reasons and their solutions
A rare cause of cigarette lighter failure is the activation of the fire protection. In this case, the new fuse fails immediately after installation. This occurs when the button is accidentally held down for a long time when the driver is trying to get something from under the seat. In this case, you need to change the fusible element. When the fire protection is activated, the socket itself may fail. It needs to be taken out. After this, remove the nut from the supply terminal and remove the fusible jumper. The missing washer is made from lead-tin solder and the block is assembled.