Headlights
Replacing a headlight yourself will require preparation of the car and tools. To work you will need:
- set of wrenches;
- screwdrivers;
- rag;
- gloves to protect hands.
For ease of work, you need to wash Kalina in advance and clean the space in the garage. To replace the headlights, you need to remove the bumper and unscrew several mounting bolts.
Steps required to remove headlights:
- Open the hood lid.
- Disconnect the battery terminal.
- Pull out the clips from the front of the fender liner.
- Unscrew the radiator grille fasteners and remove it.
- Unclip all the clips along the contour of the bumper and unscrew the screws.
- Remove the bumper without scratching the corners of the fenders and headlights.
- Disconnect the optical power plug.
- Remove the two screws holding the light on top.
- Remove the lower headlight bolts.
- Carefully remove the part.
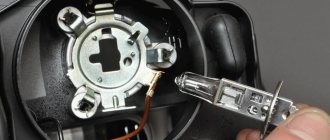
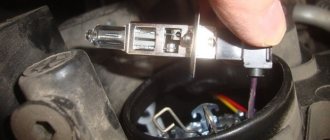
Before assembling and installing a new headlight, you should check the presence of light bulbs and their functionality. To do this, connect the flashlight to the connector and check all the functionality
When installing a new part, do not rush, it is important to be careful and not damage the case or glass
To disassemble the Kalina headlights, they will need to be dismantled. You can repair the Kalina headlight by polishing the glass, replacing it, washing the internal parts, or restoring the reflector.
To remove the glass you will need:
- Dismantle the part.
- Heat the headlights in the box using a hair dryer.
- Tear off the glass.
- Carry out all the required work and assemble the lantern using a special sealant.
To disassemble the headlight, it will take several hours, depending on the experience of the car owner. Replacing Kalina's headlight glasses will improve the exterior and increase light transmittance.
During operation, it is important to follow safety precautions, do not leave the hair dryer unattended and use gloves. Before installing the lights, wash the mounting points and mounting space
Installation is carried out in the following order:
Before installing the lights, you should wash the mounting points and mounting space. Installation is carried out in the following order:
- The power plug is connected.
- The Kalina headlight mounts are aligned and secured with standard bolts.
- The bumper is hung from the front and screwed onto self-tapping screws.
- The radiator grille is installed.
- The left and right fender liner clips are being returned.
In versions with fog lights, you will have to additionally connect the connectors to the lamps when installing the bumper and disconnect them during removal.
Fog lights
PTFs for Kalina are installed only on expensive trim levels. However, all wiring is installed from the factory and there are “ears” for mounting on the bumper. To install headlights, you will have to purchase a power button, frames in body color and a relay.
Installation of fog lights:
- Use a screwdriver to remove the plugs under the PTF.
- Screw the lights into the standard recesses.
- Snap frames to hide excess cavity.
Lada Kalina Cross uses matte black plugs that do not require painting. When installing on your own, you should buy bolts for fastening the headlight in advance.
How to connect the electrical part
Connecting the PTF to the standard wiring does not take much time. To search for the braid, you should inspect the area of the spar at the entrance of the main beam. The PTF plug is taped to the wires with electrical tape.
Fog lights Kalina 2 are often equipped with detailed instructions and an additional switch that must be installed instead of the old module to turn on the light. Connecting to pre-laid wiring does not take much time and does not require laying additional contacts.
If there are no power cables in the braid, you will have to independently pull the wires into the cabin, connect them to the connector, fog lights with plus and minus, and connect them through a relay. A detailed description of the connection is included with the part in the form of a diagram.
During the installation process you will need:
- insulating tape;
- copper wires;
- corrugation;
- connectors suitable for lamps.
When installing wiring, disconnect the battery and strictly follow the instructions.
Replacement of glass in the headlight unit of a Lada Kalina car (for Bosh headlights)
Lada Kalina hatchback red dragon logbook replacing the heater radiator without removing the panel and steering wheel
1. Remove the headlight unit from the car, see the operations described above2. Remove the six metal rivets that hold the glass in place. You can remove the rivets using a flat blade screwdriver.
3. Remove the glass.3. Install new glass on the headlight unit. (The seal between the glass and the headlight housing is sealed with a rubber seal. If the rubber has lost its plastic properties, use a sealant. Apply a thin layer to the place where the glass contacts the seal. Replace the glass, remove excess sealant.4 Install the metal clips in their places. Reinstall the headlight.
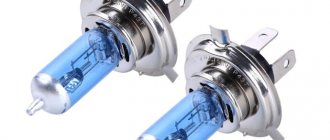
In head optics, low beam lamps most often have to be replaced. For a Lada Kalina car, the low beam lamp is a halogen lamp with an “H7” socket, the power of which is 55 watts (no more). Osram bulbs may come from the factory, but others will do. After replacement, the filament will occupy a new position, and the headlight adjustment may be lost. So, checking the settings, and, if necessary, adjusting the headlights is carried out immediately after replacing the lamps, which on the Lada Kalina is done without dismantling the headlight unit.
Lada Kalina (Bosch headlight) Smooth clear polycarbonate glass for headlight 1 pc
Smooth clear polycarbonate glass for headlight for Lada Kalina cars Bosch headlight
Full transparency and light transmittance - the level of transparency fully corresponds to glass. Weather resistant. Lightweight – almost twice as light as glass. Excellent strength (shockproof) qualities - the sheet is almost impossible to break. It is much stronger than glass.
Price for 1 piece.
If desired, DCR E22 can be hot-stamped on the inside of the glass for marking under the xenon lens. Marking costs 300 rubles/set
In our online store PTFR.RU we have smooth polycarbonate headlight glass for installing bi-xenon lenses for Lada cars
Installing smooth glass headlights can be done by a person who does not have special knowledge, skills and tools.
You only need smooth Lada polycarbonate headlight glasses, butyl rubber sealant, and a little time. The savings are obvious. In our online store PTFR.RU you can buy inexpensive left and right smooth glass headlights for Lada cars with delivery throughout Russia (cash on delivery). The catalog of headlight glasses for Lada is widely presented.
In our online store PTFR.RU we have smooth polycarbonate headlight glasses for installing bi-xenon lenses on most cars.
Using the smooth glass of a polycarbonate headlight, you can independently convert the headlight to xenon.
Recently, tuning the headlights of cars with your own hands has been popular to save money and give the car individuality. Installing a lens in the headlight instead of halogens improves road illumination and increases driving safety at night. You can buy lenses for xenon in our store PTFR.RU.
The procedure for replacing the front headlight glass is to remove the headlight from the vehicle, remove the old glass and, using butyl rubber (for the headlight) sealant, install the new headlight glass.
Examples of self-replacement of Lada front or fog lamp glass here
Our online store PTFR.RU has been operating since 2011.
From us you can purchase new glass for repairing front or fog lights of cars of recent years.
Warehouse location: Ryazan
Purchase methods:
- pickup from Ryazan
- delivery throughout Russia through couriers (DPD), a popular Transport Company (Business Lines, TK Energia)
- Russian Post (including cash on delivery)
- PickPoint pick-up points
Replacing PTF glass can be done by a person who does not have special knowledge, skills and tools.
- To replace the fog lamp glass, you need to find out how the PTF is attached to the bumper or to the car body? As a rule, the headlight is attached to the bumper with screws or nuts. The most convenient way is to partially or completely remove the bumper from the car. There is nothing complicated about this; to make the process easier, use the instructions for repairing your car.
- Then disconnect the PTF terminals from the on-board network.
- Inspect the removed fog lamp, determine the integrity of the reflective surface of the headlight.
- Remove old glass. This can be done simply by breaking the glass, then using pliers and a screwdriver, remove the remaining sealant and glass carefully without damaging the PTF housing. Attention! Use safety glasses and gloves!
- Degrease the PTF glass and headlight rim. For better adhesion, acetone, solvent or the like is necessary. degrease the PTF glass and the headlight rim where the adhesive-sealant is applied. Let dry.
- Apply a sufficient amount of adhesive-sealant to the dry, grease-free rim of the headlight so that the layer of sealant fills the entire space between the glass and the headlight housing; you can use any water-heat-resistant adhesive-sealant that meets the operating conditions of the PTF: temperature from -45°C to +150 °C
- Press the glass firmly against the headlight body (you can use a clamp for a better result) until the sealant is completely dry. That's the whole procedure for replacing PTF glass.
- Now install the light bulb, attach the PTF to the bumper, connect the terminals and put the bumper back in the reverse order.
Total four hours of dirty time and 450-500 rubles. for glass + glue.
Examples of PTF glass installation
More examples of installing glass on headlights in our VK group Our VKontakte Group
Photo reports on replacing the fog lamp glass:
Bi-xenon installation
How to remove a headlight on a Priora
With their own hands, car enthusiasts can install bilens into the lighting device. The first step will be to acquire the necessary elements
Attention should be paid only to those products that can easily fit into the cavity of the Kalina headlight. For example, if you buy a G-5 kit, you will have to cut the lenses. Work begins with dismantling and disassembling the headlight
Then, using a file, they cut the seat in the shape of a cone, due to which the lens will fit into the body by about a centimeter. It is necessary to remove the cap so that it does not block the flow of light, and then mount the lens in the prepared place. The element is secured using factory fasteners
Work begins with dismantling and disassembling the headlight. Then, using a file, they cut the seat in the shape of a cone, due to which the lens will fit into the body by about a centimeter. It is necessary to remove the cap so that it does not block the flow of light, and then mount the lens in the prepared place. The element is secured using factory fasteners.
Reasons and methods for replacing light elements on Kalina
Lada Kalina first generation: technical characteristics of the model. Lada Kalina station wagon weight
You may need to replace the headlight on a car of this model for a number of reasons. Impacts to the body from other drivers or animals, careless driving on uneven roads, rough repairs of parts under the hood can damage the integrity of the fasteners. Light elements become loose and can fall out at the most unsafe moment on the road. Headlights that do not fit well in the grooves must be replaced.
Replacement is a simple process if you approach it responsibly and without nerves. For an experienced master, this operation takes about 3 hours. But even if you have never encountered such a situation before, these instructions will help you replace the headlight without any problems.
The entire process of removing the Kalina headlight can be divided into 5 main stages:
- unscrewing the bolts from the crankcase protection;
- removing the license plate (will allow you to get to the lower radiator grille);
- removing the lower and upper radiator grilles;
- unscrewing the front bumper (you will have to remove a large number of bolts and screws);
- removing the bumper amplifier (it interferes with dismantling and putting back the headlight).
When the screws holding the headlight on top and bottom are unscrewed, you should remove its housing, first carefully clamping all the wires. During repairs, it is recommended to inspect the inside of the bumper and the metal underneath for signs of corrosion. If such formations exist, you need to clean them and coat them with a rust converter.
Removing the front bumper of the Lada Kalina
During the operation of the car, it is often necessary to remove the front bumper of the Lada Kalina for various purposes. This is done both at the service station and with your own hands. Only when working independently do you need to have the necessary plumbing tools and knowledge. After all, it is important not to leave damage to the car and to complete the job.
Why is it being removed?
The conversation about the need to replace the bumper comes up in a number of cases, not always directly related to this part. Sometimes for such manipulations it is enough that the spare part located next to it requires replacement or repair. The main reasons why removing the front bumper of the Lada Kalina, as well as replacing the bumper may be necessary:
- If it's time to restore this part of the car, update the decorative coating. After all, it is regularly exposed to external influences of varying degrees of aggressiveness. As a result, the paint loses its appearance, scratches, dents and other defects appear.
- If the front bumper needs to be replaced, then most often the reason is cracked carbon fiber, which is not impact resistant. This may be a consequence of a collision with a snowdrift with increased fragility due to weather conditions.
- Sometimes this part suffers greatly after accidents or other accidents.
- When you need to replace the headlight units, you also need to remove the bumper.
- If you need to install a front body kit, you will first have to dismantle the main part, tune it, or replace it with a ready-made improved version.
How do you remove headlights?
The lighting system in Kalina includes:
- glass or polycarbonate;
- frame;
- lamp plugs;
- the lamps themselves;
- reflectors;
- wiring;
- decorative inserts.
To replace and adjust the headlights, most often you have to remove the front bumper. Only after this all the screws from below, as well as from above, will become more accessible. Once they are dismantled, you can remove the headlight itself, having first removed all the wires and pads.
But not every car owner has enough experience to dismantle the entire bumper. In addition, a common problem is the lack of time to change the entire lighting system. That is why replacing lighting without complete dismantling is considered more popular.
To disassemble the headlight with your own hands, you need to prepare the following tools:
- one key for 8 and one for 10;
- Phillips and flathead screwdrivers;
- new lighting system component.
To modernize the lighting on Kalina, you need to take the following actions:
- Remove the air filter housing and the special coolant unit.
- Remove the PTF plug using a screwdriver.
- Using a 10mm wrench, unscrew the bolt located underneath the headlight.
- Remove the bolts located on top of the light blocks. They are located near the radiator. In this case, you need to use the key 8.
- Remove the screw that secures the light to the car's fender using a large Phillips screwdriver.
- Rotate the light block so as to move the part near the radiator a little closer to the car engine. This will allow you to remove the fasteners located below from their seats.
- Remove the lower iron fasteners. To do this, you need to unscrew several bolts with a short head.
- Remove the headlight by pulling it towards you. Try not to damage the varnish layer, because the lamp is located next to the wing and bumper.
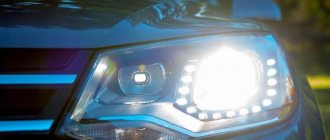
Many car owners have thought about the design and design of the Lada Kalina headlights. In fact, the design features of this element are quite simple. Since 2004, Kalina has been equipped with monoblock headlights.
Video about replacing headlight glass on a Lada Kalina. In the process, the headlight is completely disassembled:
Headlight unit installed on a car
Like most new generation cars, VAZ 1117-1119 models are equipped with headlights of a simple design. Let's look at what elements are included in this node:
- Outer glass that protects the light bulbs and prevents water and dirt from getting inside.
- A plastic case to which all the main elements are attached.
- The rubber seal between the glass and the body provides good water and dirt resistance.
- Lamps for signaling turns, as well as low and high beam.
- There is a plastic reflector installed inside the case, which has a mirror surface and reflects the light of the bulbs.
Each headlight unit is equipped with light bulbs, which are well, one might say tightly, fixed in the housing, which ensures their resistance to vibration.
Headlight diagram with explanation
Tuning options
In order to change the appearance of optical instruments, they are tuned. The following types of interventions are considered the most common:
Installation of LEDs. In order to get rid of the unpleasant yellow color of headlights, LEDs are used
It is extremely important not to reverse the polarity, as this will blow the fuse. Connecting new lamps depends on their type
In some cases, it is necessary to tear the base off the diode and move its antennae towards the holes. Headlight tinting. This can be done in two common ways. The first one is to use black tint film. Just one layer of this material is enough. Black spray paint is also used. In order to create a really good tint effect, you will need to apply several layers. In some cases, the color used is not black, but a shade that is directly similar to the car body. After such tuning, the visibility of the road surface at night deteriorates. Cilia. A special film is used for this. Oracal 970 is most often used. This material is publicly available, so it can be purchased not only in highly specialized stores, but also in many others. Eyelashes can be either rectangular or curved. First, make a stencil out of cardboard and try it on the body of the car. After this, you can cut the elements directly from the film. In order to stick them on later, a soap solution or special products are used.
Tuning of optical devices of Lada Granta is done both with your own hands and at a service station. Additionally, you can install bi-xenon or other types of headlights on your car that differ from the standard ones. No special skills are required to install the lens. It is enough just to correctly remove the optics without damaging its elements.
Grant's optical devices differ significantly from many other vehicle headlights of this brand. This applies to the design itself, the lamps used and many other features. That is why it is necessary to understand not only how to operate these devices, but also what possible malfunctions may occur with them. In this case, the use of flashlights will be correct, long-lasting and safe.
Granta and Kalina headlights are considered non-separable. If a crack appears on the glass, the headlight unit is replaced as an assembly. However, with a strong desire, it is still possible to disassemble it. Let's look at how to remove the glass and headlight mask with your own hands. The process is shown using the example of a Lada Granta headlight. On the Lada Kalina 2 headlight, all actions are performed in the same way.
Required
: remove the headlight, prepare a Dremel (disc diameter 20 mm), sharp knife.
Headlight glass mounting diagram:
The sealant that holds the original headlight glass in place is heat resistant. That is, you won’t be able to loosen its “grip” by heating it with a hairdryer or in the oven. In addition, there are four fastening brackets on the edge:
How to replace headlight glass
:
- Seal the glass with masking tape to prevent damage during work.
- We cut off about 7 mm of the U-shaped fastening (using a Dremel), and then remove the remaining sealant (photo No. 1).
- We cut off about 2 mm of the sealant between the glass and the plastic using a Dremel (photo No. 2, color green).
- We remove the remaining sealant using an L-shaped blade (you can bend an ordinary knife after heating), photo No. 3.
When reassembling, we use a transparent glass sealant (for example, ABRO).
What it looks like in practice:
The process is also shown in the video:
How to remove a mask from a headlight
:
- The inner mask is attached using a spring mechanism, which is connected to a hydraulic corrector.
- The outer mask is held in place by 4 Torx screws.
Now it becomes possible to install powerful LED or flexible DRLs. Have you ever had to disassemble the headlights on a Grant or Kalina yourself? How did you manage to do this?
Types of PTF for Kalina
The automotive industry offers a wide range of fog lights. They are selected for a specific make and model of car. According to the form of PTF for the Lada Kalina car there are:
- oval;
- round;
- square;
- double;
- recessed.
Different types of PTF fog lights differ not only in manufacturer, but also in configuration, technical parameters, and quality of manufacturing of optics. On average, fog lights cost 1,500 rubles. As for manufacturers, it is important to install the following headlights for the Lada Kalina:
- ProSport. A Chinese brand that produces parts and components for cars on the Russian market;
- "Ray". Manufacturer of spare parts similar to German ones, but the quality of the product is an order of magnitude lower than that of the original;
- "Kirzhach". High-quality lens-shaped headlights with convex glass with a good level of brightness and range of light;
- Bosch. PTFs with the highest technological parameters have flat glass and excellent quality.
Fog lights Bosch, Hella
So, all of the above headlights produce fog lights suitable for the Lada Kalina car. The standard fog lights are equipped with an H11 socket. During their installation, no special fastening or other manipulations are required. Having removed the old PTFs, following a simple algorithm of actions, you should install new headlights. For example, Hella headlights, which, by the way, are an excellent option for additional car lighting.
Replacing glass with Kirzhach headlights, teaser) — Lada Kalina Sport, 1.6 l., 2012 on DRIVE2
“Why?” - you ask, “yes, because I have a Kirzhach headlight, which you can’t disassemble without mats and besides, you won’t find glass! Yes, yes, for the viburnum with Kirzhach headlights there is officially no such part as glass, only a replacement assembly !There was no such spare part in the stores, only at the car market there was a set of glass for 2800! Horror in one word.
I also bought a set of headlight bases, of excellent quality, for which special thanks to Igor for an excellent donor from Viburnum.
PS There are changes in hardware ahead, it will be fun) Don’t switch! (c)
Thank you for your attention!
www.drive2.ru
How to remove the headlight on Kalina 2: adjusting, tuning and replacing the low beam lamp
Checking and adjusting the headlights, replacing the low beam lamp on the Lada Kalina-2
In head optics, low beam lamps most often have to be replaced. For a Lada Kalina car, the low beam lamp is a halogen lamp with an “H7” socket, the power of which is 55 watts (no more). Osram bulbs may come from the factory, but others will do. After replacement, the filament will occupy a new position, and the headlight adjustment may be lost. So, checking the settings, and, if necessary, adjusting the headlights is carried out immediately after replacing the lamps, which on the Lada Kalina is done without dismantling the headlight unit.
Step-by-step replacement instructions
Each H7 standard bulb has an iron base, which is pressed to the headlamp with a wire clamp. To bend this bracket, just get close to the plane of the headlight from behind. Let's open the hood and see what exactly will bother us.
Behind the headlight on the right is a washer reservoir. It is dismantled like this: disconnect the electric motor terminals, tighten the plug harder, find one nut and one fastening bolt. The fastening elements are unscrewed with a 10mm wrench, then the tank is placed on the engine. Next we could look at how to remove the headlight on Kalina-2, but in this case this is not required.
Before performing any manipulations with electrical equipment, always disconnect the negative terminal of the battery. It is better to connect this terminal last (before closing the hood). Be careful.
Replacement sequence:
- Remove the rubber cover covering the low beam lamp compartment;
- Disconnect both terminals from the lamp contacts;
- The fastening bracket is removed from the grooves by first pressing on it, then the bracket is moved to the side;
- They take out the lamp, install a new one in its place, and return the bracket to its place.
Next, perform steps “2” and “1” in reverse order. The connection diagram is not important - there are only two contacts, and both go to the filament. Now, if we connected LEDs. then everything would look more complicated.
When installing a halogen light source, you must remember: the surface of the lamp glass must be perfectly clean. Do not allow grease marks to remain on the flask. Installation is carried out using only cotton gloves. The glass of the flask is cleaned with industrial alcohol or Secunda.
Adjusting the headlight beam
Correctly adjusting headlights can only be done in a service station. However, let's look at how this operation is performed by experienced craftsmen.
There are two adjustment screws on the back wall of the unit called the headlight unit. The first of them, located closer to the radiator, allows you to deflect the light beam “up and down”, and the “horizontal” direction is adjusted with the second screw. Ideally, this should happen: when the car is 5 meters from the screen, the border of the light spot touches line “2” (see figure). Line “1” is spaced from the ground at a distance equal to the height of the centers of the headlights. The second line is drawn 65 mm lower.
When making adjustments, the corrector switch is moved to position “0”. Of course, you only need to turn on the low beam. We also note that the headlights are adjusted one by one (the “excess” light source is covered with a cloth).
Here are a couple more tips that will be useful:
- The centers of the beams should be on lines AE, BE;
- Line “0” has the following meaning: it intersects with line “1” at one point, so the border of the spot should pass exactly through this point;
- The caps of the plastic adjustment screws are compatible with a hex screwdriver. However, a Phillips screwdriver will also work.
So, we have fully examined how to adjust the headlights on Kalina-2. Of course, replacing lamps with subsequent adjustment is a less labor-intensive operation than connecting a radio. However, accuracy is important here. And the special equipment used to perform the settings is only available at service stations.
Question and answer: what should not be allowed under any circumstances
Q: What happens if you buy lamps with a base other than “H7”?
A: It will not be possible to install lamps in a standard headlight.
Q: If I use more than 55 watts of power, will this cause overheating?
A: Excessive power leads to the fact that the fuse in the low beam lamp circuit burns out. A separate fuse is used for each of the lamps, so it will not be possible to “deceive” the automation.
Q: Are halogens afraid of power surges?
A: For incandescent lamps, excess voltage is a harmful factor. In the case of using halogen lamps, there will be two harmful factors: overheating, underheating. Actually, this is why MTBF can be considered a relative rather than an absolute value. This value depends, and depends strongly, on the stability of the voltage.
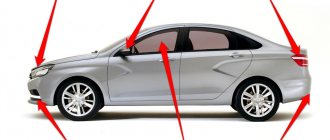
How to replace the front or rear bumper on Kalina?
The times when the bumper was only the external enclosing structure of the car are long gone. For today's Lada Kalina and its later modifications, this is rather part of the appearance - an aesthetic decoration. On the other hand, when Kalina-2 appeared after Kalina-1, many owners decided to remove the front bumper and drove “as if” the second Kalina.
- 1 In what cases should the bumper be replaced?
- 2 Replacing the front bumper of a VAZ
- 3 How to install the rear bumper
In what cases should the bumper be replaced?
Only the owner of the car can decide whether to replace the bumper. The reasons for this step are as follows:
- at some point the car hit the road barrier;
- the car was in an accident;
- the owner had a desire to stand out or do some tuning.
Lada Kalina is running, but the front bumper and headlight require replacement
Changing the part itself is not so difficult; you need to be patient, time and a set of tools. And it’s also worth purchasing a new bumper in advance or agreeing with a car repair shop where they will repair your old one.
Replacing the front bumper of a VAZ
To remove the VAZ bumper you will need tools that are available to every driver.
Photo gallery: tools for dismantling work
Flat screwdriver for removing screws Phillips screwdriver for removing screws Head wrench “10” for removing bolts
Before you begin dismantling the part, you need to familiarize yourself in detail with the design features of your car.
Owners of the Lada-Kalina Sport may encounter the fact that when tuning, installing a new bumper on the car will not be easy, since it is difficult to fit in its regular place. When removing the bumper in the cold, difficulties may arise due to some fastening features.
There is only one thing that can be advised to the owners of such cars: carry out repair work with the participation of an experienced auto mechanic or driver who has already carried out a similar procedure on this model.
How to remove a damaged part
To dismantle the broken bumper of the Lada Kalina Sedan, you need to adhere to the following algorithm:
- They open the hood, find bolts on the upper edge of the front grille and, being careful not to damage the paint and plastic, unscrew them. Sliding it up, remove the grill and put it aside.
- Under the grille on the bumper there are a pair of screws and two bolts.
You need to unscrew them all. Green arrows indicate the mounting locations for the upper grille, blue arrows indicate the mounting locations for the bumper. - The next step is to remove the lower part of the grille under the bumper.
To do this, also unscrew a pair of screws holding it in place. Hole for the self-tapping screw holding the lower grille of the Lada Kalina - Having removed this grille, unscrew the two bolts behind it.
They are located on the lower part of the body, behind those bolts that were just removed. They are also carefully unscrewed. The bolts holding the front bumper of the Lada Kalina are usually hidden by the lower grille - Under the lower part of the body, the bumper is secured with three more bolts, which are easy to feel by hand.
They are also removed. On the left side is one of three screws that need to be removed before removing the bumper - Since the front part of the bumper is no longer held in place, they move to any of the front wheels.
- The sides of the bumper are fixed with three self-tapping screws, a couple of which are located in the wheel arches, and one secures the fender liner.
The screws connect the bumper to the body, so they also need to be unscrewedFor ease of dismantling, turn the steering wheel to the side.
Bottom bumper: this screw also needs to be unscrewed
- Crouching in front of the car, lightly “pry” the bumper with your hands along the edges and pull it towards you.
The blue arrows indicate the installation locations of the mounting bolts on the front bumper of the Lada Kalina. - If all fasteners are removed, the bumper can be easily separated from the body.
The result of all the actions described above is that the bumper from the Lada-Kalina has been successfully removed - Installation of the new bumper is carried out in the reverse order, carefully tightening the bolts and screws. Then the license plate is transferred to its regular place.
- Three bolts are located at the bottom, under the rear of the bumper. Since they can become acidic, moisten them with WD40. One of the bolts is located next to the exhaust pipe, a couple of others are slightly to the right.
- Unscrew all the bolts securing the sides of the bumper to the car body.
Several bolts on each side are easily accessible from the wheel arches. Unscrew the bolts inside the wheel arches of the car to remove the rear bumper - After bending the trunk cover, remove 4 more screws.
The four bolts under the Kalina trunk lid are also removed - Now unscrew the previously wetted bolts under the rear of the body.
On the left is the car exhaust pipe: the screw next to it has already been removed - Next, remove the bumper from the latches. To do this, grab the end on the right side of the car and easily pull it towards you. As a result, the bumper should slightly separate from the car.
If you release the latch, the bumper moves slightly away from the car bodyThe latch on the left side is also detachable, but since the bumper is not attached to anything else, you need to be ready to catch it if it suddenly starts to fall.
How to install the rear bumper
When replacing a part, you need to keep in mind that in the case of a Station Wagon, you first need to unscrew 3 bolts from the lower fastening of the bumper to the car body, and when working with a Lada-Kalina Hatchback, you need to start by removing two bolts and a pair of screws. Further operations are performed in the same way on both models.
Required Tools
To the above set of tools necessary for dismantling the front bumper, add WD40 - a technical aerosol for protecting and lubricating metal surfaces.
Removing a part from a Lada Kalina Station Wagon
A step-by-step algorithm for dismantling the part is given below:
We will not dwell in detail on the removal of amplifiers. Each of them is attached to three bolts, which are clearly visible: one in the center, a pair at the edges. Unscrewing them is quite easy.
: how to disassemble the rear bumper of a Lada Kalina
To replace the rear bumper of the car, you must perform the steps described above in reverse order. The entire procedure will take you from one and a half to two hours.
Replacing bumpers on a Lada Kalina, as well as on later VAZ models, is within the capabilities of an ordinary car enthusiast. Any motorist will have the minimum set of tools required to remove and attach bumpers, and the process itself will take several hours if you have the necessary tools.
Source: https://masakra.ru/111-kak-snyat-i-zamenit-peredniy-i-zadniy-bamper-na-lada-kalina.html
Rules for adjusting light
After installing the headlight, you need to adjust the luminous flux. You can do this yourself or by contacting a specialist. When making adjustments yourself, you should direct the light from the headlight to the wall with the markings. There should be 5 meters between the car and the wall.
We measure the distance from the ground to the car headlight (H), draw a vertical line on the wall parallel to the center of the car, then draw a horizontal line equal to the height H+10 cm. Set the Kalina headlight adjustment switch to position 0 and turn on the lamps. Using the adjustment screws, we adjust the luminous flux as shown in the figure.
Replacing a headlight on a Kalina with a little skill and patience is a simple process, although it takes several hours. Basic recommendations: put screws and bolts in one place to prevent their loss, check the functionality of the lamps before assembly, do not be nervous.
Operations for removing the headlight unit Lada Kalina
1. Disconnect the “-” wire from the battery.2. Remove the front bumper from the car, see the article “Removing the front bumper on a Lada Kalina car.” If you do not remove the bumper, it will not allow you to remove the headlight from the car.3. Under the bumper there are two screws securing it, unscrew them.
4. Also unscrew the bolt and screw of the upper headlight mountings.
5. Disconnect the connectors of the electrical wiring harness suitable for the headlight unit and the turn signal on it.6. Now you can remove the headlight from the car.
7. Install the headlight unit on a Lada Kalina car in the reverse order. To ensure uniform clearances between the headlight unit and the fender, loosen the fastening bracket nut.
Technological process of removing headlights on Grant
Many car owners are wondering: how to remove the headlight of a Lada Grant? Easier than it seems. To begin with, you will need two keys from the tool - 8 and 10. And now you can go directly to the process itself:
- To begin with, we remove the “negative terminal” from the battery so as not to accidentally short-circuit anything.
- We are dismantling the front bumper, since it is impossible to get to the lower mount otherwise.
We removed the bumper and took out the headlight (I ran a little ahead)
It is worth remembering that when the lower mounts are removed, the optics should be held so that the upper “ears” do not crack under load when dismantling occurs.
Replacing low beam lamps
First you need to prepare for high-quality work. Prepare a new lamp (one or two as needed), the necessary tools (keys, screwdrivers, pliers), gloves (preferably cotton), a clean cloth and a bottle of alcohol.
Before you begin replacing the low beam lamp in a Kalina car, you must do the following. Firstly, it is advisable to place the car on a flat surface, turn on the parking brake, and for safety reasons, put blocks under the wheels of the car to prevent it from rolling. Next, open the hood of the car. After this, you should disconnect the wire from the negative terminal of the battery so that the wiring does not short circuit. To replace the lamp in the right headlight unit, you must remove the washer reservoir.
You can replace the low beam lamp after the entire optical unit of the headlight has been removed from the car, but we will look at how to replace the halogen lamp without removing the lighting fixture from the car body.
Procedure for removing the low beam lamp
- By pulling one of the petals of the rubber plug, remove it from the low beam headlight;
- We remember, or better yet, write down the correct location of the wires suitable for the halogen lamp, disconnect them;
- Carefully remove the spring clip holding the lamp. Press on the protruding part of the latch and disengage it; To avoid having to completely disassemble the headlight, the latch should be handled gently so that it does not jump out of the mount due to a sudden movement and does not fall inside the optical device.
- Pull out the burnt out lamp.
Installing a new halogen lamp
It is advisable to carry out the process of installing a new halogen lamp with gloves, since contact of the glass bulb with the skin of the fingers will subsequently cause the lamp to darken and fail. If the glass surface of the lamp does come into contact with your skin, wipe it with a swab soaked in alcohol.
Lamp installation procedure
- By inserting a lamp into the headlight hole? make sure that the protrusion of the lamp fits into the grooved recess of the mounting socket, this way the lamp is secured against turning;
- Carefully install the lamp mounting clip into place. We take into account that the antennae of the latch lie near the center of the base, where the contact group is located.
- Hold the lamp fixing clamp until it snaps into place;
- We connect the wires, install a protective rubber cap, connect the battery and check the correct operation of the lighting fixtures.
Video help on replacing low beams
https://youtube.com/watch?v=z1IyX4njizY
Replacing a damaged low beam lamp on a Lada Kalina car is easy to do. Follow the instructions carefully, and you will make sure that the occurrence of such a breakdown will no longer cause you panic or indignation. And having spare bulbs in your car will make your trips pleasant and safe at any time of the day.
Replacing head lamps
Each lamp has its own resource, the value of which depends on many factors. Over time, devices break down and require replacement. And then the question arises: how to disassemble the headlight?
Dimensions Kalina
Fog lights Kalina
Wiper size for Kalina
The replacement procedure is simple, but before that you need to choose the right lighting devices from the mass of products offered on today's market. Although sometimes all you need is to replace the headlight glass.
So, if the headlights are purchased, then we change:
- Remove the protective cover from the headlight housing. It's rubber, so it's easy to pull off if you pull on one of the three tags.
- Disconnect the power connector.
- Release the spring clip.
- How to remove the headlight? We take out the lamp and install a new element in its place.
Attention! When replacing a halogen lamp, avoid touching the bulb with your hands. This may damage the device. Over time, greasy fingerprints will cause the glass to darken, causing the lamp to overheat and eventually burn out.
- If contact occurs, it is necessary to wipe the surface of the flask with a cloth moistened with alcohol.
- Changing side lamps
- We also remove the cover and disconnect the corresponding cartridge from the on-board network.
- We remove the lamp and install a new one in its place.
Maintenance and replacement of the rear light
To replace the lamps in the rear light of Kalina 2 station wagon and hatchback, you need to remove the entire headlight unit. To do this you need:
- Unclip the plug next to the seat belt bolt.
- Unscrew the nut.
- Open the seal window and unscrew the remaining fasteners.
- Pull out the flashlight.
- The lamps are pulled out by turning the base counterclockwise.
When replacing lamps in a hatchback body, carefully remove the nuts so that they do not roll under the trim. The missing part will rattle while driving and you will end up having to disassemble the entire luggage compartment.
The Kalina sedan has special compartments in soft upholstery for access to the nuts. There is no need to remove additional plugs.
To keep your car in excellent condition, you need to periodically replace lamps, clean optics, or install new ones. Removing front, rear headlights and foglights in Kalina does not require expensive tools or special knowledge.
Tools:
- Medium Phillips screwdriver
- Small flat screwdriver
- Driver for socket attachment
- 8mm wrench attachment
Parts and consumables:
- Turn signal lamp
- Low beam lamp H7
- Side light bulb W5W
- High beam lamp H1
- Headlight glass
- Rags
- Alcohol
Note:
The operation is shown on the right headlight unit. The work of replacing lamps and removing the left headlight unit is similar. You can replace the lamps without removing the headlight from the car.
1. Disconnect the wire terminal from the negative terminal of the battery.
2. For clarity, the work is shown with the headlight removed. Turn the turn signal socket counterclockwise 45°.
3. Remove the cartridge from the headlight housing.
4. Pressing the lamp, turn it counterclockwise all the way and remove it from the socket. We install the new turn signal lamp in the reverse order.
5. To replace the low beam lamp, pull off the protective rubber cover from the headlight housing. By pulling one of its three petals, we disconnect the wire tips from the lamp terminals.
6. We remove the spring clamp from engagement with the two hooks and move it away from the lamp.
7. Remove the lamp from the headlight housing.
Warning:
High and low beam lamps are halogen. Do not touch their glass bulbs with your fingers, as traces from them will cause the lamp to darken when heated.
You can remove dirt from the flask with a clean rag soaked in alcohol.
8. Install the new low beam lamp (H7) in the reverse order.
9. To replace the side light lamp in the headlight unit, remove another protective rubber cover in the same way as the cover for the low beam lamp and remove the socket with the lamp.
10. Remove the lamp from the socket. Install the new side light bulb (W5W) in the reverse order.
11. To replace the high beam lamp, disconnect the wire block from the lamp.
12. Squeezing the ends of the spring clamp, remove them from engagement with the hooks and remove the clamp from the lamp.
13. Remove the lamp from the headlight housing. Install the new high beam lamp (H1) in the reverse order.
14. To remove the headlight, press the latches. We disconnect the wire blocks from the connector on the headlight housing and the turn signal lamp socket (shown by the arrow).
15. Remove the front bumper. Using a Phillips screwdriver, unscrew the screw for the top fastening of the headlamp, and use a wrench or a 8-mm socket to unscrew three more bolts for fastening the headlamp (shown by arrows) and remove it.
16. On the housing of the right headlight unit there is a marking “RE”; on the body of the left headlight unit there is a marking “LE”.
17. Install the headlight in the reverse order. If you need to replace the headlight glass, use a screwdriver to pry up and remove the six spring brackets that press the lens to the headlight seal.
18. Remove the headlight glass. Remove the glass seal.
19. Install the headlight glass in the reverse order.
The article is missing:
High-quality photos of repairs
The procedure for dismantling the lights
You should know that the Lada Kalina 1118 flashlight system consists of:
- housings;
- glass (polycarbonate);
- lamps;
- reflector;
- wiring;
- lamp plugs;
- decorative inserts (masks).
As for the ease of removal and subsequent replacement of the lamp on the 1118 model, the process usually involves removing the front bumper. After this, the screws on the top and bottom of the lighting fasteners become accessible. After dismantling them, you can immediately remove the headlight unit, not forgetting to first remove the blocks with wires.
Removing the front optics
However, not all car enthusiasts have a lot of time to replace the lighting system or experience in removing the bumper. For this reason, a more popular method is to change the Kalina headlight without removing the bumper.
To do this you will need to use:
- key for 8 and 10;
- a set of screwdrivers (flat and Phillips);
- new lighting system component.
Set of tools
In order to adjust the block lighting on the Lada. You will need to complete the following steps:
- Remove the air filter housing, as well as the coolant unit.
- Remove the PTF plug using a screwdriver.
- Unscrew the bolt on the lower fastener of the lighting component using a 10mm wrench. Insert your hand into the PTF hole.
- Remove the bolts located on the upper fastener of the light block component. They are located closer to the radiator. Use the key at 8.
- Unscrew the screw securing the product to the car fender using a large Phillips screwdriver.
- Expand the Lada Kalina headlamp so as to move the part closest to the radiator closer to the car engine. This measure will allow you to remove the lower fasteners from the seat.
- Remove the lower iron fasteners of the headlight. To do this, you will need to remove a couple of bolts with a short head.
Removing the headlight on Kalina
Remove the car light by moving towards you. At the same time, try not to damage the paint layer, since during dismantling the lamp will be located as close as possible to the bumper and fender.
After this, you can install a similar device in reverse order.
How to remove the front bumper of a LADA yourself
During the operation of the LADA Kalina, situations may arise when it is necessary to remove or replace the front bumper of the car. This is a simple operation that can be performed on your own without contacting service station specialists. You don't need to have any special skills to do this. It is enough to have a basic set of locksmith tools and know the location of the bumper mounting points on a specific car model in order to quickly and without damage remove the front bumper of the LADA Kalina.
Why do they remove the LADA Kalina bumper?
- While driving, and even in an open parking lot, parts of the car are exposed to constant physical and chemical attack. Therefore, the decorative paintwork of the bumper loses its attractive appearance and requires restoration, which is carried out by removing the bumper.
- The tough and brittle carbon fiber of the bumper can crack even during a minor accident and require repairs. This is especially true in winter, when at low temperatures carbon fiber becomes especially fragile and can burst even with relatively light contact with a snowdrift. Restoring the paintwork and soldering the bumper material requires dismantling this part from the car.
- If the LADA “Kalina” bumper is severely damaged, it needs to be replaced with a new one, which also requires dismantling the old part.
- You have to remove the bumper to replace the Kalina headlight units.
- Tuning a car's front body kit usually requires dismantling the bumper in order to modify it, paint it, or replace it with a finished tuned product.
How to choose a front bumper for LADA “Kalina”
If you do not take into account tuning parts, there are two types of standard front bumpers for Kalina on sale: painted and unpainted. The first ones must be carefully selected by color so that they do not differ from neighboring body elements. The paintwork changes color slightly as a result of exposure to the sun, so selection by catalog number is not always effective and it is better to choose the appropriate color “on the spot.” Unpainted bumpers are suitable when painting adjacent parts of the car (fenders, hood) is required, for example, after an accident. When purchasing a new bumper, you should pay attention to the following points:
- the paintwork of the part should not have chips or cracks (they especially often appear near the fasteners);
- the plastic of the bumper must be elastic, because excessive rigidity causes cracks even with mild impacts, for example, on snow or sand;
- when purchasing a tuned bumper, you should make sure that it has holes for fog lights;
- There must be stiffening ribs inside the bumper, otherwise it may “lead” and lose its original shape.
What is needed to remove the front bumper of LADA “Kalina”
It is better to carry out work on dismantling the bumper in the inspection hole, because part of the fastenings for this part are located at the bottom of the car. If there is no hole or lift, the job will not be impossible, but you will have to unscrew some nuts by feel or lie on the ground to see the attachment points. It is better to remove and install the bumper with an assistant who can hold one side while you unscrew the fastenings of the other. If you perform the operation yourself, you may not be able to hold the part, which as a result will fall and be damaged.
To remove the front bumper of LADA “Kalina” you need:
- crosshead screwdriver;
- socket or socket wrench 10;
- extension;
- wrench (preferably with a ratchet, which will make the work much easier).
Currently, two generations of Kalina have been produced, differing in the way the bumper is mounted. Accordingly, the procedure for removing this part is slightly different.
Advice: before removing the bumper from the Kalina (regardless of the modification), you should remove the ground from the battery to avoid a short circuit when disconnecting electrical appliances.
How to remove the front bumper of LADA “Kalina”-1
To remove the bumper from the first generation Kalina, you should perform the following steps:
- open the hood;
- unscrew the three screws securing the plastic radiator grille;
- remove the radiator grill;
- unscrew the two screws of the lower grille and remove it;
- disconnect the PTF connectors;
- unscrew the two screws securing the bumper located behind the grille;
- move into the inspection hole and from it unscrew the three central lower bolts securing the front bumper;
- Unscrew two pairs of lower screws located on the sides of the front bumper (attachments to the body kit and fender liners);
- unscrew two pairs of screws that are located in the front parts of the wheel arches;
- carefully pry and unclip the plastic latches holding the bumper to the body;
- carefully move the front bumper forward, releasing the latches from the clutch with the body, and remove it from the car (this operation is best done together with an assistant).
About the design and purpose of headlights
In Lada Kalina 2, the headlights are endowed with their own design features. Each headlight unit contains three sections that perform the following functions:
- road lighting in low beam mode;
- the same, only in long-range mode;
- dimensions lighting;
- direction indicators.
Headlights must be adjusted correctly, otherwise they can cause not only the driver, but also other traffic participants a lot of inconvenience. Correctly adjusted optics will allow you to confidently illuminate the side of the road and will not dazzle oncoming drivers.
By activating a special switch in the interior of the Lada Kalina 2, the driver turns on the low beam mode. If the same handle is switched to the high beam mode, then in parallel with the switching on of the corresponding lamps, the lighting devices responsible for the low beam also remain active.
The turn signal lamps have bright orange bulbs, and the section housings have transparent lenses.
In Lada Kalina, the headlight units are equipped with electromechanical drives, which makes it easy to adjust the light beam depending on the load on the body and the road situation. A special regulator is located on the panel in the cabin, and the drive mechanism is in the headlight.
When assembling the Lada Kalina body, the manufacturer uses headlights from such well-known manufacturers as Bosch and Avtosvet. To find out which brand produced the headlight for a particular car, you should carefully examine the body of this optics. The “AL” symbol will indicate that the headlight was produced in “Bosch” (Russia). This brand uses material such as polycarbonate. This headlight model does not use a cap that would be visible above the low beam bulb.
Avtosvet products are also made of polycarbonate, but the design already includes the specified cap.
Having disassembled the headlight, the owner of the Lada Kalina can discover the presence of many parts and other elements in it, including:
- wiring;
- lamps and reflectors;
- glass;
- fastening brackets and plugs;
- drive mechanism, etc.
Thanks to the active work of the manufacturer's engineering corps, the headlight design is constantly being improved. This is how neon headlights appeared in the Lada Kalina arsenal. Although their light transmittance is slightly lower compared to standard options, however, during testing, this modification of optics demonstrated enviable results.
Next, we will tell you how to remove the headlight and replace it.
↑ Features of tuning headlights and optics on Lada Vesta
A large test drive of the new VAZ model, numerous auto news, and reviews showed that the car is equipped with quite high-quality optics that illuminate the road well in poor visibility conditions (darkness, bad weather conditions). However, reviews from Lada Vesta owners often indicate that the car has good, but not excellent, optics. Firstly, halogen lamps do not shine as brightly as similar LED lamps, and secondly, they have a much shorter service life. Thirdly, maintenance of such optics is more expensive. In this regard, many drivers replace the standard optics unit with a modernized one.
As a result of replacing the headlight unit with an improved one, the low beam (as well as the high beam) becomes brighter and the light spot becomes clearer. The Lada's LED rear lights become more visible in the dark and in poor visibility conditions. In some cases, car enthusiasts tint the glass of their rear lights black. Despite this, the turn indicators, side lights, and brake light are still clearly visible when switched on.
Interesting! After replacing the optics, as a result of comparing Lada Vesta models with standard equipment and with improved headlights, it was found that the model with updated headlights looks more stylish and modern.
You can replace the standard headlight unit with an improved spare part yourself. To do this, you will need to study the corresponding photo and video instructions that tell you how to properly replace or modify the headlights on a Lada Vesta.
How do Kalina lighting devices work?
Regardless of the type, the headlights on Kalina have the same design. Each lamp has three sections for lamps with different light levels:
- further;
- near;
- dimensional (also rotating).
To activate the low beam, you need your own lamps, and when switching to high beam, both units work at once with a power of 55 W. To make the light wave stronger, manufacturers use special diffusers, transparent in the center in each section. The block of side lights and direction indicators differs in color (orange) and power - the bulbs produce only 20 W.
In order to adjust the light, it is necessary to use a corrector on an electromechanical drive. To use it, you will have to completely disassemble the headlight. The corrector is a device on the instrument panel associated with an electromechanical drive. Due to this, the wires of the light source are connected.
Parsing headlight Kalina 1
How it all started: I decided one month ago, namely on June 26, to reseal the housings and, at the same time, paint the headlight masks - the reason for which was the constantly fogging up left glass.
Well, actually, I quickly took everything off, I thought I’d take it apart right away, paint it and assemble it the next day. (Yeah, yeah)
Turning the headlight in my hands, I saw the screws on the body, unscrewing which, I thought that the glass would come off (naive little guy), the screws turned out to be difficult, but torx, so I bought a screwdriver with a set of bits to disassemble the headlight.
After 3 screws on each headlight were removed, to my regret, the glass did not want to give up, after reading the Kalino forums, I made sure that, in my case, the headlight was not removable (Kirzhach with polycarbonate glass). After listening to a lot of advice about how the headlight should be “ bake" in the oven - it was sent there for 10 minutes at 180 degrees.
From that moment on, the most interesting thing began... I regretted 10 times that I took on this idea.
After the headlight had warmed up, I pulled it out and, I thought, well, that’s it, now I’ll work with a screwdriver for 5 minutes and the glass will separate... Here I was very wrong. Having started this work at 10 pm, I disassembled the headlight only at 4 am... I heated it in the oven once 10, as a result, the entire rim is deformed, because the sealant did not soften, only the plastic (I pricked the glass with great effort until the plastic hardened and went back into the oven), but even worse, the headlight mount melted... well, what can you do.
On this note, I went to bed at dawn and the next weekend I was disassembling the second headlight, I decided to just pry it off with a screwdriver first, without resorting to the oven. To my great surprise, the sealant was not pressed against the headlight body at all, naturally the glass snapped off instantly - it was the left headlight, which I disassembled in 5 minutes, unlike the first one (I spent 6 hours fiddling with it).
What conclusions did I draw at this stage?
: 1.
Never, ever undertake to disassemble a Kirzhach headlight on a viburnum (it’s easier to throw it away and buy new ones) , but since you are as desperate as I am, then God help you. 2. The reason for the fogging of the left headlight is a defect from the factory (the sealant was not pressed in)
, and the car was like that for four years with a whiny little eye... 3.
Heating the headlight in the oven is a very bad idea - the sealant on this headlight, like rubber, does not respond to temperature at all
(it is necessary solder or saw the outer edge to separate the glass, and then build it up again)
The next stage was painting the headlight masks, well, there’s nothing to tell here, just appreciate the abundance for creativity (by the way, there is material here not only for the headlights - keep an eye on the bulletin board) I painted it with heat-resistant KUDO in two layers, without primer, having previously removed the chrome using Pemolux and brushes and degreasing the surface.
Then I bought a hot air gun, I thought I would assemble the headlights (I first straightened the edges on the deformed headlight with it), because it was no longer possible to ride such a tramp for more than a week
BUT, remembering how hard it took me to disassemble the headlights
,HERE I WENT PSYCHANIC!
This idea actually delayed the assembly time for another 3 weeks.
I just didn’t expect that the viburnum headlight was so tight... This lens is universal (it is screwed with a nut through the adapter into the reflector) and fits even into the 2113 headlight without any modifications.
The headlight is a source of directional lighting on the Lada 1118. It is installed in front of the car, illuminating the road surface and the surrounding area. Due to the huge range of lighting systems to choose from, the elements of which can be installed on the Kalina, lights are often the subject of replacement or modification. To replace the Kalina headlight unit, it is worth first considering its structure. On this model, the car manufacturer installs 2 headlights equipped with 3 sections:
- low beam;
- side and main beam;
- turn signals.
Block headlight of Lada Kalina
When you turn on the low beam, only the low beam lights come on, and when you turn on the high beam on the 1118 model, the low and high beam complex with a power of 55 W each starts to burn. The sections of the front indicators have transparent light diffusers. The 21 W turning lights have an orange glow.
To be able to adjust the headlights on the Lada 1118, the package includes a headlight leveler with an electromechanical drive. The adjustment system has a device that is installed on the dashboard, as well as a connection wire and electric drives pre-installed in the lights.
The plant where Kalina is produced provides for installed lights from two manufacturers:
- Bosch;
- Avtosvet CJSC (Kirzhach).
Lighting system design
Optics for Kalina are manufactured at two factories:
Both types of optics have excellent characteristics and provide high-quality illumination of the road. You can recognize Bosch products by the missing cap on the lamp in the near module, as well as by the AL code on the glass.
The headlight design of the Lada Kalina is no different from most cars. The flashlight has low and high beam modules, blocks with turn signals and side lights. In the new Kalina body, the dimensions also play the role of running lights.
The following lamps are used in Kalina optics:
- low – H7, 55W;
- long range – H1, 55W;
- direction indicators – PY21W, 21W;
- Dimensions – W5W, 5W.
Light elements from the dimensions fit into the license plate lighting module on the trunk lid. Since 2013, modernized optics have been installed in Kalina, where part W21/5W is responsible for the clearance and daytime light. The fog lamps are equipped with H11 lamps with a power of 55W.
Which optics is better to choose
While using the machine, the lights are subject to sudden temperature changes, impacts from stones and small grains of sand. These factors negatively affect glass, reducing its transparency, worsening light characteristics.
High-quality headlights that meet safety requirements are installed from the factory. Unofficial replacements are equipped with xenon lenses, “angel eyes” and modified reflector geometry. These lights look beautiful, but wear out faster due to poor quality materials and can fog up in humid weather.
When choosing new optics, it is better to trust the official ones. When purchasing, it is important to clarify the modification of the body and the year of manufacture of Kalina. Depending on the configuration, there are darkened masks or improved lighting characteristics.
Low and high beam optics
Depending on the body type, Kalina has different parts installed:
- sedan, hatchback – standard optics;
- sport, station wagon - are equipped with a more elongated reflector with an increased area to increase the lighting area by 20%.
To connect improved optics to Kalina, you do not need to lay additional wires or change contact connectors. The optics are no different in mounting points and shape.
When purchasing flashlights, you should pay attention to original parts with improved performance. This will improve the characteristics of the beam without interfering with the wiring or altering the standard fasteners.
Replacing the High Beam Bulb Kalina
How to replace a low beam lamp on a Lada Kalina
During the daytime, every car owner relies on daylight, vision and reaction. But with the coming of darkness everything changes
Particular care should be taken at this time, as tragedies often occur due to negligence when visibility is poor. To prevent this, the headlights must be in good working order
If they don't work, no movement can be made. Even if you want, it won't work as the visibility will be zero
So, it is very important to make sure that the light is flawless and shines brightly
How to replace the low beam lamp Kalina hatchback, sedan, truck
Change is not easy. You do not need to have special knowledge or abilities. Even an inexperienced motorist can cope with this task. The only thing is to act one by one and correctly. So, replacing a lamp consists of the following steps:
- First you need to open the hood.
- Then turn off the power by disconnecting the battery terminal.
- The washer reservoir should also be removed for convenience.
- Then the rubber cover is removed.
- Later, the light bulb must be removed by squeezing the retainer with your fingers.
- Then he pulled out the bulb and the terminal turned off.
This ends the procedure
It is very important to understand how the lamp was installed and what wires were connected to it
Abstract of replacing light bulbs High beam
Right H1 headlights on viburnum
2, on the left farcolb far away.
Replacing the H1 high beam lamp from VAZ. Lada Kalina 2
replacement
lamp closed World
H7.
Lada Kalina
.
Otherwise, you will not be able to connect the new headlight correctly, which will require you to contact a specialist. If you feel that you cannot do this job, it is best to immediately take the machine to a technical service where all the procedures will be carried out for you. Of course, you have to pay for this, but the result will be maximum.
Install new: sequential instruction
The procedure for removing and installing a headlight on the right or left side is not much different from each other
It is only important to strictly follow the instructions. When installing a new light bulb, you should only hold it as a base; You can't touch it with your hands
Once removed, it can be removed completely.
Please note that the Lada Kalina (16-valve engine) requires a bulb with an H7 socket. Install the new one as follows:
- Adjust the seat so that the protrusion on the base aligns with the groove on the headlight. This needs to be firmly fixed. Only then will it become clear that the protrusion has fallen into the groove;
- press the clamp onto the lamp so that the center of the base is between the antenna antennas;
- lock the latch in place;
- Attach both wires to the latch and close the lid tightly.
After completing this procedure, you need to turn on the headlights from a close distance and check their operation. If everything is fine, then the installation was completed correctly. Otherwise, you will have to take your car to a service center and pay money for it. Lamps should only be purchased in specialized stores. It is advisable to give preference to well-known manufacturers and models with a guarantee. Osram H7 12V 55W headlights for Lada Kalina Cross are very popular today.
Poor quality headlights should not be stored or purchased as they will not work for long and will require frequent adjustments or replacement
It is important to understand that not only your safety, but also the safety of the pedestrian depends on these light bulbs. It is especially important that the lighting is of good quality at night to avoid tragic consequences
There is a special offer on our website. You can get a free consultation with our corporate lawyer by simply submitting your question in the form below.
Conclusion
Of course, you can replace lamps or perform other operations on a lighting fixture without removing the bumper, but this will require additional time and skill. Also, when carrying out such a procedure, without removing the device from the car, it is necessary to disconnect the battery.
If you decide to dismantle the headlight, then its installation should be carried out in the complete reverse order. Also, do not forget to apply sealant before seating the device in the socket. Before leaving, be sure to check its functionality. If everything works perfectly, then your Lada Kalina is ready for use, and will delight you during night trips.