01/26/2022 6,373 Light and sound devices
Author: Ivan Baranov
Fog lamps (PTF) help the driver to control the car in conditions of limited visibility. The article discusses the types of PTFs, gives recommendations on which lamps are best to choose, and also includes instructions on how to replace a light bulb in a fog lamp.
[Hide]
Types of lamps for PTF
Fog lights not only perform their direct functions, but also help correct deficiencies in the headlights, and also illuminate the side of the road at night. Thanks to the low location of the PTFs, they illuminate the road efficiently without scattering the light.
Halogen lights are usually installed in standard optics. There are drivers who are not satisfied with them, in which case it is necessary to replace the fog lamp with an alternative option. It is important to know which light bulb is better.
There are three types of lamps:
- halogen;
- LED;
- gas-discharge.
Before replacing PTFs, you should decide on their type. When choosing which lamps are best to install in fog lights, you need to find out the pros and cons of each type.
Halogen
Fog lights typically use halogen products. They are more affordable, shine quite effectively in foggy conditions, and do not blind oncoming drivers.
The disadvantages include:
- short service life;
- difficulty of replacement;
- the headlight gets very hot.
When replacing standard light bulbs with more powerful ones, the power supply may burn out and the headlights will automatically turn off.
Philips halogen lamps
LED
The LED version is very popular for fog lights. In this case, it is possible to choose color and brightness. In addition, diodes consume significantly less energy.
The disadvantage is the high cost. High-power LEDs require additional cooling.
LEDs for PTF
Gas discharge
Xenon used in PTFs makes them bright and efficient. Service life is three years. But the use of gas-discharge elements has limitations. Xenon can only be installed on optics marked with the letter “D”, and an automatic corrector must be installed. The disadvantage is the high cost and the need to replace both bulbs if only one burns out.
Fog lights with xenon for cars
Installation of fog lights in the bumper
Installing fog lights will not take much time. For accuracy, you need to take measurements and mark the locations of the headlight mounts.
For installation you need to follow the steps:
- Wash the bumper from dirt.
- Attach the fog lamp to the installation site and make marks for the frames.
- Remove the mounting frame from the headlight.
- Drill holes at the mounting location.
- Install the frame using self-tapping screws or bolts that are included in the kit.
- Screw the headlight to the frame.
- Install a switch in the cabin.
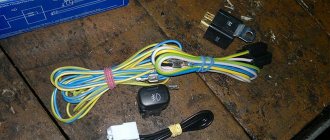
- Carry out wiring using one of the suggested methods.
- Carefully hide the cables in the corrugation and secure them to the main harness using plastic ties.
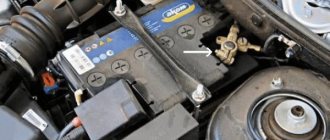
All electrical work is performed with the battery terminals disconnected. After installing the headlights, you need to adjust the angle of the light so as not to blind oncoming drivers.
To install standard parts in factory locations, you need to remove the plugs and screw the bolts into special ebbs. In some cases, cars have all the necessary wiring for quick connection.
Which ones are better?
Typically, standard optics have halogen elements; replacing them with the same ones, but more powerful, makes no sense. It is better to install LED lamps in fog lights; a good option is to replace the fog lamp with xenon (author of the video - Learning to drive a car. All the secrets for beginners.).
LEDs can be installed in PTF without restrictions, unlike xenon. Replacing a light bulb in a fog lamp does not require special equipment or specific knowledge, so you can replace it yourself. It is better to buy products from trusted brands, since cheap Chinese samples are often of poor quality and quickly fail.
When purchasing LEDs, you need to select a lamp with a base similar to the halogen counterpart. An important parameter for fog lights is brightness, measured in Lumens (Lm). Fog lights with xenon must have a brightness of at least 1000 lm.
Differences in car headlight designs, self-adjustment capabilities
In most domestic cars and budget foreign cars, the head light is distributed evenly along the road surface; such lighting is called symmetrical.
To a driver on a dark, straight road, a properly adjusted light looks like two identical, evenly illuminated spots of light starting a meter from the front bumper (for low beam) or an arched “light tunnel” for high beam. Correctly setting the low beam is characterized by a sharp boundary between the light cone and the shadow.
Without affecting expensive cars with adaptive (turning) headlights, the lighting systems of many European brands are built on the principle of asymmetric lighting.
For asymmetric lighting, specially designed reflectors and lensed glass are used. In some models, cutouts in the lamp screen and separate low and high beam headlights are used to bend the low beam light to the right.
The driver can independently identify the incorrect luminous flux by illuminating a dark vertical surface from different distances. A light cone pointing to the left requires immediate adjustment. Evenly raised or lowered lights are less dangerous for oncoming cars, but do not illuminate the road well for the driver.
Lamp replacement guide
It is more convenient to change light bulbs in PTF on a lift or inspection pit. To do this, you need to purchase either the same light bulb as the one you had, or one that matches the parameters. Changing a light bulb is easy.
To do this, follow the following sequence of actions:
- To remove the optics, you need to unscrew the mounting bolts.
- First you need to move the rubber protection to get to the PTF power supply block.
- Then you should disconnect the block from the optics.
- To remove the light bulb, you need to gently press one end of the latch and slide it down.
- The light bulb is removed along with the base. The halogen lamp has several contacts that should be remembered in order to correctly install the new one.
- Next, you need to install the new product so that all contacts match. If you make a mistake, the fog lamp will not light.
- Assembly is carried out in reverse order.
- After assembly, you need to check the operation of the optics.
Replacing fog lights on other car brands depends on their design features. There are cars on which the fog lights are located together with the head light, in which case a slight disassembly of the optics will be required. An example would be the Lada Kalina.
Loading …
How to replace a light bulb in a Kia Rio-3 fog light
Your car's fog lights improve visibility of the road surface and provide safer driving in foggy or rainy conditions. Given our climate, fog lights are used most of the year. Therefore, if one of the light bulbs is burnt out, do not delay replacing it . The safety of you and other road users depends on this.
Fog lights are installed below the level of the front headlights, which allows them to illuminate the road surface with the least fog density. Also, unlike low beam (the rays are reflected from drops of moisture at the driver’s eye level and create a white opaque veil), the PTF light extends below the driver’s eye level and also has a horizontal plane, which allows, in poor visibility conditions, to illuminate not only the space in front of the car , but also to the sides. At the same time, the PTF light does not blind drivers of oncoming cars.
Replacing a light bulb in the PTF Kia Rio-3
To replace the bulb in the fog lights in the Kia Rio-3, you do not need to go to a service station; you can do everything yourself . The procedure is no more complicated than replacing the bulbs in the headlights. However, for convenient access to the reverse side of the PTF, it is necessary to perform the replacement on an overpass or pit.
The Kia Rio-3 PTF uses halogen bulbs marked - H8 35W. Experts do not recommend installing higher power bulbs, because... This may lead to malfunctions in the vehicle's electrical equipment. To put it simply, fuses or wiring may burn out, and this creates the preconditions for a fire.
Tip: light bulbs should be replaced in pairs, because... The color of the light from the new bulb will be brighter than the old one. In addition, the light bulbs have the same resource, so there is a high probability that after the first lamp, the second one will burn out in the near future.
The procedure for replacing a light bulb in the PTF Kia Rio-3
- Place the car on an overpass and provide easy access to the lower part of the front bumper.
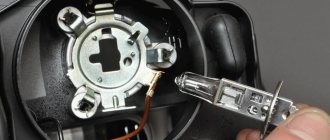
- Access to the rear of the fog lamp is blocked by the front part of the fender liner, so use a Phillips screwdriver to unscrew the two mounting screws .
- Bend the fender liner.
- Insert your hand into the opened hatch and disconnect the block with the power supply wire ; to do this, squeeze the side latches.
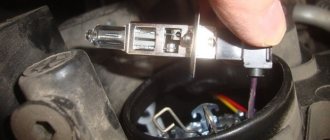
- Take out the light bulb.
- Replace the old light bulb with a new one , and install it in place, doing all the steps in reverse order.
- Proceed to replacing the light bulb in the second PTF of the Kia Rio-3.
What kind of service is this?
Most drivers have basic skills in replacing some parts of their car, but replacing a fog light bulb is often not on that list. Indeed, it would seem to be the simplest operation, because at home we usually change a burnt-out light bulb ourselves. But the problem is that in some car models you have to do a little fiddling to change the fog light bulb. And since this procedure is not performed so often, especially with high-quality optics, the skills are forgotten. And when it requires replacing a reverse lamp and replacing brake light lamps, it is not recommended to drive onto the roadway.
A small educational program
Many drivers underestimate the benefits of fog lights. Although this optics has proven itself well not only in foggy conditions. In rainy weather and snowfall, when conventional headlights are of no use, and sometimes visibility becomes even worse, fog lights can save the situation. Many drivers know how blinding the bright white headlights of oncoming cars are, practically invisible through the veil of rain, snow or fog. The yellow light of the fog lights, directed downwards, under the veil of fog, on the contrary, makes the road surface and part of the shoulder more noticeable.
How to replace a light bulb in a fog light?
Most often, fog lights (FTL) are built into the “body” of the bumper and form one whole unit with it. Therefore, in order to replace a regular light bulb, you sometimes have to unscrew and remove the entire front bumper. This procedure begins by unscrewing the screws on which the bumper is mounted. Then, opening the hood, disconnect the power wires leading from the lamps. Then the fog lights are removed and replaced.
This operation is usually performed if there is physical damage to the entire headlight or if it is impossible to open the headlight housing with a regular screwdriver (in the case of a solidly soldered housing). It is best to heat such a housing from the back to slightly melt it and be able to remove the cover and replace the light bulb. Of course, the tightness will be slightly lost, but there is no other way out if the operation needs to be performed urgently. If the housing is ordinary, then replacing the fog light bulb is easier, using a regular screwdriver. Having opened the case, the light bulb is unscrewed, and a new one is screwed in its place, after which the case is closed.
If replacing a light bulb in a fog light is still not one of your favorite activities, then by ordering an on-site service from our technician, you will receive excellent service in a short period of time and at the most affordable price.
Mitsubishi Lancer X replacement bi-xenon lenses with Devil Eyes backlight
- Replacing lenses in non-original headlights with original Hella Classic D2S
- Installation of Denso ignition units
- Setting the lens backlight to red
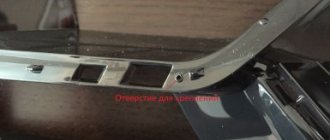
To remove the headlights, there is no need to remove the entire bumper, just unscrew one bolt under each wing, then remove the plastic clips holding the plastic trim under the hood, then unscrew the bolts holding the bumper on top
You can disconnect the glass after heating the headlight to about 80 degrees
The old lens's mounts are almost identical to the new one, so it can be installed without modifications
Before installing the lens, red LEDs were placed inside, with a forced shutdown when the low beam was turned on
The ignition unit does not fit this headlight; the housing had to be modified.
Mandatory check of the functionality and correct settings of the lenses on the machine before assembly.
After the work is completed, nothing indicates that these headlights have been tampered with.
But the difference in light is significant. Old Chinese ignition units did not light the lamps. In addition, the light distribution was not correct, but now everything is as it should be.