01/25/2022 6,176 timing belt
Author: Victor
The performance of the gas distribution mechanism is important for the proper functioning of a car engine. Thanks to the timing belt, the operation of the crankshaft and camshaft is synchronized. To ensure that its working condition is not compromised, it is necessary to monitor the integrity of all its components. From this material you can find out which timing belt is best for a Priora with 16 cl. motor and how to change it yourself.
[Hide]
Installing the timing belt Lada Priora
Lada Priora is a Russian car that is popular among experienced motorists due to its advanced design. Good acceleration capabilities and powerful engine. Another advantage is the low cost of this vehicle. According to the car manual, we will take a step-by-step look at the timing marks (timing belt). Which is located on the engine with 16 valves.
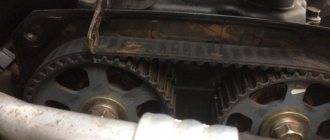
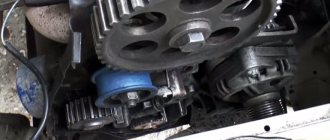
The tension roller guides the belt
However, experts advise changing the belt after driving 50,000 - 60,000 km. It is possible to carry out such a replacement yourself, in your garage. But don't forget about the marks on the shafts. If the instructions are followed, this procedure will be quite accessible to the amateur motorist.
When is it necessary to replace the timing belt on a Priora according to the regulations?
The mechanism requires constant attention to itself. The regulations for checking and replacing the timing belt of a Priora car with engine 21126 (16 valves) indicate regular condition checks every 10 - 15 thousand km. If you find any defects or damage to the structural integrity of the rubber part, replace it immediately.
Every 50 - 60 thousand mileage, it is necessary to change the spare part, regardless of its condition. Compliance with the regulations will help to avoid a number of extremely negative consequences that, in the most terrible scenarios, lead to almost a major overhaul of the car’s piston engine.
Signs of a Worn Belt
Signs of a worn belt are:
- the appearance of fabric base fibers on its surface;
- hardening, determined by the pronounced shine of the belt;
- loss of elasticity;
- drive extension is greater than permissible;
- cracks and peeling.
Belt wear can also be determined by:
- due to difficulty starting the engine;
- by extraneous noise in the engine;
- overheating
- by changing the color of exhaust gases.
By knowing the characteristic signs of wear on the timing drive and replacing it in a timely manner, Lada Granta owners will be able to protect themselves from engine failure. And when buying a belt, give preference to original spare parts from well-established manufacturers.
Necessary tool
From the tools we will need: a standard set of keys, hexagons for 5 and 6, a set of heads and a special key for the Priora tension roller, it is slightly different in size from the usual one (the pins that are inserted into the roller are thinner), the price is 100 rubles. But also the Gates timing kit itself. Gates belts are, in my opinion, some of the best timing belts out there.
The procedure for replacing the timing belt on a Priora takes approximately two hours with a lunch break.
Survey
Determine the best timing kit, belt or pulley
We will do it by voting. Leave feedback in the comments, in which you can indicate:
- Which timing belt and rollers did you choose and why?
- How often do you change the rollers and timing belt?
Where can I buy?
These and other original parts are presented at low prices in our online store:
We previously told you when to change the timing belt and rollers according to the manufacturer's regulations, as well as how to do it yourself.
Source
How to choose a belt for Priora?
In order for the gas distribution mechanism to work reliably on the 16-valve Lada Priora 21126 engine with or without air conditioning, you must choose the right product. You can purchase a factory version; according to owners’ reviews, it is considered the best for VAZ cars. Below we will analyze the types of timing belts by size, markings and prices.
Timing belt size for Priora
For Lada Priora cars, the length and overall size of the strap depends on the number of teeth installed on it. You can accurately determine which timing belt is installed in your car by identifying the engine modification and reading the user's service manual. Or you can remove the old belt and measure its size to purchase a new one.
Straps that can be used in Prioras:
- with 111 teeth, the width of such products is 19 mm, installed on Prior engines from VAZ 2108;
- with 137 teeth, the width of such straps is 22 mm, they are mounted on engines 21126 and have article number 137-22 HNBR.
Company and prices
The brand of the company plays an important role. When deciding which timing belt for Priora 16 cl. It’s better to choose, most consumers prefer the originals.
Below is a list of timing belts for the VAZ Priora with their cost:
- The original strap is produced by AvtoVAZ, its average cost is about 1800 rubles.
- The product is from the manufacturer Gates, the cost varies around 1,500 rubles. If you want to buy a complete repair kit, it will cost the buyer approximately 3,500 rubles.
- Daiko, the cost of such a product is about 1,400 rubles.
- On average, a Kontitek belt will cost the buyer one thousand rubles.
- Products from the manufacturer Bosch have proven themselves to be positive. Their cost on average is about 1200 rubles.
- One of the most budget options is the Lynx strap; it will cost the buyer approximately 700 rubles.
The “techno-056” channel provided a video that describes all the differences between original Gates timing belts and fakes.
Tests and tests
Experts from the Za Rulem magazine tested 36 drive belts - 6 copies of each from six different brands. The test results refer to specific product samples and do not allow us to judge the entire range of products of each item.
- Continental, Germany. Approximate price 850 ₽. There can be no complaints about a belt that has stood for 400 hours on the stand and could continue to work. In our tests, only two products were able to demonstrate this.
- Gates, UK. Approximate price 1150 ₽. 400 hours on the bench are sufficient grounds for unequivocal approval.
- Trialli, China. Approximate price 700 ₽. 286 hours is, let’s say, a strong middle peasant, which, unlike the leaders, nevertheless became toothless, although it lasted quite a long time, exceeding the requirements of the technical specifications. At the same time, strength tests have shown that some belt parameters are even better than those of the champions.
- Gates (fake with reference to Germany). Approximate price 350 ₽. Which is what needed to be proven: “You, priest, should not chase after cheapness.” After just 3 hours of life tests, the belt lost its “teeth”: a complete failure. Checking individual parameters confidently placed the product in last place: such belts cannot be installed!
- Lynx, Japan. Approximate price 650 ₽. During endurance tests, the belt lasted 104 hours, after which some of the teeth were cut off. In general, not so little, but the leaders worked four times longer and were not injured! The remaining parameters are not failures, but overall we are looking at an mediocre product.
- Balakovorezinotekhnika (BRT), Russian Federation. Approximate price 750 ₽. Just 1 hour on the stand instead of the champion 400 - what can I say? Alas, the teeth came off the cord almost immediately. It feels like the belts are made of raw rubber. Note that after drying, the cutting force of the tooth more than doubled - and this turned out to be the best result. But the breaking forces are low, and according to the results of bench tests - the penultimate place.
Weak links on the Priora: roller, belt, pump
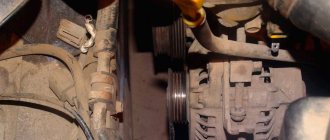
Full operation of the timing mechanism is ensured thanks to the drive tension design. Two shafts regulating the operation of the valves require an additional support roller, taking into account the increase in the length of the drive. The roller, turning on an axis, regulates the proper belt tension. And the supporting roller fixes the direction of the belt.
The tension roller guides the belt
These parts can grind down, creating play during movement and unnecessary noise. The pump may jam when the engine is running. In this case, the consequences of such work may be cut teeth. Loss of seal in this design can result in unnecessary loss of coolant. To change the pump, the camshaft pulleys and the back of the casing are removed.
At the same time, the protection mounts and the generator support roller mounts are removed. After removing the casing, the bolts of the pump itself are unscrewed. To avoid additional faults in the future.
It is necessary to replace the timing belt with teeth at the same time as the rollers and pump.
Features of self-checking the serviceability of the timing belt on Priora
If you are thinking about the need to replace a rubber product on a Priora, then it won’t hurt to initially check the belt drive. The inspection will reveal signs of wear and the presence of places where the product is deformed. To carry out the check, you will need to use a hex wrench set to “5” or a T-30 star-shaped bit (depending on the year of manufacture of the Priora).
The procedure for checking the belt drive is as follows:
- Use a hexagon to unscrew 5 mounting bolts, with which the front upper timing drive cover is secured.
Removing the timing cover - Place the jack on the passenger side, suspend the wheel, and then engage 5th gear. While rotating the wheel, carefully inspect the integrity of the rubber product.
- The presence of cracks, cuts, peeling and signs of thread appearance indicates the need for replacement. If traces of a coolant leak are visible in the pump area, then the rubber product must also be replaced.
- The tension roller is inspected. Its service life is 90-100 thousand km, so it is recommended to change it every other time when changing a rubber product.
- Belt deflection measurement. To do this, you need to press on the product with a force of 10 kg. The degree of deflection is measured between the gears of the two camshafts. The permissible degree of deflection is 5-7 mm.
- Belt stretch is checked by checking the alignment of the marks. One mark 1 in the form of a recess is located on the outer race of the tensioner roller. The second mark 2 has the form of a tooth-shaped recess located on the base of the tensioner roller. The permissible deviation from mark mismatch is 3-4 mm.
Marks on the tensioner pulley
This is interesting! The timing belt for the VAZ-2170 on the outer rim has the following information: engine type (21126 or 21127), number of teeth - 137, as well as marking with a product width of 22 mm.
How often should I change
In the service manual, the manufacturer indicated that the service life of the product is 200 thousand kilometers. However, there have been cases where the product needed to be replaced after 20 thousand km or even earlier. Practice shows how many kilometers a factory strap can actually withstand: on average, this figure ranges from 120-150 thousand km.
User Ivan Bolutov spoke about the choice of original timing belts for the Lada Priora.
We recommend that you familiarize yourself with the signs that indicate the need to change the product:
- the appearance of traces of motor fluid on the structure of the strap, the consumable material quickly destroys the structure of the product;
- the presence of defects and other types of damage on the strap, cracks quickly destroy the product;
- belt loosening;
- stretching of the product, in such conditions the service life of the strap is reduced.
How to properly replace a timing belt
To prevent the drive belt from breaking and repairs, it is necessary to promptly replace and tighten the product. Work on replacing and adjusting tension should only be carried out on a cold engine.
Tools
What you will need to complete the task:
- set of wrenches;
- a device for installing and adjusting the tensioner, can be purchased at a car store;
- ruler or construction tape;
- two screwdrivers - with a flat blade and a Phillips blade;
- set of star keys;
- clean rags.
Channel In Sandro's garage, I made a video showing the procedure for replacing the timing belt on a 16-valve Priora engine.
Instructions with pictures
Below is a detailed description with photos of how to install a new belt and correctly align it with the marks:
- Using a star wrench, remove the five bolts that secure the upper timing cover. Dismantle it.
- Turn the engine crankshaft clockwise until marks 1, which are located on the camshaft toothed disks, are aligned with marks 2 located on the rear cover of the unit drive. If, as a result of the above actions, the pulleys continue to rotate, do everything again, but now the crankshaft must be turned two turns. To align the marks, the screw securing the tensioner pulley must be turned using a 15 mm wrench. It is advisable to maintain a tension torque of 20-25 Nm, but this cannot be done without a torque tool. Set the crankshaft and camshaft to the top dead center position of the compression stroke of the first cylinder.
- To check the position of the crankshaft, remove the rubberized plug from the top of the clutch housing. It will be more convenient to disconnect the cooling system pipes, and also disconnect the connector with wires from the refrigerant temperature controller. Make sure that the mark on the flywheel is located in front of the notch installed on the clutch housing cover. To prevent the crankshaft from turning when unscrewing the screws securing the accessory drive shaft, you will need the help of a friend. The assistant needs to sit behind the wheel and engage fifth gear while holding the brake pedal. At this time, use a 17mm socket to remove the screw securing the drive pulley. Dismantle this unit.
- Remove the washer. To ensure that the further assembly procedure does not cause difficulties, we recommend fixing the camshaft pulleys relative to each other; this will require a wooden wedge. It must be carefully, effortlessly driven between the teeth of the shafts. The wedge itself should be placed along the grain of the wood.
- Using a 15mm wrench, loosen the screw securing the tensioner. As a result of these actions, the roller will rotate, which will weaken the tensioner.
- Remove the worn belt from the camshafts. Remove the product from the coolant pump pulleys as well as the crankshaft. Remove the strap from the engine compartment. Remember that after dismantling the product, it is not allowed to rotate the crankshaft and camshaft over long distances, otherwise this will lead to contact of the valves with the pistons, as a result of which the former may bend.
- When changing the strap, the support and tension roller of the product are also replaced. To do this, unscrew the screw securing the device and remove it with the thrust washer. Using a 15 mm wrench, unscrew the bolts that secure the support element; it is removed from the seat with a screw and washer. Assess the operating condition of the pumping device. There should be no traces of refrigerant leakage on the mechanism body. If the pump is working, then its shaft rotates freely and without any extraneous sounds or jamming. Otherwise you need to replace it.
- Before installing new rollers, a special sealant must be applied to the threads of the screws that secure them. The bolt of the support device must be tightened to a torque of 34-41 Nm, but the tensioner does not need to be fully tightened. Before installing the belt, make sure that the camshaft marks match the marks located on the rear drive cover. With the disk of auxiliary elements removed, you can independently adjust the position of the crankshaft by aligning marks 1 on the toothed pulley and marks 2 on the oil pump device.
- Install a new belt on the crankshaft. Pull the product, placing one part of it behind the support roller and the other behind the tension roller. After this, the strap can be put on the camshaft pulleys. If, as a result of dismantling, you used a tool to fasten the pulleys, then at this stage it must be dismantled.
- The final step is to adjust the tension of the product. To do this, use pliers to turn the tensioner counterclockwise. This action is performed until the first cutout on the outside of the device cage is aligned with the second cutout on the inner sleeve. Use a 15mm wrench to tighten the screw. If you have a torque wrench, then tensioning should be done taking into account a torque of 20-25 Nm. After installation, the crankshaft must be turned by the screw securing the pulley several turns. The node must be moved clockwise. Make sure that the marks on the crankshaft and camshafts match during installation. If any devices, including the pump, pump and other components, need to be replaced, it is better to do this during the repair.
1. Dismantle the timing belt protective cover
2. Install cylinder 1 according to the marks
3. Unscrew the tensioning devices with a wrench
4. The tension of the rollers is carried out with a special key
Tension check
How to check the correct tension of the strap after replacing it yourself:
- Make sure the marks are aligned correctly and tighten the tension roller if necessary.
- The tension diagnostic procedure must be performed in the middle between the camshaft discs. If a load weighing 10 kg is placed on this place, then the product should bend no more than 5.5 mm.
- If the belt is overtightened, then when you start the engine you will hear a noise uncharacteristic of its operation. Operating the product in such conditions significantly reduces the service life of the strap, as well as bearing devices.
Alternative manufacturers
Not all vehicle owners can choose the right spare part for their car. This is due to the wide variety of products, including timing belts. The main supplier of rubber products for VAZ cars is the RTI plant in Balakovo. In addition to this, sellers can offer buyers Bosch products, which have high quality workmanship and reliability. Also on display you can see products from] Daiko[/anchor], Kontitek, Lynx. Their cost ranges from 700 to 1500 rubles.
Reviews
Sergey. Moscow city. I decided to tidy up the timing drive mechanism on my Priora. Experts suggested trying a product from Contitech. I don’t know why they chose this belt, but it has been working for more than 30 thousand km without any complaints.
Nikolai. Tambov. On the engine of my car, the timing belt broke and two valves were bent. The engine was repaired by specialists who chose a belt from Bosch. After a run of 10 thousand km, we checked the condition and tension in the timing drive, there were no comments.
How to check tech. condition of the timing belt
Checking the condition of the belt is only allowed when the engine is cold. If the car has air conditioning. The belt of additional mechanisms together with the tension roller is removed. To access the belt, you must remove the protective cover. First, an inspection is carried out under the protective cover for the integrity of all parts of the assembly.
Next, you should rotate the timing belt, while monitoring for possible malfunctions:
- broken teeth
- abrasions and delamination of rubber layers,
- belt stretching, etc.
The stretch is controlled by aligning the marks, with a tolerance of 3-4 mm in the location of the marks. Changes in deflection are calculated when pressing the strap with a force of 10 kg. The deflection tolerance is 5-7 mm.
Mechanical and electronic testing
This check can be carried out using a special torque tool. Which determines the tension of the belt using a built-in scale.
Torque wrench in the hands of a master
Such devices are usually present at car service stations. Also, the most accurate measurement can be made using the electronic method. It is based on the use of a device with an ultrasonic indicator.
The nuances of independently checking the serviceability of the timing belt on the Lada Priora
The color of the belt should be uniform, without any extraneous stains of oily origin. It is also necessary to carefully examine the tension rollers. Since they can lead to a malfunction of the entire unit. But special attention is paid to the integrity of the belt.
Replacing rollers and timing belt: step-by-step steps
If you have an air conditioner, the replacement procedure will be more complicated. To replace the belt, first perform the following operations:
- Using a 15mm wrench, remove the generator tension roller and release the generator belt.
- Using the T-30 tool, you need to unscrew the bolts (5 pcs.) on the protective casing and 2 bolts on the lower casing.
- Raise the car with a jack to lift the wheel. This is necessary to connect the camshaft marks. We combine the marks on the body and the marks on the pulleys by turning the wheel in 5th gear.
the mark on the pin coincides vertically with the mark on the body
- When aligning the marks, the gear should be switched to neutral so as not to disturb the installed marks.
- Use a screwdriver to remove the flywheel plug. The flywheel mark should line up with the cut out triangle on the left.
- By turning the wheel all the way you gain access to the crankshaft.
- While the assistant holds the brake pedal depressed in 5th gear. You need to unscrew the crankshaft bolt counterclockwise and remove the washer.
- Using a 15mm wrench, unscrew the roller bolts, then remove the timing belt itself.
- To remove the pump (if there is an additional need for this), the closed casing and camshaft pulleys are removed.
- Then the generator roller mounts are removed, as well as 6 mounting bolts.
- After the procedure, it is necessary to install the mechanisms in the reverse order.
- The tensioner roller should not be secured; it will be needed for adjustment.
- We secure the camshaft and crankshaft pulleys.
- We first put the new belt on the crankshaft pulleys, then on the pump and camshaft.
After completing the installation of the belt, be sure to move on to the next stage - adjusting the timing belt.
How to check timing belt tension
After completing the work, you should analyze the tension level of the timing belt. This is done as follows:
The tensioner roller rotates in the opposite direction to the clockwise direction.
The roller marks must be aligned, then tighten the fasteners.
The crankshaft pulley rotates 2 circles clockwise until the camshaft and crankshaft marks align.
The mark on the camshaft pin must be parallel to the mark on the body
Tension control is carried out by applying a force of 10 kg. In this case, the deviation error should not be more than 7 mm. For a more accurate check, use a special device - a dynamometer.
After installation and inspection, replace the protective cover. The final check is carried out with the engine running. Which should function evenly, without unnecessary noise. If there are whistling notes in the engine operation. Then the belt needs to be loosened slightly.
Preparatory operations
First, disconnect the negative battery terminal, remove the engine protection and drain the antifreeze.
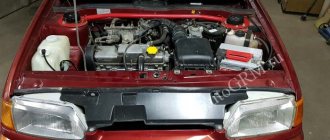
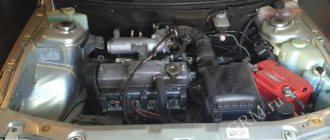
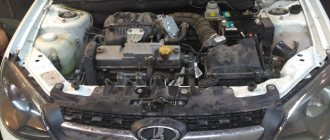
Engine 16 valves Priora.
Remove the protective cover, not forgetting to disconnect the absorber purge valve.
Step-by-step instruction
It will not be possible to completely remove the belt since the engine mount passes through it and if you want to change it you will have to unscrew it. It will not interfere with replacing the drive belt.
On newer models we will need an asterisk.
- We tint the marks on the camshaft toothed pulleys with a marker for ease of control.
- Unscrew the bolts securing the lower timing belt protective cover. Hexagon 5.
Lower timing cover.
The front right wheel does not need to be removed, but turned all the way to the right.
- We lock the crankshaft. We place stops under the front wheels, turn on fifth speed and unscrew the crankshaft pulley bolt. 17mm head and extension with a pipe as a lever. Turn off the speed.
Crankshaft pulley.
- We dismantle the pulley and the lower protective cover. There is a metal boot installed behind the pulley; do not forget it when installing.
Set the top dead center
- It is necessary to screw the crankshaft bolt into place and use this bolt to turn the crankshaft clockwise until the marks on the crankshaft pulley and the ebb on the oil pump coincide. The head is 17. We put a mark with a marker for convenience. Many manuals suggest putting a mark on the flywheel, but climbing under the thermostat is not very convenient, so we’ll take the simple route.
Crankshaft mark.
- The marks on the camshaft pulleys should also match the marks on the timing case. The camshaft marks were photographed after installing the new belt, they simply forgot to take a photo during the replacement process, may the inexperienced reader forgive us for this.
Camshaft marks.
- We unscrew the bolts securing the tension and idler rollers and remove them together with the timing belt.
Replacing the pump
Attention! There is a plate for the timing sensor installed on the intake camshaft pulley, do not damage it.
We pull the bolts evenly in several passes.
What tools are needed to replace the belt?
To properly replace the timing belt, you need a set of the following tools:
- classic pliers for removing circlips;
- wrench for 10, 13, 15, 17 mm;
- 5 mm hex key or T-30 star;
- a set of standard keys;
- The set with rollers and belt includes a special adjustment key;
- Screwdriver Set;
- roller tension device;
- office proofreader for accurate installation.
When performing these works, installing the Priora on the pit will not be necessary. All work on changing the timing belt is carried out in the engine compartment area.
Priora timing belt replacement
If you have an additional air conditioner installed, the belt itself will need to be longer. The air conditioner will also need to be unscrewed. Otherwise, it will interfere with the removal of the protective cover. It is advisable to begin work with a complete package of all necessary tools.
Recommendations from Lada Granta owners
Experienced drivers recommend replacing the timing belt at the first signs of wear. At each maintenance, do not be lazy and inspect the condition of the drive. If it breaks, the valves will “meet” the piston and the engine will have to be repaired.
Very often you can find feedback that the belt failed after 20 thousand kilometers due to the poor quality of the product. The purchase of a belt must be made at trusted retail outlets and from well-known companies.
Another tip is to check not only the condition of the belt, but also the timing parts. Often the cause of belt failure can be excessive wear of the gear teeth.
The recommendations boil down to one thing - do not be late in replacing the timing belt when it is worn out.
Self-replacement of Priora timing belt 16 valves
When installing the belt, careful and precise approach is required. If the belt is replaced incorrectly, a mismatch occurs in the actions of the shaft and camshafts. After which the pistons will contact the valves of the cylinder head. When the valve stems bend, compression may be lost. After which the valves and other mechanisms will have to be changed.
you need to turn the crankshaft
If you need to turn the entire timing mechanism during work, then you can only turn the entire system using the crankshaft. When scrolling the camshaft, you can damage the entire system, since the crankshaft is the leading one in the mechanism.
no need to crank the camshaft
Replacing rollers and timing belt: step-by-step steps
If you have an air conditioner, the replacement procedure will be more complicated. To replace the belt, first perform the following operations:
- Using a 15mm wrench, remove the generator tension roller and release the generator belt.
- Using the T-30 tool, you need to unscrew the bolts (5 pcs.) on the protective casing and 2 bolts on the lower casing.
- Raise the car with a jack to lift the wheel. This is necessary to connect the camshaft marks. We combine the marks on the body and the marks on the pulleys by turning the wheel in 5th gear.
the mark on the pin coincides vertically with the mark on the body
- When aligning the marks, the gear should be switched to neutral so as not to disturb the installed marks.
- Use a screwdriver to remove the flywheel plug. The flywheel mark should line up with the cut out triangle on the left.
- By turning the wheel all the way you gain access to the crankshaft.
- While the assistant holds the brake pedal depressed in 5th gear. You need to unscrew the crankshaft bolt counterclockwise and remove the washer.
- Using a 15mm wrench, unscrew the roller bolts, then remove the timing belt itself.
- To remove the pump (if there is an additional need for this), the closed casing and camshaft pulleys are removed.
- Then the generator roller mounts are removed, as well as 6 mounting bolts.
- After the procedure, it is necessary to install the mechanisms in the reverse order.
- The tensioner roller should not be secured; it will be needed for adjustment.
- We secure the camshaft and crankshaft pulleys.
- We first put the new belt on the crankshaft pulleys, then on the pump and camshaft.
After completing the installation of the belt, be sure to move on to the next stage - adjusting the timing belt.
How to check timing belt tension
After completing the work, you should analyze the tension level of the timing belt. This is done as follows:
The tensioner roller rotates in the opposite direction to the clockwise direction.
The roller marks must be aligned, then tighten the fasteners.
The crankshaft pulley rotates 2 circles clockwise until the camshaft and crankshaft marks align.
The crankshaft tooth is parallel to the mark on the body. The mark on the camshaft pin must be parallel to the mark on the body.
Tension control is carried out by applying a force of 10 kg. In this case, the deviation error should not be more than 7 mm. For a more accurate check, use a special device - a dynamometer.
After installation and inspection, replace the protective cover. The final check is carried out with the engine running. Which should function evenly, without unnecessary noise. If there are whistling notes in the engine operation. Then the belt needs to be loosened slightly.
The timing belt replacement scheme for the Lada Priora does not have a high level of complexity. If the car enthusiast approaches this issue responsibly. And I became well acquainted with the technical documentation for the car and the sequence of all actions. Also, this process does not require special, bulky equipment used in professional auto repair shops. Therefore, you can do it yourself in a garage.
How to check tension
At the end of the work, it is necessary to adjust the tension of the timing belt drive on the Priora. The adjustment is made as follows:
- Using a special wrench, you need to turn the tensioner pulley counterclockwise.
Tensioner adjustment key - Align the marks on the roller as shown above, and then tighten the fastening bolt.
- Rotate the crankshaft pulley 2 turns by the mounting bolt in a clockwise direction. At the same time, the coincidence of the marks on the camshaft and crankshaft pulleys is checked.
You can check the tension by applying force to a rubber product weighing 10 kg. The deviation value should not exceed 5-7 mm.
When tightening the pulley and roller bolts, it is recommended to use a torque wrench. The tightening torque for each element is equal to the following values:
- for the tension roller – 35-41 Nm;
- thrust roller – 105-110 Nm;
- pump mounting bolts – 15-20 Nm.
After adjustment, you can put the protective cover back in place. Finally, the generator belt tensioner roller is installed, as well as the belt itself. It is also recommended to replace these elements with new ones. Finally, do not forget to fill the coolant before starting the engine.
Upon completion of the work done, you can start the engine and check its operation. If the marks are correctly set, the engine will start the first time the key is turned in the ignition switch. In this case, the engine should operate evenly and keep the speed in the region of 800-900 rpm. Listen to the timing belt drive. There should be no extraneous sounds or noises. The presence of a whistle or hum indicates that the tensioner is too tight and needs to be loosened.
Video: replacing the timing belt and rollers with a pump on a Priora VAZ 2172, 2170, 2172 (timing marks)
In conclusion, it should be noted that the process of replacing the timing belt on a Lada Priora car does not present any difficulties if all steps are performed one by one. Even an inexperienced driver can handle this procedure, so don’t be afraid when the time comes to replace the belt product.
Why is this so important?
I think it’s no secret to anyone what happens when the timing belt breaks, but perhaps there are those who are not in the know. In the event of a break, the synchronization of the operation of the cylinder-piston group and valves is disrupted. The pistons begin to move towards the valves, which are no longer controlled by the belt; as a result, the pistons “meet” the valves. After such a “meeting,” the pistons are destroyed, the valves are bent, and in general you end up with a major engine overhaul. Could this have been avoided? It is possible, of course, if the manufacturer of this engine thought about this at the design stage, completely eliminating such a phenomenon. By the way, there are quite a few “plug-in” engines in the world that, after a broken belt, do not need to be “overhauled”; you just need to get to a service station and replace the timing belt. In such engines, when the valve belt breaks, the valves do not meet the pistons.
The belt and rollers must be replaced immediately if, during inspection, you find:
- Roughness on the belt (on the teeth or sides);
- Mechanical damage;
- Engine malfunctions;
- Problems starting the engine;
- Extraneous sounds indicating friction of the belt against the casing, rollers or pulleys.
Separately, I would like to note the appearance of vibration and black exhaust; such symptoms, of course, can occur under other circumstances, but this option should also be considered.
Consider solely mileage in the question: “Is it time to change the timing belt or not?” - this is mistake. Firstly, even with low mileage, problems can arise with the belt or rollers. And secondly, there are many situations when you practically or completely do not move, while the motor is running, therefore, the belt wears out. For example, if the car is used mainly in the city, the mileage may be low, but the life of the belt itself will be at its limit, since in traffic jams the engine is running, but there is practically no movement.
There are other factors that can cause a belt to fail prematurely. For example, if oil, fuel, dirt or sand gets on it. Small particles of sand eat into the surface of the belt, destroying its surface; oil and other petroleum products soften it, reducing its strength and shortening its service life.
Finally.
To summarize the above, I would like to give some practical advice that will allow you to avoid timing belt rupture and, as a consequence, major repairs.
- Buy a quality replacement belt and rollers;
- Record the mileage and date of belt replacement;
- Every 10 thousand, perform a visual inspection of the rollers and belt;
- Change the belt earlier if you mainly drive the car in the city;
- If you buy a used car, it is better to replace the belt and rollers, since it is not known when it was changed.
That's all for me, write in the comments when you prefer to replace and how you monitor the condition of the above-mentioned elements.
Installing a new timing belt
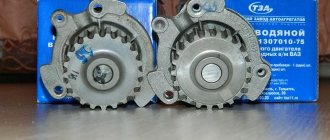
- We get a new timing belt kit.
Timing kit.
Attention! On the tension roller there is a direction of tension (shown by an arrow) and an indicator of the correct tension, indicator type.
Direction of tension on the roller.
- We install the tension and support rollers in their places and check that all marks match. We tighten the bolt securing the support roller, and simply tighten the tension roller.
The timing marks on the camshafts tend to run a bit, so if you're doing it alone, you'll have to be very tricky to hold the camshafts and fit the timing belt. You can fix the pulleys for convenience by installing a homemade clamp between the pulleys from a bolt with a nut and two washers. The Internet is full of pictures and examples, we won’t dwell on that.
- We put the timing belt first on the crankshaft pulley and pump, then on the idler pulley, the intake and exhaust camshaft pulleys and the tension roller. The branch between the crankshaft and intake camshaft pulleys must be tensioned.
- We tighten the timing belt with a roller in the direction of the arrows using a special wrench until the correct tension marks match. That is, when the pointer on the bottom of the roller is opposite the groove on the top. Tighten the bolt. Please note that an under-tightened belt will lead to rapid wear of the teeth, and an over-tightened belt will lead to increased wear on the pump bearing and reduced service life.
Correct tension.
- We check that everything should be on the mark. If the marks do not match, remove and reinstall the belt. If they match, then turn the crankshaft two turns and check the marks and tension again.
The new belt is in place.
- If everything is in place, install all the parts in place in the reverse order of removal. We start the car.
This is how easy it is to replace the timing belt on your Priora in a simple garage or even on the street.
About the resource
Well, now we’ve come to the most interesting thing, namely the resource. You know, now I want to talk specifically about normal belts and tensioning equipment, about “PRIORS” will be a little lower.
Not all manufacturers strictly indicate how often to change the belt, but such information can still be found, even in the car’s operating books.
The average mileage recommended for replacement is 100,000 kilometers. On many foreign cars, this mileage can be much longer, about 150,000 kilometers.
Now the question may arise: what does it depend on? Guys, to be honest, the belt itself can run (as some manufacturers claim) about 200,000 km, but its service life is reduced due to tension and support rollers. They are often the culprits of the cliff!
The support roller is a kind of bearing on which the belt rests, often has a plastic housing.
The tension roller is almost the same plastic bearing, only it is located on a special mount that “tensions” the belt, that is, it keeps it in “tone” and prevents it from “sagging” and jumping onto a tooth.
Both videos must be of simply excellent quality, no, they simply must ! With foreign cars this is almost always the case, these “support” and “tensioner” last a long time, and replacement is 100 - 150,000 km in advance.
If one of the rollers stands up, the belt wears out, within some 100–200 km of travel, or maybe even less.
As you may have guessed, not only the belt is changed, but also the tension and support rollers - THIS IS MANDATORY, REMEMBER THIS! As an indirect reason for a future replacement, there may be noise from the timing drive; when the rollers begin to “bend”, they begin to make noise.