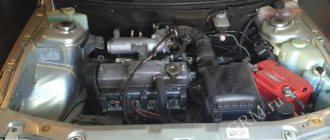
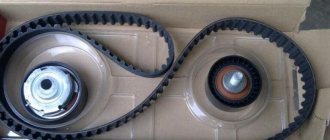
The timing belt on eight-valve “tens” is a ring belt of a toothed rubber structure.
It is designed to transmit torque from the crankshaft gear to the camshaft gear. The timing drive also includes a tension roller, with which the belt is given the required tension. In addition, the timing belt drives the water pump by rotating its drive gear.
When does a timing belt need to be replaced?
Sometimes, at the same time as replacing the belt, it may be necessary to replace the cooling pump. when signs of malfunction appear or in the following cases:
- The timing belt is very old (more than 5 years, even if it has not been used).
- Cracks, abrasions and “fluffing”.
- Destruction of belt teeth.
- Depressurization and leaks in the timing case (oil and coolant destroy the rubber base of the belt).
- If the belt is worn out, the engine may start and run unsteadily.
- Belt wear can cause an ignition failure, after which the engine begins to knock and run noisily, and black smoke begins to come out of the exhaust pipe.
When to tension the timing belt
The timing belt of the VAZ-2112 and other VAZ models is tensioned in the following cases:
- Installing a new belt;
- Loose belt;
- “Slipping” of the belt with a violation of the timing adjustment;
- Replacement of the tension roller and other timing drive mechanisms.
If the cause of the intervention is a broken or “slipping” belt, you must first ensure the integrity of the valves. A broken gas distribution mechanism (drive) leads to engine damage on 16-valve 1.5-liter power units. However, in cases of drive failure at high speeds, valves and CPGs are also destroyed on other engines.
They check the operation of the timing belt on the VAZ-2114 and other models equipped with 8-valve units by turning the camshaft manually. A working mechanism should turn with some effort. A faulty one, as a rule, cannot be affected.
During the procedure, it is necessary to check the compression in each of the cylinders. The easiest way to do this is to tightly cover the spark plug hole with paper. If there is pressure in the cylinder, the plug is knocked out of its seat at a certain stage of camshaft rotation. » alt=»»> A similar check on 16-valve engines is not recommended. The risk of damage to an initially good valve mechanism is too great. There are no grooves in the pistons of one and a half liter engines of this type. Therefore, valves that move down bend when they contact the piston surface.
Timing belt damage analysis
1. When the timing belt is slightly damaged or completely torn and the cord is frayed, then most likely the reason for this is overtension.
2. When one of the teeth is missing, this is a sign of weak belt tension.
3. Lack or high wear of teeth on the belt, in turn, indicates incorrect tension.
4. A cracked timing belt indicates severe overheating or hypothermia.
5. When wear is noticeable between the teeth, the belt is most likely not tensioned correctly. (weak or strong).
It is possible that if the belt is loosely tensioned, the belt will jump over a tooth; in this case, “CHECK” lights up and immediately goes out. This is what the camshaft position sensor signals.
6. An oily timing belt indicates that oil is leaking from the engine somewhere. In this case, you need to replace the belt and look for leaks.
7. Noticeable end wear indicates angular or parallel misalignment of the belt.
8. Increased noise indicates excessive or insufficient belt tension. This problem should be corrected immediately to avoid cutting teeth or breaking the belt.
Installing a new belt
Then the question arises: how to install a timing belt on a VAZ 2110 8 valves. The work is carried out in the opposite order.
Installing the timing belt VAZ 2110 8 valves consists of the following steps:
- The tension roller is being fixed. Attention is immediately drawn to the location of the key holes. They are heading outside.
- To install the VAZ 2110 8-valve timing belt, you need to put it on the crankshaft pulley. The same system includes a coolant pump and a tension roller. It is important to understand: how to tighten the timing belt on a VAZ 2110. A screwdriver is used to carry out this work. It must be installed between the pins that are screwed into the roller. The lever rotates the roller counterclockwise. The belt is then tensioned onto the pulley.
- Then the tension roller nut and the generator pulley bolt are returned to their place.
- Now the crankshaft rotates 2 turns clockwise. The crankshaft and camshaft marks are aligned. If the labels do not match, the entire operation is repeated.
Next you need to adjust the strap tension. The rotational movements of the crankshaft are carried out against the direction of movement clockwise. Normal tension is 1.5-2 kg. If there is no special device, then a manual method of checking is carried out. The free section of the belt is grasped with two fingers: the thumb and forefinger. The force should be enough to turn the belt at an angle of 90 degrees.
Knowing how to install a timing belt on a VAZ 2110 8 valve with your own hands, you still need to check the quality of the work done. To do this, start the engine and listen. There should be no extraneous noise. Their presence indicates a strong belt tension. To do this, the fastening of the roller is loosened, and the roller itself is rotated to the left by 10-15 degrees. The field of this system is fixed.
Wait, there are so many manufacturers here. So which timing belt is best?
Yes, there are many companies that produce the necessary materials for replacing the timing belt. They are usually divided into “original” and “analogues” - in the first case, the supplier is the car manufacturer, and in the second - third-party companies that specialize in the production of spare parts.
If you dig a little deeper, you will find out that the original belts, rollers or other parts are made by the same third-party manufacturers, only the packaging and markings are different. These are the so-called OEM suppliers - reliable companies with a good reputation that have entered into an agreement with the car manufacturer.
Among the manufacturers of timing belts and rollers, the following companies have proven themselves well: Gates, Contitech, Dayco, Bosch, INA. There are other, cheaper options that expand the price/quality range. But, as we have already found out, the timing belt is not a part you should skimp on.
How to check timing belt tension using a wrench and a special device
On many modern internal combustion engines, the timing belt is tensioned automatically; the mechanic only needs to fix the position of the tensioner roller. But there are also quite a few power plants where the belt is tensioned with manual checking. As a rule, the hands of an experienced craftsman cope with this task with a bang. It will be much more difficult for a beginner to do this. In this article we will try to provide recommendations and advice that will greatly facilitate the task of diagnosing the tension of the timing rubber ring.
VAZ "Ten"
A popular car equipped with an engine with a timing belt drive. The manufacturer recommends replacing the rubber band of the GRS mechanism after 40-45 thousand.
Procedure for replacing the timing belt
Raise the hood and disconnect the battery terminal “to minus” (the key in the ignition switch must be “off”) so that the brake lights do not light up in vain and “just in case”. Important! Before removing the terminal from the battery and turning off the power to the car, you must study the “Operation and Repair Manual” of the car
In some cars, it is impossible to disconnect the terminal from the battery (!), since adaptations in the electronic control system will be reset. In this case, you need to work with a car that is not de-energized more carefully. To ensure free access to the necessary mechanisms, you will need to remove the wheel, engine cover, protection, and generator belt. Depending on the make of the car and engine modification, work may require removing the power steering fluid reservoir or adsorber, or the air conditioner bracket, intercooler with terminals, air intake (or something else). Using a hexagon, unscrew the screws securing the belt and gear guard. If there is a crankshaft position sensor (CPS), disconnect the connector with wires from it. Unscrew the bolt and remove the timing belt tensioning roller
Also remove the support (guide) roller, if there is one. Remove the old timing belt. Check the position of the mark on one camshaft gear (on an 8-valve engine) or on two gears on two camshafts (on a 16-valve engine) in relation to the marks on the timing case. If the marks do not coincide, to set them in the desired position (against each other), you need to turn the camshaft with a wrench using the bolt securing the gear to the camshaft. To check the alignment of the mark on the crankshaft gear with the mark on the oil pump housing, unscrew and pull out the crankshaft toothed pulley with a special washer. If the pulley bolt does not unscrew, then you can rest the handle of the L-shaped key against the rod, put on the negative terminal of the battery (if it has been removed) and turn it with the starter. After unscrewing the bolt, remove the terminal back. You can also use a pneumatic impact wrench or have an assistant engage the highest gear and apply the brake while you unscrew the bolt. If the gear mark is set incorrectly, then screw the fastening bolt into place and turn the gear by this bolt with a wrench until the mark on the crankshaft gear is correctly aligned with the mark on the oil pump housing. Install the support (guide) roller, if equipped. First place the new timing belt on the crankshaft gear, on the support roller, then on the camshaft gear (or two gears, if there are two camshafts) and then on the pump gear. In this case, you need to control the position of the marks on one or two camshaft gears. If the marks are lost, they must be set correctly immediately. Install the tension roller and tighten it loosely, without tightly tightening the bolt until it stops. Check the evenness of the belt pad. Then tighten the belt using a special key for the tension roller, turning the roller counterclockwise (or in the direction of the arrows on the roller body). Next, holding the roller with a special key in the desired position, fix the position of the roller by tightening the fastening bolt until it stops, with a little force. You can check the belt tension with one hand by turning the belt lengthwise with your fingers. A well-tensioned belt should not turn more than 90°. At the final stage, reinstall and secure all dismantled elements in the reverse order.
After completing all the work, you need to start the engine and check the work by ear.
Description of disassembling the mechanism
Disassembling the timing drive assembly on a VAZ 2110 with 8V and 16V engines is somewhat different; in the case of a 16-valve engine, some additional elements must be removed. Therefore, a description of the process will be posted specifically for it with reservations for the 8-valve unit. At the very beginning, you need to remove the protective plastic casing and, for greater ease of operation, remove the air filter housing and move it to the side. A sensor is installed below, opposite the crankshaft pulley. You need to disconnect the connector from it, unscrew and remove the sensor itself (this is not necessary in an 8-valve engine). Next, in both types of engines, you need to rotate the crankshaft to align all the marks on the camshaft pulleys and the engine housing. This alignment is checked by matching the mark and the slot on the flywheel; to do this, remove the rubber plug from the socket on the gearbox.
Carefully rotating the crankshaft, align all existing marks on the pulleys
Next, in order to disassemble the mechanism and remove the timing belt, you will first need to loosen and remove the alternator belt from the pulley. When performing this simple operation, the latter should be carefully examined. It is quite possible that it is also in poor condition, and at the same time the VAZ 2110 alternator belt will also need to be replaced. In cars equipped with power steering, this is an additional operation, which will be discussed below.
The next step is to loosen and unscrew the pulley bolt on which the VAZ generator belt of the tenth family is put on. To do this, jam the crankshaft with a screwdriver or a small pry bar and loosen the bolt with a spanner, after which you can remove the pulley itself. Now you can unscrew the roller, the timing belt tension will decrease, which will make it possible to unscrew and remove the support roller.
It is important not to lose the special washers that are located under the rollers (there is only one roller in the 8V engine). Disassembly is complete, the old timing belt can be removed
Causes of belt breakage
One of the common problems with the model is the failure of the timing belt. The reasons for this may be different:
- Simple wear and tear caused by a long period of use of the vehicle;
- Regular increased loads under which the engine has to work intensively;
- Mechanical damage as a result of improper operation or received during the repair of other components;
- Manufacturing defect.
Regardless of the causes of the problem, it must be eliminated.
Over time, it stretches so much that the gear teeth jump by 1-2 links. This disrupts the valve timing and causes interruptions in engine operation. But this is the best-case scenario for such a situation. The worst is when the strap breaks and the valves bend.
Belt faults
Malfunctions of the timing belt can arise as a result of its long-term operation, and can also be the result of incorrect adjustment or malfunctions of the pump or tension roller. These include:
If any of the specified malfunctions are detected, the belt must be replaced.
Timing belt VAZ 2114 8 valves: functions, location and signs of malfunctions
So, the belt is under a protective cover on the crankshaft pulley side. The belt itself is a ring structure, made of reinforced rubber, and has an internal tooth structure so that the teeth on the crankshaft pulley and timing gear can engage with the belt.
Engaging with the crankshaft and camshaft with its toothed side, the belt ensures synchronous rotation of the shafts, and with its smooth side it drives the water pump shaft of the internal combustion engine cooling system. The required timing belt tension is maintained by a tension roller.
If the timing belt is torn or has become dislodged/flipped off or jumped, the vehicle’s internal combustion engine stalls or operates extremely unstably. Possible signs of timing belt failure:
- the engine stalls;
- the car does not start;
- “phase sensor error” lights up - failure of the timing belt (displacement or slippage of the belt).
It is important to understand that, subject to constant wear and various loads (including temperature), the timing belt 2114 may fail ahead of schedule
For this reason, it is important to pay attention to signs of problems with this element. For example, the timing belt on a VAZ 2114 “chews”. There may be several reasons why the timing belt is chewing.
This is either mechanical damage to the teeth of the crankshaft or pulley, sagging belt, displacement of the axes of the pump roller and tension roller, etc.
There may be several reasons why the timing belt is chewing. This is either mechanical damage to the teeth of the crankshaft or pulley, sagging belt, displacement of the axes of the pump roller and tension roller, etc.
For example, the timing belt on a VAZ 2114 “chews”. There may be several reasons why the timing belt is chewing. This is either mechanical damage to the teeth of the crankshaft or pulley, sagging of the belt, displacement of the axes of the pump roller and tension roller, etc.
Another such reason may be the belt slipping or moving to the side relative to its working position. This can lead to damage to the timing belt structure (contact with metal parts, abrasion on the edge of the tension roller) and, accordingly, disruption of the car engine.
The main reasons for belt displacement can be:
- manufacturing defect of the product (different rigidity across the width);
- failure of the water pump bearings (play, lack of lubrication, poor cleaning of the seat);
- deformation of the tension roller mounting pin (improper tightening or errors when replacing elements).
When is replacement necessary and what is needed for this?
During the depreciation period, the timing
begins to peel, tear, or otherwise known as slip.
If a breakdown occurs while the engine is running, it stalls and is impossible to start. When operating a VAZ 2114
with an engine equipped with an injection device for supplying fuel, an indicator on the device panel will light up, notifying you of a phase sensor error.
If the car is equipped with a 1.5 liter, 8-valve unit, then the repair itself will only require purchasing and replacing the belt. If a 1.3 liter engine is installed, this breakdown will lead to damage to the entire gas distribution mechanism
. You need some repairs. The timing belt replacement on a VAZ should take place after 45 thousand km of vehicle operation. We need constant control over the mechanism with the intention of prevention. The sequence of actions is as follows.
How to properly tension the timing belt of a VAZ 2110.
- Purchase and replace the tension roller.
- Remove possible free play in the pump.
- Lubricate the roller mechanism.
If you have regular plumbing tools, changing the timing belt is possible at home. List of tools needed to repair the unit in question.
We carry out what remains to be done for our client without panic and in no hurry. What remains for our client to do is trivial, weakly tightened, strongly weakened. Roller when moving
- Wrenches in sizes 10, 13, 17,19;
- Socket wrench with pipe.
Return to contents
Replacing the timing chain
It remains to note such a point as replacing the timing chain. We can say right away: it is absolutely no different from the belt replacement algorithm. The main difficulty is the preparatory operations, with the help of which you can get to the desired part. On average, this takes several hours, while direct replacement takes a few minutes.
So, it is quite possible to cope with replacing the timing belt yourself. Of course, this procedure is not quick, but it is quite accessible even to beginners.
The main thing is to stock up on the appropriate tools, as well as a user manual for the car. Some things are unique to a particular model.
For example, how to properly tension the timing belt is written there. Remember that if you do something once, it will be much easier the next time.
What is a timing belt tensioner?
The timing belt tensioner roller (tension roller, tensioner) is an auxiliary component of the timing belt drive, providing the belt tension necessary for normal operation of the drive. Additionally, this device can perform the functions of a deflection roller.
The timing belt drive is sensitive to belt tension. Excessive tension leads to intense wear of timing parts - pulley bearings (water pump, generator, tensioner, etc.), the belt itself, and others. In addition, a tight belt stretches faster and its service life is reduced. Too weak a tension is fraught with more serious problems - slipping of the belt along the timing pulleys of the camshafts, which leads to disruption of the valve timing and deterioration of the entire engine.
Therefore, a tensioning device is introduced into the timing drive in the form of rollers of one design or another, which maintain optimal belt tension during engine operation.
Step-by-step instructions for replacing the timing belt
- Unscrew the two bolts from the side of the timing belt protective cover. Key for 10.
- And one in front, remove the cover. Key for 10.
- Remove the generator drive belt. Loosen the locking nut, set the wrench to 13 and unscrew the tension bolt, set the wrench to 10. Move the generator towards the cylinder block.
Alternator belt tensioning mechanism.
- If you cannot move the generator, you need to loosen the fastening nut from below. The key is 17.
Generator mounting.
Set the top dead center
- Use the crankshaft pulley bolt to turn it clockwise.
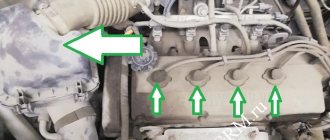
- We ensure that the mark on the camshaft toothed pulley (hereinafter referred to as simply an asterisk) matches the mark on the metal casing.
Camshaft mark.
- The mark on the crankshaft sprocket should also coincide with the low tide on the oil pump.
Crankshaft mark.
- We unscrew the crankshaft pulley bolt, having previously locked the crankshaft. We block the rear wheels, engage fifth gear and insert a screwdriver into the ventilation hole of the brake disc below the caliper. 17mm head with extension and pipe as a lever.
- Unscrew the nut securing the tension roller and remove it along with the old timing belt.
Fastening the tension roller.
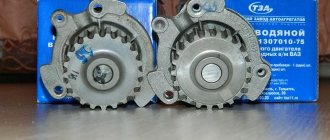
Replacing the pump
- Unscrew the bolt securing the camshaft sprocket and remove it. The key or head is 17.
Fastening the camshaft sprocket.
- Remove the timing belt protective cover. We unscrew the nut and bolt by 10, as well as the three bolts securing the water pump. Head for 10.
Fastening the timing case.
- Removing the pump
- Lubricate the pump gasket with a thin layer of sealant and install the pump in place. We install the protective casing and tighten all the bolts evenly.
Pump mount.
Belt tension on 8-valve VAZ engines
Before tightening the timing belt on the VAZ, the following preparatory work should be performed:
- Hang up and remove the right front wheel;
- Unscrew the 3 bolts securing the front timing cover;
- Remove the cover;
- Use a 17 key to loosen the tension roller.
After this, you should check the drive marks. One of them, located on the crankshaft pulley, must coincide with the installation tab of the rear cover. At the same time, check the mark on the flywheel. It should be flush with the alignment mark on the block boss.
IMPORTANT! In reality, it is not always possible to achieve an exact match of marks. Therefore, the mechanism is adjusted with an error of +/- 1-2 mm. This does not have a noticeable effect on the driving performance of the car.
If the marks match, the question of how to tighten the timing belt can be considered resolved. Without removing the belt, it is necessary to move the weakened tension roller to the right so that the necessary tension occurs. After this, the roller is tightened tightly. To adjust the roller, a special “horned” key is used. If it is not available, you can use two Phillips screwdrivers, which are inserted into special holes on the roller.
Replacing the timing belt of the Lada Priora engine
According to the maintenance regulations, the condition of the timing belt should be checked after 105 thousand km, and the belt replaced after 200 thousand km.
It is necessary to take into account that failure of the timing belt (breakage or shearing of teeth) can lead to valves sticking into the pistons due to mismatch of the rotation angles of the crankshaft and camshafts and, as a result, to expensive engine repairs. Therefore, we recommend checking the condition of the belt more often - every 45 thousand km.
The surface of the toothed part of the belt should not have folds, cracks, undercuts of teeth and separation of fabric from rubber. The reverse side of the belt should not have wear, exposing the cord threads, or signs of burning.
There should be no delamination or fraying on the end surfaces of the belt. The belt also needs to be replaced if traces of oil are found on it (before replacing the belt, the cause of its oiling should be eliminated) or when replacing a failed tensioner/support roller of the timing drive and coolant pump.
Use a 5mm hex to unscrew the five screws securing the front upper timing cover...
...and remove it. Remove the right mudguard of the engine compartment (see.
Using the “17” head, turn the crankshaft clockwise by the bolt securing the generator drive pulley... ...and inspect the belt for damage.
To replace the belt...
...using a 5mm hexagon, unscrew the two screws securing the front lower timing cover...
...and remove the cover. Remove the generator drive belt (see.
...until the marks on the camshaft toothed pulleys align with the marks on the rear timing cover. To check the position of the crankshaft...
…we remove the rubber plug in the upper part of the clutch housing (for clarity, the cooling system hose and the wire blocks from the coolant temperature gauge sensor and the ECM coolant temperature sensor are disconnected)…
...and make sure that the mark on the flywheel 1 is located opposite the slot 2 of the upper cover of the clutch housing. In order not to disturb the valve timing when unscrewing the bolt securing the generator drive pulley, an assistant fixes the flywheel by inserting a large slotted screwdriver through the hole in the clutch housing between the flywheel teeth.
Having unscrewed the bolt securing the generator drive pulley...
...remove the pulley...
...and its support washer.
Using a spanner wrench or a 15mm socket, loosen the bolt securing the belt tension roller. At the same time, the tension roller will rotate and the belt tension will weaken.
Remove the belt from the camshaft pulleys of the tension and support rollers. After removing the belt from the coolant pump and crankshaft pulleys, remove the belt from the engine compartment.
After removing the timing belt, the crankshaft and camshafts must not be turned at large angles to avoid the valves sticking into the pistons. When replacing the timing belt, we also change the tensioner and support rollers of the belt. Unscrew the bolt securing the tension roller and remove the roller.
Using a 15mm spanner, unscrew the bolt securing the support roller... ...and remove the roller assembly with the bolt and thrust washer.
The roller thrust washer has cores that prevent the washer from being removed from the bolt. Before installing the new support and tension rollers, apply thread sealant to the threaded part of the bolts that secure them. We do not completely tighten the tension roller bolt.
Before installing the belt, make sure that the alignment marks of the crankshaft and camshafts are aligned.
With the generator drive pulley removed, it is convenient to control the position of the crankshaft...
...by aligning mark 1 on the crankshaft toothed pulley with mark 2 (rib) on the oil pump cover. We put the timing belt on the crankshaft pulley. While tensioning both branches of the belt, we place the front branch behind the support roller, and the rear branch, putting it on the coolant pump pulley, behind the tension roller. Then we put the belt on the camshaft pulleys. To tension the belt...
...insert the tips of the pliers to remove the retaining rings into the grooves of the outer race of the tension roller.
We tighten the belt by turning the tension roller counterclockwise with pliers...
...until cutout 1 of the outer race of the roller aligns with the rectangular protrusion 2 of its inner sleeve... ...and tighten the roller mounting bolt with a wrench.
Having installed the generator drive pulley, turn the crankshaft by the pulley mounting bolt two turns clockwise.
We check the alignment of the installation marks on the crankshaft and camshafts, as well as the alignment of the cutout with the protrusion on the tension roller.
Otherwise, we repeat the operations of installing and tensioning the timing belt.
Why change the belt?
In accordance with the list of routine maintenance for the VAZ 2110, the timing belt must be changed after every 60-75 thousand kilometers, however, here you also need to take into account the conditions of its operation, and this is:
- temperature changes;
- oil getting on the belt;
- problems with the tension roller;
- faulty pump.
All this will inevitably lead to damage.
It is necessary to inspect at least once a month:
- belt (determining its integrity);
- tension roller ;
- water pump gear.
And although on 8-valve VAZ engines, the valve does not bend when the belt breaks, this breakdown can damage the pump or generator.
Help in choosing a timing belt and rollers
The reliability, efficiency and operating life of the motor depend on the quality of the rollers and belts chosen for replacement.
Research shows that the cost of a belt is from 450 rubles, and rollers will cost you at least 600 rubles.
When buying spare parts, be guided by the opinions of VAZ 2110 car owners. There are many forums. Also consult with specialists at the service station. They will be able to give professional advice, or even order quality components for you.
Surveys among owners of AvtoVAZ’s creation, namely the VAZ 2110, showed that the most popular belts are products manufactured by the following companies:
- Gates;
- Bosch;
- Kraft;
- Power Grip;
- Dayco;
- Contitech.
As for videos, it’s better to pay attention to the following brands:
- Gates;
- Power Grip;
- VPZ;
- BRT;
- Dayco;
- Marel.
Of course, the choice is purely individual and depends on the financial capabilities and available assortment of a particular store. But if the necessary elements are not available in your city, you can always order them online. Nowadays this is not a problem.
Installation diagram and purpose of the VAZ 2114 alternator belt
Since the engine installation on the VAZ 2114 is transverse, then the VAZ 2114 alternator belt is located on the right side of the car or on the left side of the engine, if you look there with the hood open, not familiar with the cooling radiator.
At the end of the crankshaft opposite the flywheel there is a timing belt drive pulley, which spins the camshaft and oil pump shafts with a pump, as well as the electric generator drive pulley. The timing drive is covered by a plastic cover, and the belt drive runs outside, on top of this cover, and connects the electric generator drive pulley on the crankshaft to the alternator pulley. On the VAZ 2114 there is no belt tensioner pulley, like on the VAZ 2110. Tensioning the alternator belt is done using a different method.
The belt drive is marked 21082-3701720 and when selecting it you need to find a belt with a length of 698 mm. During the use of the machine, the myth drive is exposed to severe loads, not only mechanical, but also thermal and chemical. Therefore, the highest demands must be placed on the quality of the belt drive. Probably experts and car owners advise using belts of the “BOSCH” brand, also called “GATES”. Although their cost is about 500 - 550 rubles, versus 200 - 300 rubles for products from a Russian manufacturer, the quality of these drives is significantly higher.
Purpose of the crankshaft pulley
The crankshaft pulley on the VAZ 2110 serves the following purposes:
- Reducing the amplitude of crankshaft vibrations during resonance. In particular, for this purpose, some craftsmen install a lightweight version of the crankshaft.
- Reducing noise from the operation of the power unit.
- Rotation of mechanisms that are directly involved in the operation of the motor. This happens with the help of gears and a belt.
- The damper, in turn, addresses pulses corresponding to the number of crankshaft revolutions to the ECU.
Crankshaft damper pulley VAZ 2110
The VAZ 2110 car has a crankshaft damper pulley. The pulley itself transmits torque to additional units. The part is a flat ribbed wheel with a special hole for installing a belt. To improve performance, automakers equipped the pulley with a damper. Damper - a rubber layer to dampen vibrations that occur in cars. However, with this innovation, the life of the pulley has been reduced because the damper loses elasticity due to excessive loads. Sometimes the pulley breaks completely, which is why the VAZ 2110 stops moving.
Possible faults
The crankshaft pulley is removed in the following cases:
- In the case of a VAZ 2110 hub turning. In most cases, this occurs due to careless repairs. The VAZ 2110 car is equipped with a special fixing sleeve, which is pressed into the gear. If installed incorrectly, it may fall out, which will cause the hub to rotate.
- In case of lubricant leakage from under the crankshaft oil seal. It needs to be removed and replaced with a new one.
New oil seal
- In case of strong resonance.
- Incorrect pulley type installations.
- Incorrect damper installation.
- A split in the place where the damper is installed. In this case, replacement is necessary, and better yet, together with the crankshaft gear.
- When removing the crankshaft - for repair work, changing bearings, etc.
conclusions
Replacing the gas distribution mechanism kit on a VAZ-2112 with an 8-valve engine is quite easy. Another problem remains the correct and timely identification of the problem, as well as the selection of spare parts. If you make the wrong choice, this can cause even more serious consequences for the engine. The same applies to the quality of products.
The question of how to replace the 8 valve belt on a VAZ 2110 with your own hands constantly arises, since such a procedure at stations is expensive. You should know that the part is a product whose main task is to transmit rotation from the crankshaft to the camshaft. In addition, the system also involves a water pump, which is also included in the system. The inner surface of the timing belt is equipped with teeth, the pitch between which varies depending on the type of car model. In order to provide the necessary voltage, the device is equipped with a tension system in the form of a roller.
Preparatory work
Before you start work, familiarize yourself with the timing system diagram and the location of the marks on the camshaft and crankshaft.
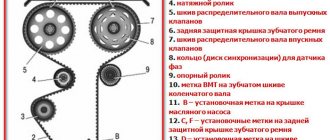
This is what a detailed timing belt diagram looks like.
Diagram: 1. Crankshaft pulley. 2. Timing belt. 3. Water pump pulley. 4. Tension roller. 5. Intake camshaft pulley. 6. Upper timing belt protective cover. 7. Exhaust camshaft pulley. 8. Phase sensor synchronization dial. 9. Support roller.
A – TDC mark on the crankshaft pulley. B – Mark on the oil pump cover. C – Installation mark on the protective cover. D – Mark on the exhaust camshaft pulley. E - Mark on the intake camshaft pulley. F - Installation mark on the protective cover.
Tools for work
To carry out all the work you will need:
- New timing belt for the 16-valve VAZ-2112 engine.
- Socket head for “10” and “17”.
- The key is "17".
- Screwdriver.
- Tensioner pulley key.
Step-by-step replacement procedure
- First of all, after opening the hood, remove the negative terminal from the battery.
- Next, remove the timing belt protective cover by unscrewing 6 bolts using a “10” socket.
- Remove the chip from the crankshaft sensor. Read more about all sensors on the VAZ-2112.
- We unscrew one bolt that secures it and remove the sensor.
- You will then see that the pulley is missing a number of teeth, this is to allow the sensor to detect TDC and also block it in order to unscrew the pulley.
- Next, align this hole for the sensor with the pulley, and insert an object through the hole (a hex key with a “12” size works well - approx.).
- When the pulley is blocked, we “tear off” this generator nut.
- Then loosen the bolt on the tension pulley and remove the old timing belt. If necessary, we also shoot videos. Usually, along with replacing the belt, both the pump (water pump) and the rollers are replaced. We have already written in detail about checking the pump for play and about choosing a pump for a 16-valve engine.
- You can install a new belt by removing the tension roller, or by turning the exhaust camshaft pulley (pulley on the right side - approx.) with a key to “17”.
- We fix the crankshaft pulley bolt back and align the marks with the housing on the oil pump.
- Next, make sure that the pulley marks on the camshafts align and that the drive gear does not go astray.
- The next step is to tension the belt using a tension roller using a special wrench. However, if you don’t have one, you can use two nails and a screwdriver inserted between them.
- We tighten the belt until you feel its elastic state between the two camshaft pulleys. Don't forget to tighten the tension roller nut.
- Afterwards, we turn the crankshaft two full turns, if all the marks match and remain in place, then the work on replacing the timing belt can be considered complete.
- We tighten all the nuts until they stop, put the crankshaft sensor in place, connect the power supply to it and put the protective cover in place.
If all work is carried out in such a strict order, the entire replacement can be done with your own hands within an hour.
We change the belt ourselves (on the 8 valve model)
Replacing the VAZ 2114 timing belt is strictly regulated in the car’s operating instructions.
It is recommended to change this part after 30-45 km. But you can’t rely only on recommendations; over time, without running the required kilometers, it slips off the gears, eats, bursts, and may even rupture. For a car with a 1.5-liter 8-valve engine installed on it, a belt break will not have serious consequences: the car will simply stop and will not start. And in a 1.3 liter engine, the valves may become damaged, which will lead to breakdown of the entire engine. If an injector is installed on the VAZ2114, then when the belt slips, eats or breaks, the dashboard will display: “headlight sensor error.” Solve the question after how many km. This part should be changed after a visual inspection and a replacement should be made if it is in poor condition. Which strap is better to choose is written in the manual for the VAZ 2114.
Required Tools
To carry out the replacement yourself, you need to prepare new spare parts and tools:
- a set of keys;
- new timing belt;
- new tension roller.
Stages of work
The DIY replacement sequence consists of the following steps:
- The car must be set to the handbrake.
- Set to 4th or 5th gear.
- After unscrewing the three bolts, remove the cover that protects the camshaft drive.
- Next, you need to loosen the generator drive belt and remove it from the crankshaft along with the pulley, leaving the bolt that holds it in place.
- Now the car should be put into neutral gear.
- The next step is to take care of the marks. To do this, rotate the crankshaft in a clockwise direction, observing the marks and the flywheel. The shaft should be rotated until the mark is parallel to the middle division of the scale.
- After making sure that the mark on the pulley is opposite the mark on the protective cover, you need to slightly loosen the fastening nut on the tension roller. If necessary, change the tension roller.
- Using a roller, you need to loosen the tension of the strap to remove it.
- Next, you need to install a new product on the crankshaft timing pulley.
- Then you need to pull the leading branch of the product onto the camshaft pulley so that it does not sag.
- Then turn the crankshaft 1.5-2 turns and set the marks. If the marks do not match, the belt should be removed and the installation procedure repeated again.
- After setting the marks, you need to unscrew the bolt on the crankshaft and put the generator pulley in place, securing it with the bolt.
- By turning the tension roller counterclockwise, it is necessary to adjust the timing belt tension and put on the alternator belt.
Why you should change the timing belt yourself: you will save time and money, you will know what to do if it slips or eats.
Honda GC 135 engine analysis
We directly disconnect the engine from the unit (remove the pulleys, starter flywheel, frame, etc.), we get the following:
We unscrew the cover bolts, pry the cover evenly around the perimeter (it sits on the sealant) and remove it, we get the following:
We remove the magneto and flywheel (lock the shaft, unscrew the nut and knock it off the cone by tapping). Don't forget about the keys, don't lose them.
Next is the crankcase. The plane of connection between the crankcase and the head is at an angle. We unscrew it around the perimeter of the crankcase (there are many of them), pry it along the seam with a strong screwdriver (it sits on the sealant). The direction of removing the crankcase is along the crankshaft, and not along the plane; the guide tubes are visible there in the photo.
We gained access to the crankshaft, later we will unscrew the two bolts with the numbers 12.
In order to avoid problems later when assembling and installing the timing belt in the correct position, we will make notes on the pulley and crankshaft gear relative to the marks on the belt. We remove the belt, unscrew the bolts on the crankshaft, remove the piston (here you will have to play around, since it comes out at a certain position. Remove the crankshaft. We received the following picture from the cylinder side
And then we are engaged in examining the problems. In my case, it was a ring on the piston (there were no scuffs on the cylinder). I bought the rings in a Honda brand store (on Google) for 1000 rubles, since the search for a cheap equivalent did not yield anything. Well, since the oil spilled through the air filter, then I carefully cut out the paper of the old filter, bought a regular filter for Lada cars (I don’t remember exactly which model for 100 rubles, the width and thickness were the same), removed the parallon, cut it to the required length and secured it with sealant. By the way, a native filter for GC135 costs approximately 500-600 rubles.
We received a new filter. When assembling, we clean anything, remove old silicone, degrease, apply sealants where necessary, check for unnecessary parts. After assembly, the engine does not start on the first try, so do not be alarmed
Dismantling
To correctly replace the timing belt, you first need to dismantle the element. The process can take quite a lot of time, although the work itself is not very difficult.
- Remove the casing covering the belt, pulleys, dismantle the tension roller and other elements related to the gas distribution mechanism.
- The cover is held in place by three mounting bolts, so removal should not be a problem.
- Remove the alternator belt. This will give you access to the desired object - the timing belt. To do this, lower the retaining bolt down a little and move the generator towards the engine. This will loosen the belt, making it easy to remove.
- Align the gas distribution mechanism to the marks. First you need to install the crankshaft in the required position. This is done by turning it and looking through the hatch on the clutch housing.
- Stop rotating as soon as the mark on the crankshaft flywheel aligns with the marks on the housing. This indicates that the piston of the first cylinder is at TDC - top dead center.
- Make sure that the mark on the camshaft gear is aligned with the mark on the metal housing.
- Having set the marks, you can begin the procedure of dismantling the old worn timing belt.
- Release and move the tension roller to the side. This will release the tension on the strap. As a result, it can be removed from its position.
- Next you need to remove the belt from the crankshaft gear. To do this, the pulley is first removed.
- There should be no problems with dismantling the pulley, since it is removed this way. First remove the right wheel, turn the steering wheel to the right and you will gain access to the side shield. The shield is removed, and behind it is the crankshaft pulley. Relevant for carburetors and injectors.
- If your VAZ 2109 has an injection engine, you will need to fix the crankshaft to remove the pulley. It is not difficult to do such a procedure. Insert a long screwdriver into the special hatch where the flywheel mark is located. This will lock the crankshaft in the required position, so you can easily unscrew your pulley.
- On a carburetor VAZ 2109, fixation should be performed directly on the pulley.
- Before you begin removing the timing belt, examine the condition of the water pump and tension pulley. You should also check whether the axis of the tension roller and timing gear are in good condition.
- If there is damage, defective elements must be replaced.
- Check the current condition of the camshaft and crankshaft seals.
Crack on the strap
Experts agree that when replacing the timing belt, the rollers and pump should also be replaced. But this is a recommendation, not a requirement.
Features of labeling
Before installing another timing belt, it is better to set the crankshaft and camshaft to the specified marks from the very beginning. We set the gears to 0 position. Points A, B, C, D, E, F must match as shown in the picture. After this, you need to set the marks on the camshafts and the belt casing in the same position.
To check the location of the crankshaft, remove the plug from the box, which is installed under the thermostat, and look for the flywheel. If the marks on the camshaft and the casing match, then there should be a match in the cut on the flywheel and on the metal casing.
All alignments must be clear, the marks must match for proper operation of the belt. After the mark is installed on the flywheel, it must be fixed in this position so as not to break off the thread. And then, as mentioned, you can begin to tension and adjust the timing belt.
How to replace the timing belt on a VAZ 2108-VAZ 21099?
Removal: 1) First unscrew both side cover bolts.
2) Next, unscrew the last remaining central bolt that secures the cover.
3) Now, holding the cover with your hand, remove it from its seat.
4) Next, remove the generator belt from all the rollers. (For information on how to remove the alternator belt, see “this article”) 5) Then remove the front right wheel from the car. (see Removing the wheel)
Note! If your car also has fender liners installed, then they will also have to be removed!
6) Then, using the central bolt that secures the pulley, turn the crankshaft strictly clockwise.
Note! After turning the crankshaft, pay attention to both marks that are indicated in the photo, they should coincide with each other, the first mark indicated by a screwdriver is the camshaft mark, and here is the second mark, this cover mark!
7) Now pull the plug with your hand to remove it from the clutch housing.
Next, look at the mark that is present on the flywheel; it should coincide with the slot on the clutch housing cover.
Note! In the photo, for easier viewing, the cooling hose has been removed!
9) Then remove the crankshaft position sensor. (see “Removing the crankshaft position sensor”)
10) Next, with the help of an assistant, secure the crankshaft from turning, and then remove the generator pulley itself, to do this: 1. Ask the assistant to insert a screwdriver through the through hole in the clutch housing, and then let him fix this screwdriver.
Note! The screwdriver must be inserted between the teeth of the flywheel!
2. Next, at this time, unscrew the central bolt that secures the generator pulley. 3. And then, holding the generator pulley with your hand, remove it from the engine, and at this time let an assistant remove the screwdriver.
11) Next, using a wrench, loosen the central nut of the tension roller.
Note! After loosening the nut, rotate the roller to the position where the belt will be loosened the most!
12) Then remove the belt from all rollers, thereby removing it from the engine.
13) Next, after removing the belt, if you need to remove the tension roller to replace it, then completely unscrew the nut securing it, and then remove it.
Note! Immediately behind the roller there is a spacer washer, which must also be replaced if deformed!
Installation: 1) Install the new belt in the reverse order of removal.
Note! When installing a new belt, start with the lowest pulley, the “crankshaft pulley”!
2) Next, insert a pair of screws into both holes that are located in the tension roller housing, and then between these two screws, insert a screwdriver as shown in the figure, and then turn the roller strictly counterclockwise, thereby tensioning the belt to the desired state.
Note! Turn the roller strictly counterclockwise!
3) Next, install the generator pulley in its place, and then tighten the bolt that holds it until it stops.
Note! Before you begin installing the generator pulley, check that the crankshaft mark “indicated by a screwdriver” matches the mark on the cover “indicated by an arrow”!
4) Now turn the crankshaft bolt a few turns strictly clockwise.
5) After all the operations performed, check the alignment of the marks on the flywheel, as well as the marks on the camshaft; all these marks must coincide with the marks on the body.
Note! If at least some of the marks do not match, then reinstall the belt!
Manufacturer's recommendations
- Your primary task as a car owner is to periodically visually inspect the unit.
- In addition to replacing the element, it is necessary to simultaneously replace the tension rollers.
- VAZ 2110 comes with 8 and 16 valves. The replacement process also depends on this. So, in an 8-valve valve, one tension roller is installed, and in a 16-valve valve, a support and a tension roller are installed.
Replacing the timing belt of a dozen is not difficult. It is not necessary to contact specialists. It is quite possible to do it on your own.
Set of tools
To complete the job of replacing the timing belt you will need:
- A set of spanners and open-end wrenches;
- Mount;
- Screwdriver Set;
- A special key with which to tighten the roller or simple pliers with curved rings;
- Car jack;
- Rags, protective gloves.
Many people ignore the advice on using gloves. Especially in the summer when it's hot. But they are needed to protect you from injury.
There is no need for an inspection hole. You will need to remove the right wheel to remove the timing belt if your Ten is equipped with power steering. So you can't do without a jack.
Visual belt check
Before replacing the timing belt on a VAZ 2110 8 valve, it is necessary to inspect it. It is carried out after a run of 15 thousand km.
Tools are prepared for this:
- keys: overhead and open-end.
- different types of screwdrivers;
- a mount is required;
- pliers with special jaws for proper installation of the roller;
- jack.
The check consists of the following points:
- There is a special plug on the front protective timing cover that can be removed.
- The belt is removed from the generator pulley. This is important for ease of use.
- The timing cover is held in place by 6 bolts that need to be unscrewed.
- The belt opens. He is visually inspected.
Do-it-yourself replacement of the VAZ 2110 8-valve injector timing belt is carried out in the case when all defects are clearly visible.
Lada 2112 2007, 89 l. With. - with your own hands
Lada 2112, 2007
Lada 2112, 2007
Comments 48
I don’t know what they write about here regarding belt tension on 2112, on PRIOR everything is tightened little by little through the tension roller. The right branch of the belt through the guide roller should already be laid: - through two camshaft pulleys, a crankshaft toothed pulley, through a pump and have sufficient tension. In this case, the marks on the camshaft pulleys and the crankshaft toothed pulley must be fixed using the corresponding counter marks
In this position, holding the belt with your hand on the left side of the branch, on the side of the tension roller, so that it does not weaken and does not jump over the teeth, no matter where and in what place (and this is possible even for one tooth), we place or slip the tension roller under the belt , insert its bolt and tighten everything with such a turn of the roller by hand that the belt does not loosen and does not jump over the teeth
Next, spin the engine several times, or maybe it’s better, by the wheel with 4-5 gear engaged, and make sure that all the marks on all the pulleys match perfectly. How to recognize the mark on the ring gear of the generator drive pulley on the crankshaft, I have already written below and given a drawing. With the wheel removed and the stand hanging with the steering wheel turned, this ring and the DPKV are clearly visible, or almost well, through the mirror.
Then, after cranking the engine several times by hand, carefully, slowly - and what the hell is not joking, the marks didn’t match when parked and the valves were bent with the starter, yikes, then you begin to tighten the roller to working condition. At the moment when, when cranking the engine, the right branch self-tensions when viewed from the side of the pulleys - and the left one weakens, this is where you need to tighten the roller - like how everyone around writes and rips off each other. On a Priora, the tension of the roller can be general or weak, the belt will jump, or the roller may be pressed against the belt so that it and other damn spare parts will feel sick
At the moment when, when cranking the engine, the right branch self-tensions when viewed from the side of the pulleys - and the left one weakens, this is where you need to tighten the roller - like how everyone around writes and rips off each other. On a Priora, the tension of the roller can be general or weak, the belt will jump, or the roller may be pressed against the belt so that it and other damn spare parts will become sick.
Don't be afraid to start the engine to see how your video lives when the engine is running. Nothing will happen to either the belt or the roller when adjusting in a tightened state. The main thing is that the belt does not dangle too much, otherwise it will either fly off or fly like plywood over the toothed pulleys and fucking bend the valves. If the tension roller is dead, overtightened, the belt may hum a little from the overtightening, which in turn will affect on a PUMP, therefore, it will not last long due to a strongly tightened belt (of course it will not immediately fall apart) - then we begin manipulations to tension the roller. The ROLLER on the Priora should be alive when the engine is running. It should vibrate inconspicuously on the tension spring and this is clearly noticeable, and when you press the gas sharply it jumps, pushing up well with the belt and this can be seen even by a blind mole.
What is written in the Talmuds about how to pull a roller does not always coincide with reality. Therefore, it may be that when you set it up as written in the bible for dummies, the roller will simply rest in peace and will not work properly. Therefore, everything is relative to different manufacturers and defects.
In general, honestly, it’s better to under-tighten the roller a little than to over-tighten it. The roller, the pump and the belt will live. The main thing is to watch and listen for extraneous sounds in the timing belt area.
More than once I had cases where the belt was about to fly off, dangled and shouted, pull me up, even rubbed the protective cover. The casing probably saved the day because the belt did not fly off and the piston did not stick into the valves.
But for those who have plugless pistons, they are destined to drive on loose belts. Well, just think, it fell off, hey, hey, but everything lasts a long time and doesn’t break. By the way, the tenth cans have 2110 and some others may have rollers with flanges, they don’t have to worry too much about it, these rollers won’t let the belt fly off just like that from weakness. — It’s okay to slip over the teeth of the pulleys, well, just think, the traction has dropped or it’s completely stalled, corrected it, tightened it and again the gas is up to the limit. The main valve head and pistons cannot be killed. They already write on the Internet that AvtoVAZ began producing engines with 98 hp. and 106 hp with plugless pistons - Freebie please! But the 1.8 liter engines are 122 hp. Not yet, just look for and install such pistons yourself.
So, change the pumps themselves and the safety belts. brr timing belt and don’t be afraid of anything. The main thing is logical thinking and the right approach to what you want to do.
Timing marks - installation of timing marks using the example of a VAZ 2110, 2111 and 2112 engine
Dear friends, today we will tell you the basics of setting timing marks using the example of a VAZ 16 valve engine. It's no secret that correctly set timing marks are the key to proper engine operation. If the marks are set incorrectly, then normal engine operation is impossible. It is also important to tension the belt correctly, this greatly affects its durability. So, when do we have to deal with the procedure for setting timing marks? When, according to the regulations, we need to replace the timing belt at the next maintenance, by the way, the rollers are also necessarily changed along with the belt in this case. Also, if our pump is “covered,” the timing belt will have to be removed, since it is this that drives our “water pump.” Well, what if (the worst case scenario) is that our belt broke. Here, if the engine is “plug-in”, then this is a huge nuisance, the pistons meet the valves, and at a minimum, we are guaranteed to remove the cylinder head and replace the valves. So, what are timing marks and where are they applied? The first is the marks on the camshaft pulleys, both on the intake and exhaust:
They must coincide with the mark on the crankshaft, and there are already several methods for calculating this mark. It’s quite difficult to remove the generator belt pulley (it doesn’t allow you to see the mark) and see if the marks match.
With such a coincidence of the piston marks, they are at TDC (Top Dead Center)
The second method is to calculate the DPKV sprocket by the teeth
And finally, the third option for setting the crankshaft position is the marks on the flywheel, they can be seen if you remove the rubber plug on the gearbox:
These are the options for comparing timing marks that we offer you using the example of 1.5 16V engines installed on the VAZ-2110, VAZ-2112 and VAZ-2111. If you still have questions regarding timing marks on your specific engine, ask them on our forum, in the appropriate section.
REPLACING THE VAZ 2110 TIMING BELT (16 VALVES)
Not every car enthusiast knows how to replace the timing belt on their own. For 16 valves this procedure is carried out slightly differently than for 8 valves.
First of all, you need to remove the protection casing.
Remove the “chip” from the crankshaft sensor and unscrew the bolt. After this, remove the sensor itself.
The pulley is missing a tooth that allows the crankshaft sensor to find top dead center. In addition, the missing tooth is necessary to lock the crankshaft and tighten the pulley mounting bolt.
The pulley must be aligned with the hole for the crankshaft sensor. A tube of suitable size or some other suitable object must be inserted into this hole. We block the pulley, unscrew it and remove it.
We loosen the tension by unscrewing the tensioner nut and remove it.
We insert a new belt. You can do this in two ways, depending on what is convenient for you. This is done by turning the right camshaft with a wrench or by removing the tensioner roller.
We fasten the bolt that serves to secure the pulley, then align the marks of the belt drive gear. If there is no mark on the oil pump housing, you can use the flywheel marks as a guide. Afterwards, you can make a mark yourself to make it more convenient.
We align the marks on the camshaft pulleys, paying attention to the fact that the drive gear marks must certainly match. We use a tensioner roller and a special key to tension the part.
If you don't have such a key, you can use two nails and a screwdriver or pry bar that needs to be inserted between them. You can also use forks by first removing the two front teeth and shortening the two outer ones to half by bending them. Finally, be sure to tighten the tensioner nut.
We use a tensioner roller and a special key to tension the part. If you don't have such a key, you can use two nails and a screwdriver or pry bar that needs to be inserted between them. You can also use forks by first removing the two front teeth and shortening the two outer ones to half by bending them. Finally, be sure to tighten the tensioner nut.
Check the tension by pressing your finger up and down.
- We turn the crankshaft exactly two turns, and then check each mark. If they all match, the pulley can be screwed on. Otherwise, repeat steps 6 – 9.
- After everything is done, we return everything to its place and start the engine.
Now the replacement can be considered completed. As we now see, this procedure takes a little longer, but it is not much more complicated.
Replacement process detailed instructions
Replacing the air filter on a VAZ 2110 with your own hands
We will look at options with 8- and 16-valve engines, which are present in the VAZ 2112 and 2110 models. Regardless of the number of valves, the same set of tools will be required for replacement. The list includes standard tools that can be found in almost every driver's garage.
Timing belt for VAZ 2110 16 valves
In addition to the timing belt itself and the roller for the VAZ 2110 or 2112, you will need:
- a special key that regulates the degree of tension of the roller;
- spanner set to “17”;
- key to “15”;
- key to “10”;
- installation, as an alternative - a powerful screwdriver.
Replacement on an 8-valve engine
Replacing the VAZ 2110 8 valve timing belt is as follows:
- First of all, we de-energize the battery - for this you need to get the negative wire;
- We unscrew the bolts that hold the timing belt protective casing, and then remove the casing;
- On the passenger side, it is necessary to remove the engine compartment mudguard along with the protective element and the right wheel;
- Our task is to ensure that the marks on the cover and, accordingly, on the pulley match, as indicated in all the diagrams. To do this, you need to twist the part clockwise;
- We go to the gearbox and remove the plug from it;
- We need to check the alignment of the marks in this hole;
- We block the flywheel - for this you can use a mounting tool or a powerful screwdriver;
- Now you can remove the timing generator pulley;
- We got to the nut that holds the timing belt pulley - it needs to be loosened, but not unscrewed;
- Now we have reached the required element of the VAZ 2110 or 2112 timing belt. Now it can be removed. All parts that it covered must be cleaned with detergent. After removing dirt, the area should be wiped with a clean rag;
- Next, a new timing belt and tensioner roller are installed - follow the direction indicated on the arrow. Sometimes it happens that the manufacturer does not indicate the arrows, in which case, you need to place the element so that the inscription is read from left to right;
- To tension, you need to turn the roller counterclockwise.
- The next step is to test the timing belt and its tension. You need to check the element with a cold engine, and the temperature in the garage or box should be within +15-+30C. We start the engine and inspect the timing belt.
If there are no unnecessary sounds or vibrations, then all the elements can be installed back - these are the wheel, casing and mudguard.
Replacement on a 16-valve engine
Despite the fact that there are more valves, replacing the timing belt is no more difficult than on the version with 8 valves. So, replacing the VAZ 2110 16 valve timing belt is performed as follows:
- As in the case of the VAZ 2110 or 2112, where there are 8 valves, we need to dismantle the belt protection. It is held in place by 6 bolts.
- Next, you need to remove the chip from the crankshaft sensor - unscrew the mount and take out the sensor itself. For clarity, you can study the photo.
- If you dismantle the gas distribution mechanism yourself, then you probably noticed the absence of one tooth. This is done so that the sensor can independently find the dead center. This feature can also be used to lock the crankshaft.
- Blocking can be done when a tube of a suitable size is placed in the hole under the sensor. Now the pulley is blocked, as a result, it can be safely dismantled.
- Next, the work scheme is practically no different from removing the 8-valve timing mechanism with your own hands - loosen the roller fastening and remove the faulty or worn belt.
- There are two ways to install a new element: remove the tension roller and then install the belt along with it, or do it by turning the camshaft.
- When the new element is installed, you can return everything to its original position. You should start by fastening the pulley - tighten the bolt and align the gear - the marks on the oil pump will help with this. If they are missing, then you can make a mark yourself.
- The parts must be combined carefully, since the timing gear should not get knocked out.
- Using a special wrench, we must tighten the belt. Not everyone has such a wrench, but as an alternative you can always take a powerful screwdriver and two nails. It is also worth remembering the nut, which must be tightened tightly.
- We check the tension; the rubber should move away from the gears, but there should be no folds.
- All that remains is to turn the crankshaft 2 times and make sure that the marks remain in the same place - the work is completed
Check the gas distribution mechanism every 10 thousand kilometers, and then you will not have to spend money on expensive repairs.
When is replacement required?
The belt has a resource - a set service life. If this period has expired, the spare part must be replaced even if it looks normal. After all, a break can happen at any moment.
When asked how many kilometers it is necessary to replace the belt so that the belt does not break, experienced car enthusiasts give different answers. Some believe that after 50–60 thousand kilometers. Others clarify: this replacement period is relevant for an 8v (eight-valve) engine. If a 16v (sixteen-valve) engine is installed, then replacement must be done after 30–45 thousand kilometers.
In the video, a practitioner shows what timing belts look like after a long run and whether advertising should be trusted. Filmed by ExpertR channel.
Timing belt 2108.10 - 8kl (slips and wears off, after tension there is extraneous noise)
Many have encountered such a problem as the belt slipping and being “eaten”. Sometimes such a car is bought second-hand, or during scheduled maintenance when replacing a belt, rollers, or pump, this happens.
Also, all this is overgrown with numerous myths: like the tension roller pin is bent, the timing gear is worn out - well, to manage to bend the M10 pin, of course you need to try (!); wearing out the timing gear with a rubber belt is probably(!) only possible in a million kilometers, but not in 100,200 or even 400 thousand km.
Let's figure out why this happens.
Belt slippage occurs:
1. poor-quality belt
(after replacement, it moves outward/inward) - you can determine by turning the belt over to the other side
2. Pump
- misalignment and, as a result, the belt moves out (if the pump is worn out or when installing a new pump, the mating surface to the block was poorly cleaned of the old one gaskets, sand, dirt)
3. The tension roller wears out the bearing
and, as a result, the roller is skewed.
4. banal tugging of the belt!
A very common case - you may not even notice it. In the case of operations with the timing belt, when the belt begins to slip (and before that everything was fine), check the belt tension, barely tighten it and look - if it doesn’t slip, it means the belt was tightened too much!
When changing the pump and rollers, you need to thoroughly clean the mating surface on the block and on the mating mechanism (roller/pump); there should be no sand or dirt, otherwise there will be distortion.
Sometimes everything is simpler than it seems!
By the way, I can’t understand who came up with the story about the fact that timing gears need to be changed...even the factory doesn’t regulate their replacement - they are eternal; a rubber belt in life will not erase an iron gear; 9 cars from the 80s to this day have the original gears and nothing has worn off and it works with a bang (and they have mileage even under 400 thousand) - most likely this story came from crooked services where they usually change everything just to squeeze more money out of the client...
You do not need to tighten the belt too much so that its part from the timing gear to the crankshaft can be rotated 90 degrees with a little finger effort, but does not dangle. If you tighten the belt a little, the pump will start howling. You need to grasp this fine line.
By the way, there are those who pull the roller in the other direction - i.e. clockwise is not correct! Tension only counterclockwise!
All this information posted by me is based only on personal experience, trial and error + consultations with competent people. Miracles don't happen; if the mechanism doesn't work, then you made a mistake.
Naturally, all this is provided that your crankshaft/camshaft is not hanging out in bed!
Source
The timing belt is slipping! Help... Part 3 - hopefully the final one!
In general, I changed my mind and re-read everything I could about the timing belt slipping. In the end, I decided that I would change the tensioner pulley again (well, suddenly it was crooked), I went and bought the most expensive one. The price seems to be 550 rubles. In the store I measured it with at least a caliper. All smooth. I also bought another new washer. Came back to the service center. Put. Eeeee. The belt slipped right after starting the engine. AHHHHHHHHHHHHHHHHHHHHHHHHHHHHHHH! Yes, what is it? He spat. I collected everything. I went to drink coffee, get upset and see how much dozens of them are these days)) Then I thought that it was wrong to sell someone such turd. And God forbid they get stuck somewhere else... and God forbid with a child. In general, after these thoughts, I went once again to terrorize my mechanics and craftsmen. Apparently I really got them, if the master began to read the Kulibins’ advice on this issue. Once again we watched the videos on YouTube, if I’m not mistaken, by Alexander Skripchenko. He cut out all sorts of halves of washers from beer cans and put them there. We have already gone through this and decided to approach this issue differently. We took an ordinary Soviet washer about 3 mm thick. They sawed it in half and went to line it up. We tighten everything, start it, and the belt runs to the engine. Well, that means “a little thick”)))) we thought)) We found some copper one half as thin. They halved it and again went to line it up and tighten it. We start it up and lo and behold. You guessed it. The belt sits exactly in the middle of the roller and does NOT slip! Guys, you have no idea how I exhaled. Well, as always, I have a beer for the guys. Result: Please note right away that these are our personal conclusions. The crooked stud seat is to blame. Either take it to the turners and cut a new thread for M12 on a machine and install a repair stud, or throw away the cylinder head and install a new one, or collect all sorts of half-washers from the collective farm, as we have done so far. CONCLUSION from this whole epic: The reasons for the timing belt slipping can be either a worn pump, or a worn roller, or a crooked stud, OR a CROVE SEATING PLACE OF THE PIN. Advice: If you encounter a problem such as the timing belt slipping: 1. Change the stud. This is the cheapest (25 rubles) 2. If 1 doesn’t help, change the pump (about 700 rubles) 3. If this doesn’t help, we start collective farming the halves of the washers. Exactly pucks! not beer damn cans! take a regular washer, cut it into strips and put it in! If it slides AWAY from the engine, place this half washer to the left of the pin (if you look at the engine from the end and imagine that the pin is like the center of a clock, then you need to place the half washer within 7-1 hours). If to the engine, then accordingly to the right of the hairpin (i.e. 2-8 o'clock). Everything is done only by trial and error!
If you liked my post, please like and subscribe) I hope that my experience will be useful to someone. Well, as always, a photo report. I read it to the end - handsome!
Source