Operating conditions and the attitude of the car owner towards his vehicle largely determine the service life and the manifestation of certain problems in the car.
We often hear about such a phenomenon as water hammer caused by water entering the power unit. In general, cars and water are not particularly friendly with each other, since moisture provokes the development of corrosion on the body, the appearance of rust, and the destruction of the paintwork. Plus, water can damage the wiring and cause a short circuit. And you shouldn’t forget about the notorious water hammer, since they actually destroy the engine, forcing the car owner to carry out expensive internal combustion engine repairs or completely change the engine.
Drivers need to be aware of the possible causes of water getting into the engine oil, as well as the necessary measures to take in such situations. Knowing the causes and triggers greatly helps prevent the negative effects of moisture. Or at least promptly and correctly eliminate the consequences of foreign liquid getting into the engine.
Routes of entry into the engine
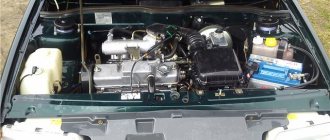
The first step is to understand why water may suddenly end up in the oil, which is responsible for cooling and safe operation of the engine, which contains a large number of moving elements inside.
This phenomenon is indeed considered non-standard, since initially the design of the internal combustion engine is thought out and created in such a way that water and other external destructive factors do not affect the engine in any way. For this, various monolithic structures, seals, protection, etc. are used.
But in practice, it is almost impossible to completely protect a vehicle from water. Liquid can penetrate even the smallest holes, seep through cracks and reach the internal parts of the engine.
The primary source of water in the engine are considered to be puddles, ponds, and various water obstacles that you have to overcome in your own car. Moreover, water gets into the engine not only of those who engage in extreme overcoming of obstacles on the roads. This also often happens when operating a car in the city after heavy rainfall, broken pipes on the road, etc.
When the car is low-slung, that is, the ground clearance is low, and the puddle or pond through which it passes is deep, the fluid will most likely come into contact with the heated internal combustion engine. Do not forget that water is not compressible, that is, it does not have the property of compression, unlike gasoline or diesel fuel. Because of this, when water enters the combustion chamber, the piston experiences a strong shock due to the impact on the fluid. This leads to negative consequences in the form of destruction of engine elements.
Winter is also not the most favorable period, since drivers have to drive through snowdrifts and overcome snow and ice masses. If you add to them various reagents used to clear roads from ice and snow, you get a mixture that is extremely dangerous for metal. Gradually, the crankcase walls are destroyed. They rot and holes appear. Water quickly seeps through them and confidently moves towards the power plant.
The pan can accumulate moisture for more trivial reasons, when during careless driving it is hit, pierced, and gradually, during even light rain and after driving through small puddles, liquid collects there. But even a small amount of moisture in the crankcase is potentially dangerous for the internal combustion engine. That is why motorists are advised to regularly check the condition of the oil pan and eliminate any defects, punctures, cracks and holes that form. Simple prevention will allow you to avoid much more serious and dangerous consequences.
The worst thing about water getting into the engine is that the liquid mixes with the lubricant. As a result, the water-oil emulsion begins to move throughout the lubrication system, ending up directly on the engine cylinder head.
It is worth highlighting several main sources of moisture that ends up inside the engine:
- Oil may be mixed with water due to a crack in the oil pan itself;
- Or cracks have appeared in sections of the lubrication system line;
- In some cases, when the crankshaft on which the liner has rotated is performing poorly, strong impacts appear on the head. As a result, cracks appear between the water and oil lines in the head. Water penetrates through them;
- Condensation can be a potential source of trouble. Sometimes it forms directly inside the engine crankcase. This happens if you drive your car into a garage after a frost, where the temperature is quite high.
Regardless of the reasons, it is imperative to find the source of liquid penetration, carry out repairs if necessary, and also get rid of the extraneous moisture itself. Otherwise, you may face dangerous and costly breakdowns.
Causes of malfunctions and ways to eliminate them
An oil leak that goes undetected in time can lead to serious damage to the power unit. To eliminate the problem and prevent further leaks, it is important to know the causes of their occurrence. So, the malfunction may be caused by:
- Insufficient ventilation of the unit crankcase. The problem is typical for heavily worn engines and gearboxes. The ventilation ducts of such units are very dirty - this creates increased pressure in the crankcase and leads to the displacement of lubricant through oil seals, cuffs or gaskets; oil can drip quite copiously.
- Excessive amount of lubricant poured into the unit. An excessive amount of oil contributes to an increase in oil pressure in the system. In this case, the seals and gaskets cannot withstand the increased operating pressure and “break through” (begin to leak).
- Incorrect choice of lubricant. Long service life of oil seals and gaskets is ensured by the type of lubricant recommended by the vehicle manufacturer. The use of another, even higher quality oil leads to the destruction of the sealing elements.
- Long-term (more than a month) vehicle downtime. Gaskets and seals can fail if the engine does not warm up for more than four weeks - all the oil drains into the crankcase, and the seals that remain without lubrication dry out and collapse.
In addition, lubricant leakage occurs due to defects:
- oil pan;
- intake manifold;
- oil filter;
- distributor;
- oil pressure sensor.
Attention! If the low oil pressure indicator located on the dashboard is activated, the vehicle is prohibited from operating.
Let's take a closer look at those components and assemblies of the car, the malfunction of which can cause an oil leak.
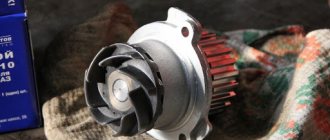
Engine
Lubricant leaks are a serious challenge for anyone, especially a novice driver. Note that it is quite difficult to independently eliminate the causes of blue smoke from the muffler. It is no less difficult to eliminate oil leakage due to severe wear of the shaft or piston-cylinder group of the engine - with such problems it is better to immediately contact a service station, where experienced craftsmen will quickly and efficiently repair the engine. Today we will only talk about those defects that you can eliminate with your own hands.
Crankcase ventilation system
Modern car engines are equipped with “dual” crankcase ventilation: the first part of the system operates at high crankshaft speeds, the second - at idle. This equipment includes:
- An oil deflector valve that prevents oil vapor from penetrating into the engine combustion chamber. If the device becomes clogged with carbon deposits, its normal operation will be disrupted - oil will penetrate into the air filter and then into the intake manifold. The car engine will begin to smoke heavily.
- A ventilation valve that regulates the pressure of gases that enter the manifold. In idle mode, the device is in the open state, closing smoothly with increasing speed. Incorrect operation of the part leads to a lean mixture, causing interruptions in the engine.
- Dense rubber tubes that remove excess gases that enter the crankcase. These elements are ventilation channels; becoming clogged with slag and fumes, they disrupt the normal operation of the system. Exhaust gases create excess pressure, which leads to the fact that most sealing gaskets, unable to withstand such loads, are destroyed and begin to leak the steam-oil mixture.
If ventilation channels 2 and 3 are contaminated, there may be an increase in pressure in the system and breakdown of sealing gaskets
The crankcase ventilation should be checked first, paying special attention to the condition of the oil deflector valve installed in the valve cover . You can verify that the system is working as follows:
- Remove the oil filler cap.
- Cover the neck with a piece of thick cardboard.
- Start the car engine.
- Increase the crankshaft speed to 1000 rpm.
Attention! The ventilation system works normally if the cardboard is pressed tightly against the neck due to the vacuum that forms in the engine crankcase. Otherwise, all rubber tubes included in the assembly should be cleaned of internal carbon deposits or replaced with new ones.
Valve lid
If oil leaks from under the valve cover, remove it and thoroughly clean it of internal carbon or deposits.
Oil leaks from under the valve cover are eliminated by removing deposits
In addition you will need:
- Wash the oil separating valve of the crankcase ventilation system and the mesh located in it.
- Replace the rubber sealing gasket, having previously lubricated it with sealant on both sides.
- Apply sealant to the rubber washers that are installed under the bolts securing the cover.
- Reinstall the valve cover and tighten the mounting bolts.
Diagram of drawing fastening bolts
Attention! When tightening the mounting bolts, be careful; excessive force may damage the surface of the cover or strip the threads.
Oil filter
If you find that fluid is leaking from under the oil filter, the part should be tightened. Typically, an oil leak in this place can only occur when installing a defective device, so the correct solution would be to completely replace it.
An oil leak from under the filter housing can only be eliminated by replacing it.
Attention! A filter of a collapsible design should be changed at the first sign of a malfunction - in most cases, even a minor leak can lead to complete destruction of the part body.
Pressure meter
A leak from under the oil pressure sensor can be eliminated in the only way - by immediately replacing the device. The urgent need to perform these actions is due to the fact that the cause of the malfunction here is wear and disruption of the integrity of the rubber diaphragm located inside the part. The element can break through at any time - then the oil pump through the sensor will expel all the lubricant from the engine in a few minutes.
The problem of oil leakage from under the pressure sensor can be solved by urgently replacing the device
Attention! Most oil pressure sensors produced by the same manufacturer differ only in the connector design and can be interchanged.
Distributor
Fixing a leak that occurs from under the distributor cap is not difficult. To do this you need to do the following:
- Remove the protective cover and notice where the slider is pointing. Remember that the reference point should be the mark on the engine, and not on the body of the part.
- Unscrew the mounting bolts and remove the distributor.
- Apply sealant to the outer surface of the toric (rubber seal).
The rubber ring can be removed by prying it with a thin screwdriver
Attention! The distributor must be installed so that the slider takes the same position as before the dismantling procedure.
Pallet
Oil flows out of the engine crankcase only after the pan hits uneven road surfaces.
Leaking engine oil pan needs to be straightened
In case of critical damage, the part must be replaced, but if the pallet is simply “stretched” on the mounting bolts, then it can be straightened (straightened). To do this you will need:
- Drain the engine oil.
- Unscrew the fastening bolts and disconnect the part from the crankcase.
- Thoroughly clean and rinse the tray of all kinds of deposits and dirt.
- Straighten (straighten) the surface.
- Apply sealant along the contour of the part and install it in place, tightening the fastening bolts.
Attention! When installing the pallet, tighten the bolts evenly and with extreme caution - you can easily strip the threads and break off one or more fastening elements.
Oil seals
Any modification of a car engine is equipped with two sealing gaskets - crankshaft oil seals, framing the mechanism at the front and rear. The exhaustion of the working life of parts or excess pressure of crankcase gases can cause oil to leak through these elements. Please note that this problem can only be resolved by replacing the seals.
Oil leakage through shaft seals
Depending on the design of the engine, the front “frontal” oil seal is mounted in the cylinder block cover or the oil pump housing. To replace it you will need:
- Remove the generator drive belt.
- Unscrew the pulley nut and remove the device from the shaft.
- Unscrew the bolts securing the crankcase cover with the oil seal.
- Remove the oil pump housing (if necessary).
- Carefully remove the broken seal.
Carefully remove the broken oil seal from its seat
To eliminate oil leakage through the rear “main” oil seal of the crankshaft, you will need to dismantle the cardan drive, disconnect the gearbox and clutch housing. The cage in which the sealing element is installed is removed as follows:
- Disconnect the clutch basket.
- Remove the flywheel and the protective casing located behind it.
- Unscrew the bolts securing the cover holding the oil seal.
You need to unscrew the cover bolts
There are other seals in a car engine that can leak - gas camshaft seals or oil pump shaft seals. Replacing these elements is done in the same way: they are lubricated with lithol and installed with a spring inward.
Before replacement, the seals are washed with lithol.
Attention! Avoid purchasing suspiciously cheap or homemade seals. It is important to use high-quality oil seals - only they can ensure long-term and uninterrupted operation of the units.
Video: Fixing a lubricant leak from a Ford Transit engine
If the source of the oil leak is the gearbox, first of all you need to check the tightness:
- drain plug;
- installation location of the measuring probe (if available);
- sensor mounting points.
A continuing transmission oil leak indicates the need for more complex, time-consuming and expensive repairs of the unit.
An oil leak from the gearbox requires urgent repairs.
Dismantling the gearbox may be required in the following cases:
- Violations of the tightness of sealing elements (cuffs, gaskets, seals).
- Wear of the main oil seal and the input shaft oil seal.
- Violations of the geometry of the surface of the pallet, leading to destruction of the gasket.
- Contamination of the crankcase ventilation system.
- Wear of the shafts or drives connecting the box with the engine and wheels.
- Malfunction of the torque converter or oil pump (automatic transmission).
- Primary shaft play.
Please note that repairing a gearbox requires some skills and the use of sophisticated tools. To determine the causes of the malfunction, we recommend that you consult with an experienced technician and determine the possibility of eliminating it or the need to completely replace the unit.
Video: Gearbox in oil. What to do?
Remember - do not put off replacing gaskets or seals if they begin to leak. It's not just a matter of lowering the fluid level and a drop in oil pressure in the system. Lubricant can contaminate the internal parts of the unit, increasing the likelihood of them slipping and leading to critical failure of the unit. And the last piece of advice - if one of the sealing elements leaks, replace them all at once, this will be much more reliable.
vote
Article rating
Possible consequences
The presence of water in the engine oil is always a bad sign. This is a dangerous phenomenon that must be combated as soon as the first signs appear.
The most undesirable and unfavorable consequence is considered to be water hammer in the engine. Such a phenomenon can literally lead to rupture of the power plant due to the destruction of internal combustion engine components. If a water hammer occurs, there is practically no chance of restoring the engine by repairing it.
A much more acceptable situation is when water found itself in the combustion chamber while the engine was running at low or idle speed, and the internal combustion engine did not have time to warm up to its maximum operating temperature. If the circumstances are this way, then the driver will encounter only minor deformation of the connecting rod. In this case, the remaining moisture can probably be removed using the release valve. The engine will remain in working order, and the car will be able to move on under its own power.
Signs of water in the engine
In practice, it is very difficult to completely protect against possible water ingress into engine oil. This requires driving the car extremely carefully, avoiding even the smallest puddles, not leaving the garage during rain and snow, monitoring the temperature in the garage to avoid the formation of condensation, etc.
Everyone understands perfectly well that no one is immune from such a problem. Therefore, in such a situation, it is extremely necessary to be able to recognize signs of water entering the engine in order to promptly take appropriate measures to remove it from the engine oil system.
There are several useful recommendations on how you can independently determine the water in your car’s engine oil:
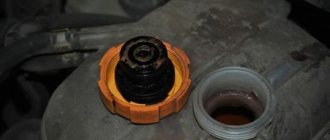
- Air filter. First, try unscrewing the air filter cover on your car. Even in situations where liquid has penetrated through the crankcase openings, it will be virtually impossible to stop further progress throughout the entire system. If the air filter is wet, water is dripping from it, or the humidity of its filter membranes is simply increased, there is a problem;
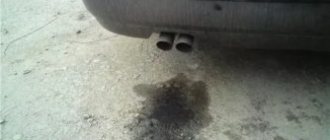
- Oil pan There is also a special lid that you can unscrew with your own hands. In normal condition, after dismantling, engine oil begins to flow out of the sump in a pure form and in good condition. If it flows into oil and water, then the car is obviously flooded with a large amount of liquid dangerous to the engine. Here, the first thing you need to do is try to completely drain the emulsion.
If after draining it seems to you that the system is completely cleaned and not a single drop of moisture remains inside, do not rush to start the engine. This is fraught with dangerous consequences.
In this situation, it is recommended to evaluate the current condition of the engine components. You should first find out whether the moisture has had time to cause trouble in the engine. The cylinder-piston group and crankshaft are checked.
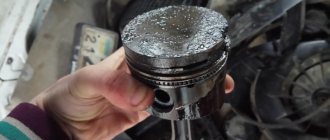
If a water hammer occurs, even a superficial inspection of these elements makes it clear that everything is very bad. This is due to deformation and large-scale damage to the crankshaft and piston-cylinder group, which are impossible to miss visually.
If a visual inspection does not allow you to get an accurate answer, you can try setting the manual transmission to third gear, and then roll the car literally a few meters so that the crankshaft rotates. If the shaft rotates, then the problem of a stalled motor is probably not at all caused by trapped water. Especially when, when removing the cover from the pan, you did not find any traces of water in the leaking oil. Here you will have to look for another source of trouble.
Algorithm of actions
Although water ingress is not a good sign, it does not always penetrate the oil of the engine lubrication and cooling system and cause problems with your engine.
It happens that when driving through another puddle or other water obstacle, the engine suddenly stalls. It is not necessary or even necessary to panic right away. It is possible that everything is fine, and you will soon be able to continue driving under your own power without any consequences for the integrity of the engine.
But if such a situation happens to you, first stop and turn on the handbrake. This will protect the car from accidentally rolling down a slope on the road surface. After this, the following actions are performed:
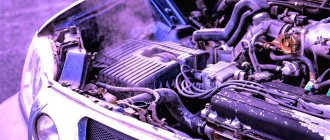
- Get out of the car, open the hood to let the resulting steam escape. After all, contact of a hot engine with water will certainly lead to abundant steam formation. You should not leave it inside, as condensation will form and moisture will settle on different surfaces;
- Using dry rags, paper towels and other available materials that can absorb water, go over all surfaces of the engine compartment. The first step is to remove moisture from the wiring so that not a drop of water remains. If you are afraid to touch them, first remove the negative terminal from the battery;
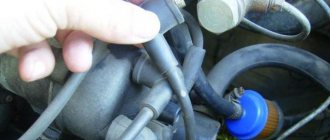
- Wipe thoroughly all existing recesses located near the spark plugs. Moisture is also removed from the ignition distributor cap and coil.
Starting after removing moisture
After the oil has been successfully changed, rushing to start the engine as quickly as possible is wrong. If the car is an old model and does not have an electronic control unit, then it is enough to unscrew the spark plugs, switch or coil and distributor. If you have an ECU, it is better to wait for the moisture to evaporate naturally. After removing the spark plugs, you can safely crank the engine using the starter, thereby drying the cylinders. For a full start, it is better to leave the car for a couple of days to completely evaporate any remaining moisture and ventilate it.
After a few days, you can put the spark plugs back in place and try to start the engine. If you can’t do this, you shouldn’t use any kind of sophistication for this. It is better to immediately call a tow truck or tug and go to the nearest car service center, where they will determine the cause as accurately as possible and eliminate the consequences using more technologically advanced methods.
Now, having found yourself in such an unpleasant situation, you also know what to do if there is moisture in the engine. There is no need to panic, turn off the engine immediately and do not wait for it to stall on its own due to water hammer.
Source