The main function of the charger (charger) is to restore the energy expended by the battery when starting the engine or during the operation of other consumers of the on-board network. The battery needs to be charged from third-party sources in cases where, for some reason, it cannot be restored from the generator.
This necessary accessory for car enthusiasts is presented in a wide range in the retail chain. But with prolonged or improper use, like any other equipment, charging equipment may lose functionality. You will always have time to buy a new one, but it is worth trying to determine the cause of the breakdown and, if possible, eliminate it. We will tell you how to independently check the functionality of the battery charger and, if necessary, restore it.
How to repair a car battery charger
Automotive battery chargers (BACs) are available in large quantities on the consumer market. However, any of them can break down over time during use. Therefore, it will not hurt car owners to know how to carry out simple repairs of chargers for car batteries. Of course, a lot depends on the degree of damage: if it is the simplest, there are elements that you can fix yourself.
System charging connector malfunction
As a rule, this problem is the main reason why the phone cannot be charged. To identify a specific malfunction, you need to check all the causes.
Poor contact between plug and charging socket
A similar problem may arise due to improper or careless operation of the charging device. In addition, poor contact can be caused by various debris, dirt, and dust that can accumulate in the charging socket. By the way, this reason is one of the most common. Therefore, to avoid such a problem, it is necessary to prevent the connector from becoming clogged. For prevention, regular cleaning is recommended.
Deformation of the charging connector
Most often, deformation of the connector occurs when an attempt is made to connect the device incorrectly (with the wrong side) for charging, or in case of excessive pressure during the connection process. In the event of such a breakdown, the phone will not be able to be charged, either via USB or by connecting to an outlet. To identify deformation of the connector, it is necessary to visually inspect it, check it with a multimeter or voltmeter in a specialized service. If you have all the necessary tools and knowledge of the phone's structure, you can perform the check yourself.
Main types of ROM
All chargers, based on the principle of operation, are divided into two types: pulse and transformer . A pulse device operates due to the presence of a pulse current converter in it. And inside the transformer charging there is a simple transformer with a rectifier, due to which the ROM weighs more and looks more bulky than a pulse one. Pulse-type devices are considered more reliable in operation, but transformer-type devices are easier to maintain and repair.
How to check the charger
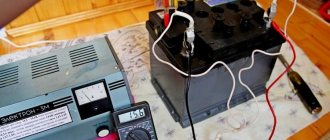
If you decide to charge your car battery at home, but have doubts about your charger, this article is for you. A simple check determines the quality and serviceability of its operation.
One way is to connect it to the battery and measure the voltage readings with a multimeter. The optimal U in this case is 14 V, a little higher is allowed, up to 14.4 V. If U is less than 13 V, or the multimeter detects its jumps, then there is definitely a malfunction, and it is necessary to carry out some kind of repair of the starting-charger.
If you don’t have a battery at hand, you can check the functionality of the charger with a simple electric light bulb rated for U 12 V. If the light bulb starts to light when connected to it, charging is working normally, and if the light bulb does not light up, the device should be repaired.
Types of starting devices
Having some skills in radio electronics, we assemble a starting device for a car with our own hands. We will show drawings and photos, but first we will decide on its type, since they are different
Regardless of the type, it is important for us, as users, that the PU can work without the help of a battery and starts the engine not at the limit of its capabilities, turning red and smoking, but working stably even in severe frost. This is the most important condition when choosing a ready-made charging and starting device or assembling it yourself
There is no special pickle here. The mechanism can be one of four types:
- pulse;
- transformer;
- battery;
- capacitor.
The essence of the work of each of them ultimately comes down to supplying the on-board electrical network with a current of the required rating and voltage, 12 or 24 volts, depending on the type of electrical equipment on board.
We carry out simple ROM repairs with our own hands
You can try to carry out a simple repair of a car charger and, using the example of a transformer-type power supply, consider how this should be done.
Before carrying out any actions with the ROM, you must turn it off from the network. Carefully remove the cover using a screwdriver and first check the integrity of the wiring. It is quite possible that the problem is loose contacts, and then the problems can be solved yourself using a simple soldering iron.
It happens that some plastic connections between the components of the charger break or melt. In this case, you can also replace them yourself using a soldering iron and suitable available tools.
If all the wires and connections are in place, you should check all other ROM elements in turn . First of all, a multimeter checks the voltage level at the beginning of the electrical circuit, at the input. U is measured along the wire to the point where the wire connects to the transformer itself.
If U jumps or is not there at all, then it is checked:
- fuse (U should be on both sides, on one terminal and on the other, and if there are problems, the fuse must be replaced);
- wiring and plug (U is checked according to the same principle; if there are problems, one or the other is replaced);
- checking the transformer itself (measurements U, if there are any, the transformer is working, if not, you need to check the biscuit switch);
- if the switch is faulty, the output U will be absent but present at the input .
DIY Repair Tips
Troubleshooting and repairing a charger is a creative process; the fault can lie in anything, so it is impossible to provide step-by-step repair instructions. But we can sort out the general principles.
To diagnose and repair a memory, you need to understand its structure. Chargers are built according to two schemes:
- linear;
- pulsed.
Each option has its own advantages and disadvantages.
Linear memory structure.
Linear type chargers are built relatively simply:
- 220 volts goes to the power transformer, which reduces the mains voltage;
- the secondary voltage is rectified by a controlled rectifier (usually based on thyristors, but there are also powerful transistors);
- the control circuit specifies the operating modes of the memory (performed both on discrete elements and on microcontrollers;
- measuring instruments indicating current and voltage (there may not be a voltmeter - current is more important).
As a rule, there is no output filter in linear chargers - this is not needed to charge the battery.
Scheme of the Kedr-auto linear charger.
The Kedr-auto charging and recharging device was built on a similar principle. When plugged in, you should hear a low-frequency rumble and feel a slight vibration. If this is not the case, you need to check the voltage of 220 VAC at points 1 and 2. If it is not there, you need to look in the power cord and fuses. If there is voltage, there is a high probability of failure of the power transformer. If everything is in order, the presence of low alternating voltage is checked at points 3 and 4. If it is present, then the diagnosis of the power transformer is completed.
Next, the power part is checked. The thyristor is tested by a tester in diode continuity mode . In the normal state, the resistance in both directions should be high - the device is locked. But if you touch the anode and the control electrode simultaneously with the positive probe of the tester, the thyristor will open and the multimeter will show some resistance. This means the valve is working properly.
Checking the serviceability of the thyristor.
If the power transformer and key elements are working properly, then the problem is in the control circuit. Different charger models use different designs of such devices, so it is impossible to give general recommendations. In each specific case you need to figure it out yourself. If the circuit is assembled using discrete elements, there is a chance of success. If the charger is controlled by a microcontroller, it is unlikely that it will be possible to repair the charger. Replacing the microcircuit is easy, but finding the firmware is difficult.
If a charger made using a pulse circuit does not work, then in addition to the devices, a certain level of knowledge and qualifications will be required - such devices are much more complex.
Structure of a pulse charger.
In such a device the mains voltage is:
- passes through a surge protector;
- straightened and filtered;
- using an inverter controlled from a separate circuit, pulses with an amplitude of about 300 volts and a frequency of several kilohertz/tens of kilohertz are cut;
- pulses are transformed by a step-down transformer;
- then the reduced voltage is rectified and filtered (the filter serves here not only to smooth out the voltage, but also to eliminate some of the high-amplitude surges - the battery does not like them);
- through feedback circuits and a control circuit, the operating mode is set (current stabilization, voltage stabilization, training cycle, etc.).
The basic principles of troubleshooting can be considered using the example of the ZU-3000 charger.
Scheme of the pulse charger "ASTRO" ZU-3000.
First of all, you need to check the alternating voltage at the input of the diode bridge (after resistors R1 and R2). There should be 220 VAC. If not, you need to check sequentially:
- fuse serviceability;
- power cord and plug;
- input filter elements (primarily the thermistor).
If everything is in order, then the voltage at the bridge output is checked (on capacitors C2, C3, C4). there should be about 300 volts DC. If not, check the serviceability of the bridge diodes VD1-VD4, then capacitors C2, C3, C4. If everything is OK there, you need to use an oscilloscope to verify the presence of pulses at output D of assembly DA1. If they are not there, there is reason to suspect a failure of the power transformer or TOP225YN PWM controller. If everything is fine here, the secondary circuits are checked - rectifier, filter, feedback. If the AtTiny-26 controller is faulty, the chances of successfully repairing the device are slim.
Checking the diode bridge
If you have the desire and ability to diagnose a diode bridge, you must keep in mind that diode bridges can be either monolithic or with the ability to replace one faulty diode with another. In case of malfunction, monolithic bridges are removed and replaced entirely. As for applying voltage to the bridge to check its normal operation, U is supplied to the ROM. If the bridge is working properly, no current will be lost at either the input or output. If the current does not flow at one of these stages, then you need to check each diode separately, identify the faulty one and replace it.
Checking the ammeter inside the ROM
For a more accurate diagnosis of a breakdown, if nothing was detected during previous checks, you should check the ammeter. If, when checking the voltage in the ammeter, it is absent, but when connecting its terminals to each other, U appears, it means that the ammeter is broken and it is time to repair it.
Thus, it is possible to carry out fault diagnosis and simple repair of chargers for automobile lead-acid batteries on your own. But when the battery is not charging due to a malfunction of the device, and the car enthusiast does not have the necessary skills in the field of electronics, or he was unable to repair the ROM himself, it is best to turn to specialists. As a last resort, you can try to charge the battery without a charger.
Well, home handymen may also be interested in learning how to make a load plug for a battery with their own hands.
Source
Disassembly and testing of the device
Like any equipment, malfunctions may occur in the operation of the charger. Suddenly it turned out that it stopped performing its charging functions. There can be many reasons that led to the malfunction. For example: improper operation, careless storage, aging of parts and wires. Given the complexity of the device, repairing it without appropriate qualifications is only possible superficially. The check is done in the direction from the power source to the battery.
Inspections and repairs are carried out only with equipment disconnected from the network . Using a screwdriver and keys, you need to disassemble the case and inspect the parts of the charger. It is likely that there will be obvious signs of burnt out wires, diodes, and a step-down transformer. Burnout of the windings of the latter is usually accompanied by the release of a pungent odor of burning and soot. It is possible that during inspection a wiring or broken wires will be discovered. If nothing could be detected visually, you need to proceed with a more detailed check.
Battery won't charge
If a battery that is more than 5-7 years old is not charging , then the answer to the question is: “ why ?” most likely lies on the surface. After all, any battery has its own service life and over time loses some of its basic performance characteristics. But what if the battery lasted no more than 2 or 3 years, or even less? Where then should we look for reasons why the battery does not want to charge? Moreover, this situation occurs not only when recharging from a generator in a car, but even when it is replenished from a charger. Answers must be sought depending on the situation by performing a series of checks followed by procedures aimed at eliminating the problem.
Most often, you can expect 5 main reasons that manifest themselves in eight different situations:
| Situation | What to do |
| Oxidized terminals | Clean and lubricate with special lubricant |
| Broken/loose alternator belt | Stretch or change |
| The diode bridge has failed | Change one or all diodes |
| Voltage regulator faulty | Replace graphite brushes and the regulator itself |
| Deep discharge | Increase the charging voltage or reverse polarity |
| Incorrect electrolyte density | Check and adjust to the required value |
| Sulfation of plates | Perform a polarity reversal, and then several cycles of full charge/discharge with low current |
| One of the cans is closed | Actions to restore a battery with such a defect are ineffective |
What should you consider when choosing a ROM?
Despite the fact that over a period of time a certain rating of starter-charger models has been formed, which can be found below, the most popular and popular model is not always suitable in each specific case. When purchasing a device, you need to base it on your needs, situation and capabilities. To choose the most suitable ROM, you need to consider several basic characteristics, which are described in detail below.
Watch this video on YouTube
Maximum starting current
One of the most important parameters that you need to pay attention to when choosing a starting charger is the magnitude of the starting current. This indicator is measured in amperes and shows the amount of charge that is transferred to the battery when using the device.
To choose the most suitable model, you need to start from the engine size of the car for which you are purchasing the device. For small cars, a device with a starting current of up to 200 amperes is sufficient. If the engine is larger, then it is better to give preference to a ROM with a starting current of 300 amperes.
Support voltage
As for the output voltage indicator, it is recommended to purchase a device with this indicator of 19 Volts. Despite the fact that the vehicle's on-board network operates at a voltage of 12 volts, in the case where it is impossible to start the engine due to a discharged battery, a higher voltage will be required, even when starting the engine normally.
Dimensions and weight
Such parameters of the ROM depend on the further conditions of its operation. If a car enthusiast has a garage and there is no need to have the device with him all the time, then it is better to purchase a more powerful ROM, which can weigh on average 20 kg.
If a car enthusiast does not use a garage, but leaves his car in the parking lot and prefers to have the ROM with him, then the best option is to purchase a lighter and more portable device, the weight of which does not exceed 10 kg, and the width and height are 20 and 40 cm, respectively.
Additional options and features
Regarding various additional functions, it would not be a bad idea to purchase a device equipped with various protection systems, for example, if the car owner mixed up the terminals when connecting the device to the car’s on-board network.
It is also worth giving preference to devices that allow you to regulate current and voltage indicators. Using this function, you can independently select the required value depending on the situation and the condition of the battery.
When purchasing, you should pay attention to the material from which the device body is made. It is better to give preference to devices with a metal body or made of high-strength plastic
Such models can last for a long time.
The main reasons why the battery may not charge
To understand in detail all the possible malfunctions due to which the car battery does not charge, first of all, clearly define the situation:
| The battery quickly discharges and dies | or he | does not charge at all (does not accept charge) |
In general, when the battery refuses to charge, the following options are allowed:
- plate sulfation;
- destruction of plates;
- terminal oxidation;
- decrease in electrolyte density;
- short circuit
But you shouldn’t worry so much right away, everything is not always so bad, especially if such a problem arose while driving (indicated by a red battery light). It is necessary to consider special cases in which the car battery does not take charge only from the generator or from the charger as well.
The charging system of a car battery contains a number of external devices, on which the performance of the battery itself and the charging process can also greatly depend. To check all external devices, you will need a multimeter (tester); it will allow you to measure the voltage at the battery terminals under different engine operating modes. You will also have to check the generator. But this is only true when the battery does not want to be charged from the generator. If the battery does not take a charge from the charger, then it is advisable to also have a hydrometer to check the density of the electrolyte.
How do you know if the battery is not charging?
The battery does not charge from the generator . The first signal that the battery is not charging is a lit red battery light! And to make sure of this, you can check the battery voltage. There should be 12.5... 12.7 V at the battery terminals. When the engine is started, the voltage will rise to 13.5... 14.5 V. With consumers turned on and the engine running, the voltmeter readings, as a rule, jump from 13.8 to 14.3V. No changes on the voltmeter display or when the indicator goes beyond 14.6V indicates a generator malfunction.
Battery problems
How to make a magnetostrictive emitter with your own hands: description, diagram and recommendations
One of the cases in which the problem was precisely in the phone battery is described in detail, with photographs of the process, here. Having then carried out diagnostics, we determined that the problem was a break in the control signal directly on the battery. This failure turned out to be the reason why the phone did not charge. The battery life of modern smartphones is designed for a certain number of full charge cycles. Therefore, if the resource is exhausted, the battery must be replaced.
Battery swelling
In some cases, you can determine that the problem with charging your phone lies in the battery by visually inspecting it. If the battery is swollen or shows other external signs of damage, repairs will not be advisable. The problem is solved by replacing the damaged battery with a new one.
The battery has lost its capacitive qualities
It is important to remember that a swollen battery or other external manifestations of its malfunction are not always the reason why it is impossible to charge a smartphone. However, charging problems associated with the battery manifest themselves as follows: the phone only works with the charger connected, the battery power is consumed very quickly and therefore the phone turns off after a short period of use
Such factors indicate that the phone’s battery has lost its capacitive characteristics specified by the manufacturer. This kind of damage cannot be repaired. The only solution to the problem is to replace the battery.
What can you do when your car battery is not charging?
The first step is to find out the cause, and only then take action to eliminate it. To do this, you need to measure the voltage at the battery terminals, check the level, density of the electrolyte and its color. It is also, of course, necessary to visually inspect the surface of the battery, the car wiring, and also to determine the current leakage.
Let us consider in detail the possible consequences of each of the reasons for poor battery performance, and also determine what needs to be done in a given situation:
Oxidation of contact terminals
both prevents good contact and contributes to current leakage. As a result, we get a quick discharge or unstable/absent charging from the generator. There is only one way out - check not only the condition of the battery terminals, but also the condition of the generator and the ground of the car. Heavily oxidized terminals can be removed by cleaning and lubricating the oxides.
Generator malfunction
(belt, regulator, diodes).
Belt break
you would probably notice, but the fact is that even a slight loosening of the tension can contribute to slippage on the pulley (as well as oil ingress). Therefore, when powerful consumers are turned on, the light on the panel may light up and the battery will discharge, and on a cold engine a squeaking sound can often be heard from under the hood. This problem can be eliminated either by tensioning or replacement.
Diodes
in normal condition they should pass current only in one direction; checking with a multimeter will make it possible to identify the faulty one, although often they simply change the entire diode bridge. Improperly functioning diodes can cause both undercharging and overcharging of the battery.
When the diodes are normal, but they get very hot during operation, it means the battery is being overcharged. The regulator is responsible for the voltage . It is better to change it immediately. In a situation where the battery is not fully charged, you need to pay attention to the generator brushes (after all, they wear out over time).
During deep discharge
, as well as with a slight shedding of the active mass, when the battery does not want to be charged not only in the car from the generator, but even the charger does not see it, you can reverse the polarity or give a high voltage so that it grabs the charge.
Possible faults and solutions
| Possible malfunction | Probable Cause | Elimination method |
| When the charger plug is plugged into the network, there is no voltage at the output terminals. | Broken power cord. | Replace the power cord. Remedy by a qualified person or repair shop. |
| When the charger was plugged into the network, a protective shutdown* occurred. | Battery short circuit, or charging current exceeds 13 A | -Reduce the charge current to that recommended by the manufacturer, -Check the polarity of the charger and battery connections. |
*Safety shutdown - in the event of a short circuit or incorrect connection of the battery (“polarity reversal”), the bimetallic fuse trips after a few seconds. To restore the device's functionality, snap the fuse back to its original position.
Causes of malfunction of starter car batteries
The service life of a battery discharged by 25% is significantly reduced if:
- malfunction of the generator and voltage regulator;
- starter malfunctions leading to an increase in current or an increase in the number of attempts to start the engine;
- oxidation of power wire terminals;
- constant use of powerful consumers during long periods of idle time in traffic jams;
- repeated cranking of the crankshaft with the starter on short trips.
A reduced electrolyte level during battery operation is also a key reason for rapid battery failure. Therefore, the cause of the malfunction may be:
- Rare electrolyte level monitoring. In summer, checking should be done more often because high temperatures promote rapid evaporation of water;
- Intensive use of the car (when the mileage is more than 60 thousand km per year). Requires checking the electrolyte level at least every 3-4 thousand kilometers.
Charging the battery from the generator
While the vehicle is moving, the electricity generation installation generates charging voltage, which is the main resource for recharging the storage unit. The process of charging the battery from the engine is carried out in a gentle mode, completely eliminating the possibility of boiling the electrolyte in the banks.
What kind of charging should go from the generator to the battery?
How much should the battery be charged from the generator to ensure its full operation? It is generally accepted that to fully replenish the energy costs of a battery, a generating device with a charging current volume of at least 10% of the capacity of the storage device will be sufficient. In other words, for a 70 ampere/hour battery, the generation system must provide at least 7 amperes of charging current, which will be normal charging of the battery from the generator. The power of the storage source must comply with the recommendations of the vehicle manufacturer.
If a more powerful storage unit is used, the current value generated during operation of the car engine may not be enough to fully restore energy consumption. This can further lead to battery discharge and problems starting the engine. In addition, you should remember about the load from all electrical appliances that the machine is equipped with - the generating source must also cope with it.
How can an ordinary car enthusiast check whether the battery is charging from the generator?
How to independently check whether the generator is charging the battery?
Motor vehicles of the 21st century are equipped with on-board electronic systems that control the operation of all mechanisms, and also allow checking the battery charging from the generator. If the battery loses charge, its icon on the instrument panel will light up red. In addition, with the help of modern electronic devices you can monitor the voltage value in the network.
But what about those who have an old-style car, without bells and whistles? There are so-called “driver’s” methods that allow you to check whether the generator is charging the battery:
- Removing the terminal from the battery - if the generator malfunctions, the engine will immediately stall (only suitable for systems with mechanical ignition).
- Short circuit of the positive terminal to ground for a short time - check for a spark.
The above methods cannot be used when diagnosing modern cars - the control unit, fuses or diode bridge will instantly fail.
How to check the charging of the generator with a multimeter?
The operation of the generator set should be monitored and diagnostics of current, voltage and resistance values should be carried out at least twice during the year.
How to check if the battery is charging? Diagnostics of potential difference can be carried out using two methods:
- Directly on the generator winding.
- Through the battery pack, with which the energy generation source is inextricably connected directly with a large cross-section wire.
Let's connect the wires of the device in any order to the battery terminals and determine the mains voltage, the value of which should not be lower than 12 V. When the engine is idling with the load completely disconnected, the permissible voltage is determined by the range from 13.5 to 14 V. In this case, deviations of no more than 0.2 V down or up.