A knock on the stabilizer bar is a harbinger of the fact that this suspension part will soon need to be replaced, and, consequently, additional expenditure of money. However, few people know and are trying to restore the racks.
Restoring the struts is only possible with a prompt response from the car owner! If there is a knock, quickly remove them and revive them. This reaction will allow the stabilizer struts to serve for at least 100 thousand km. If you drive one or two thousand kilometers, they will have to be changed without any options. But if you “tamper” the rack in time, then it can easily cover another 50 thousand kilometers, about the same as a new one.
How to make the stabilizer struts last 100 thousand km or more. Simple procedure
- 57 17 107k
A knock on the stabilizer bar is a harbinger of the fact that this suspension part will soon need to be replaced, and, consequently, additional expenditure of money.
However, few people know and are trying to restore the racks. Restoring the struts is only possible with a prompt response from the car owner! If there is a knock, quickly remove them and revive them. This reaction will allow the stabilizer struts to serve for at least 100 thousand km. If you drive one or two thousand kilometers, they will have to be changed without any options. But if you “tamper” the rack in time, then it can easily cover another 50 thousand kilometers, about the same as a new one.
Tool
The procedure for replacing stabilizer struts on all cars is almost the same. To produce it, you need to purchase new parts, and also acquire a torque wrench to control the tightening torque. It is different for each car; you can find out the indicator from the technical documentation supplied with the car.
The work of replacing racks is best done on a lift, but not everyone has this device in their garage, so a pit and a jack are suitable for repairs. Also, if possible, for replacement it is best to purchase special spring ties and a puller for steering rods, since with these tools repair work will be much easier.
All work is carried out on a suspended vehicle. Stabilizer struts are installed on all cars, regardless of the type of suspension, and may differ in mounting: studs or eyes.
What is the secret to recovery?
In fact, there is no secret. You just need to eliminate the gap between the iron ball of the finger and the fluoroplastic bushing. And also replace the lubricant that has worn out during operation and ensure that the boot is in proper condition. In total, there are several rules that will allow the stand to live for a very long time.
Lubrication
First and most important is lubrication. More precisely, its abundance and quality. The smooth operation of the hinges is entirely dependent on lubrication, which guarantees the required sliding. The task is to pack as much lubricant into the joint as possible, which works equally well under temperature changes and other negative factors. For joints such as stabilizer struts, steering ends and ball joints, barium grease ShRB-4 is recommended.
Anther
Nobody talks about buying an expensive branded boot. We are talking about replacing this spare part with a new one. This way, the recovery will be more efficient and you definitely won’t have to look into the nodes for the next six months.
If you don’t have the funds to buy a new boot, you can clean the old one. To do this, you need to remove the remnants of old grease, sand, and dirt from its surface. If damage is found, in the form of cracks, then only a new spare part will help.
Repair work
Ball elements
Restoring them, as already mentioned, is not easy. Typically, the restoration process involves replenishing the amount of lubricant in the boot. The following actions are envisaged:
- Removing the support. The stages depend on the specific make and model of the machine, as well as its technical features.
- Determination of wear. You need to move your finger and determine how easily its rotation is ensured. If there is a crunch, repair is impossible.
- Restoring the flare of the ring that secures the boot. To do this, take a tube and place it in a vertical position.
- With your finger down, the support is inserted into the tube. Next, the retaining ring is removed using pliers.
- Use a screwdriver to lift the boot, which is then folded up and filled with lithol using a brush.
- The boot that covers the hinge must be sealed using a thin wire wrapped around the boot.
- The retaining ring is placed in its original place, and the functionality of the hinge is checked. Movement and movement of the finger should be difficult.
Attention! A part that has been restored has a shorter service life compared to faulty elements, so during operation it is important to take into account that such supports can be driven after 1,000 km.
Repair of structures with bushings
Typically, such models are used on expensive machines and are easy to repair.
To repair the rack yourself, you will need to acquire bushings; it is better to give preference to polyurethane options. This approach will make the service life of the spare part longer.
The procedure for carrying out the work is quite simple:
- The stabilizer links are removed using a special removal tool.
- The parts are inspected and the condition of the stabilizer tips is taken into account: if there is a noticeable increase in wear, the rod is completely replaced.
- The support to be removed is clamped in a vice. Using a hammer, knock out the bushing head. Usually this stage of repairing racks with your own hands goes without problems.
- The new bushing is lubricated with oil and placed in place of the old design, and clogged. The main thing is to secure the element correctly, since each model has a different method of fastening.
Such elements have a long service life because they are made of high-quality iron. However, their service life is shorter than that of ball elements. But they can be changed easily, so this factor is not considered a disadvantage.
How is the repair going?
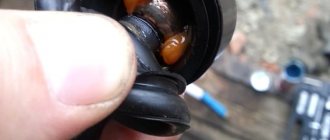
The recovery process is quite simple. First you need to wash out the old grease with gasoline. Then we fill the ball with new lubricant, sparing nothing. You need to not just apply a new layer on top of the ball, but “drive” the lubricant under it, which is quite possible to do with a syringe.
Installation location of the mandrel for crimping the hinge
Next, we select the heads, and from this design we compress the back part along the ring, where the metal presses the sleeve. This process must be carried out very carefully using a press or a massive vice. This is necessary to return the original shape, and the finger moves along the bushing with little effort, as it should be.
Next, you need to fill the hinge to the top with grease, install a new boot that will hold it all inside. For better glide, it is also recommended to lubricate the inner surface of the boot to make the process easier. All that remains is to assemble the stand and enjoy the road, without knocking or discomfort.
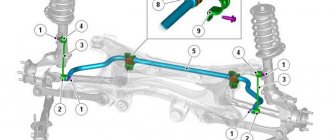
11.5. Removing and installing the front stabilizer bar
REMOVAL
1. Block the rear wheels, apply the handbrake, then jack up the front of the vehicle and place it on axle stands. Remove both front wheels.
2. Remove the lower engine shield (where available) and the exhaust pipe of the muffler/converter (refer to Chapter
Power and exhaust systems).
3. On models equipped with a manual transmission, disconnect the gear selector rod from the transmission as described in Chapter
Transmission.
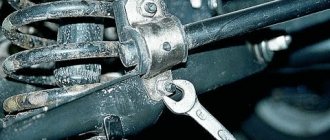
4. On models where the stabilizer bar is attached directly to the lower control arms (all models except Scenic), loosen and remove the nuts and bolts securing the stabilizer bar mounting clips (refer to accompanying illustration). Unhook both clips and remove them from the arms.
5. On models where the stabilizer is attached to the lower arms via rods (Scenic), unscrew the mounting nuts and bolts and remove the stabilizer mounting clips from the subframe (refer to the accompanying illustration).
6. Move the stabilizer bar out from under the car and remove the rubber bushings.
7
Carefully inspect the stabilizer components for signs of wear and damage, paying particular attention to the mounting bushings. Replace worn components as needed.
| INSTALLATION |
Restoring the stabilizer link
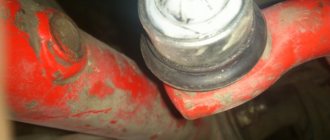
As I wrote earlier in the topic tyts! I still have the old stabilizer struts, which I started breaking and disassembling when replacing them, but it was cold and my hands were freezing, today I tried to do something with them! This was facilitated by the topic tyts2!, where I was given the conclusion that it was necessary to replace the right stabilizer link. There aren’t many photos, and I didn’t take pictures of the whole process, my hands were covered in oil, I didn’t want to get my phone dirty. I’ll try to describe it in detail, I think you’ll figure out where the “plus” and “minus” are)))) Actually, we remove the boot from the cover, move the cover to the side. I turned the stabilizer in my hands for about half an hour, looked for ways to disassemble it, tried to pry it off from the back with a screwdriver or a knife, broke one of the tendrils that holds the cap with the inscription
, later the devil pulled me to hold the patient in a vice and fucking hit him with a hammer on the back side, and the patient gave up, a miracle came out of its clip
Results
The Renault Duster stabilizer bushing is a necessary suspension part that ensures comfortable off-road driving of the vehicle. This part “dampens” the shocks that the car body experiences when driving over potholes and potholes. A component malfunction is indicated by a knocking sound in the suspension area and increasing play in the stabilizers. Due to the breakdown of these components, the crossover turns worse and begins to twitch when maneuvering. The part is replaced within a few minutes in the inspection pit. You can do the work yourself or contact a specialized center.
Repair of stabilizer struts
Hi all! According to the plan, the stabilizer struts, front and rear, were repaired. For the repair we needed:
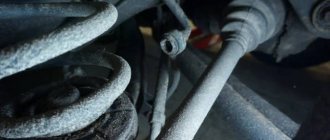
Spray gun, jack of course. Also heads for 14, 17, and a suitable one, I took a 22, a wrench and an extension, a hexagon for 6, wrenches for 14, 17 are better, of course, ring ones and in my case an open-end for 15, a hammer (heavier), a vice, pliers , wire, metal and nylon brushes, thick lubricant and where would we be without WD-40. I brushed the threaded connections extending beyond the nuts with a metal brush, then used a simple brush to remove the dust from them, and filled them with WD-40. I'm going to drink tea. It's better to hang the car, I hung it on wooden blocks, one at a time, first before the back. I had the wheels removed, you can probably do it without removing the wheels, but it’s much more convenient with them removed. Disconnected the front stabilizer struts from the strut.
After I tore it off, I started to unscrew it and saw that the stud of the stub post was turning. Taking a closer look, I saw a hole for a hexagon at the end.
It is better to do this on both sides at once so that the stabilizer gets movement, it will be more convenient to crawl to the fastening of the strut to the stabilizer. Then I began to unscrew it from below, there is an ambush without a cap, but I didn’t have one, due to the scant information in the notes. I had to lift the stabilizer, put on the head with difficulty, lower and jam the stabilizer. After this, loosen the nut. It is not convenient to press and there is not enough space, but the nut sits tightly, I had to use a jack.
The task was made easier by the fact that the racks were removed to install the spacers. The stabilizer strut hinges moved differently, one was tighter, the other was very weak. I took off the retaining ring of the boot, it looks like a key ring. I removed it towards the boot (thread), starting from the outermost turn, and carefully using a screwdriver in a circle so as not to damage the boot. I took off the boot. There is no corrosion underneath and little lubrication.
11.5. Removing and installing the front stabilizer bar
REMOVAL
1. Block the rear wheels, apply the handbrake, then jack up the front of the vehicle and place it on axle stands. Remove both front wheels.
2. Remove the lower engine shield (where available) and the exhaust pipe of the muffler/converter (refer to Chapter
Power and exhaust systems).
3. On models equipped with a manual transmission, disconnect the gear selector rod from the transmission as described in Chapter
Transmission.
4. On models where the stabilizer bar is attached directly to the lower control arms (all models except Scenic), loosen and remove the nuts and bolts securing the stabilizer bar mounting clips (refer to accompanying illustration). Unhook both clips and remove them from the arms.
5. On models where the stabilizer is attached to the lower arms via rods (Scenic), unscrew the mounting nuts and bolts and remove the stabilizer mounting clips from the subframe (refer to the accompanying illustration).
6. Move the stabilizer bar out from under the car and remove the rubber bushings.
7
Carefully inspect the stabilizer components for signs of wear and damage, paying particular attention to the mounting bushings. Replace worn components as needed.
| INSTALLATION |
How to properly repair a stabilizer link?
Today, every driver knows how important it is to drive with “fresh” stabilizer struts. This can be useful both for the car and for the safety of the driver and his passengers. The problem with the Russian market is that all these racks are quite expensive. Their price is low, but they have to be changed constantly. The eternal costs of an easy-to-understand part, which ultimately becomes a consumable, makes the driver want to know how to repair a stabilizer bar so as not to buy a new one.
Recommendations for use
The driver is always interested in how to repair the stabilizer link, but if you think about it, you can drive competently and won’t have to repair it so often, right? Russian mechanics have prepared several tips for drivers on how to operate their car with minimal damage to the anti-roll bar struts:
- drive smoothly, avoid skidding;
- slow down when turning;
- avoid small obstacles;
- do not increase speed on uneven roads.
In order for the struts to last longer, you first need to think about the correctness of your driving style. If the stabilizer receives a signal of danger during drifts, it tries to smooth out this very movement, which is first felt by the struts. To prevent this from happening, it will be enough to brake when turning, then the racks will wear out much longer.
Braking on corners
The stabilizer deals not only with turns. Also, its synchronous operation with the car’s suspension can be affected by uneven roads, small holes, humps or speed bumps. In this case, it is better to go around the bumps, but if the whole road is breathing with difficulty, then it is better not to increase the speed.
Car suspension diagram
The anti-roll bar ensures the safety of the car and the driver when driving, but this cannot be done without struts, which need to be constantly changed or repaired. If you have enough experience in this area and can share it with us, write in the comments.
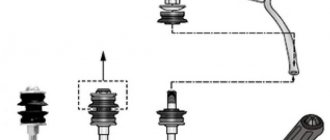
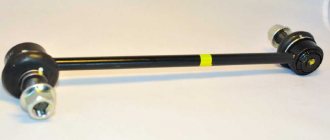
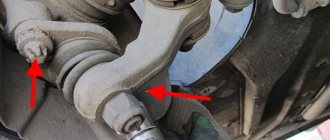
Stabilizer link components
Before talking about repairing struts, you need to fundamentally understand their structure so that the driver clearly understands how to deal with all this. It should be noted that this element is one of the simplest components of a car. It is enough just to understand the structure and structure of the part once, and in the future all the work will be done by itself.
Racks can be divided into three types based on fastening:
- hinged;
- with bushings;
- combined.
It should be noted that hinged struts are much more common. They are attached to the body and stabilizer of the car, allowing you to connect these two important parts of the car, forcing them to work synchronously. Hinged ones are very common; they are constantly purchased because they are easy to install. In addition, many note improved vehicle movement. But be that as it may, the racks do not last long.
Stabilizer link
The structure of the hinge elements is very simple - these racks consist of the same metal rod and hinges at the ends. The hinge itself is a supporting element with a boot and lubricant under it. This allows the part to work more gently with the suspension, which results in a lighter ride.
Stabilizer link with bushings
Also on the market you can also find racks with bushings, which differ in the same types of fasteners. Everything is much simpler here - no boots or grease, the stand works on its own. But it is difficult to deal with such an element in the future, but at least the bushings can be repaired, it is only important to understand how to do it.
Combined stabilizer link
Combination struts are the same joint supports and bushings, only presented on the same strut in opposite places from each other. If the driver plans to repair the stabilizer link after using it, it is better not to buy such complex elements, as they require a different approach. Sometimes it happens that the hinges cannot be repaired, but the bushing can, so the element will have to be thrown away in any case.
Types of structures
The repair process differs in some features, depending on the type of fastening used in the car model. There are two types of parts:
- Ball joints are installed on a significant part of modern cars. They break due to insufficient production of lubricant and wear. Restoring such stabilizer elements can be problematic and sometimes impossible.
- Bushings - this type can be found much less frequently, however, there are not many problems during operation.
Let's consider all the stabilizer struts and the intricacies of their own repair.
Repair of racks with hinged supports
Repairing a stabilizer link with a hinged support is not as easy as it seems. Most likely the element will only serve once. I would like to note that the main reason for the failure of the element is that the lubricant under the hinges wears off over time or, worse, gets mixed with dirt. Anthers serve as a kind of barrier against this dirt, but over time they cannot withstand the mileage and cease to properly perform all their functions.
When buying articulated struts, the driver should choose only high-quality boots, but not too rough ones. You need to pay attention to the integrity of the anthers, since in fakes, as a rule, they can often be torn. Unfortunately, not everyone attaches importance to this, which is why they buy a new part every few months.
Common car rear suspension problems
All automakers today strive to make the suspension of their cars as comfortable and reliable as possible. Moreover, cars produced for the Russian market are equipped with a reinforced suspension option. This strengthening is achieved by increasing the ground clearance and using stiffer springs. But operation on domestic roads sooner or later causes malfunctions even in the reinforced chassis, which puts the car owner in front of the need for repairs.
We list the main problems that arise in the suspension design:
- violation of wheel alignment (wheel alignment angles);
- deformation of suspension arms;
- weakening or destruction of springs;
- various damage to the shock absorber;
- wear of the shock absorber support;
- bushing wear or damage to the anti-roll bar;
- Damage to rubber-metal or ball suspension mounting elements.
The main reason for suspension wear is the poor quality of roads. However, there are other factors that affect the durability of chassis parts. For example, driving style and skill, especially when driving over bumps
The qualifications of car service technicians servicing suspensions are important. And also a lot depends on the quality of the components used during repairs.
Suspension problems occur either gradually or all at once. This happens when driving over bumps and obstacles. Ignoring some faults may lead to the failure of other parts, since everything in the suspension is interconnected.
The car owner can understand from indirect signs that problems are starting in the suspension. Let's list these signs:
- the car does not keep the road (trying to go to the side);
- turning and braking are accompanied by rocking of the car body;
- the movement of the car is accompanied by vibration;
- suspension knocks while driving;
- “breakdowns” or increased rigidity when driving over uneven surfaces;
- tires wear quickly or unevenly.
However, you should know that similar symptoms are also typical for steering problems. Therefore, it is possible to specifically determine which component of the car needs repair only after a thorough inspection and check of all suspension elements.
The above symptoms may not be caused by malfunctions in the suspension, but by violations of the nominal operating parameters of the wheels. For example, with underinflated tires, the car may not hold the road and veer to the side. Vibration is also caused by insufficient air pressure in the tires. If the wheel is not balanced, then beating and knocking in the suspension is expected when driving. Therefore, when diagnosing the condition of the suspension, first of all, versions associated with a discrepancy in the operating parameters of the wheels are excluded.
Some motorists ignore faults and drive a car with a faulty suspension. But it is strictly not recommended to do this, since any malfunction in the chassis can cause an accident.
We systematize in the table suspension malfunctions and the signs that indicate them:
| Signs | Malfunctions |
| Pull to the side when driving | Front wheel alignment violation; violation of the geometry of the suspension arms; loss of spring stiffness; damage to the upper shock absorber support; failure of the anti-roll bar. |
| Rocking when turning and braking | Poor quality shock absorber; deterioration of bushings or breakdown of the anti-roll bar. |
| Vibration while moving | violation of the angle of installation of the front wheels; the shock absorber has lost its characteristics. |
| Knock when driving | Spring breakage; shock absorber malfunction; Rubber-metal or ball suspension elements require replacement |
| "Breakdown" of the suspension | Deformation of the suspension arm; reduction in spring stiffness; shock absorber malfunction; Rubber-metal or ball suspension elements require replacement. |
| Uneven or increased tire wear | Violation of the alignment angle of the front wheels; deformation of the suspension arm; Rubber-metal or ball suspension elements require replacement |
Repair of racks with bushings
As already mentioned, bushings are much less common, most often on expensive cars from well-known brands. It has also been observed that bushing struts are an ideal option for an SUV. Unlike hinged ones, this type can be completely repaired, but only if the rack is not yet completely worn out. To do this, you need to check the base - that same metal rod. If everything is fine with it, remove the rack from the car.
Replacing the bushing and stabilizer link
Next you need to repair the stabilizer link. Ends with bushings are more expensive than articulated ones, but if the base is intact, then why buy the entire part? For this purpose, the bushings are sold separately from the base and the driver can freely buy them if necessary. Removing the bushing is easy, you just need to knock it out with a hammer; it is recommended to hold the rod itself in a vice so as not to miss.
Important: After dismantling the element, a new bushing is installed, which must first be lubricated with oil. The process does not take as long as it seems. Mechanics recommend checking struts every few thousand kilometers. As a rule, you can ride this way indefinitely until the rod itself is completely worn out.
conclusions
Carrying out restoration and repair work independently will help reduce the costs of each driver associated with car repairs. The process of carrying out operations on your own is quite complicated, the main thing is that the racks are repaired in accordance with the recommendations of specialists. In the process of performing work, you need to take into account some features and nuances. Repair in the first case - with ball joints - is carried out for a short time.
Read also: UAZ loaf error 0106
Many car enthusiasts are interested in how to repair stabilizer struts with their own hands. After all, replacing these parts is quite expensive; it is much easier to repair this component of the suspension. Restoring racks will cost much less; in some cases, you won’t even need to buy consumables. Moreover, any driver can do this.
The work requires a minimum number of tools. Restoration methods depend on the features of the strut itself, or more precisely on the features of fastening this part to the stabilizer and body.