Under the hood of the "six"
Adjusting the idle speed of the VAZ 2106 is intended for:
- restoring proper engine operation if idle speed is lost - maintaining stable crankshaft speed;
- adjusting the emission of toxic substances and carbon dioxide into the atmosphere, reducing these indicators to a minimum.
The adjustment will eliminate excess fuel consumption and normalize the amount of CO2. If the content of harmful substances in the exhaust gases of a vehicle is critical, its operation is prohibited.
If the idle speed of a VAZ 2106 is lost, this may indicate the following problems:
- the idle fuel jet is clogged;
- the solenoid valve is damaged if it is installed on the XX jet;
- The carburetor is not adjusted.
The breakdown is accompanied by unstable operation of the engine at low speeds. It may stall after heavy braking or while driving.
One of the elements of the carburetor on the VAZ 2106 is the idle fuel jet, which can be made with or without a solenoid valve. In the second case, a blank holder is installed instead of the EMC.
Design and principle of operation
The legendary “six” - a model from the VAZ concern - was produced from 1976 to 2006. Over the entire period, more than 4 million cars of various modifications were produced. The car was equipped with engines ranging from 1.3 to 1.6 liters. Fuel type: gasoline. Both mechanical and electronic ignition were used. The fuel system had a carburetor.
How to adjust the carburetor on a VAZ 2106
They were installed from different manufacturers, but the most popular were:
- carburetors from the Dmitrov Automobile Unit Plant (DAAZ);
- Ozone carburetors. Better quality and more productive. They began to install them instead of the old ones from DAAZ. They had simpler settings and lower fuel consumption.
In addition to those presented, Solex carburetors were also installed. They were a modified version of the DAAZ, but with much better characteristics.
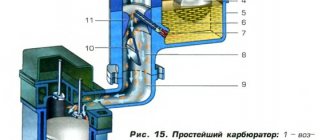
Any carburetor is a special device that is installed in a car to create the highest quality fuel-air mixture. This happens by mixing fuel and air in a certain proportion and supplying the finished mixture to the cylinders of an internal combustion engine. Maximum combustion efficiency of gasoline can be achieved if the mixture ratio is 14.7:1. In this case, the first number is equal to the amount of air, and the second, respectively, to the fuel. However, the presented ratio may be different, it all depends on the mode in which the power unit operates.
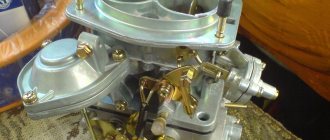
Carburetor "Ozone", VAZ-2106, design and adjustment
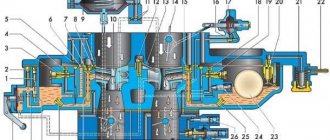
Any carburetor for a VAZ-2106 car consists of the following parts:
- float chamber;
- econostat;
- idle system;
- accelerator pump;
- launch system.
Important! Each part consists of many elements. In this regard, there are practically no fundamental differences between carburetors of different brands.
As for the adjustment, during the process it is necessary to adjust each element presented.
Unstable operation of the injection engine
Usually expressed in a spontaneous change in engine speed. Observed while driving and at idle. The most common reason for low speed in VAZ2107/2105 injection units is the failure of the mass air flow sensor (mass air flow sensor).
This device controls the amount of air entering the engine. Based on this data, the ECU regulates the supply of a combustible mixture with the optimal fuel-to-air ratio under different engine operating modes. Accordingly, in the absence of this balance, engine speed begins to depend on the amount of incoming oxygen. That is, the wind blew - the speed increased, the speed died down - it decreased.
It is quite simple to make sure that it is the mass air flow sensor that is faulty. Disconnect the device connector and the ECU will switch to emergency mode. In this mode, fuel supply is controlled by the throttle position. If the car begins to behave more adequately, then the MVR is faulty. You can drive like this, but the power will drop slightly and fuel consumption will increase.
A failed mass air flow sensor cannot be repaired, except for contamination, so you can try to clean it.
Cleaning algorithm for DMVR VAZ2107/2105:
- Remove the sensor along with the protective casing.
- Unscrew the two screws and pull the sensor out of the base without touching the surfaces of the active element (straight, bent wire).
- Wash the casing with any dishwashing liquid.
- Using a bottle of cleaner for DMVR or for carburetor, based on alcohols (without acetone), carefully clean the surfaces.
- Pour generously 3-4 times, the liquid should drain.
- Dry the device.
- Reassemble the block in reverse order.
Adjustment process
The VAZ-2106 carburetor can be adjusted personally by the car owner or at a specialized station. It should be remembered that the operation of the vehicle in any driving modes, in any weather and under various conditions will depend on the quality and correctness of the procedure performed. Therefore, before starting repairs, it is important to acquire certain skills. You need to know well the structure of the carburetor and the principle of its operation. You also need to have a certain set of devices and tools:
- various screwdrivers;
- keys of various sizes;
- drills and probes (round);
- toothpicks;
- rubber bulb;
- ruler;
- tweezers;
- calipers;
- rags;
- special containers for washing.
If you have a full set of tools, you can make high-quality adjustments quite quickly.
Device adjustment devices
Adjusting the starter
The starting device is adjusted by opening or closing the air damper. This operation can be carried out directly on the car; you just need to remove the air filter. In addition, you will need:
- Unscrew the plug of the starter, since there is a special screw under it.
- Press the three-arm lever. To do this, pull out the choke lever in the cabin, then close the damper and push the rod into the body of the starter all the way.
- Using a drill with a diameter of 5.5 mm, check the size of the gap from the lower edge of the damper to the chamber wall.
- Using a thin screwdriver, turn the adjustment screw, thereby changing the clearance value.
- Next, you need to hold the air damper by the three-arm lever in the closed position and use a 1 mm drill to check the gap between the chamber wall and the throttle valve.
- Adjust the gap by installing the lever in another hole or by bending the rod.
Shifting the lever to adjust the gap
Float adjustment
This stage is one of the most important processes of general configuration. The carburetor float is an element of the so-called float chamber. If an increased amount of air or gasoline in the mixture enters the combustion chamber, the engine will run unevenly. This increases both gasoline consumption and its toxicity when there is a lot of fuel supplied. Conversely, there will not be enough fuel for normal combustion if there is little supply. The correct amount of mixture requires adjustment of the float. It is recommended to set its stroke to 8 mm.
In addition, before installing the indicator, it is advisable to remove it and check for the absence of various violations, defects and other problems.
If a car enthusiast suspects poor quality work, the float needs to be replaced altogether.
Mixture adjustment
All actions are carried out using control screws. They have a factory press-fit made of plastic, which limits their speed in the range from 50 to 70°. If the presented range is not enough, you can break off the press-on and set the required value. However, this must be done on a warm engine.
Adjusting the throttle valves
Idling
Sequencing:
- Start the engine and wait until it warms up to a normal temperature of 90 °C. After this you need to turn it off.
- Find the screws on the carburetor and tighten them completely. After that, unscrew the quality screw by five turns, and loosen the quantity screw by three.
- Start the engine and use the speed screw to set the speed on the tachometer to 800 rpm.
- Tighten the quality screw until the number of revolutions begins to drop. Periodically you should stop and add half a revolution.
Adjusting the rods
Before carrying out any actions, you need to measure the distance between the ends of the rods. This is done using a caliper. According to the original factory settings, this distance should be 80 mm. To adjust the length, you will need to loosen the clamps.
After this, you should check the filter. The shut-off valve needs to be cleaned and dried. It is responsible for loss of power and problems with the supply of gasoline, so it is recommended to thoroughly flush the entire carburetor.
As a final step for adjusting the rods, it is recommended to check the tightness of the locking needle. For this you will need a pear. If air loss is heard, the needle needs to be replaced.
Video “How to check and replace the DZH”
This video discusses the reasons for the malfunction of the DZH and its replacement (the author of the video is “Do-it-yourself car repair”).
There are situations when, for one reason or another, it is not possible to buy a new regulator. Then there is a need to repair the old device.
Replacing the IAC on a VAZ 2114
The first thing you need to do is try the sensor. To do this, you need to remove it, dip a cotton swab in carburetor cleaner and rinse the contacts. After this, generously lubricate the needle, rod and spring with cleaner. Take a toothbrush and thoroughly clean the greased surfaces. After washing the IAC again, install it in place. It happens that this is enough for the speed to stop “floating”.
A more complex way to repair the device is as follows:
- take the sensor and clean its outer part from dirt;
- remove the three pins that secure the regulator body;
- the case is removed in the most careful manner so as not to damage the contacts;
- if, after removing the case, a break in the solder is detected, then it is necessary to solder the wire to the fastening point and cover this place with a special varnish, this is done to avoid corrosion;
- If gaps are found in the IAC housing, they must be eliminated using sealant to avoid air being sucked in through the valve.
If needle wear or problems with the windings are detected, this sensor must be replaced with a new IAC.
Adjusting the carburetor VAZ 2106 first stage
Unscrew the 3 nuts with an open-end wrench (10) securing the upper cover of the filter housing and remove the air filter.
Using a tubular wrench ( we will give 4 nuts from the studs securing the lower part of the body to the carburetor.
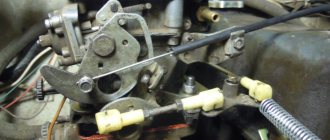
Then let's see how the air intake draft works and whether the air damper moves freely. It is possible that the bolt securing the choke cable to the bracket (the “three-arm lever” on the carburetor) will be tightened, then the damper will jam, which is not allowed.
Then, using a Phillips screwdriver, unscrew the bolt on the fuel hose clamp and pull the hose out of the tube and drain the remaining gasoline into any container.
Stalls when pulling choke
Stalls when pulling choke
Message by Mikhail_Vl. » Mon Apr 09, 2007 9:15 am
Post by Volodya » Wed Apr 11, 2007 1:28 pm
Message by Mikhail_Vl. » Thu Apr 12, 2007 12:29 pm
on a warm engine it works fine at idle and on gas and gasoline. but you pull out the choke and it suddenly stalls.
As I understand it, it is necessary to adjust the moment of turning on/off the microswitch (vacuum valve control), and the opening of the air damper relative to the throttle on the first chamber (by bending the connecting rod).
I don’t have time to try such assumptions. If it works, I’ll write it down myself and send you the instructions I have (from the repair catalogue)
Post by Volodya » Fri Apr 13, 2007 4:40 pm
Post by Propan » Sat Apr 14, 2007 10:38 am
Message by Mikhail_Vl. » Mon Apr 16, 2007 11:03 am
Post by kuwalda4 » Mon Apr 16, 2007 12:12 pm
Source
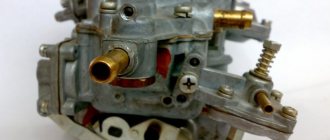
The second stage of carburetor adjustment
We work in order:
- Using a Phillips screwdriver, unscrew the 5 screws of the top carburetor cover and remove the assembly with the float;
- Let's drain the remaining fuel and see if there is dirt there;
- Using an open-end wrench, we will stretch the 4 nuts securing the carburetor to the bottom; these nuts become loose due to constant heating;
- Unscrew the solenoid valve with your fingers (see photo below);
- Use the flat blade of a screwdriver to pull all the jets through; there is no need to completely disassemble them.
The textolite “thick” gasket presses well over time and air leaks in this place rarely occur. You should not grind the seat on the emery wheel unless absolutely necessary.
Then use a wooden toothpick to clean all the jets and holes and blow with compressed air. The jets were selected at the factory so that fuel consumption would not increase and engine power would not be reduced. Install jets according to your numbers, such as those recommended by the manufacturer. In the injection chamber, a diffuser with a larger diameter nozzle is placed with a larger hole diameter and vice versa.
The starting jet, which gives maximum power, must be put in its place, look at the photo to see how it is installed correctly.
Then we will unscrew the 2 jets in the float chamber and check the condition to see if they meet factory manufacturing standards. Carburetor repair kits contain aluminum jets instead of brass and copper, which is not recommended for car operation.
On the solenoid valve, check the presence of the rod, the condition of the rubber ring of the gasket, blow it with air and screw it back, put the positive wire “female” on the terminal “folder”. The functionality of the “finger” can be checked by connecting the positive terminal to the positive of the battery, and the body to ground; if the rod clicks, this means that the valve opens.
Then we will check the operation of the starting device, everything should work perfectly here.
We will also check the correct installation of the rod to the lever on the throttle valve axis of the first chamber.
There should be a washer on the traction lever that comes from the accelerator pedal, be sure to check, if the washer is missing, then replace it. All parts must be assembled as originally intended and repeatedly tested in practice.
Then we pump gasoline into the float chamber through the fuel hose using a gasoline pump, install the top cover with the float and, after tightening 5 bolts, start the engine. Let it run a little and, turning off the engine, unscrew 5 bolts.
Let's remove the top roof again to check the fuel level in the float chamber; the jets should be submerged in gasoline.
Why does the engine stall when it is hot, and a well-warmed engine does not start?
1. The first possible reason is the carburetor. During movement, a large amount of air passes through it, due to which the carburetor is seriously cooled, at the same time the fuel that passes through it is also cooled. As a result, the carburetor temperature is several times lower than the engine temperature. Because of this feature, problems arise; after a long journey, you turn off the engine and make a short stop, at which time the carburetor begins to get very hot from the hot engine body. The remaining gasoline in the float chamber begins to evaporate from the high temperature, filling the voids - the air filter, the intake manifold and the carburetor itself. Air pockets form, and not a drop of fuel remains in the float chamber.
The solution to the problem is quite simple - press the gas pedal halfway several times and try to start the engine. This will make the mixture leaner and release excess evaporation. It should be noted that problems with hot starting can also be due to a similar problem, only due to the fault of the fuel pump or fuel line. This usually happens in hot weather when air pockets form from evaporation in the fuel system or pump, preventing fuel from entering the carburetor.
2. The second possible reason for the strange behavior of a warm engine is problems with the starter. Make sure that when you try to start the engine, the starter turns and does not just click or not respond at all. If this is the case and one of the above options is confirmed. the starter needs to be checked. If you are on the road, then the check can be reduced to a basic check of the starter power wire or other visual operations. If you get home, perform a detailed check of the starter according to these instructions. In case of malfunction, repair or replace it.
3. Alternatively, the reason when the engine does not start when hot may be a dead battery due to the reason described above, when the generator did not charge and the battery was completely dead.
Well, it seems like you didn’t miss anything!? That’s all for today, we hope the article will help, tell you the cause of the breakdown and help you solve your problem. If you know other reasons, as well as ways to solve them, you can supplement the article using the comment form
Thank you for your attention
The third stage of carburetor adjustment
Then use a Phillips screwdriver to finally tighten the top carburetor cover with five bolts, not too tightly, but not too loosely, so that the cover does not hang loose and the threads are not stripped. Install the fuel hose and tighten it with a clamp.
Pay attention to the drainage tube of the INTAKE manifold, whether it is in its place, air is sucked through it in a dosed manner.
The tube is correctly installed in the letter “G” so that gasoline does not get into the EXHAUST manifold...
On the new VAZ 2107 “OZON” carburetors (DAAZ 2107-1107010-20) there is no drain tube on the intake manifold.
Then we start the engine to check proper operation. Use a screwdriver to adjust the idle speed and starting system; this adjustment should be done 1-2 times a year.
Signs of a malfunctioning carburetor solenoid valve
A malfunction of the carburetor solenoid valve can be determined by several characteristic signs:
- the engine regularly stalls at idle;
- the engine stalls when coasting;
- Fuel detonation occurs after the ignition is turned off.
The instability of the solenoid valve can also be determined by a drop in engine speed when an additional load is turned on (car radio, headlights, etc.). Thus, the main sign of a valve malfunction is unstable engine operation in idle mode.
The final stage of carburetor adjustment
If the threads on the 4 studs securing the air filter housing are broken, you need to replace them with repair ones and tighten them, dripping a little special liquid fixative onto the threads.
We place the lower filter housing and fasten it with 4 HIGH by 7 mm nuts with nylon so that it does not get sucked into the cylinders if it spins spontaneously due to engine vibration.
Important point! If you find that the nuts are 3 mm low, be sure to buy high 7 mm self-locking nuts from the auto store and install them yourself...
In winter, you cannot operate the car without a corrugation to heat the air supplied to the filter from the exhaust manifold.
Breather pipe Niva VAZ 2106-07 (2121-1014056).
And also, according to environmental laws, you cannot drive without a rubber hose of the engine breather; the most harmful gases come out from there, which you breathe. Don't poison yourself and your family.
It is important to know! The engine will not jerk or jerk when the spark plugs are in working condition. It is advisable to change one contact spark plug every 25,000-30,000 kilometers.
Don’t neglect to replace consumable parts on time and you won’t pay twice...
Computer diagnostics shows errors and deletes them, shows parameters, adapts. In case of complex failure, a motor tester, a gas analyzer, a smoke generator, a compressometer, an endoscope and other instruments and devices are used.
Fault diagnosis
Many people who are not particularly savvy in the auto repair industry often ask the question: “How to actually check whether the solenoid valve and its control unit are working or not?” There are no particular difficulties in this, but there are a number of basic nuances. In order for every reader of our resource to understand exactly how to identify problems with EPC, our resource has prepared a step-by-step diagnostic algorithm. In general it is as follows:
- First you need to find the place where the economizer is located specifically on your make of car. It often looks like this;
- Then start the engine, drive the car, turn it off and analyze its operation at idle. If the XX fails at all stages of engine acceleration, first of all it is worth checking the solenoid valve;
- Next, when the engine has cooled down, you need to start it again and disconnect the EPHH from the carburetor by carefully removing the corresponding terminal with tweezers. After which it is worth observing the operation of the engine. If everything is normal and the economizer rod (needle) has moved out, then it is unlikely to be faulty. In this case, most likely there is a problem with the main idle jet or other carburetor components. If the rod does not extend and the car quickly stalls after turning off the economizer, then the latter is faulty;
- Now you need to remove the EPHH from the car and connect it to an alternative power source (for example, directly to the battery). After 10-120 seconds, the rod of the operating economizer should extend and make a characteristic click. If this happens, but when connected to the car’s network, the EPHV needle does not extend, then either its control unit or the valve wiring is faulty. If the rod remains in place in both cases, then the economizer needs to be changed, or even attempted to be repaired.
Do not forget that the final malfunction of the solenoid valve can only be determined if all other carburetor components are guaranteed to be in good working order. Under other circumstances, specific conclusions should not be drawn.
This concludes, perhaps, the most important information on the EPC of modern carburetors. We hope the material presented above was useful to you. Good luck on the roads and in repairs!
Gasoline engines with a displacement of 1.1 to 1.6 liters were installed on VAZ-2106 cars from 1980 to 1991. These engines were equipped with Ozone carburetors. The fundamental structure of this mechanism, well studied by motorists over more than 30 years of operation, will be the subject of this article.
Adjusting the idle speed on Ozone carburetors
Before you begin adjustment work, you should warm up the internal combustion engine to operating temperature; it is also important that the carburetor is clean, without clogged channels. Next we proceed as follows:
- start the engine at idle speed (XX);
- using the quantity screw, unscrewing it, we increase the speed by 100 more than the normal norm;
- we begin to tighten the quality screw until the engine begins to work less steadily, then we turn it back a little, achieving stable operation;
- we find the optimal operating mode of the motor at idle with the quality screw tightened as much as possible, while 850 rpm is considered the norm (from 800 to 1000 is allowed).
With proper adjustment, gasoline consumption in urban areas averages 8.5-9.5 l/100 km, but the engine must be in good working order and the ignition must be set correctly. Even on Ozone carburetors, the solenoid valve jet often becomes clogged; before adjusting the idle mixture, it should be checked and, if necessary, cleaned.
The procedure for replacing the IAC on a VAZ 2114 engine
Before replacing the idle speed control of the VAZ 2114, you need to prepare the sensor, the necessary tools and materials:
- As a replacement device, you can buy an IAC marked 2112-1148300-04 “KZTA” or “omega” 2112-114830. When choosing, be sure to check the exit of the needle rod to a distance of no more than 23 mm;
- for work you need a Phillips-head screwdriver, as well as a key “13”;
- Be sure to have rags, WD-40 and carburetor cleaner ready.
Before replacing the device, you must:
- Place the car on a level surface and put the handbrake on.
- Raise the hood and lock it in the open position.
- Disconnect the battery; when replacing the IAC, this is not a requirement, but a mandatory condition.
- Remove the cover, which is the protective casing of the engine.
- After loosening the clamp, disconnect the rubber tube from the air filter pipe, otherwise it will interfere with the disconnection of the pipe itself.
- Unscrew the clamp securing the VF pipe, disconnect and move the pipe corrugation to the side.
- Loosen the fastening screw and pull out the cable running from the gas pedal to the throttle valve.
- Using a rag, clean the surface of the throttle body and around it.
- Lubricate the remote control mounting nuts and IAC mounting screws with WD-40 to make them unscrew better.
- Unscrew the two nuts to “13” and remove the entire throttle assembly.
- Disconnect the IAC connector by removing it from the sensor terminals.
- If there is dirt in the places where the IAC is attached and adjacent to the remote control housing, it must be removed by thoroughly wiping everything with a prepared rag.
- Using a Phillips screwdriver, unscrew the two screws that secure the IAC to the remote control.
- Remove the valve from the mounting socket.
- It is advisable to wash the throttle assembly with carburetor cleaner.
- Install the regulator prepared for replacement on the throttle assembly in the same position in which the device was just removed.
The rubber gasket, which should be sold together with the sensor, must be pre-lubricated with engine oil.
If your car starts to stall at idle, then the fuel filter needs to be properly adjusted or cleaned.
Adjustment
To adjust the idle speed, the only tool you need is a flat, narrow screwdriver, preferably with a short handle. Adjusting the idle speed should only be done when the engine is warm. The timing and ignition clearances must be adjusted. If the adjustment is carried out on a cold engine, it will not bring the desired effect and it will not be possible to achieve stable performance.
Idle speed adjustment is carried out using 2 adjusting screws: 1st - the quality of the mixture and 2nd - its quantity (Fig. 2). By default, at the factory, adjusting screw 2 is equipped with a restrictive sleeve, which acts as a seal. Thus, the manufacturer indicates that the rotation of the screw is within the factory range. For complete adjustment and when it is not possible to adjust the idle speed, the restrictive sleeve is removed and the basic adjustment is carried out.
Use screw 1 to set the crankshaft speed to 900 min.-1. They can be checked on a special stand or using a tachometer located on the instrument panel.
Using screw 2, you need to achieve a CO2 value that falls within the range of values from 0.5 to 1.2%. A special device will help with this - a gasometer.
The rotation of screw 2 helps to change the crankshaft speed. In this case, we again adjust and set screw 1 to the value of the rotation speed within 900 min.-1.
The correct idle speed setting is checked by pressing the accelerator pedal and releasing it sharply. The crankshaft rotation speed should increase smoothly and without failure, and then decrease as well. The engine should not stall. If this happens or jerks are observed when you press the gas pedal, the setting must be repeated.
It is recommended to place the limiting bushings on the adjusting screws, focusing on the mounting lugs. After completing the idle adjustment, the engine should run stably.
Repair of the solenoid relay follow the link.
gone missing
I had this happen too - I needed to thoroughly flush the bottom of the carburetor, check and, if necessary, replace the needle valve and adjust the position of the float. Particularly check the idle jet on the back of the carburetor opposite the valve cover.
Check the condition of the contacts, the integrity of the central high-voltage wire and the resistance of the slider. The ELXX valve on the Azon carburetor may be faulty, the tube may have broken or fallen off. A carburetor malfunction is also possible.
How to setup
To solve the problem of how to adjust the idle speed on a VAZ 2106, you need to stock up on a set of driver’s tools, although one screwdriver is enough for this technological operation. On the Internet you can watch the “VAZ 2106 idling” video clip about carrying out adjustment work to stabilize the idling speed of the vehicle.
To adjust the idle speed of the “six” carburetor, a number of preparatory conditions must be observed. These include:
The operation is carried out only on the motor that has reached operating temperature (about 90 degrees Celsius).
The clearances of the timing valves and ignition contacts (with a contact system) must correspond to the required dimensions.
When adjusting the idle speed of a VAZ 2106 carburetor on a cold engine, the required result cannot be achieved. If there is no idle speed, it will appear only if the correct adjustment conditions are met.
If the VAZ of the “sixth model” stalls at idle, then to find out how to adjust the idle speed, you need to use the following algorithm:
The process of adjusting the idle speed on a VAZ 2106 car is carried out using two screws for adjustment, the first is the quality screw, the second is the quantity of the mixture.
In accordance with the factory parameters, the quantitative adjusting screw is locked with a sealed limiter sleeve. To carry out adjustments and when there is no idle speed on the VAZ 2106, the seal is removed and adjustment work is carried out.
Using a high-quality screw, we achieve a value of 900 rpm, checking the value with the tachometer readings.
Using the quantity screw, we use a gas meter to set the carbon monoxide value in the range of 0.6-1.3 percent. The circular movement of the adjusting screw changes the number of rotations of the crankshaft of the power unit.
In this situation, we re-fix the required crankshaft speed parameters with the first screw. If everything is done correctly, then when you sharply press and lower the accelerator pedal, the rotation value should remain stable.
If all operations are performed correctly, there should be a smooth increase in engine speed and the unit should operate stably.
Do-it-yourself carburetor adjustment on a VAZ
Before adjusting the VAZ-2106 carburetor or its equivalent, you should perform the following operations:
- Check the timing valve clearances for correctness:
- eliminate malfunctions of the ignition system, if any;
- clean or replace spark plugs if necessary:
- clean the carburetor;
- adjust the position of the float valve.
Carburetor adjustments are made with the engine preheated. First, with the engine not running, both adjusting screws must be tightened until they stop. After this, unscrew the screw that regulates the amount of fuel mixture three turns. Then we unscrew the screw that regulates the fuel quality by 4-5 turns.
To make further adjustments, start the engine. By rotating the fuel quantity adjustment screw, we set the speed within 800 rpm. After this, using the screw that ensures quality, we lean the air-fuel mixture (to do this you need to tighten it) until the speed begins to drop. In this position, fix this screw, and then unscrew it in the opposite direction by 1-0.5 turns, achieving stable operation of the engine in idling mode. It is recommended to revoke the engine and make sure that the engine speed in idle mode is within 800 ±50 rpm.
Setting the Ozone carburetor trigger
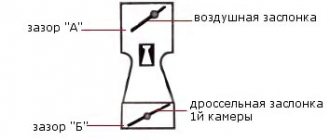
A situation often arises when a VAZ-2106 car has difficulty starting in cold weather; the main reasons for this problem are an unregulated starting system or a broken diaphragm. Here you need to know that when the choke is extended, the air damper is completely closed, but when starting, under the influence of vacuum, it opens slightly to a certain angle.
On DAAZ carburetors of models 2105, 2107, for cold starting, a pneumatic valve is installed, which provides a starting gap for the air damper, and this valve has an adjusting screw closed with a special plug. If the throttle angle of the screw is set incorrectly, the proportion of the fuel mixture of a cold engine will be disrupted and starting problems will arise.
There are several ways to adjust; it can be done with the carburetor removed by closing the damper and simulating the vacuum force by pressing your finger. In this case, the gap between the housing wall and the lower edge of the “air” should be within 5-5.5 mm; for measurement, you can use probes, drills or other objects of certain diameters. Also, the starting gap is set between the throttle valve (lower part) and the carburetor body, its recommended value is 0.7-0.9 mm, and the adjusting screw is located at the bottom.
Nuances and main malfunctions of Solex carburetors
Despite all the positive aspects and advantages, Solex carburetors have their disadvantages and characteristic “diseases”; one of the main disadvantages is problems with idling due to clogging or airing of the channel. Air enters the XX system mainly due to the tight fit of the cover to the body, since over time the metal is deformed, and such a defect can be corrected by replacing the gasket and grinding the adjacent surfaces.
Another common problem with idle speed is a clogged channel, which can only be cleared if you remove the quality adjustment screw. But the whole difficulty lies in dismantling this screw, since it is located deep in the “body” of the carburetor and is held in place by a rubber seal.
Even a completely unscrewed screw does not simply come out of the channel; it can be dismantled using a piece of hollow tube, for example, taken from an old radio. To use the tube as a puller, we make two cuts at the end, then insert the device into the channel, and remove the part we need by twisting it out.
Another typical drawback of Solexes is failure while driving when accelerating the car, which occurs due to the accelerator pump. To correct this defect, car owners most often upgrade the accelerator pump nozzle (“spout” or “elephant” in common parlance), transferring the injection of both tubes to the primary chamber. Solex practically does not cause any other troubles; it serves for a long time and reliably.
The work applies exclusively to the idle speed of the VAZ 2106. The setting does not affect other engine operating modes. There are two screws for regulation: a large one for the number of revolutions and a small one for the quality of the mixture.
Before starting work, make sure that the ignition system is working properly. Adjust or repair it if necessary. The engine must also be in good working order.
Self-replacement of DZH
Before changing the device, you should first check that the light bulbs may have burned out, bad contacts, a blown fuse, or damaged wiring. If the reason is a malfunction of the device, then it needs to be replaced. Checking the bulbs and wiring is done with a multimeter.
Tools and materials
To replace the idle speed sensor on a VAZ, you should prepare the tools and necessary materials:
- key on “22” and a key on “24” may be required;
- multimeter;
- screwdriver;
- pliers;
- container for oil;
- knife;
- electrical tape;
- chisel;
- hammer.
Stages
Before the replacement procedure, you need to find where the device is located. It should be located on the VAZ 2107 carburetor and injector to the right of the gearbox.
Replacing the VAZ 2107 reverse sensor consists of the following steps:
- First you need to disconnect the wires going to the device.
- Next, you should spin the device. To do this, it is better to use a wrench, since over time the fasteners stick to the crankcase. If the wrench does not help, you can resort to using a chisel and a hammer.
- Then, using a knife, you need to clean the seat from dirt.
- When removing dirt, remove the metal washer and install a new part.
- Having installed the DZH in place, tighten it with the fastening key.
- Then the wires are connected.
This completes the replacement.
Replacing the IAC and IAC are simple operations that can be performed by any car enthusiast. Having learned how to change sensors on the “Seven”, this knowledge can be used when repairing a VAZ 2108.
Which carburetor model to choose
For any VAZ car, starting from 2101 to 2107, only certain carburetor models are suitable.
DAAZ carburetors
Carburetors DAAZ 2101, 2103, 2106. They were produced at the Dmitrov Automotive Unit Plant, which bought a license from the Italian company Weber, therefore these carburetors can be indicated under both names. The devices were not distinguished by the complexity of their design, but they could please their owners with the rapid acceleration of the car and good speed. One of the biggest problems in installing these models is their virtual absence on the market.
In addition to speed and simplicity, Weber carburetors also provided incredibly fast fuel consumption - these “monsters” consumed 10–14 liters per 100 km. fuel.
The powerful but resource-intensive Weber carburetor was produced by the Russian Dmitrov plant using Italian technology
Carburetors "Ozone"
More technologically advanced models, which were already installed in VAZ 2105 and 2107 cars, were also produced at the Dmitrov Automobile Unit Plant. However, they were not only more advanced and improved, but also more environmentally friendly. This is why they received the name “Ozone”. This carburetor made it possible to reduce fuel consumption to 7–10 liters. 100 km, while maintaining the dynamic characteristics of its predecessors. The downside of the device was the complexity of its assembly and constant contamination in one of the chambers, which led to the fact that the acceleration of the car noticeably deteriorated, the speed decreased and the engine began to act up.
“Ozone” is an environmentally friendly model of DAAZ carburetors
Solex
A little later, DAAZ 21053 carburetors appeared. They were produced under license from the French company Solex, hence the name of the models. These carburetors were not much similar to previous DAAZ models. The updated design with a fuel return system made it possible to save 400–500 ml of fuel per 100 km. These carburetors were distinguished by good power and low gasoline consumption. The disadvantage of the device was the narrow fuel and air channels, which very often became clogged.
The Solex carburetor successfully combines the power and environmental friendliness of its predecessors
Solex carburetors came in many variations with different auxiliary systems. In the CIS, the most popular option has become an electric idle air valve.
Custom carburetor Solex 21073
Often, inquisitive car enthusiasts resorted to replacing the carburetor on their own. One of the suitable models turned out to be Solex 21073, famous for its fairly wide jets and channels. Such a carburetor increased the car’s power, but at the same time increased fuel consumption - 9–12 liters. per 100 km.
Solex 21083
The second non-standard carburetor, which with some modifications fits the VAZ 2106 and 2107 models, is Solex 21083. After expanding the diffusers and installing jets, this device allows you to significantly increase the dynamics of the car without much fuel consumption. However, the process of upgrading a carburetor is very complex and time-consuming.
Operating principle of the carburetor solenoid valve
The carburetor solenoid valve is used to regulate the supply of the fuel mixture bypassing the throttle valve, which is controlled by the accelerator pedal. At idle, fuel enters the ICE inlet manifold through a separate channel. This is why the solenoid valve is also called the vehicle idle air control valve. The main purpose of the valve is to stop the fuel supply in inertial modes, which, for example, allows engine braking and coasting.
In gasoline carburetor engines, the valve is installed directly in the carburetor and is part of the car's forced idle economizer system. The valve is controlled by the system's electronic control unit; when a pulse is received, the valve needle retracts and closes the fuel supply, bypassing the valve. After the engine is started, power is supplied from the control unit and the valve begins its operation, which consists of two strokes:
- on the first stroke, the valve opens, as a result of which air enters the chamber and mixes with fuel;
- at the second stage, the air channel is closed and the fuel channel is opened, as a result of which the fuel-air mixture enters the engine.
The movement of the valve shut-off needle is carried out by incoming electrical impulses from the control unit. As soon as the gas pedal is pressed, the valve moves to the open position and the needle extends. At idle, the valve goes to the closed position at engine speeds above 2100 RPM. The transition to the open position occurs when the engine speed drops below 1900 RPM. Closing and opening the valve allows you to regulate the flow of the fuel-air mixture into the engine and, accordingly, save gasoline consumption by up to 5%. Also, the operating principle of the valve allows reducing wear of the piston group. The immediate consequence of the operation of the solenoid valve is a reduction in emissions of harmful substances (CO) into the atmosphere, which increases the environmental friendliness of the car.
Reasons for adjusting the VAZ 2106 carburetor
If the mixture coming from the carburetor to the engine is too rich in fuel, it can flood the spark plugs. If the mixture is too lean, engine power will noticeably decrease. The main symptoms of suboptimal mixture composition are:
- difficulty starting a cold engine;
- unstable engine operation at idle;
- dips when pressing the accelerator pedal;
- loud pops from the muffler.
In most cases, the problem can be solved by timely adjustment of the mixture composition using quality and quantity screws. By rotating these screws, you can change the clearance of the emulsion channels, the fuel level in the float chamber and provide additional fuel to compensate for the excess air. This procedure will only take a few minutes.
The car won't start
The cause of difficulties when starting a cold engine, when the crankshaft rotates but the engine does not start, may be the ignition system and carburetor. If the ignition is working properly, most likely the nozzles, strainer or other elements are clogged, making it difficult to supply fuel to the float chamber. You can fix this problem as follows.
- It is necessary to clean clogged channels and jets with a special aerosol carburetor cleaner, and then blow them out with a stream of compressed air.
Using aerosols to flush the carburetor will eliminate the need for dismantling it. - If there is no fuel in the float chamber, the strainer and needle valve should be flushed. To do this, the filter will need to be removed from the carburetor. Flushing the fuel filter eliminates the possibility of oil deposits preventing fuel from penetrating into the float chamber.
- It is necessary to check the presence of gasoline in the float chamber using the accelerator pump (AP). When you sharply press the accelerator lever, you should be able to see fuel being thrown into the mixing chamber from the nozzle channel.
When the throttle valve is pressed, the lever through the drive sector acts on the diaphragm pusher, and fuel is instantly injected through the nozzle into the diffuser.
Car stalls at idle
In idle mode the valves are closed. A vacuum is formed under them, ensuring the flow of fuel through the hole under the damper of the first chamber. The cause of a situation in which the engine starts but runs unstably is most often the carburetor. Depressurization of its housing may occur. This will lead to excess air entering the carburetor, leaning the fuel-air mixture. The settings of the quality and quantity screws that regulate the composition and quantity of the combustible mixture may also fail. In addition, the lack or absence of fuel in the float chamber leads to a lean mixture entering the engine.
The current situation will require the car owner to perform the following actions.
- To eliminate depressurization of the housing, replace the sealing gaskets between its individual parts.
The Ozone carburetor uses a heat-insulating gasket as a sealing element - Tighten all bolted connections.
During operation, to prevent depressurization, the screw connections of the carburetor parts should be periodically tightened. - To prevent depressurization, replace the rubber ring of the solenoid valve and quality screw.
- Check the condition of the ignition timing vacuum regulator hose for wear and mechanical damage.
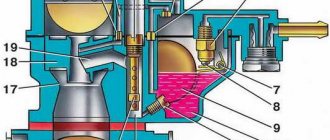
A loose connection in the vacuum ignition timing regulator hose allows excess air to enter the carburetor. - Set the optimal gasoline level (in the Ozone carburetor it is located in the middle of the inclined wall of the float chamber) by bending the float mounting tab. The float gap (distance between the float and the gasket adjacent to the carburetor cover) should be 6.5 ± 0.25 mm.
The optimal fuel level is in the middle of the inclined wall of the float chamber - Use the quality screw to adjust the free movement of the fuel emulsion through the idle system, and use the quantity screw to adjust the volume of the mixture supplied to the cylinders. Rotation of the quality screw changes the size of the fuel channel, reducing or increasing the flow of fuel emulsion
The smell of gasoline appears in the cabin
In any case, the appearance of a fuel smell in the cabin is due to its excess in the float chamber or a loose connection of the housing elements as a result of wear or mechanical damage to the sealing gaskets and rubber hoses.
The appearance of a smell in the interior of a VAZ 2106 is a sign of a high fire hazard. In this situation, you should immediately turn off the engine and take all measures aimed at identifying the malfunction. Starting the VAZ 2106 is possible only after eliminating the causes that led to the penetration of gasoline vapors into the vehicle interior.
To eliminate the causes of gasoline vapor entering the cabin, you should:
- Check fuel lines for leaks.
- Replace the carburetor sealing elements.
Periodic replacement of sealing elements to eliminate malfunctions in the carburetor during long-term operation - Measure with a caliper and set the optimal height of the float position, ensuring complete shutoff of the needle valve (6.5 ± 0.25 mm). The location of the float in the chamber must ensure complete closure of the needle valve
Dips when pressing the accelerator pedal
When you press the accelerator pedal, the throttle valve opens. Next, the accelerator pump comes into operation through an articulated lever. If it is faulty, then pressing the pedal will lead to interruptions and engine stop. This most often manifests itself when starting from a stop and suddenly accelerating. When you sharply press the accelerator lever, a powerful jet of fuel should be observed from the nozzle channel into the emulsion chamber. A weak stream may be due to:
- clogging of supply channels, spray nozzle and discharge valve;
- depressurization of the housing;
- a broken tube of the vacuum ignition timing regulator.
To resolve this problem you must:
- Replace the carburetor sealing elements.
- Tighten bolted connections.
- Replace the rubber o-ring of the solenoid valve.
- Check the vacuum ignition timing regulator tube for wear and mechanical damage.
- Repair the accelerator pump (rinse the supply channels, clean the spray nozzle of deposits, replace the diaphragm).
The causes of interruptions when pressing the accelerator pedal are often faulty elements of the accelerator pump.
Video: repair and maintenance of the VAZ 2106 accelerator pump
Popping sounds in the exhaust system
The appearance of loud sounds in the exhaust system is a consequence of the fuel-air mixture being too rich. Such a mixture with a high content of the liquid phase, without having time to burn out in the working cylinders and having heated up to maximum temperatures, ends the cycle with an explosion in the exhaust system. As a result, loud popping sounds are heard from the muffler. In addition to the carburetor creating a mixture with an excessively high concentration of fuel, the reasons for this situation may be:
- late ignition;
- loose fit of exhaust valves;
- mismatch of valve timing.
To eliminate possible causes of this malfunction, you must:
- Remove the valve cover, measure the thermal clearance of the exhaust valves and adjust it if necessary.
A correctly set thermal clearance of the exhaust valves prevents the valves from being pinched and the unburned mixture being thrown into the muffler. - Adjust the fuel supply to the carburetor by setting the required clearance of the shut-off valve in the float chamber. The distance from the float to the carburetor cover with gasket should be 6.5 ± 0.25 mm.
Correctly set float clearance ensures optimal fuel level in the chamber - By rotating the quality screw and thereby changing the cross-section of the fuel channel, achieve free movement of the fuel emulsion along the idle circuit. Use the quantity screw to adjust the volume of mixture supplied to the cylinders.
The composition and quantity of the mixture coming from the carburetor is regulated by quality and quantity screws: 1 - quality screw; 2 - quantity screw - Set the ignition timing. To eliminate the possibility of late ignition, loosen the octane corrector mounting nut and turn the housing 0.5 scale divisions counterclockwise.
The ignition of the mixture is greatly influenced by the correctly set ignition timing: 1 - housing; 2 - scale; 3 — nut for fastening the octane corrector
Setting up XX in the car
Setting the idle speed of the VAZ 2106 serves to perform the following functions:
- Adjustments to the operation of the power plant if the idle speed is lost - to stabilize the engine crankshaft speed.
- Bringing the percentage of carbon monoxide into the environment to normal levels, minimizing the CO content in exhaust gases, because operation of a vehicle with a high level of toxic emissions is prohibited.
This adjustment of the idle speed of the VAZ 2106 will allow you to get rid of excess fuel consumption. If a car enthusiast discovers that the “six” has lost idle speed, then possible malfunctions of the fuel system include the following defects:
- the carburetor idle jet is clogged;
- defective valve system of the electromagnetic idle type;
- The carburetor device was adjusted incorrectly.
The defect is determined in a situation where the VAZ 2106 stalls at idle while driving or due to a sharp press on the foot brake. The defining component in this unit of the product is considered to be the idle jet for passing a jet of fuel, which is optionally equipped with an electromagnetic type valve. There are carburetor models where a plastic plug is installed instead of this element.
In all models, regardless of configuration, cleaning the VAZ “sixth model” idle jet for fuel supply is carried out in the same mode:
- Using a wrench, unscrew either the valve or the plug, having previously disconnected the positive connector.
- We remove the idle fuel jet.
- Using a compressor, we blow through the product line.
- We put it in the landing slot.
- After screwing it in, lightly tighten it with a wrench.
- We connect the positive contact to the valve connector.
- We turn on the ignition, for the convenience of repair work, removing the air mass cleaning filter.
- Before turning on the ignition, disconnect the contact from the solenoid valve, then touch the contact to the socket.
- The sound of a click indicates that current is supplied to the valve input connector, which indicates its serviceability.
- If there is no click upon contact with the connector, then it follows that there is a defect in the valve or its safety device.
If not the valve, then what?
Dirt, low-quality fuel, malfunction of the ignition system - all this separately and in the compartment can affect the idle speed disappearing or becoming unstable. If you have already decided to carry out a full diagnosis, then start with the filters - air and fuel.
If they are heavily clogged, then gasoline or air (these are the main components of the air-fuel mixture) will not enter the carburetor normally. To be more precise, they will hit, but only after overcoming great resistance. And don't forget about the thimble-shaped filter that is installed at the inlet of the carburetor.
Device malfunctions and their manifestations
The stability of the engine operation depends on the serviceability of the EPHH, and the failure of this device leads to the following unpleasant consequences:
The standard engine operation control circuit in this mode does not allow the slightest violation of the system's tightness or its clogging. The main reasons for the failure of this unit are cracks in the membrane or clogging of the channels with solid deposits resulting from the use of low-quality fuel.
Malfunctions of the electrical equipment of the Lada 2107 car, checking the devices of the VAZ 2104, VAZ 2105, VAZ 2107. Diagnostics of the electrical equipment of the Lada 2105. Instructions for repairing electrical equipment: ignition systems, starter of the Lada 2104. Operation of the generator, battery, purifier. Diagram of fret 2107.
Checking the functionality of the control unit 25.3761
Diagram of the carburetor pneumatic valve control system: 1 - microswitch in the carburetor; 2 - pneumatic valve; 3 — mounting block; 4 - ignition relay; 5 — ignition switch; 6 — pneumatic valve control unit; 7 - ignition coil; A - to terminal “30” of the generator; B - the order of conditional numbering of plugs in the control unit
A working control unit 25.3761 should turn off pneumatic valve 2 when the crankshaft speed of the VAZ 2107 engine is more than 1600 min-1 and turn it on again when the speed drops to 1200 min-1. Before checking the functionality of the unit, you need to make sure that the wiring harness of the VAZ 2104, VAZ 2105, VAZ 2107 car is connected correctly to the control unit (see view “B” to the connector of the VAZ 2105 control unit).
The functionality of the control unit is checked using a tachometer and a voltmeter (with a measurement range of 0–15 V) in the following order:
— disconnect the wires from the microswitch installed on the carburetor of the Lada Classic;
Scheme for checking the pneumatic valve control unit: 1 - control unit; 2 — adapter connector with voltmeter; A - car wiring harness
— connect 1 voltmeter to the control unit using a special adapter connector 2; — start the engine and, gradually increasing the speed, monitor the voltmeter readings: after starting the engine, the voltmeter should show a voltage of at least 10 V, and at the moment the pneumatic valve is turned off, an abrupt decrease in voltage to a value of no more than 1.5 V; — after turning off the pneumatic valve, gradually reduce the rotation speed until the pneumatic valve turns on: the voltmeter should show a sudden increase in voltage to at least 10 V.
It is possible to check the unit without a voltmeter by the characteristic knock of the valve when turning it off and on. Checking the solenoid valve control unit If the engine has a carburetor 21053-1107010, then instead of the 25.3761 pneumatic valve control unit, a 501.3761 carburetor solenoid valve control unit is installed. The control unit 501.3761 must turn off the valve when the crankshaft speed is above 1900 min-1, and turn it on at 1700 min-1. The addresses of the control unit output terminals are shown in Table 8–9.
The operation of the control unit is checked using an adapter connector with a voltmeter in the following order:
— disconnect the wire from the carburetor limit switch and connect the tip of this wire to ground; — connect a voltmeter to the control unit using an adapter connector; — start the engine and, gradually increasing the speed, monitor the voltmeter readings: after starting the engine, the voltmeter should show a voltage of at least 10 V, and at the moment the valve is turned off, an abrupt decrease in voltage to a value of no more than 0.5 V; — after turning off the valve, gradually reduce the rotation speed until the valve turns on: the voltmeter should show a sudden increase in voltage to at least 10 V; — set the crankshaft speed of the VAZ 2105 within 2200–2300 min-1, disconnect the tip of the wire going to the carburetor limit switch from ground, and then reconnect it to ground. When the wire is disconnected from ground, the valve should turn on, and when connected to ground, it should turn off.
When is adjustment needed?
Adjusting the carburetor unit is no more difficult than adjusting the clutch drive on a VAZ 2107, since it only involves adjusting the jets. In some cases, they need to be cleaned of resins and other contaminants; the presence of contaminants is felt by power dips in the process of accelerating. Many car owners claim that Ozone carburetors are not a very good option and recommend replacing them with Solex.
However, the signs that the device has begun to prepare an enriched mixture and needs to be adjusted are the same for both types of units:
- Increased fuel consumption.
- Frequent overheating of the motor.
- Black smoke from the exhaust pipe and pops.
- Loss of power.
The preparation of a lean mixture is characterized by the following characteristics:
- Popping sounds in the carburetor.
- Loss of power.
- Engine overheating.
Of course, you don’t always need to immediately grab a screwdriver and turn the adjusting screws - perhaps it’s something else. For example, when the idle speed floats, air may leak through the intake manifold gasket, or there may be a breakdown of the brake booster diaphragm. But even the reasons listed are not all the options, so specific recipes for eliminating certain problems cannot be given. The issue should be addressed comprehensively, taking into account the connection between vehicle systems.
Cleaning the jets
Before adjusting the carburetor, it is necessary to clean the channels and jets of dirt and deposits. To do this you need:
- unscrew the fuel and air jets;
- soak them in acetone or some other carburetor cleaner for ten minutes;
- blow out the jets with compressed air;
- Install cleaned and dried jets into the carburetor.
Working with a carburetor is associated with an increased fire hazard. All precautions should be taken before starting work.
The VAZ 2106 carburetor is a rather complex device consisting of many small elements. Nevertheless, any car owner can wash the jets and strainer, as well as adjust the supply of the fuel-air mixture. To do this, you just need to consistently follow the instructions of the specialists.
Source
What do we have after proper adjustment of the carburetor unit of the “six”?
Checking the adjustments of the fuel mixture preparation unit is the same important maintenance step as monitoring the condition of the car battery. An integrated approach to setting up the carburetor guarantees not only a comfortable mode of movement, but also a lot of useful points:
- An increase in power and a confident increase in speed.
- No failures in the operation of the internal combustion engine in the low and medium speed sector.
- Improved dynamic characteristics - the car picks up speed faster and accelerates in a short time.
- Optimal engine response, which is expressed in the responsiveness of the gas pedal.
The listed qualities make it possible to effectively use the combustible mixture, which is necessary both in urban traffic jams and on country roads. Therefore, proper adjustment of the carburetor unit will help the car gain speed in a timely manner and complete the planned maneuver.
How does a faulty carburetor behave?
No VAZ-2106 will drive without a carburetor. It is there that a mixture of gasoline and air is born, the combustion of which powers the engine. Ideally, the ratio of air to gasoline should be 15 to 1, but an already overworked carburetor may create a mixture of incorrect proportions. This is how it gets into the engine, depleted or enriched, and the quality of operation of the entire car decreases. In this case, there is no need to delay repairs.
What behavior is uncharacteristic of a carburetor:
- excessive engine heating;
- increased consumption of gasoline;
- the engine has difficulty picking up speed or even stalls;
- there are failures in the operation of the gas pedal;
- black smoke and popping sounds from the muffler.
The above signs fit the description of the situation when air saturated with gasoline enters the engine. If a lean fuel mixture is supplied, the car behaves in the same way, except that, unfortunately, gasoline consumption does not seem to decrease and remains at the normal level.
Connecting the carburetor to the engine and other vehicle systems.
The first device we see connected to the carburetor is the air filter. The dimensions of the filter are such that it completely covers the carburetor. The filter housing is attached directly to the top of the carburetor using 4 nuts. A fuel hose is connected through a fitting located on the side of the carburetor, through which fuel is supplied from the tank using a fuel pump.
A hose is connected from the distributor (ignition system) to the Ozone. A vacuum is created in the carburetor, which rotates the contact plate in the distributor through this hose, thereby changing the ignition timing.
A wire is connected to the solenoid valve. Through it, voltage from the fuse box is supplied to the valve.
A thin cable is connected to the throttle control lever. This thrust increases the amount of produced fuel-combustible mixture, which is supplied to the engine combustion chamber. It is this thrust that acts when the driver presses the gas pedal in the cabin.
In the area of the air inlet (which is blocked by a special flap), a so-called “choke” rod is connected. This device starts a cold engine: the flap allows less air into the carburetor, thus producing a rich mixture. The rod leads to the choke handle, located inside the car, at the bottom right of the steering column.
The intake manifold, which directs the air-fuel mixture directly into the cylinders, is connected to the carburetor by a short spring and two bolts.