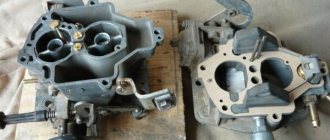
Despite the fact that the VAZ-2121 SUV was developed quite a long time ago, this car is still very popular. In 1994, the model was changed to VAZ-21213. Many people buy these cars because of their high cross-country ability, which can be the envy of some jeeps from famous brands. Others like reliability, unpretentiousness and high maintainability. A simple design and excellent off-road characteristics made this vehicle a vehicle for lovers of travel, hunting, fishing and tourism.
Niva cars 211213 are equipped with a 1.7 liter engine. It is carburetor, and is based on a VAZ-2106 engine. There is also a five-speed manual transmission and a proximity ignition system. The power system is equipped with a Solex 21073 carburetor for the Niva. Many novice car owners are intimidated by carburetors and everything connected with them. But a carburetor is not a death sentence. You just need to understand its basic structure, how to adjust it, and how to repair it.
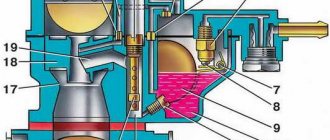
Float mechanism
The Solex 21073 carburetor, installed on the Niva, has a float chamber of two sections. They are located on both sides of the main cameras of the device. The system consists of two ebonite floats, which are mounted on a lever.
The latter swings on an axis pressed into the bosses of the device cover. There is a tongue on the bracket. The element presses the needle valve needle through a special ball. The float mechanism serves to adjust the level of fuel required for normal operation of the carburetor. The needle valve is a non-separable type. It is not being repaired. The valve body is mounted on a thread in the carburetor cap. The ball protects the needle from shock when the machine moves. If the chamber is empty (for example, if the driver is using LPG), then the floats will knock.
Technical characteristics of the carburetor version
The VAZ 21213 four-cylinder eight-valve petrol engine has a displacement of 1.7 liters. The power of the power unit is 81 horsepower with a torque of 125 Nm.
Engines 21213 in their latest generation were equipped with an injector and ran on high-octane 93 gasoline. The cast iron cylinder block ensured maximum strength for this power unit.
The use of numerous automatic engine control systems made it possible not only to change the traction performance of this engine, but also significantly improved fuel efficiency. Niva in suburban mode consumes 8.3 liters of gasoline per 100 kilometers when driving at cruising speed.
Starting from 2014, Niva cars with a diesel engine are also offered to customers.
Also interesting: Chevrolet Niva hubs: front bearing, advantages of non-adjustable Iveko
The Niva engine with an overhead camshaft is equipped with a chain drive, which significantly simplifies the service of this power unit. The chain drive does not require replacement of the tensioner or any adjustment during operation of the motor. We also note the presence of hydraulic compensators, which relieves the car owner of the need to carry out the procedure for adjusting the valve clearance. All maintenance work on this engine can be performed by the car owner himself, without contacting branded service stations.
Let's look at what is better - a Niva carburetor or an injector. If we talk about the first version, it is considered older and archaic. The main component in this system is the carburetor. It is this mechanism that mixes a portion of gasoline with air, creating a flammable mixture. This system has a simple device.
VAZ-21213 (Niva). Cleaning and checking the technical condition of carburetor parts
GENERAL INFORMATION PERFORMANCE ORDER
Fuel filter
1. Wash the filter in gasoline and blow with compressed air.
2. Check the condition of the filter. 3. If the filter or fuel supply pipe is damaged, replace it with a new one. Float mechanism 4. Wash the parts in gasoline and check their condition. 5. Floats must not be damaged. The sealing surface of the needle valve and its seat must not be damaged to impair the seal of the valve. 6. The valve should move freely in its seat and the ball should not hang up. The weight of the floats should not be more than 6.23 g. 7. Replace faulty parts with new ones. Carburetor cover
8. Clean the cover and all holes and channels from dirt and oil.
9. Wash the lid in acetone or gasoline and blow with compressed air. 10. Inspect the sealing surfaces of the cover. If there is damage, replace the cover with a new one. Starting device
11. Clean all parts of the starting device, rinse with gasoline and blow with compressed air.
12. Inspect the parts, replace damaged ones with new ones. Jets and emulsion tubes
13. Clean the jets and emulsion tubes from dirt and resinous compounds, rinse them with acetone or gasoline and blow with compressed air.
14. Do not clean the jets with a metal tool or wire, or wipe the jets and other parts of the carburetor with cotton wool, cloth or rags, as lint can clog the fuel emulsion path. 15. If the jets are severely clogged, you can clean the jets with a soft wood needle moistened with acetone. Carburetor body
16. Clean the body of dirt and oil.
17. Rinse its channels with acetone or gasoline and blow with compressed air. 18. If necessary, clean the channels and emulsion tubes with special reamers. 19. Inspect the sealing surfaces of the housing; if they are damaged or deformed, replace the housing with a new one. Acceleration pump
20. Clean the pump parts, rinse them in gasoline and blow with compressed air.
21. Check the ease of movement of the ball in the sprayer and the movement of the moving elements of the pump (lever, diaphragm parts). Jams are not allowed. 22. The diaphragm must be intact, without damage. 23. Check the condition of the sealing surfaces and gaskets. 24. Replace damaged parts with new ones. Power mode economizer
25. The diaphragm must be intact and without damage. 26. If the total length of the diaphragm pusher, including the head, is less than 6.0 mm, replace the diaphragm and pusher assembly.
VAZ-21213 (Niva). Carburetor assembly
GENERAL INFORMATION ORDER OF EXECUTION
1. Assemble the carburetor in the reverse order of disassembly. In doing so, pay attention to the following points. 2. The float must rotate freely on its axis without touching the walls of the chamber. 3. The needle valve should slide freely in its seat, without distortions or jamming, the tightening torque of the needle valve seat should be 14.7 Nm (1.5 kgfm). 4. The tightening torque of the solenoid shut-off valve should be 3.68 N·m (0.4 kgf·m). 5. To avoid mixing up the jets during assembly, pay attention to the markings of the jets and when installing them, follow subsection 2.15.2. 6. Before installing axle 19 (see Fig. Parts of the carburetor cover), lubricate the end of the axle and the outermost 1–1.5 turns of thread with UG-9 sealant. 7. When assembling the accelerator pump, tighten the screws securing the cover, press the drive lever all the way, tighten the screws and release the lever.
VAZ-21213 (Niva). Adjusting and checking the carburetor
GENERAL INFORMATION Setting the fuel level in the carburetor float chamber
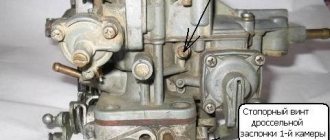
| 1 – adjusting screw for the amount of mixture; 2 – adjusting screw for mixture quality (composition); | 3 – sealing ring; 4 – adjusting screw plug |
PERFORMANCE ORDER Setting the fuel level in the float chamber
1. The fuel level required for normal operation of the carburetor is ensured by the correct installation of serviceable elements of the shut-off device.
Check the correct installation of float 1 (see Fig. Setting the fuel level in the carburetor float chamber) with a gauge 4, for which install it perpendicular to cover 2, which is held horizontally with the floats up. There should be a gap of no more than 1 mm between the contour gauge and the floats. 2. If necessary, adjust by bending the tongue and float arms. The supporting surface of the tongue must be perpendicular to the axis of the needle valve 5 and must not have dents or nicks. Adjusting the starting device
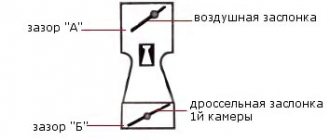
3. When turning the lever 4 (see Fig. Carburetor starting device) to control the air damper 5 fully counterclockwise, the air damper should be completely closed under the action of spring 7. If the damper is not closed, eliminate the cause of the jamming.
4. With the air damper completely closed, manually press rod 3 of the trigger until it stops. In this case, the air damper 5 should open 3.0 mm (starting gap B). If necessary, adjust the gap with screw 2. 5. Throttle valve 12 of the first chamber, with the air damper completely closed, should be slightly open by 1.1 mm (starting gap C). If necessary, adjust this gap with screw 10. Adjusting the carburetor drive
6. With the throttle valve control pedal 7 (see Fig. Carburetor control drive) fully pressed, the throttle valve of the first chamber should be fully open and rod 15 should not have additional travel.
When pedal 7 is released, the throttle valve should be completely closed. If this is not the case, adjust the position of the pedal and the throttle valve with tip 10 at the front end of the longitudinal link 1. 7. In the air damper drive, secure the end of the cable 3 so that when the handle 5 is extended, the air damper is completely closed, and when it is recessed, it is completely open. Adjusting the engine idle speed
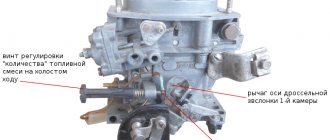
8. Adjustment is provided by adjusting screw 2 (Fig. Idle speed system adjustment screws) for the quality (composition) of the mixture and adjusting screw 1 for the quantity of the mixture.
Adjusting screw 2 is closed by plug 4. To access the screw, you need to remove the plug with a corkscrew. 9. Idle adjustment must be performed on a warm engine (coolant temperature 85–90 ° C), with adjusted clearances in the gas distribution mechanism, with the ignition timing correctly set and with the air damper fully open. 10. Using adjusting screw 1 for the amount of mixture, set the engine crankshaft speed in the range of 750–800 rpm using the stand’s tachometer. 11. Using adjusting screw 2 for the quality (composition) of the mixture, achieve a carbon monoxide (CO) content in the exhaust gases of no more than 1.5% at a given position of screw 1 (CO content is reduced to 20 ° C and 101.3 kPa (760 mm Hg) .)). 12. Using screw 1, restore the crankshaft speed to 750–800 rpm. 13. If necessary, use adjusting screw 2 to restore the CO content to no more than 1.5%. 14. Upon completion of the adjustment, sharply press the throttle valve drive pedal and release it; the engine should increase the crankshaft speed without interruption, and should not stall if it decreases. If the engine stops, use screw 1 to increase the crankshaft speed within 750–800 rpm. 15. Install a new plastic plug 4 into the hole for the mixture quality adjusting screw 2. Checking the operation of the second chamber locking mechanism
16. Turn the air damper control lever counterclockwise until the damper is completely closed. 17. Then turn the lever of the axis 19 (see Fig. Parts of the carburetor body) for controlling the throttle valves until the valve 23 of the first chamber is completely open, while the throttle valve 24 of the second chamber should remain in the closed position. 18. Turn the choke control lever clockwise until it stops, and the throttle valve control lever 19 until the valves are completely open. 19. If the throttle valve of the second chamber does not open, eliminate the problem. The reason may be that the locking lever 20 of the second chamber is jammed or the spring 21 of the locking lever is disconnected.
Main dosing systems
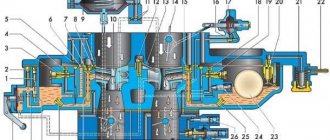
The first and second chambers are equipped with diffusers. There is one large and one small element. Spray devices are also made together with small diffusers. The latter are connected through channels to the emulsion wells, and they communicate through one channel with the float chamber. To ensure that gasoline flows in certain portions, the main fuel jets are located below in the emulsion wells. These same wells have special tubes. Each of them is equipped with an air jet at the top. Air is supplied to them from the neck of the device.
Operating principle of the main dosing chamber
Under the influence of vacuum that occurs in the engine cylinders, air is drawn through the filter. Next, oxygen is supplied to the first chamber. It passes through diffusers. Due to the fact that the air flow speed has increased, an even greater vacuum is created in the nozzle area.
Under its action, the fuel rises from the emulsion well from the atomizer. At the same time, air passes through the air nozzle into the emulsion tube and is then mixed with fuel. As a result, an emulsion is formed, which is sucked at high speed into the carburetor channels, where it connects with the air flow. The installed Solex 21073 carburetor on the Niva operates on this principle. Its design may vary depending on the modification. But the principle of operation of the systems is approximately the same for all devices.
Lada Niva 4x4
How to decide on a carburetor for Lada Niva 4x4?
Niva-2121, also known as VAZ-2121, is a popular small-class SUV with continuous all-wheel drive and a monocoque body. It is noteworthy that even the very first configuration of this car had the same markings on the engine - VAZ-2121. The car was also equipped with a DAAZ 2107-20 carburetor device, otherwise called “7-20”. If this unit fails, you will now have to choose a carburetor for the Niva from those that are produced today.
Main characteristics of the carburetor VAZ 2121, 21213
The carburetor got its name directly from the functions it performs - carburetion and mixing. In this unit, gasoline is mixed with air. The supply of the mixture that will end up in the engine cylinders is also regulated.
The carburetion process is also influenced by the design of the unit itself. The “native” carburetor for Lada Niva 4x4 includes:
- Float chamber (the volume of fuel contained in it affects the functioning of the optimal idle mode and a number of other systems);
- Jet (this element is responsible for dosing the volume of air-fuel mixture entering the VAZ 2121, 21213 carburetor);
- Diffusers (are narrowings of the carburetor pipes of both chambers, their function is to accelerate the air passing through the mixing chambers);
- The throttle valve (“manages” the cross-section of the channel, changing the volume of fuel or gas that passes through this channel).
Fuel is supplied through the carburetor VAZ 2121, 21213 of the old model as follows:
In the required volume, fuel flows from the tank directly into the float chamber. Filling with this liquid, the chamber goes down. When the fuel starts to move, it moves up. After passing through this chamber, the fuel ends up in the nozzle. From there it goes to the atomizer, which is located in the narrow passage of the diffuser. In the carburetor, air enters through the outer pipe. The required volume of fuel, passing through the intake manifold and throttle bodies, ends up in the engine.
When the carburetor on a Niva 2121 fails, craftsmen usually replace it with one of the options produced today.
Which carburetor for Lada Niva 4x4 should you install?
Experienced auto mechanics say that it is optimal to install one of two types of carburetors on the Niva: Ozone or Solex. In principle, these models are largely identical to each other, but there are certain differences. In particular, Solex does not need an economizer to function, and Ozone does not have a vacuum corrector.
These devices are important to a certain extent, and their absence may have some impact on the functioning of the machine. Thus, the vacuum corrector rotates the table located in the tumbler to change the ignition timing. And the economizer, in essence, is a mechanism for heat exchange that preheats the water supplied to the steam boiler.
Theoretically, you can choose any of these carburetors for the Lada Niva 4x4, but the vast majority of experts believe that Solex is less picky than Ozone. And this is influenced by the difference in the design of the devices themselves.
Idle system
The device is equipped with an idle system. It is designed to allow the engine to operate at low speeds. At this moment, the vacuum in the diffusers is very small. Fuel cannot enter the main metering system. At idle speed of the engine, fuel is supplied under the throttle valve of the first chamber of the carburetor. There the vacuum is strong enough to form a stable combustible mixture.
Air is supplied through the main jet and the emulsion well of the first chamber. The fuel will then flow to the idle fuel jet. After this, it is mixed with air supplied from the XX air jet. Oxygen is supplied to this element through a special channel. This operating scheme allows the engine to ensure a smooth transition from load to idle and prevents fuel from leaking out of the float chamber.
How to reduce fuel consumption on a VAZ 2121
moLife Blog Carburetor Pierburg 2E
Using a standard carburetor, the Niva consumes a large amount of fuel. Putting a Solex carburetor on the field does not mean that the problem is completely solved
It is important to monitor many other systems and the overall condition of the vehicle.
The following parameters affect fuel consumption:
| Cleanliness of filters. This applies not only to the fuel filter, but also to the air filter. If less oxygen gets into the carburetor, the Niva 2121 will begin to consume more fuel in order to maintain the speed at the desired level. The mixture will become richer and it will begin to pour. |
| Tire pressure. If the pressure is insufficient, then the engine has to do a lot of work to overcome such resistance. This leads to the fact that, while performing unnecessary work, the engine consumes a huge amount of fuel. But you should not overinflate your tires, as this will impair road grip. |
| Excess weight of the car. The effect is the same as with insufficient pressure. If you carry it in the trunk, the carburetor will fill the cylinders with more fuel. Niva 2121 is not designed for transporting goods. |
| Violation of aerodynamics. This applies to luggage racks and cargo installed on the roof of a car. An increase in air resistance causes the motor to consume more energy. The same applies to open windows when driving on the highway. |
| Aggressive driving style. It is known from driving school that a smooth increase in speed and smooth braking helps to save fuel. When driving at higher speeds, the carburetor consumes more gasoline. The VAZ 21213 Niva was designed taking into account driving at speeds no higher than 3000. If you do not exceed these limits, you can save a lot. |
| Driving in neutral gear. This is the biggest mistake many drivers make. When the speed drops below 1100 rpm, the autonomous idle system comes into play, which forces the engine to consume more fuel so that it does not stall, since the throttle is closed at this moment. When approaching intersections, you need to take your foot off the pedal and smoothly shift to lower gears. |
| Use of electronic devices. If you turn on a large number of different devices at a time when they are not needed, the load on the generator, the pulley of which is in mechanical connection with the crankshaft, increases. This leads to excessive consumption of gasoline. |
| Long engine warm-up. Many people take too long to warm up their car. It is most effective to apply warm-up while moving. When the motor has reached 50 degrees Celsius, you can start moving without putting a lot of load on the motor. The temperature will reach 90 degrees much faster, and, accordingly, more fuel will be saved. |
| Driving at maximum speed on the highway. If you go too fast, air resistance increases proportionally, which slows down your movement. The same principle applies here as when aerodynamic characteristics are violated. |
Author of the article: Yuri Veselov
Troubleshooting
Car components do not last forever, and sometimes the installed Solex 21073 carburetor on the Niva fails. Repairing it must begin with diagnostics. It may be possible to get by with a simple adjustment. So, during operation, solid particles can enter the carburetor, which ultimately causes clogging of the jets. Low-quality gasoline leads to the formation of deposits on the walls of the channels in the device. This significantly reduces their cross section. Failure of carburetor systems can be diagnosed by the following symptoms:
- Increased fuel consumption.
- Difficulties in starting the engine. Reduced power and dynamic performance.
- Unstable operation at idle.
In this case, it is necessary to clean the installed Solex 21073 carburetor on the Niva. The adjustments that will be made after this will allow the device to work as it should again.
Which carburetor is better to install on a VAZ 21213 Niva with a 1700 engine
The best option for reducing fuel consumption on a Niva is to install a DAAZ 21083 carburetor. The “eight” carburetor has all the necessary characteristics that a 1.7 engine may require. If you are looking for an answer to the question of which carburetor to install on Niva 21213, then this is exactly what you need.
Carburetor DAAZ 21083
The only negative that may follow after such an installation is a decrease in throttle response of a carburetor engine due to a smaller throttle valve diameter of several mm. Also on carburetors 21083 the float has a small stroke. Installation can be done by yourself without outside help. Adjusting a new carb is also not difficult. The cost of this carburetor is not small - 6,290 rubles, but the quality of the parts and service life deserves respect.
When selecting carbs, there are several points to consider:
- The DAAZ 21083 carburetor is not designed to fit the Niva manifold - it will have to be bored;
- A new throttle control system is needed;
- You will need a set of larger diameter fuel jets;
How to restore carburetor operation?
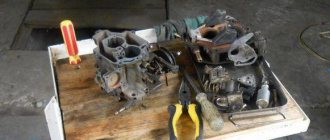
For repairs, most often you have to remove the device from the engine. First, remove the air filter. Then the fuel lines, air pipes, wires and cables are removed. then unscrew the fastening nuts.
It is best to disassemble the carburetor on a table or other convenient surface. The parts should be laid out in some order. This will help you not lose them. The process of adjusting the needle valve is performed using a special template. To wash the device, you must use special liquids. Replacement jets can be purchased at any auto stores. Often, disassembling and flushing the carburetor helps solve a lot of problems.
Features of servicing DAAZ-21073 devices
All possible disruptions in the operation of the device directly depend on the quality and frequency of service. Despite the design differences between the VAZ DAAZ-21073 and the DAAZ-4178 carburetor on the UAZ, their maintenance is not much different. The technically required work includes:
- external cleaning;
- washing the float chamber strainer;
- cleaning the float chamber;
- cleaning jets;
- adjustment of the float device;
- adjustment of the starting device;
- stabilization of the XX system.
Washing the external and internal parts of the carburetor unit is carried out using kerosene, white spirit or preparations in aerosol cans. The aerosol composition is injected into the chambers and jets while the engine is running. The cleaned apparatus is blown with compressed air.
Adjustment
If the installed Solex 21073 carburetor on the Niva fails, repairs and adjustments help bring the device back to life. The settings allow you to restore optimal modes in which the motor will operate as efficiently as possible. Fuel consumption is at an average level. First of all, start the engine and warm it up a little. Next, you need to remove the fuel hose and the device cover. It is recommended to remove the latter with extreme caution so as not to damage the float. Next, using a measuring tool, measure the distance in each of the carburetor chambers. Measure from the mating surfaces to the edge of the fuel. This size should be approximately 24 mm. If this distance is less or more, then it is adjusted by bending the float. Then you need to start and warm up the engine again. When the level adjustments are successfully completed, you can proceed to adjusting the idle speed.
The engine is turned off. To set up, you will need a flathead screwdriver and a little time. There is a hole on the base of the device in which there is a screw that regulates the quality of the fuel mixture. It is twisted all the way. Then from the extreme position the same screw is unscrewed by about five turns. Then the engine is started. There is no need to use a suction. If you unscrew the “quality” screw, then the carburetor will change the engine speed. Then it is twisted again. It is required to rotate until the operation of the motor is stable and stable. When the engine starts to run smoothly, then the element is unscrewed no more than one turn. As a result, the idle speed will be set at 900. If the engine starts to stall, it is better to slightly increase the idle speed.
Checking and adjusting the fuel level in the float chamber of the 21073 Solex carburetor
If malfunctions occur in the operation of a car engine with a Solex 21073-1107010 carburetor: loss of power and throttle response, “dips” and jerks when pressing the gas pedal, “overflow”, it makes sense to check and, if necessary, adjust the fuel level in the float chamber.
Necessary tools and equipment
— Medium Phillips screwdriver
— Slotted mid-size screwdriver
— Drill with a diameter of 1 mm
Preparatory work
— Place the car on a level surface
— Remove the car engine air filter housing
The procedure for checking the fuel level in the float chamber of the carburetor 21073-1107010 Solex
For normal operation of the 21073 carburetor, a certain position of the elements of its float chamber is necessary. Therefore, we check two parameters: the first is the fuel level itself in the float chamber and the second is the position of the floats.
Let's carry out work on checking and adjusting the fuel level in the float chamber using the example of a Solex 21073-1107010 carburetor just removed from the 1.7 liter Niva 21213 engine, the operation of which began to cause small dips when pressing the gas pedal. The carburetor has never been independently adjusted, so all dimensions are original (factory).
— Start the car engine and let it run for 3-5 minutes
In this case, the float chamber will automatically fill with fuel to the verified operating level.
— Remove the top part (cover) of the carburetor
Unscrew the five screws securing the cover using a Phillips screwdriver.
— We measure the distance from the edge of the float chamber to the fuel mirror
(we measure the fuel level)
We use a ruler. The distance from the edge of the float chamber to the fuel “mirror”, if the fuel level is normal, should be 25-26 mm. See photo above.
If the fuel level is normal, further measurements need not be taken. But just in case, let’s check the position of the floats, in case one of them touches the walls of the float chamber.
— We measure the distance between the protrusions on the bottom surface of the floats and the cardboard gasket of the lid
To do this, turn the carburetor cover over with the floats facing up and place it on a horizontal surface. We insert a drill with a diameter of 2 mm between the protrusion on the bottom of the float and the cardboard gasket (it should be pressed tightly against the lid). The drill should go in with a slight pinch. We check for the second float. At a fuel level of 25-26 mm, the distance between the floats and the gasket should be 2 mm. These are interdependent quantities. If the distance is greater or less, then using a slotted screwdriver and pliers we slightly bend the upper tongue on the float levers. Let's check again.
We measure the gap between the gasket and the float using a drill
On our test carburetor 21073 Solex, a 2 mm drill bit fit freely between the gasket and the edge of the float. If you slightly squeeze the cardboard spacer, a drill with a diameter of 2.5 mm will fit in with a slight pinching (I repeat once again that the carburetor has never been adjusted and all its settings and dimensions are “factory”).
— Check the position of the floats relative to the walls of the float chamber
We look from above at the horizontally installed carburetor cover. The floats should be parallel to the print lines on the cardboard lid liner. If not, bend the float arms.
The floats should be parallel to the print on the cardboard “lid” gasket
Place the lid vertically. We look at the stamping line on the side of the float. It should be parallel to the plane of the lid. We check the second float in the same way. In this case, the tongue on the levers should slightly recess the shut-off valve needle ball. If there is no parallelism, bend the float levers and (or) the tongue.
We check the parallelism of the floats relative to the plane of the “cover”
— We adjust the full stroke of the floats
Place the lid horizontally. Using a ruler, measure the distance from the lower corners of each float to the plane of the cardboard lid gasket. Let's remember the number.
Measuring the distance to the bottom corner of the floats
We raise the floats up, simulating their descent to the bottom of the float chamber when the fuel level in it drops. Using a ruler, measure the distance from the bottom corners of the floats to the cardboard spacer. It should be: the first memorized digit plus 15 mm. For example, 3 mm plus 15 mm equals 18 mm. If the distance does not correspond to the required one, then we achieve its compliance by bending the rear tongue on the float levers and checking again.
Set the full stroke of the floats
That’s it, checking and adjusting the level in the float chamber of the carburetor 21073-1107010 Solex is completely done, it’s time to install it on the engine and check whether the “dip” in engine operation has disappeared when you press the gas pedal.
Notes and additions
— If the fuel level in the carburetor float chamber is set correctly, but there are still problems with the engine, it is necessary to check the tightness of the float chamber shut-off valve and the presence of “suction” of foreign air into the carburetor.
TWOKARBURATORS VK -More information on the topic in our VKontakte group