The carburetor is an important engine element that is responsible for supplying the correct air-fuel mixture. Malfunctions in the operation of the unit can lead to various engine breakdowns and disable the car. Timely adjustment of the VAZ-2109 carburetor will prevent serious damage and also improve the quality of movement in the car.
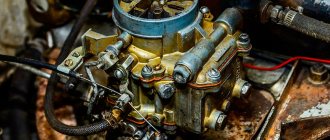
Domestic VAZ-2109 cars are equipped with a reliable and repairable Solex carburetor. The device has proven itself to be quite reliable, but to ensure a long period of operation it must be constantly cleaned and adjusted. Malfunctions of the part can lead to excessive fuel consumption and serious engine damage. The VAZ-2109 carburetor can be adjusted independently at home if you have a set of tools.
You may be interested in an article by our specialist, from which you can learn how to remove the box on a VAZ-2109.
How to determine that the VAZ-2109 electrical circuit is faulty? Find out about this in a detailed and informative article from our expert.
Signs of carburetor failure
The carburetor, like the rest of the engine, plays a big role when moving the car. Malfunctions of the unit first manifest themselves as unpleasant symptoms, and only then lead to serious problems in the operation of the motor. The first signs that you should pay attention to are the following manifestations.
- Pedal dips . When you press the gas pedal, the car drives at the same speed for some time and only after a few seconds begins to accelerate. Sometimes the interval can reach 10 - 20 seconds, and then ignoring it becomes unsafe.
- Jerk . A sharp increase and decrease in speed may indicate a carburetor malfunction. Usually the jerks are very short-lived, so they can be confused with signs of failure of other parts.
- Twitching . A series of jerks, which are repeated at some intervals, indicates problems in the carburetor.
- Rocking . Successive failures lead to a rocking effect.
- Slow acceleration . If the car begins to accelerate significantly more slowly, but there are no obvious reasons for this, then it is worth adjusting the VAZ-2109 Solex carburetor.
Although all these signs are highly likely to indicate a carburetor breakdown, sometimes situations may occur in which the characteristic features of the malfunction become uninformative.
In unusual cases, it is necessary to conduct a comprehensive diagnosis.
How to set up a carburetor on a VAZ-2109 Solex with your own hands
Initially, you need to prepare all the tools for adjusting and repairing the carburetor. Setting up is often accompanied by minor repair work, so experts recommend having all the necessary tools on hand. In the room in which the mechanism will be dismantled, it is necessary to ensure good ventilation, since strong fuel evaporations can lead to deterioration of health.
During the work, you cannot use rags or brushes, so it is worth preparing in advance a special material that does not crumble and does not change its structure.
For convenience and high-quality results, the car must be on a horizontal plane. A flathead screwdriver should always be nearby, as it is most often used when adjusting the carburetor. The part must be cleaned with special means or, in extreme cases, with pure gasoline.
We also advise you to read the article by our specialist, which describes in detail how to set up a VAZ-2108 carburetor.
Don’t know how to adjust the carburetor on a VAZ-2107? Then be sure to read the detailed material from our specialist.
Pouring candles
If you notice that the carburetor on a VAZ 2109 is overflowing, the problem is in filling the spark plugs. This happens most often in winter. Both carburetor and injection engines suffer from this disease.
Type of poured candle
The reasons are as follows:
- Creating a working mixture in winter requires more effort, which causes the candles to flood;
- This phenomenon is not possible on new cars;
- The power unit is worn out;
- The spark plugs or spark plug wires turned out to be of poor quality.
To avoid flooding of spark plugs, it is recommended to keep the battery fully charged, use high-quality oil, and also monitor the serviceability of the starter. Of course, be sure to complement all this with reliable candles.
Unit setup and repair
The carburetor on the VAZ 2109 Solex is quite easy to repair due to the fact that the manufacturer has released ready-made repair kits for replacing parts of the unit. In the kit you will find fuel and air jets for both chambers. There are also kits with diffusers. You will have to buy other parts separately, for example, if you need to replace the VAZ choke cable.
Solex has several adjustment modes that allow you to adjust the fuel level in the chamber, the minimum idle speed, and the composition of the air-fuel mixture. The adjustment is carried out as follows:
- To set the fuel level in the carburetor, you will need to remove the top cover by unscrewing several screws.
- Next, remove the air filter, disconnect the wiring of the solenoid valves and the cable of the air intake system.
- Remove the clamps and pull the pipes off the carburetor cover.
- After removing the cover, turn it over, place it horizontally in front of you and inspect it.
- There should be a small gap between the floats and the surface of the cover - no more than 1.5 mm. This gap can be adjusted by bending the plate that holds the floats.
- Remember to align the floats after completing the adjustment.
By the way, as the work progresses, inspect the suction cable. The choke cable on a VAZ 2109 is replaced if the engine does not start the first time without warming up. Motorists often make a mistake when securing this small part. The air damper should be closed using a cable. If this does not happen when the choke is turned on, it is worth securing the cable in a different position. Change the position of the cable until the damper closes normally at the right time.
Return to contents
Adjusting the ignition angle
Sluggish acceleration of the car and instability of the idle speed are also often associated with incorrectly set ignition; this procedure is mainly carried out in car repair shops using special equipment. But if you wish, it’s easy to make the adjustment yourself, and without a strobe, and quite accurately:
- with the engine stopped, loosen the three nuts securing the distributor (the third fastening is located at the bottom, it is not visible from above);
- we start the car, turn the distributor-distributor clockwise (to “+”), and if the ignition was late, the idle speed will increase noticeably;
- we select the optimal position of the distributor (the operation of the internal combustion engine should be smooth, without failures), reduce the speed using the quantity screw, turn off the engine, fix the distributor-distributor with one nut for now, and check the results of the ignition adjustment on the fly.
We recommend: How to replace a VAZ-2114 pump with your own hands
If, under heavy load and sharp acceleration, your fingers begin to noticeably “knock” (engine detonation appears), you should move the distributor a little to “minus”, then check the car again while driving. This way you can set the ignition quite accurately, and sometimes even better than with a strobe light.
Cleaning process
The most negative impact on the operation of the carburetor is caused by low-quality fuel, which is used to fill cars at some gas stations. The carburetor of the VAZ 2109 begins to malfunction, affecting the operation of the engine. The composition of the mixture can be determined using an analyzer, which allows you to determine the content of carbon monoxide, hydrocarbons and oxygen. Spark plugs can tell you a lot about the amount of different substances in the mixture. If you see a gray-brown coating on the tip, the proportion of the mixture is even. Black color indicates fuel dominance. White indicates excess air in the mixture.
It is necessary to visually inspect the carburetor of the car. It must be clean, without any contamination. You need to clean the carburetor thoroughly, so the work does not take five or ten minutes.
Stock up on rags, cleaning products, and buy or borrow a compressor. You will also need a solvent, a set of wrenches and screwdrivers, and toothpicks. There are different carburetor cleaners available, and you just need to choose the right product.
Having removed the carburetor and disassembled it according to the instructions above, you need to start cleaning each part separately. Don't lose a single screw, nut or bolt. Rubber seals cannot be treated with solvent, as it damages them. All metal parts should be placed in a separate container and filled with cleaning agent or ordinary solvent. After some time (1-2 hours), clean the parts with a toothbrush and blow with a compressor.
Do not insert anything into the carburetor or valve outlets as this is where fuel and air are supplied to the engine. The recesses must be blown out with an air stream from a can or compressor. After cleaning, the carburetor should be thoroughly dried and reassembled in the appropriate sequence. After installing the node on the machine, it needs to be configured (more on this below).
To further protect the carburetor from contamination, it is necessary to regularly change the air and fuel filters. This should be done when replacing spark plugs, and cleaning the carburetor should start with the strainer. It is located under the fuel filter cap. It can be washed in gasoline and blown with air using a compressor. If the carburetor does not work as it should, you will have to replace the unit.
The gasoline consumption of the VAZ 2109 depends on the settings and adjustments of the carburetor. If you wish, you can make all the adjustments yourself, doing everything according to our instructions.
How does Solex differ from Ozone and Weber?
The main difference between Solex carburetors and devices of previous families is the possibility of installing it on transversely located power units with the float chamber forward. This installation option made it possible to eliminate the leanness of the fuel mixture when the car enters a turn, climbs, or during sudden acceleration.
In addition, Solex has a completely different float chamber design. It has a two-section design, which allows the device to be used both on front-wheel drive cars and on classic cars.
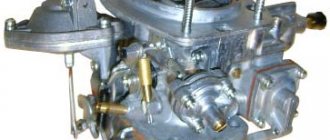
Solex carburetors are reliable and maintainable
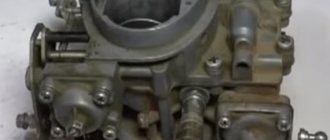
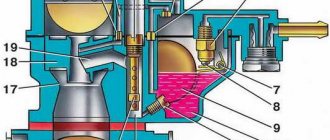
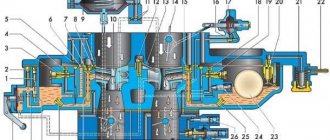
Solex design
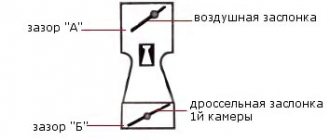
The carburetor mechanism of all modifications on the VAZ 2108/2109 is emulsion and consists of two internal combustion chambers. At the top of the carburetor there is a cover that prevents dirt from entering the cavity of the device, and fittings - fuel lines are supplied to them. The middle part is the body itself, into which diffusers and cameras are mounted. At the bottom of the carburetor are the float chamber and throttle valves.
The key elements of the system are:
- accelerator pump;
- float;
- throttle thrust;
- forced idle economizer;
- main dosing system;
- trigger mechanism;
- econostat;
- vehicle idle system.
The principle of operation of the Solex carburetor is that gasoline is supplied through the inlet valve in the fitting. The fuel is directed directly into the float chamber. The fuel level in the cavity must always be at a certain level to avoid dips and jerks in engine operation. Level control is carried out through the movements of a needle valve mechanism.
After the chamber, gasoline is sent to emulsion wells, where it is supplied in strictly limited quantities through fuel nozzles. It is in the wells that air flows break up large drops of gasoline, forming a single air-fuel mixture with it.
The mixture is supplied to diffusers, and through them to the power unit device. Thus, the main task of the carburetor is to form the air-fuel mixture in the desired consistency and direct it to the engine.
The interaction of many elements ensures smooth operation of the motor
Setting up the float chamber
The fuel level is regulated in the float chamber. This part of the device is the easiest to repair and configure, so it is better for novice craftsmen or car enthusiasts to start from this point. Do-it-yourself adjustment of the VAZ-2109 carburetor consists of several stages:
- It is necessary to start the engine and let it run for 2 - 3 minutes.
- After the engine has been turned off, it is necessary to remove the air filter from the Solex.
- Next, disconnect the fuel hose.
- When dismantling the carburetor cover, you need to unscrew 5 hardware. A special feature of dismantling bolts is the need to unscrew them strictly vertically. If the hardware is removed incorrectly, the floats can be damaged, which will cause serious repairs.
- Normally, the distance from the edge of the carburetor to the gasoline is 25.5 millimeters. If the distance does not match, then you need to correct it by bending the tongue of the float bracket. Since it is difficult to set the required distance the first time, the bending procedure can be repeated several times.
- While the cover is removed, experts recommend checking it for parallelism of the edges and, if necessary, restoring the correct position of the elements.
On the “nine” this work is quite easy to carry out.
One of the main conditions is to constantly maintain cleanliness and prevent various small parts from getting into the carburetor.
Carburetor jets VAZ 2109
In terms of their effect on the quality and composition of the fuel mixture, they are opposite:
- depletion of the mixture is fixed when the cross-sectional area of the air jet increases;
- enrichment is noted as the cross-section of the fuel nozzle increases.
Moreover, the level of their influence depends on the specific operating mode of Solex. The composition of the combustible mixture is regulated in direct proportion to any throttling modes by the cross-section of the fuel nozzle. But the impact of its “brother” is more noticeable with an increase in the throttle opening angle.
Due to these features of the VAZ 2109 carburetor jets, you should remember that:
- the fuel mixture curve must be changed using an air jet;
- The composition of the mixture according to the range of characteristics is changed by the fuel nozzle.
The revolutions are floating
One of the most common carburetor malfunctions on the VAZ 2109 is floating speed. Similar problems appear on a car that has covered quite an impressive mileage.
It is not difficult to determine the fact that the idle speed on a VAZ 2109 is floating. To do this, turn on the idle speed and start the different mechanisms one by one. If the speed starts to fluctuate, you need to quickly solve this problem.
There are three reasons for idling:
- The jet is clogged. By the way, experts recommend paying attention to this first;
- The power supply to the solenoid valve has burned out;
- There is no power to the solenoid valve.
If problems with the carburetor are eventually discovered, you can perform the setup and adjustment yourself, with the help of a friend.
Here it is better to work with four hands. But don’t rush to the service station. They will charge a lot of money for their services, given the relative ease of the work, which can be done with your own hands.
To prevent the carburetor from creating problems for you, try to use high-quality fuel, lubricate quality screws, and check the serviceability of the choke cable. The latter, by the way, requires periodic replacement.
Carburetor VAZ 2109: how does it work?
All VAZ “eights” and “nines” were equipped with domestically produced automobile carburetors “Solex”, which are classified as emulsion-type units.
He has:
- two main dosing systems;
- an idle mechanism and a transition system of the first chamber, equipped with a shut-off solenoid valve;
- diaphragm starting device;
- transition mechanism of the second chamber;
- accelerator diaphragm pump;
- power mode economizer;
- econostat.
Also, the car carburetor we are considering has an idle economizer, which is forced to start. It consists of:
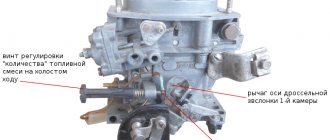
- a screw switch, which is designed to adjust the idle mixture volume;
- control unit (electronic);
- shut-off valve;
- a set of wires connecting all specified elements of the system.
The carburetor is installed using four studs on the intake pipe. Secure it with nuts. The throttle valves are opened using a pedal located inside the car. A cable in a special sheath is attached to its upper part, which allows you to control the dampers.
Basic faults
Any malfunctions of the 2109 carburetor affect the performance of the engine: the engine may stall when the speed is reduced, run intermittently, not develop power, and consume gasoline beyond the norm. There are many reasons for problems with this unit, but the most typical of them are:
- clogging of the HDS and idle jets, both air and fuel, and in the solenoid valve (EMV);
- rupture (defect) of the accelerator pump diaphragm;
- failure of the EMG itself;
- loose fit of the locking mechanism needle to the seat;
- air leakage through the junction of the body and the cover;
- leakage of the float in the float chamber;
- clogging of the accelerator pump nozzle with dirt;
- misadjustment of screws XX.
Of course, various types of malfunctions can occur not only due to the carburetor, the engine itself is often faulty, and the ignition may also be set incorrectly, especially if the installation was carried out by an inexperienced technician without a strobe light. Problems with idle speed can occur due to a lack of power to the solenoid valve, so before disassembling the HRV, you should first check for voltage on this wiring.
Operation and repair
The VAZ 2109 carburetor, like all other parts, tends to break. Typically, a breakdown involves the failure of any spare part. In such cases, repair usually helps.
The first thing that can break is the accelerator pump. Its purpose is to enrich the fuel mixture, regardless of the air supply, when the throttle valves are opened. If, when you sharply press the gas pedal, the car jerks, it means that there is either not enough fuel, and significant gaps occur in the supply, or, on the contrary, there is too much of it, and it overflows the spark plugs. So, to avoid this problem, an accelerator pump is used. It regulates the exact amount of fuel required for normal engine operation, even when the gas is pressed hard.
The accelerator pump more often becomes clogged with sediment than breaks down, and then repairs are not needed, but simply cleaning is enough. But, if this is not the case, but there is still a breakdown, then the pump needs to be repaired urgently, otherwise operation of the engine of the VAZ 2109 car will be impossible, and you are guaranteed to have pedal failures.
The first symptoms that the pump is faulty is that when you press the pedal, the speed does not increase steadily, but floats. This is due to a shortage, or vice versa, an excess of fuel. The spark plugs do not have time to burn out all the gasoline, and they are simply flooded, so the car jerks while driving. Also, the pedal may fail when pressed.
Repair for such a breakdown is as follows:
- We take out the sprayer;
- Shake it. If there is a characteristic knocking sound of the ball inside, then the sprayer is working, if not, then this will be the reason why the pedal failed;
The pump has a rather heavy structure with parts. A large number of holes and channels increases the chance that the pump will clog, and pedal failure will be inevitable. If the holes are clogged, then repairs are not needed. You just need to buy carburetor cleaning fluid and use it to blow out the channels.
Scheme of operation of EPHH
If the VAZ 2109 jerks when idling, and there are dips when you sharply press the gas pedal, then the EPHH control unit has a malfunction. Its repair primarily depends on which control unit is installed. They can be 4 or 6 pin. Repair of EPHH must be carried out by a specialist. If you do not have the appropriate knowledge, simply replace the part with a new one.
The reason that the VAZ 2109 jerks when driving, or even stalls, and when you press the gas pedal, failures occur, may be not only the carburetor or the EPHH control unit, but also the spark plugs. When used for a long time, carbon deposits appear at the contact site. Because of it, the spark plugs do not completely burn out the fuel in the cylinder.
Sometimes the spark plugs flood even at idle. This is due to the fact that the EPHH control unit is selected incorrectly. The valve opening does not occur synchronously, and the engine speed fluctuates. At the same time, gas pedal failures and late ignition are observed. In order to understand which EPHH is better to install, you need to decide on the choice of carburetor jets. The type of device depends on their diameter.
Replacing spark plugs
In general, before repairing the carburetor, make sure that the speed is fluctuating precisely because of it. Also, gas pedal failures occur for this reason. After all, maybe the candles are to blame for everything. If they are flooded, the car will jerk and stall. But in this case, the cause must be sought in the fuel lines, pump and similar components. But this is better than repairing the carburetor, since this work is quite painstaking.
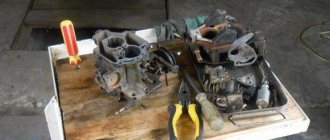
Dismantling, disassembling and cleaning the carburetor
In order to restore the functionality of the Solex carburetor, you must:
- remove the device from the engine;
- take it apart;
- clean and rinse;
- replace faulty elements;
- assemble and install on the engine;
- make adjustments.
We recommend: Step-by-step installation of a towbar on a Chevrolet Niva with your own hands
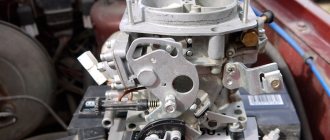
Removing the Solex carburetor from the engine
Required tools:
- slotted and Phillips screwdrivers;
- keys for 7, 8 (2 pieces), 10, 13 (preferably a cap).
Execution order:
- Raise the hood.
- Using a 10mm wrench, unscrew the air filter cover fixing nut.
- We snap off the latches (4 pcs).
To remove the filter, you need to unscrew the nut and press the latches
- Remove the air filter from the “pan”.
- Using a size 8 wrench, unscrew the nuts securing the air filter housing.
- Using a 7 key, loosen the clamp screw on the gas exhaust hose. Let's remove this hose.
- Remove the filter housing.
To remove the filter housing you need to unscrew 4 nuts - Disconnect the wires from the terminal of the EPHH valve and from the contact of the quantity adjustment bolt.
Disconnect the wire tips from the valve and from the quantity screw contact
- Disconnect the vacuum hose from the fitting.
Disconnect the vacuum hose from the fitting
- Using a 7 key, loosen the clamps on the fuel supply hose and on the return hose. Let's take them off.
Disconnect the fuel hoses
- Remove the crankcase ventilation hose.
Disconnect the crankcase ventilation hose
- Using two 8 keys, release the air damper rod screw. Disconnect the drive cable.
Remove the air damper drive rod
- Remove the spring from the damper drive.
Remove the spring
- In the damper drive sector, disengage the cable tip. Disconnect the cable.
Disconnect the throttle valve cable
- Using a 13mm wrench, unscrew the nuts securing the carburetor body (4 pcs).
- Using a screwdriver, unscrew the screw securing the heating module.
- We dismantle the carburetor. If it cannot be removed, pry out its body with a slotted screwdriver.
Remove the carburetor from the studs
There should be three gaskets under the carburetor: top (thickest), middle (heat insulating) and bottom (sealing).
Disassembling the Solex carburetor
Required tools:
- crosshead screwdriver;
- hammer;
- drill (knitting needle) with a diameter of 2.5 mm;
- keys for 11, 13, 14;
- tweezers;
- awl;
- toothpicks.
Execution order:
- Unscrew the five screws securing the cover with a Phillips screwdriver. Disconnect the cover.
Unscrew 5 screws
- Using a drill (knitting needle) and a hammer, remove the float axis. We dismantle the floats.
Disconnect the float axis
- Carefully remove the cardboard gasket from the sealing surface of the lid.
Carefully remove the cardboard spacer
- Using a 11mm wrench, unscrew the needle valve. Let's take it off.
Unscrew the needle valve
- Using a 13mm wrench, unscrew the solenoid valve.
We remove the seal, cup, and jet from it. We unscrew the valve, remove the jet, seal, cup from it - Use the same tool to unscrew the filter plug.
Remove the filter. Unscrew the plug and remove the filter - Without changing the tool, unscrew the fuel fitting. We take it out together with the sealing ring.
- Using a 14mm wrench, unscrew the bolt securing the air damper lever. We remove it, trying not to lose the fixing ball and pressure spring located under it.
Remove the lever
- Using a Phillips screwdriver, unscrew the 4 screws on the starter cover. We remove it with the diaphragm and spring.
Removing and disassembling the starting device
- Using the same tool, unscrew the 2 screws securing the air damper.
We remove its axis from the carburetor cover. Removing the air damper - Remove the rubber seal on the idle air passage tube.
Remove the seal on the fuel channel tube
- Using a slotted screwdriver, unscrew the choke rod holder screw.
Let's take it off. Removing the bracket - We also unscrew and remove the air jets of the dosing systems.
Unscrew the air jets - We remove the sprayer by prying it with a screwdriver at the top “spout”.
We remove the sprayer by prying it with a screwdriver
- Use a screwdriver to unscrew the fuel nozzles. If they do not shake out of the channels, we take them out with a toothpick.
We unscrew the fuel nozzles (if necessary or, for example, in order to reduce fuel consumption, they can be replaced later)
- Using pliers, carefully remove the diffusers from both chambers.
We remove the diffusers using pliers
- Using a Phillips screwdriver, unscrew the 4 screws securing the accelerator pump cover.
Disassembling the accelerator pump - Remove the cover with the diaphragm and spring.
- Using a Phillips screwdriver, unscrew the 3 screws of the power mode economizer cover. We remove it with the diaphragm and spring.
We disassemble the economizer of power modes
- Using a slotted screwdriver, unscrew the economizer nozzle. Let's take it out.
- Disconnect the wire contact from the quantity adjustment screw.
- Using a slotted screwdriver, unscrew the screw of the wire holder. We remove the wire.
Disconnect the tip of the screw wire, then unscrew the screw itself
- Unscrew and remove the quantity screw.
- Using a Phillips screwdriver, unscrew the screw securing the throttle valve drive. Remove the mount.
Removing the throttle control sector
- Using a slotted screwdriver, unscrew the quality screw.
- We remove it using tweezers.
- If the screw comes out without a rubber seal, remove it using an awl.
- Using a size 11 wrench, unscrew the nut securing the accelerator pump drive cam. We remove the cam along with the washer that is located under it.
Remove the accelerator pump drive cam
- Using a Phillips screwdriver, unscrew the screws securing both dampers. We remove the flaps.
- Remove the spring and plastic sleeve from the damper axis of the first chamber.
- Remove the axis of the first camera.
- Using a slotted screwdriver, pry up and remove the lock washer of the shutter axis of the second chamber.
Remove the axle. We disconnect and remove the throttle valves - the carburetor is completely disassembled. Assembly is carried out in reverse order
Important: do not disconnect the dampers or remove their axles unless necessary! If installed incorrectly, they may become skewed, which will lead to incomplete opening or closing!
Cleaning and flushing the Solex carburetor
Required tools:
- a compressor or pump with a tapered fitting at the end of the hose;
- carburetor cleaning liquid in an aerosol can or acetone;
- toothbrush (preferably a children's one);
- thin wooden spatula;
- toothpicks;
- clean rag.
Before washing the carburetor, it is recommended to soak the disconnected elements in a special washing liquid for 8–10 hours. This does not apply to rubber and plastic products!
If you don't have that much time, spray the parts on the outside and inside with carburetor cleaner and wait 30 minutes.
Carburetor cleaning fluid
The most convenient way to remove external stains is with a toothbrush. Dirt deposits on the inner surface of the carburetor cover and body are removed using a thin wooden spatula wrapped in a clean rag.
After washing, parts with internal openings (nozzles, diffusers, tubes, and internal channels of the carburetor cover and body) must be blown with a stream of compressed air (preferably at least 6 atmospheres).
Replacement of faulty elements and assembly of the Solex carburetor
When completely disassembling the carburetor, it is recommended to replace all its elements that show signs of damage or deformation. The best solution when repairing a device yourself is to purchase a repair kit, which includes all the parts that may need to be replaced:
- jets;
- springs;
- seals;
- diaphragms;
- gaskets (carburetor covers and housings);
- needle valve;
- filter;
- screws (quality, quantity);
- repair studs, etc.
Assembly/cleaning or other actions with the carburetor are carried out using the Solex carburetor repair kit.
Having replaced the rejected elements, we proceed to assembling the carburetor. We produce it in the reverse order to that described above. We do not screw the carburetor cover to the body!
Removal and connection process
This is the most critical area of work, because:
- All sensors and actuators are located in the engine compartment, information about the operation of which is displayed on the instrument panel;
- There is a high panel in the cabin, which is connected to the engine compartment sensors;
- Between them is a steel panel of the engine compartment, through which the wiring is routed.
Photo of the terminal block under the VAZ 21099 panel
Reconnecting the fuse box
The most correct and reliable option is to put a new one next to the fuse box and use it as a visual aid. Better yet, record it on video.
That's why:
- We arm ourselves with a notepad and pen;
- We record the location of the terminals and wires.
A DIY electrical circuit will protect you from mistakes.
Replacing wiring
Having remembered the location of the wires and sketched their connection points, we proceed to replacing the wiring. For this:
- From the engine compartment we take out the wiring harness going into the cabin;
- Instead, we thread a new set;
- Disconnect the terminals from the sensors and reconnect with new wires.
Let's understand the wiring diagram of the VAZ 21074 injector.
The wiring terminals are the same - there will be no problems
Connecting sensors and panel
Another important step is connecting sensors and actuators. These include:
- Ignition system (from the ignition switch, which we dismantled - start relay)
- Sound signal;
- Electronic tachometer;
- Brake fluid sensor;
- Temperature sensor;
- Fuel level sensor.
Additional insulation of connections
Inside the cabin, all the wires are combined into terminal blocks, which connect the wiring to the instrument panel. Everything is extremely simple and will not cause problems.
And then you have to:
- Assemble the plastic parts of the panel into a single whole;
- Install a new ignition switch;
- Install the cover on the steering column;
- Check the functionality of the new panel.
Sequencing
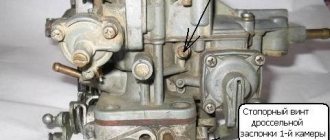
Initially, you should adjust the throttle valve. This is done in the following sequence:
- We check and adjust the cable tension using a 13 key.
- We check whether the throttle is fully open when the gas pedal is depressed, and whether it is closed when the pedal is released. If there is a discrepancy, we use the same key to eliminate the problem.
The next stage is the air damper. The procedure is as follows:
- Remove the cover from the air filter.
- If there is such a need, we replace the filter.
- If the choke handle is completely recessed, the damper should be located directly under the dashboard and be completely open.
- Turn the damper lever until it is fully open and push it in until it stops.
- Remove the torso from the insulation and tighten the draft adjustment bolt, then check the damper again.
- If there is such a need, you should move the cable sheath slightly and tighten the fastening bolt.
- Once the desired result is achieved, tighten the bolt towards the lever and close the filter cover.
Adjusting the starting device is the third stage of this work. It can be adjusted in two ways. In accordance with the first, the carburetor will need to be removed. But, following the second stage, you can do without dismantling it. For the last option you will need a tachometer. Before proceeding with the adjustment, remove the air filter housing and completely remove the choke lever. It is located in the car's interior directly under the dashboard. Next, you need to start the engine and carefully observe what happens.
Using a flat-head screwdriver, unscrew the air damper by a third, and using a 7 key, do the same with the adjustment bolt. A similar action must be carried out until the tachometer reading varies in the range from 3100 to 3400 rpm. Once the above result is achieved, the damper must be lowered.
At this point, the process of adjusting and tuning the carburetor on the VAZ-2109 can be considered complete. As you can see, there is nothing complicated about this. The main thing is to acquire the necessary tools, knowledge and endurance.
There is a special offer on our website. You can get a free consultation with our corporate lawyer by simply submitting your question in the form below.
Nuances to consider during setup
To do this, use compressed air, gasoline, and special cleaning products.
Preliminary ignition adjustment is required. If early or late ignition is installed, there is no point in adjusting the carburetor. All work must be carried out only when the engine has reached operating temperature; to do this, it starts and idles for some time. Remove the link from the gas pedal from the throttle valve. Disconnect the crankcase ventilation. Check that there is no vacuum in the timing adjuster tube. The presence of a vacuum is a sign that something was done incorrectly. Adjust the quality screws.
Pre-adjustment
As mentioned earlier, in order to properly adjust the carburetor, you need to contact a good specialist. To do this you need to go to a service station. Well, I want to go more or less normally. Therefore, you can at least adjust the idle speed and the amount of mixture. After adjustment, the engine will run relatively normally. The adjustment is made according to the user manual (a book with the device of the VAZ 2109 car) or “by eye”. In the second option, it is necessary to set it so that the idle speed is within the range of up to 1000 rpm, and when you press the gas pedal, the car does not “stupid”, but quickly picks up speed. Adjustment is carried out using the fuel quality and idle speed screws.
How to make repairs for a “classic”
Initially, we will discuss the carburetor repair instructions from 2107. For the work, we will need the following tools:
Also learn about replacing the oil filter without changing the oil and changing the brake fluid yourself.
We begin repairing the VAZ 2107 carburetor by dismantling the unit from the car. It is produced in the following sequence.
- First of all, we dismantle the air filter housing together with the filter element by unscrewing the nuts.
- After unscrewing the fasteners, disconnect the throttle cable and the choke cable.
- We disconnect the crankcase gas exhaust hose.
- Loosen the clamp and remove the fuel hose.
- Disconnect the vacuum regulator hose.
- Disconnect the pneumatic valve from the economizer.
- Remove the microswitch from the terminals.
- Using a screwdriver, press the tip away from the damper drive rod, and then remove the return spring.
- We dismantle the entire assembly unit.
Now, to repair a carburetor from a VAZ 2107 with our own hands, we need to disassemble it, replace the defective parts with new spare parts (they are sometimes sold in the form of a special repair kit for repairing VAZ 2105 - 2107), and we may also have to process the filler plane. We will describe how to do all this.
- We dismantle the three-arm lever, spring and rod.
- We remove the cover, as well as the housing from the throttle valves. Replace the gasket if necessary.
- Carefully dismantle the float by pulling out the axle.
- We unscrew the fuel needle valve, as well as the fuel jets from the float chamber. If necessary, we replace parts.
- We unscrew the fuel nozzle of the idle system. If necessary, we replace it.
- After unscrewing the accelerator pump bolt, remove the pump cover, diaphragm and spring. These parts can also be replaced.
- We take out the diffusers that worked above the dampers.
- Unscrew the screw for the amount of mixture.
- We wash all disassembled metal parts in acetone.
- We apply the edge of the ruler to the plane of the upper body, which is connected to another plane of the body for fastening the dampers. Checking the curvature. By the way, if before this it was not possible to properly adjust the stable idle speed, the culprit could be precisely this curvature, which causes air leaks. If necessary, we process the plane with an emery wheel manually, without an electric drive of the wheel, after first removing the adapter tubes from the plane. We perform this operation extremely carefully.
- We assemble it in the reverse order, just like installing it on a car.
Let us add that repairing a carburetor from a VAZ 2106 is done in exactly the same way, since the unit is the same, under the DAAZ 2107 brand. Generally speaking, repairing a VAZ 2105 is done in the same way, because again the brand of the unit is the same.
Differences for front-wheel drive
Now let’s look at the features of the process when it is necessary to repair a VAZ 2109 carburetor.
With the front-wheel drive Lada, a unit called “Solex” was used, somewhat improved compared to the DAAZ 2107. Its removal from the car is carried out according to the already described scenario. Let's see what differences there are from the above manuals when disassembling and repairing a carburetor from a VAZ 2109. The same tools are needed. We move point by point in the same way and look at the differences.
- Removing the lever.
- The cover and housing from the throttle valves are removed in the same way as the previous instructions.
- The float chamber here is arranged in a similar way - let's disassemble it.
- We unscrew the similar fuel jets plus the needle valve.
- The fuel jet of the idle system is definitely replaced here with a solenoid valve; we unscrew the valve with a wrench. We then install a new one instead - this is desirable.
- The accelerator pump is disassembled in a similar way, its parts, especially the diaphragm, are replaced with new ones.
- We remove the diffusers.
- The mixture quantity screw is of a different type here; we also dismantle it.
- We wash parts that are not worn out in acetone.
- If necessary, we process the plane of the upper body according to the above recommendations.
- We do the assembly, moving back step by step, this also applies to installation on the car.
As you can see, the instructions differ little from those given earlier. Here it must be added that when repairing a carburetor, most often it is necessary to replace the jets, since due to their small size, coupled with the strict requirements for their operation, the life of these parts is short.
In addition, it is important to know that on the “nines” they actually installed a carburetor with brand 2108, so repairing a carburetor from a VAZ 2108 is carried out exactly according to the instructions given. In addition, the “eight” and “nine” modifications have the same unit, but modified, with slightly different clearances. Therefore, repairs on 21083 are done in the same way, but when making adjustments they are guided by slightly different gap values. Their values should be taken from the technical documentation. The same goes for repairs on 21099.
Settings must be made after installation.
Something about cost and non-repairability
Of course, not everyone can repair such a complex mechanism as a carburetor. Many car enthusiasts would rather resort to the services of car services. Let's see how much money they have to shell out. Here are the average data for major cities of the Russian Federation.
Adjusting the choke or trigger
Install the carb, but do not install the air filter. Pull the choke out completely and close the valve. In this position, you need to adjust the air damper cable.
Try pulling out and removing the choke several times. The damper should open and close completely without jamming. If everything is done correctly, you can install the air filter in place, connect all the hoses and carburetor drives. It's time to start adjusting the idle speed of the VAZ 2109. Don't forget about connecting the EPHH.