Hello everyone, this article will be useful for beginners, here you will learn a detailed description of the instrument cluster of the Lada Largus car. In short, devices are needed to monitor the characteristics of a car.
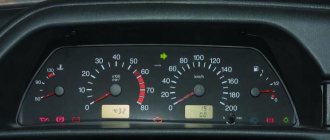
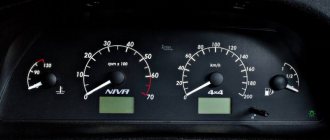
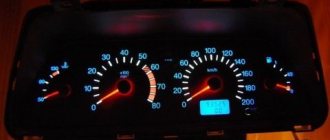
- Tachometer. Shows engine speed
- Speedometer
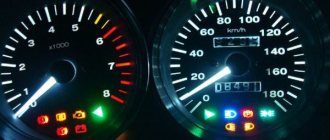
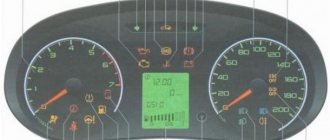
Instrument cluster icons Lada Largus
1 - ABS indicator. Lights up when the engine starts and goes out. Lights up when there are problems with the anti-lock braking system.
2 - Front airbag. Lights up when a malfunction occurs, you should contact a specialist.
3 - Seat belt reminder. Lights up when you start the engine and lights up if you are not wearing a seat belt.
4 — Signal lamp for disabling the front passenger airbag
5 - Heated rear window. Lights up when the rear window heating is turned on.
6 - Low beam. Lights up when low beam mode is turned on.
7 - High beam. Lights up when high beam mode is turned on.
8 — Rear fog lights. Lights up when the rear fog lights are turned on.
9 — Fog lights. Lights up when the fog lights are turned on.
10 — Designation electric amplifier. Lights up when there are problems or the electric amplifier is turned off.
11 - Warning lamp for door(s) not closed.
- Fuel level warning lamp. Lights up when the fuel level is low
- Turn signal indicators. They light up when they are turned on.
- Engine coolant temperature indicator. Lights up when overheated.
- Engine oil pressure and level. Lights up at low level, pressure
- Warning light for the electronic engine immobilizer system.
- Indicator for preheating system (glow plugs). Lights up when there is a fault.
- Battery warning lamp. Lights up when the battery charge is low.
9. Parking brake warning light and brake system fault warning light.
10. “CHECK ENGINE” indicator - check the engine. Lights up when there is a malfunction in the engine management system. You should contact specialists.
- Fuel level indicator.
- Dashboard firmware version
- Coolant level indicator.
- Clock and time
Diagnostic mode for Largus tidy
100% satisfied with the machine
I decided to update the recording of my own bortovik made when I still owned Logan!
so here it is for: To enter the diagnostic mode, you need to insert the key into the ignition switch, press the pin on the instrument panel, and without releasing it, turn the key to the ignition position, while holding the pin for several seconds until the numbers appear on the display, after which he needs to be released. The existing mode has four windows with information that appear one after the other when you press the pin slightly:
1. The 1st screen indicates the firmware version of the on-board computer;
2. The 2nd screen diagnoses the performance of all parts of the LCD monitor, including them all at once. If there is a malfunction, one of the parts will not light up. I note that one of the parts on the left on the clock display is missing on all cars, because... with both types of time designations (12-hour and 24-hour) this element is not used;
3. The 3rd screen indicates the remaining fuel in the tank with an accuracy of up to a liter and provides more accurate information than a regular graphic bar. If there is a fault of the “open circuit or short circuit” type, “- – -“ is displayed on the screen. It is important to note that the fuel level sensor located in the gas tank does not reflect the amount of fuel filled above the 50 liter limit. Those. if you filled the gas tank with 51 liters or more, then the BC in diagnostic mode will still show only 50 liters;
5. The 5th screen informs about the presence or absence of defects in the cooling water level sensors, the fuel level sensor and the fuel consumption information system. If there are no existing or stored defects, “- – – – -“ are displayed on the monitor. – Stored and existing malfunctions of the cooling water temperature sensor are displayed on the screen in the form “- – -TO” with an open circuit, “- – -TC” with a small short circuit. Malfunctions of the cooling water temperature sensor are not critical; You can not focus on the “TO” malfunction if the engine is cool. – Stored and existing faults of the fuel level sensor are displayed on the screen in the form of “-JO- -” when the circuit is open, “-JC- -” when there is a small short circuit. – Stored and existing malfunctions of the fuel consumption information system are displayed on the screen as “D- – – -” in the absence of a fuel consumption signal. Malfunctions of the fuel consumption information system are taken into account only if the car is equipped with an on-board computer. All “stored sensor faults” listed on the page are defects that were found, but which no longer appear. If there are several stored or existing defects, they are shown on the same line.
To delete stored defects from the memory and exit the self-diagnosis mode, press and hold the pin pressed for several seconds;
and here is a video taken from YouTube by our forum member Dim X :
Source: largusladaclub.ru
Exterior of Lada Largus
As already mentioned, the appearance of the Lada Largus is an almost complete copy of Logan with some small touches from AvtoVAZ. The car’s belonging to Tolyatti manufacturers is most clearly visible from the front, by the characteristic emblem on the radiator grille. The headlights look rather modest; the picture is completed by a bumper with smooth outlines and a large air intake mouth.
When viewed from other sides, Lada Largus looks like an ordinary station wagon from any manufacturer. All similar models are characterized by a sloping hood, a flat roof, and side glazing that takes up a large area. At the rear, judging by the photo, you can see two asymmetrical doors, a non-bulky bumper and vertically oriented optics on the sides.
Misha RYABOV, presenter of the project “Auto on the B0 platform”
Today we have reached a localization level of 62% in terms of price. The list of devices produced here (mostly in Togliatti) includes stamped body parts (almost all are supplied to Avtoframos), all chassis parts, and interior elements - from the instrument panel to rubber mats. By the end of the year, we plan to increase the localization rate to 72% by launching motor creation. Naturally, localization will affect all cars on the B0 platform that will be produced by AVTOVAZ. These are two Renault models, one Nissan, two under the Lada brand. Changes in the Largus design caused by specific Russian operating criteria will also affect single-platform vehicles. For example, the next news under the Nissan brand will receive engine protection and reinforced front suspension arms.
Source: www.zr.ru
Interior of Lada Largus
The interior of the car, as can be seen from the photo, is practically indistinguishable from the same Logan and is just as ascetic and unremarkable. In the arrangement of instruments and other elements, you can notice the same ergonomic errors that were characteristic of Logan. The set of instruments is laconic, the two-color screen of the course computer and instrument dials are surrounded by chrome trim. The information content of the devices is quite good. The steering wheel is large, mounted on three spokes and has the AvtoVAZ logo in the center.
The number of controls on the central panel is minimal. In the maximum configuration you can find a radio with AUX and USB connectors; in the initial and middle configurations there is a plastic plug instead of a radio. Nearby are the controls for ventilation and heating (air conditioning and stove). Between them there are also buttons for the electric windows of the front windows, the rear door lock, the heated rear window and the hazard warning lights.
All upholstery is made of hard plastic and fabric, and the comfort provided by the seats is minimal. The front seats are quite flat, lateral support is minimal, but the range of adjustment is quite wide. In the luxury version, the driver's seat even has lumbar support and seat height adjustment.
There is also more than enough space for passengers in the second and third rows; the roof does not create an oppressive impression, however, climbing into the third row is not very convenient. However, the car was created to transport goods and passengers on a budget basis. It doesn’t have to be very comfortable, but it copes with its main tasks perfectly well. Despite the cheapness of the interior and upholstery, everything is made quite well and firmly; unnecessary noise or squeaks from poorly secured elements are not annoying, as in other similar cars of this class.
THE SAME “LOGAN”, ONLY “LARGUS”
“Everything here breathes Logan,” I involuntarily paraphrased a contemporary, as soon as I saw Largus. Although there are still differences between station wagons of foreign and Russian assembly. On the outside, for example, in addition to the unique front bumper and radiator mesh with a boat (by the way, the updates benefited the exterior), plastic linings were used on the wheel arches for the best protection of the body; The anti-gravel coating on the bottom has become thicker and approaches almost the door openings. By the way, “Largus” is protected from corrosion better than other models produced by AVTOVAZ: all body panels are galvanized outside and inside, the most modern painting equipment is already being installed in the new workshop (for now they are temporarily using capacity for the production of “Kalina”), and hidden cavities in This is the first time for local cars to be filled with wax.
One of the interesting differences in the cabin are the unique seats. With their simple forms, they resemble those installed in Logan, but they differ in both manufacturer and design. In the best configuration, which, by the way, was rolled out for testing, you can additionally adjust the lumbar support and the height of the pad. This set is completely enough to take a comfortable position. At least to those whom the Creator did not endow with an unusual figure. During the 400-kilometer run, my employee and I never remembered the seats. The best confirmation that you have a successful system under you.
As I remember, it was more spacious for me in the back seat in the Logan. No, the Largus is not cramped, but it’s not so easy on the legs. There is plenty of space on the shoulders, and even more so above the head. What's the matter anyway? The answer came from the front seat. The tall employee noted the longest longitudinal adjustment. In general, whoever doesn’t like it in the 2nd row should go to the “gallery”. I don’t remember a car that would be so comfortable and have a lot of space. Naturally, buses don't count.
Payment via Yandex Cashier
After selecting payment via Yandex, the Yandex Cashier payment system will launch, where you need to select a convenient payment method (bank card, QIWI, Yandex Money account, etc.)
After specifying payment details and confirming payment, payment for the goods will occur.
If you have a bank card in a currency other than the ruble, then the money will be debited from the card at the rate of the Central Bank of Russia at the time of the purchase.
This payment method is optimal for residents of Russia, Kazakhstan and Belarus.
Official website of the Yandex Kassa payment system https://kassa.yandex.ru
Lada Largus dashboard description
Please note that the instrument panel layout may differ depending on the vehicle version.
1 - Side deflector. 2 - Airflow grille. 3 — Switch lever: — direction indicators; — outdoor lighting; — fog lights; — rear fog lamp; - sound alarm. 4 — Instrument panel. 5 - Space reserved for installing the driver's airbag. 6 — Lever of the steering column switch for windshield and rear window wipers/washers. Button for controlling data output to the on-board computer display. 7 - Central deflectors. 8 - Glove box or space reserved for installing a passenger airbag. 9 — Airflow grille. 10 - Side deflector. 11 - Warning decal prohibiting the use of a rear-facing child restraint (in which the child sits rear-facing) in a front right seat protected by a functioning airbag installed in front of that seat. 12 - Glove box. 13 Space reserved for installation of a car radio (optional) or glove box. 14 Power window switch. 15 Central door lock switch. 16 Hazard switch. 17 Air conditioning system controls. 18 Socket for additional equipment. 19 Parking brake. 20 Rear window lock switch. 21 Electrically adjustable outside rear view mirror position regulator. 22 Space reserved for installing an ashtray, or a holder for glasses. 23 Gear shift lever. 24 Rear window heating switch (depending on the vehicle configuration, a plug is installed). 25 Power window switch. 26 Ignition lock and key. 27 Headlight direction control in the vertical plane. 28 Hood lock release handle. 29 Fuse compartment - mounting block.
Note: many car owners unsuccessfully try to find the instrument panel backlight brightness control on the dashboard. The Lada Largus does not provide such adjustment.
While holding the daily mileage button, turn on the ignition. After 5 seconds the panel goes to self-diagnosis. Let's release the button.
Informing about the need for maintenance
The service interval for your vehicle is 15,000 km or one calendar year, whichever comes first. When the response threshold is reached at 1,500 km or one month (whichever comes first) before the need for service, when the ignition is turned on, the indicator on the on-board computer screen turns on for 3 seconds
. From now on you can find the same icon in the menu.
When the response threshold is reached at 0 km or 0 days (whichever comes first) before the need to carry out service, when the ignition is turned on, the indicator on the on-board computer screen turns on for 3 seconds and the multifunction indicator in the instrument cluster constantly lights up in red
. After the service has been completed and the counters have been reset, these indicators and warning lights will go out.
Source
Dimensions and technical characteristics of the Lada Largus car
The overall dimensions and other data of the Lada Largus car are as follows:
- Seats – 5 or 7 pcs.;
- Length – 4470 mm;
- Width – 1750 mm;
- Height – 1636 mm;
- Front wheel track width – 1469 mm, rear – 1466 mm;
- Curb/gross vehicle weight – 1185/1985 kg;
- Trunk capacity is 535 or 135 liters, increases to 2350 liters;
- Fuel tank – 50 l;
- Ground clearance – 145 mm.
Lada Largus cars are equipped with two modifications of atmospheric gasoline engines with a displacement of 1.6 liters each and with eight or sixteen valves. With any of them, only a manual transmission is available for installation - manual transmission JR5 or JH3/VAZ, each with five gears. Drive type – front.
The first of the engines, the eight-valve K7M/VAZ-11189, provides a power of 84 hp. With. and a maximum speed of 155 km/h, acceleration to 100 km/h is carried out in 14.5 s, and average fuel consumption when driving in the combined cycle is 8.2 liters per 100 km.
The second power unit, K4M, equipped with sixteen valves, produces 105 hp. With. and provides a maximum speed of 165 km/h, and accelerates the car to 100 km/h in 13.1 s. Gasoline consumption with this power unit in the combined cycle is 7.9 liters per 100 km.
The Lada Largus is based on the front-wheel drive B0 platform from the Renault-Nissan alliance of manufacturers, in which classic McPherson struts are installed at the front, and a semi-independent V-shaped beam is used at the rear. In the initial configuration, ABS and power steering are not available to buyers; in other more expensive versions they are installed by default.
Braking systems – drum brakes are installed at the rear, ventilated disc brakes at the front.
ALONG THE MOTHER VOLGA
With these ideas we went out onto public roads. Yes, you don’t notice a lot when cutting circles around a high-speed oval. For example, how well the suspension handles bumps of various sizes. The smoothness of the Largus is reminiscent of the similar Logan and Sandero. Small road imperfections simply dissolve on the way from the wheels to the body, and large ones, which are scary to even look at, are happily swallowed by the suspension, allowing you not to slow down. It’s comfortable, and with all this, the car reacts correctly and completely promptly to the driver’s commands. If you expect the reactions of a sports car from a hard-working station wagon with a high center of mass and energy-intensive suspensions, stand in line behind the rest of the car. There are sensitive tilts and slight delays in steering movement, but in general the car behaves predictably, at least at speeds allowed by our Traffic Rules.
Is 105 “horses” not enough for a car with a gross vehicle weight of under two tons? Those who expect acceleration, like during the take-off run of an airplane, go to the same line where lovers of refined maneuverability stand: the economical car has never been given extra power. I’ll tell the rest that with a half load (as annoying as it may sound, it was not possible to fill all the seats), the efforts of the sixteen-valve engine are completely enough for a brisk overtaking. The elastic motor pulls out from all speeds, and perfectly selected gear ratios in the boxes also simplify the planned maneuver. True, in order to spur the Largus, due to the closeness of the gear ratios in the box, you often have to jump not one, but two steps down. At first it’s not out of habit, but automaticity comes quickly. And along with it, the fuel gauge on the instrument panel is rapidly falling. As annoying as it may sound, short gears and average aerodynamics do not contribute to a moderate appetite. With fairly economical driving on country roads, fuel consumption for various drivers ranged from 8.5 to 10 liters per 100 km.
“Largus” is the first car in which you don’t remember that it was manufactured by AVTOVAZ. He is the first whose name is not ashamed to write in Latin. And for which I am not sorry to pay my hard-earned money. But most Russians look at it with distrust, because the most fundamental question remains open - about reliability in operation. Almost everyone in recent years was badly burned by buying models from the Volzhsky Automobile Plant, and, disappointed, went to their rivals. Maybe Largus can return them?
Misha RYABOV, presenter of the project “Auto on the BO platform”:
Payment via PayPal
After selecting payment via PayPal, the PayPal payment system will launch, where you need to select the payment method: bank card or PayPal account.
If you already have a PayPal account, then you need to log into it and make a payment.
If you do not have a PayPal account, and you want to pay using a bank card via PayPal, you need to click on the “Create an Account” button - shown with an arrow in the picture.
PayPal will then prompt you to select your country and provide your credit card information.
After specifying the information required to make the payment, you must click on the “Pay Now” button.
Official website of the PayPal payment system https://www.paypal.com
Description of the standard on-board computer Lada Largus
The topic seems to be simple, but attempts to find a couple of points described in human language were unsuccessful. Neither in the instructions nor on the Internet did I find a simple and clear description of two points from the first reading: - setting the clock on the Largus BC; - resetting (zeroing) the Largus BC readings, in particular the average fuel consumption readings.
Maybe I'm so stupid that I don't understand the general phrases in the instructions, maybe I'm so untalented that Google search didn't give me any answers. I believe that somewhere there are people like me, so I’m posting the answers to these questions in simple human language.1. How to set the clock in Largus, which is on the display of the tidy. There is a button on the tidy that switches the readings of the total mileage and some kind of horseradish, understand what kind of mileage.
To set the clock, you need to press and hold it. First, the mileage readings will disappear and the clock will flash. Then the clock will stop blinking and the minutes will begin to change. Do not release the button and do not try to understand any logic in the changes occurring with the watch. There, minutes, tens of minutes and hours will somehow increase arbitrarily.
2. Resetting the average flow rate is performed as follows. Use the end button on the right steering column switch to select the average flow rate readings. Press the button from the previous point on the dashboard and hold. The average consumption value will start flashing and then change to –.- That’s it, all readings have been reset (average mileage, etc. too).
Hope this helps someone.
30 January 2022 LadaOnline 32 093
An on-board computer or trip computer (BC or MK) is designed to display useful information about the current trip. In some cases, using the BC you can diagnose a car. An on-board computer is also installed on board the Lada Largus; the display of information depends on the vehicle’s equipment.
| The displayed data is switched by sequentially pressing the right steering column switch button | Explanations for the on-board computer display readings |
| Total mileage counter. | |
| Mileage per trip. | |
| The amount of fuel consumed since the last time the on-board computer was reset. | |
| Average fuel consumption since the last time the BC readings were reset. The value is displayed after passing 400 meters of the path. | |
| Estimated fuel range. The calculation takes into account average fuel consumption. The value is displayed on the BC display after passing 400 meters of the path. | |
| The distance traveled since the last reset of the calculated indicators. | |
| Average speed since last reset. The value begins to be displayed after passing 400 meters of the path. |
The greater the distance traveled since the last reset, the more stable and accurate the average speed, average consumption and remaining fuel range readings will be.
Manual reset of BC parameters:
- select the indication of one of the parameters, and then press the end button on the right steering column indicator and hold it until the readings are reset to zero.
Automatic reset of BC parameters:
- occurs when the memory capacity is exceeded.
With the ignition on, select the total mileage and hours on the BC display. To enter the time setting mode, hold the button on the left side of the speedometer for 5 seconds. Set the time in one of the following ways:
- Long presses on the button will quickly change the hours and minutes.
- Short presses will allow you to set the time minute by minute.
Let us remind you that on our website you will find other reviews and tests of the Lada Largus.
Keywords: on-board computer Lada Largus | dashboard of Lada Largus | ECM Lada Largus
– To avoid property damage and fire, do not disassemble the system or make any modifications to it.
-To troubleshoot or dismantle the audio system, contact a representative of the manufacturer.
– Do not insert foreign objects, damaged or dirty MP3 CDs/CDs into the player.
– Use only round CDs/MP3 CDs with a diameter of 12 cm.
– When handling discs, hold them by the inner and outer edges without touching the surface of the MP3 CD/CD.
– Do not stick paper onto CD/CD MP3,
– When using for a long time, carefully remove the MP3 CD/CD from the player as it may be hot.
– Do not leave the MP3 CD/CD near heat sources or in direct sunlight.
Precautions when using your phone
-There are laws regulating the use of telephones in cars. Some laws prohibit the use of a hands-free phone system while driving; the driver must remain focused on operating the vehicle. -Telephone conversation while driving is a distracting and dangerous factor at all stages of using the phone (dialing a number, making a telephone conversation, searching for a number in the phone book...).
Front panel care
– Use a soft cloth and, if necessary, a little soapy water. Wash with a damp soft cloth and wipe with a soft, dry cloth.
– Do not press on the system panel screen or wipe it with alcohol-based cleaners.
This instruction manual contains descriptions of models based on their technical characteristics existing at the time of writing. The manual covers all types of equipment installed on vehicles of this model. However, its availability on your car depends on the configuration, selected options and country of delivery. Also in the manual you may find information about the equipment that is supposed to be equipped with cars over the next year,
In this manual, when referring to a manufacturer's representative, the manufacturer refers to the vehicle manufacturer.
GENERAL DESCRIPTION OF THE AUDIO SYSTEM (RADIO)
– RDS radio;
– CD/CD MP3 player;
– control of additional audio devices;
– Bluetooth hands-free telephony system.
Radio and CD/CD MP3 functions
The audio system allows you to listen to radio stations and play audio CDs and MP3, WMA, AAC, and WAV. Radio stations are located in the following frequency ranges: FM (frequency modulation) and AM (amplitude modulation).
– information about the general state of road traffic (TA);
– emergency messages.
Additional audio function
– USB connector;
– Jack connector;
– Bluetooth connection.
For details on the list of compatible devices, contact the manufacturer.
Bluetooth hands-free telephony function
– connection up to 5 phones;
– call/receive/reject call;
– transfer of a list of contacts from the phone’s phone book and from the SIM card (depending on the phone type);
– display a list of recent calls;
-access to messages.
Bluetooth function
This function allows the audio system to recognize and control the player or phone when a Bluetooth connection has been created.
Trip computer multitronics C590
Prehistory
In 2014 I learned what multitronics is. Almost immediately I bought the 731 model and installed it in my Logan. At the beginning of 2015, model 590 was released - the one that replaces the air duct. I hung my 731 from the glass onto the ceiling trim and started dreaming about a new product. So I drove until the last car was sold. During this time, I have accumulated a lot of positive experience from using this device. And I removed 731 and put it on a shelf in the country.
After 3 months, I carried out troubleshooting, during which I found out that the additional cable braid needed to be changed and there were glue smudges on the body that I could not remove. I put everything in its original box and put it away until “better times.”
Six months later, I started looking for the scythe in earnest. Found it for 900 rubles including delivery. Due to natural laziness, I couldn’t get to the savings account for another 3 whole months.
And after 9 months of using only a regular bookmaker, I threw away 731 on Avito “as is” for a modest 2200 rubles. My hard worker left on the same day. The new owner was not at all embarrassed that he would not have Air overboard, physically. ignition, analogue FLS and dimensions/gas input. I referred this to the price tag of 30 percent of the price of new. But he still didn’t fit the bill for me. Putting a 750togo body on a panel is ugly. Vestaplafon does not allow it to be placed on the ceiling.
Purchase
The moment of fulfillment has come. After 4 years, I finally bought 590. I was looking for version “C” - with voice. It was almost impossible to find these in the city, CLs are voiceless everywhere, but I found the one I needed.
Installation
First of all, I studied a lot of records on d2 and realized that the air duct definitely needs to be plugged. I couldn’t find parolon at home, so I went to the nearest chain hypermarket, where I bought a sponge for washing the car. I returned to the box and scattered the radio, beard and air duct. I started to bundle the cable. I pulled the connector out of the glove compartment. I attached a cable to it and hid the whole thing under the carpet at the passenger’s feet.
I laid a cable over the glove compartment
I took care of the air duct - pushed in a sponge, rolled up the mating surface with a piece of vibration insulation
I crimped the cable to size (for some reason it goes to the BC itself, and not to the obd as before).
Inserted all cables
Then I started wiring an additional cable and a temperature sensor. With the wires everything is as usual - 10,11 and 24 pins of the tidy. I inserted the sensor into the engine compartment and then realized that it was not long enough. Fortunately, the sensor is resistive and is not afraid of cable extension. I found 50 cm of 0.2mm2 spiral cable. The wire was spliced, soldered and everything was insulated. I wound electrical tape on top along the entire length.
The sensor was attached to the “gill” of the PTF cover. There it is blown and does not catch the heat from the engine/headlight. Moreover, the BC measures readings only at speeds above 20 km/h
The last step was to click the BC into place and assemble the interior
I made a brief adjustment - I chose the “M86” protocol, the ignition “physical”, the dimensions “physical”, the tank “FLS” “Tareed 7”. I was surprised by the abundance of additional parameters. There are flags for all lamps, and all misfires, all errors, and even the percentage of catalyst aging. I was very pleased with the opportunity to turn on the radiator fan at 1/2 speed at any coolant temperature (according to the firmware, I have 96g - 1st speed, 100g - 2nd speed) and, of course, the ability to forcefully turn on fan speed 2, before turning off the ignition. This will be very useful for cooling the radiator of the air conditioner in the summer, in the heat.
UPD
At the request of Svarog-RUS, I added a video on setting up corrections as in the dashboard. I don’t want to set it up according to the instructions; there you need to fill the tank up to the neck, roll out 25 liters or more, fill it full again and indicate the amount of fuel on the receipt. For Largus this is difficult, because everything depends on the tilt of the car, and you will have to drain about 20 liters
Prices and configurations of the Lada Largus car
There are three main trim levels available for the Lada Largus model: Standard, Norma and Lux.
The Standard assembly includes an eight-valve K7M power unit with a five-speed manual transmission JH3 and the following options:
- Driver airbag;
- Seat belts for the driver and front passenger with limiters;
- Clips for child seats;
- Vacuum brake booster;
- Mechanical optical lighting corrector;
- Inertial seat belts – 5 pcs.;
- Rear seat head restraints;
- Locking doors from opening by children;
- Immobilizer;
- Chair upholstery made of fabric material;
- Plastic upholstery;
- Brushed carpets in the cabin and luggage compartment;
- Bracket for securing cargo;
- Tilt adjustment of the steering wheel;
- Lighting in the luggage compartment;
- Indicator of non-switching off of side lights;
- Single ignition key and door locks;
- Audio preparation;
- Stamped wheels R15;
- ABS and EBD systems;
- 12V socket;
- Cabin air filter;
- Light tinting;
- Rails;
- Full size spare wheel.
This build is average both in terms of options and price, which is why buyers most often choose it. The cost of a Lada Largus car in the Norma configuration is 544 thousand rubles. It additionally includes the following options:
- Sun visor with mirror for front passenger;
- Possibility to recline passenger seats in a 60/40 ratio;
- Power steering;
- Seat belt height adjustment;
- Central locking;
- Power windows on the front windows;
- Bumpers painted in the same color as the body;
- Moldings on the side doors.
Emergency and service warnings:
— Warning about starting to move with low beams off;
— Warning about insufficient oil pressure when the engine is running;
— Motion warning with active handbrake;
— Warning about loss of communication with the ECM;
— Warning about starting to drive with an unfastened seat belt;
— Warning about low brake fluid level;
— Warning about lack of battery charge from the generator;
Downloading a book
After successfully completing the payment (by any method) and returning to the KrutilVertel store from the payment system website, you will be taken to the successful payment page:
On this page you need to indicate your e-mail, where access to download the book will be sent.
If you are already registered on our website, then simply follow the link to your personal account.
The book you purchased will be in your personal account, from where you can always download it.
Please note that after making the payment, you need to return back from the payment system website to the KrutilVertel website.
If for some reason you did not return back to the site and closed the payment system tab with a message about the successful completion of the payment, please let us know - we will send you a letter indicating access to download the book.
Mounting the navigator on the dashboard
Home > Interior tuning > LADA Largus
Any, even minor, change in the interior of a car in order to increase comfort can be safely called tuning. A not so complex technical task, namely mounting the navigator in the center of the dashboard, turned out to be not so simple.
I didn’t want to mount the navigator on the windshield using a standard mount for two reasons; a navigator on the glass interferes with visibility from an aesthetic point of view. The most suitable place turned out to be the center of the dashboard, where it is located on car models equipped with a standard navigation system.
The mount included in the kit turned out to be useless, since the upper horizontal surface of the dashboard did not have more than one straight section in the plane, sufficient for attaching the suction cup; it is in this place that the central air ducts are located, giving the dashboard such geometry.
The option with an expensive, about one and a half thousand rubles, mount equipped with a suction cup made of synthetic rubber was also eliminated for this reason.
The complexity of solving this problem was made by the condition of not using mechanical force on the dashboard itself, that is, drilling and fastening with screws was completely excluded, and there was also no place for attaching a suction cup on the vertical surface of the dashboard.
After reviewing a considerable number of sites, I decided to try the Lexand LH-110 universal car holder at a price of six hundred and twenty rubles apiece, which was ordered from the Enter store and delivered within two to three days. The choice had to be made blindly, since it was not entirely clear whether it could be glued to a vertical surface using stickers.
If somewhere there was a picture from the instructions below, the choice would be much easier.
Different options for attaching the Lexand LH-110 universal car holder using a sticker
As a result, this holder turned out to be an ideal option for mounting the navigator on the LADA Largus dashboard, right above the standard radio.
Instrument panel - removal and installation
Removal
Place the car in the workplace. Raise the hood, disconnect the earth wire terminal from the battery.
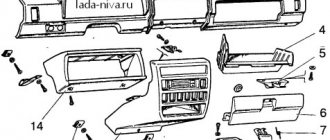
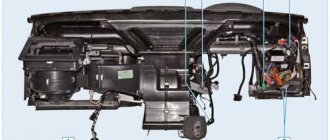
Figure 12-1 — Instrument panel assembly:
1 — left wind window pillar trim: 2 — instrument cluster; 3 — instrument panel; 4 — passenger airbag module; 5 — upholstery of the wind window pillar, right 6 — ventilation nozzle; 7 — floor tunnel lining; 8 — central trim of the instrument panel; 9 — steering wheel; 10 — driver’s MNPB
Lock the airbag computer using the diagnostic tool
Remove the driver air bag module (DIA).
Remove the steering wheel, steering wheel covers, shift paddles, steering column adjustment knob and transponder ring.
Having overcome the resistance of the clamps, fold back the decorative plug 1, Figure 122, unscrew screw 2 and remove the rear part of the floor tunnel lining 3 (flat screwdriver, replaceable Torx T20 head, wrench).
Figure 12-2 - Attaching the rear of the floor tunnel lining:
1 — decorative plug; 2 — screw securing the rear part of the floor tunnel lining; 3 - rear part of the floor tunnel lining
Unscrew two screws 1, Figure 12-3, securing the front part of the floor tunnel lining (replaceable Torx T20 head, knob).
Figure 12-3 - Fastening the front part of the floor tunnel lining:
1 — screw securing the front part of the floor tunnel lining; 2 - front part of the floor tunnel lining
Unscrew nut 4, Figure 12-4, and two screws 1. Remove cover 5 of the gear shift lever. Disconnect the wiring harness block from the cigarette lighter 2 and remove the front part of the floor tunnel lining 3 (replaceable head 10, replaceable head Torx T20, extension, wrench).
Figure 12-4 - Attaching the front part of the floor tunnel lining:
1 — screw securing the front part of the floor tunnel lining; 2 — cigarette lighter; 3 — front part of the floor tunnel lining; 4 — nut securing the front part of the floor tunnel lining; 5 — gear shift lever cover
Remove the central trim 1, Figure 12-5, instrument panel, overcoming the force of the clamps. Disconnect the wiring harness connectors from the switches and remove the trim.
Remove the plug from the center console of the instrument panel or the radio with CD player 2, disconnect the wiring harness connectors and the antenna (radio and CD player puller).
Figure 12-5 — Central console of the instrument panel:
1 — central trim of the instrument panel; 2 - radio and CD player
Remove decorative trims 1 and 3, Figure 12-6, overcoming the force of the clamps.
Unscrew the two screws 2 securing the visor of the instrument cluster and remove it, overcoming the force of the clamps (replaceable Torx T20 head, knob)
Figure 12-6 — Decorative trims of the instrument panel:
1 — left overlay; 2 — screw securing the visor of the instrument cluster; 3 - right pad
Unscrew the four screws 1, Figure 12-7, securing the instrument cluster 2. Disconnect the two wiring harness blocks and remove the instrument cluster (replaceable Torx T20 head, knob).
Figure 12-7 — Attaching the instrument cluster:
1 — screw for fastening the instrument cluster; 2 - instrument cluster
Remove the left 1 and right 5 wind window pillar trims (see Figure 12-1), overcoming the force of the clamps.
Remove handle 4, Figure 12-8. Unscrew the two screws 3 securing the headlight range control regulator 2, remove it from the hole in the instrument panel (replaceable Torx T20 head, knob).
Having overcome the force of the clamps, fold back the decorative plugs 5 and unscrew one screw 1 of the lower fastening of the instrument panel on the left and right (replaceable Torx T20 head, knob).
Figure 12-8 — Attaching the headlight level control and instrument panel:
1 — screw for the lower fastening of the instrument panel; 2 — headlight level control; 3 — screw for fastening the headlight corrector; 4 — handle for headlight adjustment; 5 - decorative plug
Unscrew screw 1, Figure 12-9, securing the instrument panel through the window that opened after removing the radio and CD player (replaceable Torx T20 head, extension, wrench).
Figure 12-9 — Central mounting of the instrument panel:
1 — screw for the central fastening of the instrument panel; 2 - instrument panel
Unscrew two screws 1, Figure 12-10, securing the heating, air conditioning and ventilation control unit 3 to the instrument panel, squeeze the clamps 2 and push the unit inside the instrument panel (replaceable Torx T20 head, knob).
Figure 12-10 — Attaching the heating, air conditioning and ventilation control unit:
1 — screw securing the heating, air conditioning and ventilation control unit; 2 — clamps; 3 - control unit for heating, air conditioning and ventilation
Unscrew two screws 2, Figure 12-11, securing the instrument panel 1 to the heater body (replaceable Torx T20 head, extension, knob).
Figure 12-11 — Attaching the instrument panel to the heater body:
1 — instrument panel; 2 — screw securing the instrument panel to the heater body
Unscrew one screw 1 from the right and left sides, Figure 12-12, of the upper fastening of the instrument panel 2 (replaceable Torx T20 head, knob).
Figure 12-12 — Upper mounting of the instrument panel:
1 — screw for the upper fastening of the instrument panel; 2 - instrument panel
Instrument panel mounting points : A - outer side of the instrument panel; B — inner side of the instrument panel; 1 — lower side fastening; 2 - top mount; 3 - central fastening; 4 - lower mount
Remove the instrument panel. When removing, remove the diagnostic connector from the socket in the glove box and disconnect block 1, Figure 12-13 (remove with an assistant).
| 1 — wiring harness block; 2 - instrument panel |
Figure 12-13 — Wiring harness block:
Unscrew four nuts 2, Figure 12-14, securing the passenger airbag module 1, disconnect the wiring harness block 3 and remove the passenger airbag (replaceable head 10, knob).
Figure 12-14 — Fastening the passenger airbag:
1—passenger's airbag; 2 — nut securing the passenger airbag; 3 — wiring harness block
Remove outer ring 1, Figure 12-15, ventilation nozzles.
Remove the inner ring 2 of the ventilation nozzle and, pressing the three clamps 3, remove the housing 4 of the ventilation nozzle from the instrument panel.
| Figure 12-15 — Ventilation nozzle: |
1 — outer ring of the ventilation nozzle; 2 — inner ring of the ventilation nozzle; 3 — clamp; 4 — ventilation nozzle housing
Installation
Install the removed parts in the reverse order of removal.
Unlock the airbag computer using the diagnostic tool
Video
Specifications
| Characteristics | 1.6MT | 1.6MT |
| Engine's type: | Petrol | Petrol |
| Engine capacity: | 1598 | 1598 |
| Power: | 106 hp | 87 hp |
| Acceleration to 100 km/h: | 13.1 s | 14.5 s |
| Maximum speed: | 165 km/h | 156 km/h |
| Consumption in the urban cycle: | 11.5/100km | 12.3/100km |
| Extra-urban consumption: | 7.5/100km | 7.5/100km |
| Combined cycle consumption: | 9.0/100km | 9.3/100km |
| Fuel tank capacity: | 50 l | 50 l |
| Length: | 4470 mm | 4470 mm |
| Width: | 1750 mm | 1750 mm |
| Height: | 1636 mm | 1636 mm |
| Wheelbase: | 2906 mm | 2906 mm |
| Clearance: | 145 mm | 145 mm |
| Weight: | 1260 kg | 1260 kg |
| Trunk volume: | 560 l | 560 l |
| Transmission: | Mechanical | Mechanical |
| Drive unit: | Front | Front |
| Front suspension: | Independent – McPherson | Independent – McPherson |
| Rear suspension: | Semi-independent – torsion beam | Semi-independent – torsion beam |
| Front brakes: | Disk | Disk |
| Rear brakes: | Drums | Drums |
| Production: | Tolyatti | |
| Guarantee: | 3 years or 100,000 km |
Take advantage of the opportunity to save up to 70,000 rubles on your purchase by trading in your old car under the exchange program.