Normal operation of the braking system is the most important component of safe movement in any vehicle. The design of the VAZ 2114 includes front disc and rear drum brakes. To ensure their operation, the design includes a brake master cylinder. Over time, it begins to deteriorate, which affects braking performance. In the article we will look at how to replace the master brake cylinder of a VAZ 2114.
Useful video:
Replacing brake discs on a VAZ 2114 (photos and videos) – signs of wear, which discs to choose, cost
Brake discs are certainly considered one of the important components of a car. They bear most of the load during operation. From time to time, VAZ 2114 brake discs need to be replaced, but, to be honest, the repair process is not that complicated and can be done with your own hands without specialized tools. Let's look at how to change brake discs on a VAZ 2114?
The video clearly shows the process of replacing brake discs on a VAZ 2114:
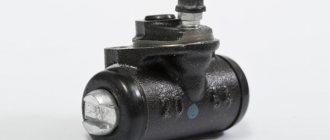
Front brake cylinder VAZ 2114
Probably no one needs to explain the importance of a car's braking system to ensure maximum safety while driving. The system consists of many elements, each of which performs a function. Today we will dwell in detail on such a detail as the front brake cylinder for the VAZ 2114 . Structurally, the element is located in the brake caliper (right and left).
Inside the unit there are pistons, which, when you press the brake pedal, are activated under the pressure of the brake fluid and press on the pads. The latter rest against the brake disc, thereby preventing the rotation of the front wheels.
The device of the VAZ brake system
The brake system of Togliatti-made cars is quite simple; the vehicle consists of the following main parts:
- pedals, which are pressed to achieve braking;
- brake master cylinder (MBC), it transmits the force of pressing the pedal through hydraulics to the working cylinders, respectively, to the wheels. GTZ VAZ - dual-circuit, the circuits are divided to transmit fluid pressure to the front and rear wheels;
- a vacuum booster that makes it easier to press the pedal;
- tubes that connect the elements of the vehicle;
- brake working cylinders (RTC);
- pads (drums) and discs;
- brake distributor (pressure regulator).
When you press the brake pedal, the piston in the brake fluid compressor compresses the brake fluid and transmits its pressure to the brake pedal. The pistons of the working cylinders are expanded under the influence of hydraulics, moving the pads towards the discs or drums. The movement of the wheels slows down, and thus the car slows down.
Disassembly and assembly of the front brake mechanism VAZ 2114, VAZ 2115, VAZ 2113, Lada Samara 2
Disassembling the front wheel brake mechanism
Unscrewing the cylinder mounting bolt: 1 – cylinder mounting bolts; 2 – cylinder; 3 – bolts connecting the cylinder with the caliper
Details of the brake mechanism of the front wheel of Lada Samara 2: 1 – wheel cylinder; 2 – fitting for bleeding the brake drive; 3 – sealing ring; 4 – piston; 5 – protective cap; 6 – retaining ring; 7 – caliper; 8 – pad guide; 9 – brake pads; 10 – protective cover; 11 – guide pin; 12 – guide pin fastening bolt; 13 – brake hose; 14 – bolt securing the cylinder to the caliper
Disconnect the hose from wheel cylinder 2. Unlock and unscrew bolts 1 securing the wheel cylinder to the guide pins, holding the guide pin by the edge with a wrench. Remove the 8 pad guide assembly with pins. Remove the brake pads of the VAZ 2113 VAZ 2115.
Pushing the piston out of the cylinder
Remove the lock ring 6 and the protective cap 5 from the cylinder and piston. Carefully push a stream of compressed air through the fluid inlet to push the piston out of the cylinder. To avoid damaging the piston on the surface of the caliper when pushing it out, install a wooden pad under the piston. Unscrew the bleeder fitting from the cylinder body and carefully inspect the working surface of the cylinder. There should be no scoring, damage or corrosion.
Front wheel brake assembly
Assemble the brake mechanism of the VAZ 2114 in the reverse order of disassembly. In this case, it is recommended to replace O-ring 3 and cap 5 with new ones. Lubricate the cylinder mirror, piston 4 and the sealing ring with brake fluid, and apply graphite grease or Ditor grease to the surface of the piston, install the piston in the cylinder and, without removing any remaining grease, put on the protective cap 5 so that its edges fit into the groove of the piston and cylinder, then install retaining ring 6. Lubricate the guide fingers with UNIOL-1 grease (1.5 g for each finger). Tighten the bolts securing the caliper and cylinder to the pins to the torques specified in Appendix 1, then lock them. Before tightening the bolts, apply sealant to them to prevent corrosion of the threaded part of the connection. After assembling and installing the brake mechanism, restore the fluid level in the reservoir and bleed the hydraulic drive system of the VAZ 2114.
How to replace the brake cylinder on a VAZ 2113-VAZ 2115?
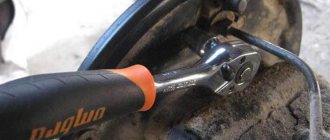
1. Remove the wheel first from the side on which you will change the cylinder (Read the article on “Replacing wheels on modern cars”, it describes how to properly remove the wheels), when the wheel is removed, remove the brake hose from the bracket to which it is attached (the location is indicated by a red arrow) and using a wrench, tear off the nut that secures the brake hose to the brake cylinder (see small photo).
2. Now the brake caliper bracket assembly with the cylinder will need to be removed, to do this you will have to unscrew two bolts, but when unscrewing them, hold the guide pins with a second key so that the bolts in the guides do not turn (see photo 1), after which the bolts are removed from the guide pins and the bracket assembly with the brake cylinder is removed from the caliper, but the bracket cannot be completely removed, and the fault is the brake hose, which will have to be disconnected from the brake cylinder. To do this, completely unscrew the hose mounting nut (While unscrewing, hold the nut with a wrench and rotate the caliper assembly in the brake cylinder by hand, counterclockwise) and disconnect the hose, as soon as you disconnect it, immediately plug the hose with some kind of plug so that the brake fluid does not pour out through it, then firmly tighten the brake cylinder with the caliper you need a vice, but you can do without them, in general you will have to unscrew the two bolts that attach the brake cylinder to the caliper, they need to be unscrewed with a hex key or hex heads, after unscrewing, the caliper and the cylinder must be separated.
When should a brake cylinder be replaced?
The cylinder can be changed as an assembly, or it can be repaired by replacing parts in it such as the piston and boot separately, but we do not recommend going down this path, because firstly, the assembled cylinder does not cost that much money, but secondly, if you assemble something incorrectly (for example, don’t fasten the pin well), it will fly off and the brake fluid, if it’s missing, will all leak out (you’ll be left without brakes), so it’s better to change the entire assembly, the signs that indicate that the cylinder needs to be replaced are as follows: The bleeder fitting has broken and you cannot unscrew it in any way, also if the boot is torn, the cylinder must be replaced, if the piston in the cylinder becomes sour (This happens from time to time), it will also need to be replaced, but the piston can become sour in different positions, namely in braking mode (The wheel will constantly brake) or in its calm state (This wheel will not brake at all and the car will pull to the side when braking).
Types of installed calipers and their prices
The same caliper is installed on a given family of cars, with the exception of the index in its marking, indicating the model of the vehicle body. Otherwise, these are identical brake devices that have a single-piston design independent of the fixed caliper. A similar modernization took place after 2001, and the last half calipers with 4 pistons were installed on the VAZ 2108.
The cost of a caliper for a VAZ 2109, 2110, 2114, 2115 can be as follows, based on its condition:
- New – 1,610-4,270 rub .
- Used – 700-1,980 rub .
- Refurbished (restoration using original components) – 1,420-2,190 rubles .
Replacing caliper guide pins and their boots on VAZ 2114-2115
The first step is to jack up the front of the car. Then remove the wheel and use a flat-blade screwdriver to bend the locking washers of the caliper bolts.
Then unscrew the two fastening bolts at the top and bottom, as shown in the photo.
Next, compress the brake cylinder using a screwdriver by inserting it between the bracket and one of the pads.
Next, you can lift the cylinder with the bracket up, as shown below, and move it to the side so that it is out of the way.
And now you can easily remove the caliper pins, both from above and from below, with minimal effort.
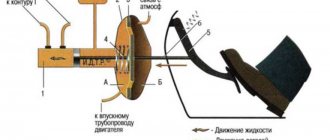
The principle of operation of the GTZ and its main problems
The master brake cylinder of the VAZ 2114 is a device that converts pressing the brake pedal into increased pressure inside the system. It works on the vacuum principle and requires complete sealing of the brake fluid path.
Any violation of this tightness becomes the reason for the “disappearance” of the brakes, namely:
- air entering the system;
- the appearance of cracks in the line and leakage of brake fluid;
- wear or damage to the integrity of the gaskets.
Checking the tightness of the brake system is very simple - you need to press the brake pedal with the engine not running, and then, without releasing it, start the engine. If immediately after this the pedal “fails,” then the line is completely sealed and the brakes are working properly.
The operation of the brake system as a whole can be affected by many different components that have a malfunction. But each element has its own individual characteristics, by which one can “calculate” this or that problematic detail. It is quite easy to track problems that are specific to the brake cylinder system; here are some of them: 1. Soured piston. This is a fairly common phenomenon on cars with high mileage and service life. Indirect signs indicating this problem are stalling of the drive wheels (the piston is jammed and it constantly presses on the block) or the brake does not work when the pedal is pressed. 2. Damage to the seal or breakage of the fitting or boot (brake fluid may leak out in various volumes).
If you notice the above symptoms, immediately carry out a thorough diagnosis.
The process of replacing the turbocharger and brake fluid
When the tools, new mechanism and fluid are prepared, you can begin dismantling the old VAZ 2114 spare part:
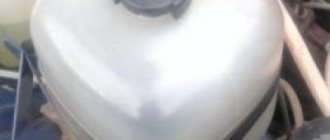
- The first step is to disconnect the negative terminal from the battery. Replacing the master cylinder involves completely removing the old brake fluid - this is best done with a syringe;
The brake fluid level sensor must be removed - Next you need to unscrew the tubes. It is recommended to support them with a rag to prevent any remaining liquid from getting onto other parts of the car;
- In mating, if the thread does not yield, apply lubricant to the master cylinder connection and leave for 2 minutes. After this, you can remove the thread with the 10th key;
Advice! When assembling the system, motorists often confuse brake pipes. To make your work easier, it is recommended to sign them with a marker. This applies to any parts in the VAZ 2114 car.
- Once the threads have been removed, dismantling the main unit can begin. Using the “18” socket, you need to remove the nuts that attach the main cylinder to the amplifier;
Unscrew the marked fasteners - The next step is to replace the cylinder along with the tank (the entire assembly must be replaced). After this, all parts must be returned to their places. Also, do not forget about new fluid, which should be poured into the tank. The replacement takes place quite quickly if two people are involved in installing the tank. The assistant’s task is as follows: he presses the corresponding pedal until the remaining liquid comes out of the system holes.
By unscrewing the nuts, the cylinder can be removed along with the tank
The vacuum booster may also need to be replaced. In this case, remove the fitting and turn the main unit to the side. After this, you need to unscrew the hose and go into the interior of the VAZ 2114 car, where the pin locking bracket is located. After removing all the fasteners, you can install a new fluid pressure booster.
Why do pads wear out quickly?
There may be several reasons why brake pads wear out quickly, but all of them, as a rule, can be quickly resolved with the exception of a few.
Reasons for rapid pad wear:
- Poor workmanship of the part;
- Caliper jamming;
- Intense riding;
- Overheated (crooked) brake disc;
All these reasons greatly affect the condition of the brake pads.
Low-quality pads have cheap materials, which leads to rapid wear, and using cheap pads can damage the brake disc.
A jammed caliper leads to constant friction of the pad against the brake disc and, as a result, to rapid wear and damage to the brake disc.
Intense and fast driving of a car leads to frequent braking and strong friction of the pads on the disc.
Overheating of the disc deforms it and then the brake pad may wear unevenly, which will lead to bending of the caliper guides and to its failure.
Replacing anthers and caliper guide pins on VAZ 2110, 2111 and 2112
First you need to unscrew the front wheel mounting bolts, jack up the car and remove the wheel completely. Then, using a flat-head screwdriver, bend the locking washers of the guide bolts, both from above and from below. Then unscrew the fastening bolt, holding the finger from turning it with a 17 mm wrench.
How to correctly replace the caliper guides of VAZ 2109-2115. How to replace caliper pins
When driving a VAZ
, you can often hear some kind of creaking noise from the front wheels. Where they are.
Inspection of the caliper (guides and boots) on Priora, Kalina, Grant and 2110, 2114
Guide lubrication
caliper
pins ,
replacement
of pins and boots, video review of repairs. For all cars.
Examination
You should make sure that the master cylinder is the culprit for the malfunction of the brake system. This is easy to do; you don’t even have to go to a service center and spend money on it.
Unit location
- Press the brake pedal with the power unit off.
- Start the engine without taking your foot off the gas pedal.
- During normal operation, the gas turbine engine fails under the influence of vacuum.
- If the pedal does not fail, you will need to conduct more thorough diagnostics and restore the device to functionality.
Most likely, you will need to restore the tightness of the return regulator connection. It is located on the intake manifold amplifier housing.
Repair kit or new GTZ?
Many car owners face a question when the brake master cylinder fails: how exactly to repair the brake master cylinder. After all, there are two main options:
- Purchase a new GTZ;
- Use repair kit.
First, let's take a look at the price tags.
Element
Price
New GTZ entry-level quality
New high quality GTZ
Purchasing a repair kit and using it to restore the functionality of the brake cylinder entails uneven wear of old and new elements, breakage of rings and a number of other problems. In this regard, we advise you to eliminate the breakdown by completely replacing the gas turbine engine, and not by using a repair kit.
Dismantling
To carry out dismantling work that entails replacing the master brake cylinder, it is necessary to prepare a certain set of tools and materials. It includes:
- Brake fluid;
- Tool for unscrewing fittings;
- Pliers;
- Dry rags;
- Metal brush for cleaning contacts;
- Key for 17, 13 and 10 millimeters;
- Spring tensioner;
- New brake cylinder.
Before starting work, prepare yourself a site where you can place all the elements to be removed. Write down or photograph, or otherwise record where this or that unit was removed from. This will greatly simplify the reassembly procedure.
After all the preparatory activities, you can start working.
- Be sure to remove the negative terminal from the battery of your VAZ 2114. Without this, almost no repair or maintenance work on the car can begin.
- Raise the hood and lock it securely.
- Use a syringe to remove any remaining brake fluid from the container.
- Unscrew the brake fluid supply pipes using an open-end wrench. Unscrew it carefully so that the brake fluid does not get on other units in the engine compartment.
- In some cases, the thread becomes stuck, making it very difficult to remove. In such a situation, we recommend treating the threads with brake fluid and letting it sit for a while. Then the hoses are removed using a 10 mm wrench.
- If these measures do not help, you will need a special wrench with a clamping bolt and a cap slot. It is attached to a nut, clamped with a bolt and rotates the part.
- After dismantling the brake fluid pipes, be sure to mark them with a marker or corrector so that you know which pipe is connected where during reassembly.
- Now you need to remove the brake master cylinder. To do this, first remove the two main nuts that hold the GTZ to the amplifier.
- That's it, the damaged element can be removed from its seat.
Dismantling works
- Clean the installation sites so that there are no problems with the new cylinder in the very first months of operation.
- Follow the reverse assembly sequence so as not to confuse the location of certain elements.
- Do not clamp the brake fluid hoses too tightly, otherwise there is a risk of stripping the threads. Restoring connections is a hassle.
- It is recommended to replace the brake fluid used before repair, and then be sure to bleed the brakes.
- To level up, you will need help, so make an agreement with a friend in advance. One will gently press the brake from inside the car, and the other will wait for brake fluid to start coming out of the holes. At this very moment it will be necessary to return the front tubes to their places.
Be sure to simultaneously check the correct operation of the vacuum booster. If it is faulty, it will need to be replaced.
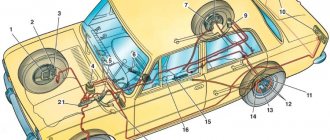
BRAKE SYSTEM
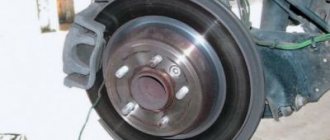
All modern cars have a hydraulic brake system, and discs or drums are used as braking elements. Discs are considered more efficient in their action, but drums do not wear out longer. The brake system of the VAZ 2114 contains the following parts:
- Brake master cylinder;
- Front caliper (right and left, they are not interchangeable with each other);
- Rear brake service cylinder (one for each rear wheel);
- Vacuum booster;
- Tubes;
- Hoses;
- Disks (on the front wheels, identical to each other);
- Drums (on the rear wheels, interchangeable with each other).
From the cabin, the system is controlled using a pedal, the free play is regulated by a rod.
Replacing the front brake cylinder
The main malfunction of the front brake cylinders on cars such as VAZ 2109-2108 is either jamming or leakage of brake fluid. In both cases, you should not expect normal operation of the braking system.
If it begins to leak fluid, then naturally the braking efficiency drops, since normal pressure is not created in the system.
Usually, only the cylinder itself is replaced, although stores sell assembled calipers, even with pads. If desired, you can buy and install the mechanism assembled. To replace the front brake cylinder on a VAZ 2109-2108 you will need the following tool:
- Socket head 13
- Ratchet handle
- Open-end wrench or socket wrench 13
- Hexagon 10
- Special split wrench for loosening brake pipes and hoses
First, we tear off the bolts of the front wheel, after which we lift the car with a jack and finally remove the wheel. Then unscrew the two hex bolts that secure the cylinder to the caliper:
And the top cover-bracket is now removed, and at the same time we take out the pads:
Next, you need to unscrew the brake hose, as shown in the photo below:
If it starts to rotate together with the fitting, you can unscrew it later, after removing the cylinder - it will be more convenient. Now you need to unscrew the two bolts to the caliper guide bracket:
Now you can remove the front wheel brake cylinder without any problems, since nothing else holds it. If the hose did not unscrew earlier, now you can safely unscrew it together with the cylinder:
If a replacement is required, then a new part for a VAZ 2109-2108 can be purchased for about 450 rubles, although stores most often only have assembled calipers at a price of 1,600 rubles. The installation will take place in the reverse order, after which you will need to bleed the brake system.
Advice from professionals
- Before completely assembling all the parts into one whole, it is important to treat them with isopropyl alcohol, blow them off and wipe them with a rag.
- Do not allow parts to come into contact with kerosene, gasoline or other oils, as they can damage the integrity of the seals.
- Before replacing the main brake cylinder on a VAZ 2114, it is necessary to restore the working body of the unit in proper condition, remove oxidation, plaque and other contaminants.
- It is important to monitor the sealing of the mechanism and change the O-rings in a timely manner, even if they are still in good condition.
- All units must be lubricated with brake emulsion during assembly.
- It is imperative to change the sealing gaskets that are located under the screws.
- After replacing the main brake cylinder on a VAZ 2114, it is necessary to bleed the hydraulic brake drive to remove air from the system.
- When dismantling blocks with wires, it is necessary to close all openings in the main mechanism and pipeline to prevent dirt and dust from getting inside, or to protect yourself from liquid leakage.
- When disassembling the unit, it is first better to remove the barrel of the master cylinder, and then unscrew the locking screws, which will allow you to effectively and easily access all other components of the system.
- The most common cause of master cylinder failure is leakage of brake fluid, which indicates a faulty cuff of the unit. To see oil stains, you need to open the hood and look at the joint of the unit.
vote
Article rating
Front brake cylinder repair
1. Remove the corresponding wheel.
2. Remove the brake hose seal from the bracket on the rack.
3. Loosen the hose fitting on the brake cylinder.
4. Use a screwdriver to bend the antennae of the lock washers and remove the two caliper mounting bolts, holding the guide pins by the hexagons with a second wrench.
5. Remove the bolts and remove the caliper and cylinder assembly.
6. Hold the hose fitting by the hexagon with a wrench and unscrew the cylinder from the tip.
Be careful - brake fluid will leak from the hose. Please note that the fitting has a copper O-ring. Replace a badly compressed ring.
7. Clamp the caliper in a vice and remove the two hexagon socket bolts securing the cylinder to the caliper. Remove the cylinder from the caliper.
8. Carefully, so as not to tear the protective cover, remove the retaining ring.
9. Remove the protective cover from the cylinder.
10. After applying compressed air through the brake fluid supply holes, remove the piston from the cylinder.
11. Carefully, so as not to damage the cylinder mirror, remove the sealing ring.
12. If it is necessary to replace the cylinder or the valve itself, unscrew the air release valve.
13. Carefully inspect the cylinder bore and the working surface of the piston. If any signs of wear, damage or severe corrosion are found, replace the cylinder and piston.
14. Replace a damaged, swollen or non-elastic o-ring. It is recommended to replace the ring every time the cylinder is disassembled, regardless of its condition.
15. Install a new sealing ring into the cylinder bore, having previously lubricated it with brake fluid.
16. Insert the edge of the protective cap into the piston groove.
17. Lubricate the cylinder surface and the working surface of the piston with fresh brake fluid. Insert the piston into the cylinder and install the outer edge of the protective cap into the groove of the cylinder body. Install the retaining ring.
18. Install the brake cylinder in the reverse order of removal. Before installing the guide pins, lubricate them with Uniol-1 grease.
19. Remove air from the brake drive hydraulic system (see “How to bleed the brakes”).