Niva 2131 replacement of the main brake cylinder, bleeding of brakes. Video and photo
We will show you how to replace the master brake cylinder with your own hands and then bleed the brakes on a NIV 2131 car. This car has a problem, there are no brakes, brake fluid is leaking, two reasons were discovered during the diagnosis. One of the reasons is that the main brake cylinder is leaking, we will replace it with a new one, and on this tee the brake pipe was “loosened”, as a result of which the brake fluid was leaking:
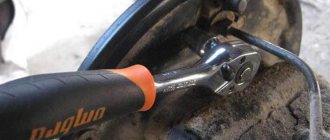
Let's get to work. Unscrew the brake pipes using a 10mm wrench:
Unscrew and remove the brake hoses:
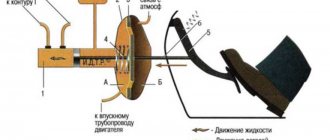
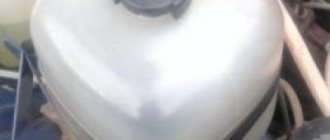
Pour the liquid into a prepared container. Here we have a dual-compartment system, so the tank is also divided into two circuits (front and rear). For example, in our situation, the tube stopped moving backwards, but the front brakes still worked. The pedal sometimes fails, but when pumped again, the brakes appear again. When you remove all the hoses and tubes, we begin to unscrew the two 17 nuts from the vacuum booster:
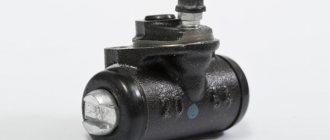
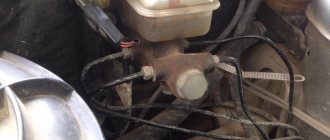
The GTZ can be removed and a new one installed. We have it original from AvtoVAZ. We reassemble in the reverse order, carefully with the tubes, do not bend them when installing. Fill the reservoir with new brake fluid and bleed the brakes. To do this, remove all four wheels. We start with the rear right wheel, then the rear left, front right and front left. For this procedure, you will need an assistant to apply pressure on the brake pedal. A small brake cylinder comes out from behind the wheel, take an empty bottle, pour a little brake fluid into it, put the hose on the spout and loosen it a little, at this time the assistant presses hard on the pedal. While pumping, add brake fluid. There are two fittings on the front wheels. We bleed until all the air comes out of the brake system.
Video of replacing the brake master cylinder in NIVA 2131:
Backup video on how to replace the main brake cylinder and bleed the brakes on a NIVA 2131:
When fluid begins to “run” from the master cylinder, it collects in the vacuum brake booster, corroding the membrane, and as a result, the vacuum dies. Be prepared for its replacement soon.
Source
Installation of rear disc brakes Niva 2121, VAZ 2131
So, first of all, to replace the rear brakes with disc brakes, it is best to change the master brake cylinder, because the RDT requires a larger volume of pumped brake fluid. Also, so that the rear axle of the car does not brake earlier and more strongly than the front, you need to install more powerful front brakes on the VAZ 2131.
What is required to switch to ZDT?
— A set of brake discs from a front-wheel drive VAZ 2108.
— VAZ 2108 calipers.
— The pads are all from the same car
— And the most difficult thing is the hose washer for the rear disc brakes. washer drawings.
GTZ NIVA
Removing and installing the Niva brake master cylinder (instructions)
Remove the spare wheel support bracket for the VAZ 2131.
Using pliers, loosen the clamps securing the flexible hoses to the fittings of the master brake cylinder.
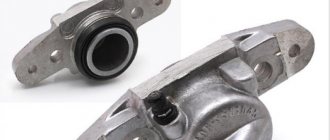
Carefully holding the fittings, remove the hoses. Drain the brake fluid from the reservoir into a substitute container. To replace the brake master cylinder fitting...
pry it off with a screwdriver...
and remove it from the brake master cylinder socket.
Use a screwdriver to pry up the rubber connecting sleeve...
and take it out. To remove a vehicle's brake master cylinder...
Using a special “10” wrench covering the five sides of the nut, unscrew the fittings of the four Niva 2121 brake pipes.
We remove the pipes from the brake cylinder Niva 2131.
Using a 17mm spanner, unscrew the two nuts securing the master brake cylinder to the vacuum booster...
and remove the main brake cylinder of the VAZ 2121. Install the main brake cylinder of the VAZ 2121 in the reverse order. We bleed the hydraulic drive system.
Repair of GTZ NIVA
Problem: the Main Brake Cylinder on the NIVA leaked directly into the Vacuum Booster.
I took out the main brake assembly with vacuum from a Peugeot 405 from old bins, and also bought two cylinder connectors for the front calipers and two front brake hoses from Shevik.
cylinder connector VAZ-2123
front brake hose VAZ-2123
GTZ and VUT from Peugeot 405 (front view)
GTZ and VUT from Peugeot 405 (rear view)
I started disassembling the old system. As it turned out, the old owner was wise here too. I threw out absolutely everything old, leaving only the pedal and the front cylinders, and began to assemble everything in a new way: 1. Put the cylinder connectors on the front calipers;
When does the need arise?
The brakes need bleeding if there is interference with the system design, namely:
- Tubes and hoses are being replaced.
- The brake fluid is changed.
- New calipers are installed on the front wheels.
- New cylinders are mounted on the rear axle.
- The master cylinder is being replaced.
In other words, bleeding is necessary if there has been a leak in the system. Before bleeding the brakes on the Niva, you should prepare the car for this procedure. First you need to loosen all the bleeder fittings. To do this, you need to use a special key at “8”. It is best to carry out all work on an overpass or inspection pit.
Niva front brake cylinder, history
In the form in which you now see brake cylinders, they have existed since the first Niva car produced in 1977. In 2016, with the advent of “urbans,” the cylinders changed a little in geometry, but the design and mounting dimensions remained the same. Of course, it was worst of all for the field drivers, since it was on the fields that the stillborn dual-circuit braking system was installed. I wrote separately about its modification and made a special kit so that the car could have an axial brake circuit. Let's return to the cylinders. As usual, I followed the beaten path and started looking for analogues from foreigners. It turned out that the cylinders are made by the Pilenga company (Italy-Turkey) and some Dutch company. In terms of quality-price ratio, I didn’t test any of the options, so I had to start “improving” the factory conveyor spare part.
In Russia, the Niva front brake cylinder is made by several companies. But only cylinders in branded boxes turned out to be acceptable for subsequent work. To my regret, I never found a factory that makes them, so I’ll have to overpay a little for “repackaging.” The most offensive moment in this entire 40-year history is the following. Both the cylinders and the pistons are made quite well from a mechanical point of view. There are two problems.
How to check your brakes
I started it up and went for a drive around the outskirts of the village. Everything is fine! There were brakes before, the car would stop without rear brakes, but now the pedal has become sensitive and immediately responds to pressure.
To check, I didn’t even need to look for some special place - it rained a little, and there were no fresh traces in front of the gate home. I drove up to the gate a little faster than usual and slammed the brake pedal all the way so that the wheels blocked. Then he got out of the car and looked at the tracks: everything was fine, they blocked almost simultaneously. The brake mark from the front wheels is slightly longer than from the rear wheels. Of course, it would be necessary to do it at the same time, but that would be absolutely ideal! But does that really happen?
OK it's all over Now. I changed the brake cylinder, it only took me half an hour of time and 400 rubles of money. It takes a long time to bleed the brake system alone. How do you do things like this? If I haven’t described something exactly or you know a better way, write in the comments!
Installation and kit kit.
The installation recommendation is as follows: mandatory bleeding of the ENTIRE system. But as practice has shown, if everything is assembled correctly, then there is no need to pump the front circuit at all. It all comes down to the release of air under brake pressure by gravity. Of course, don’t expect a strong miracle, BUT after installing this kit, the efficiency of the front circuit increases greatly. And most importantly, the piston in the front brake cylinder will not sour. For this set, I didn’t skimp, so the tube was taken German or Serbian, made of annealed copper (even if you tie it in a knot, it won’t break). The kit includes 4 copper tubes with fittings, 2 hoses with large nuts, 2 Shnivo combiners (for the front cylinders) and 10 thick copper washers. The photo does not show the longest tube going to the right front caliper; it is 130 cm long, the short ones are 70 cm each. The length of the tubes is selected in such a way that you can always unscrew the main brake cylinder from the vacuum pump without much effort and move it forward without unscrewing the brake pipes .
Alternative way
This method is suitable when it is not possible to use the help of a partner. To do this, you will need to create excess pressure in the system using a simple bladder or spare tire. You'll have to be Kulibin a little to make an adapter between the chamber fittings and on the expansion tank cap (you need to use a spare cap).
The essence of the procedure is the same as in the first option. You should unscrew the bleeder fittings one by one to get rid of excess air. Experts recommend carefully monitoring the fluid level in the tank and, if necessary, adding it to the required volume.
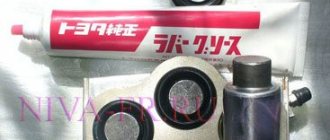
Niva front brake cylinder, problem solving
The first problem was solved in a simple way. Complete disassembly of the unit, washing and reassembly with lubricant designed to work with rubber seals and brake fluid. My friend helped, who has been repairing hydraulic systems all his life, from loaders to industrial presses. He gave me a tube of glamorous pink lubricant, made in Japan. On the Internet it is known under the Toyota brand, although in fact it is made by Seiken. There is also a slightly cheaper analogue, the German trendsetter in brakes, the ATE brand. The cylinders that are in the price list are additionally treated with just these lubricants, depending on their availability. On forums I often came across the opinion that it is enough to apply lubricant under the boot and everything will be fine. WILL NOT BE! You have to disassemble the entire cylinder to get to the O-ring, and nothing else. The lubricant will not get there naturally. The problem with rubber bands can be solved by installing a repair kit. Several companies produce it for our cylinders, but this will be the subject of the second part of the article.
Standard method
The essence of this method is that the work is performed by two people at once. One sits in the driver’s seat and, on command, presses the brake pedal, while the other performs the necessary manipulations.
Here's how to properly bleed the brakes on a Niva:
- Start working with the rear right cylinder. Fill the expansion tank with liquid. Place a tube onto the fitting and lower the other end into a jar with a small amount of brake fluid.
- Give the command to your partner to press the brake pedal 5-7 times (of course, you also need to release it).
- When pressing the last time, it is necessary to fix the pedal in its extreme position near the floor.
- Unscrew the fitting a little and bleed air from the system. It will come out along with a small amount of liquid.
- Repeat the procedures described above until air stops flowing.
Then you need to switch to the second rear cylinder. The last to be pumped are the calipers of the right and left front wheels, respectively. The main thing is to strictly follow the sequence and add liquid to the tank in a timely manner.
Question answer
The factory doesn't even lie. Since 2017-18, the cylinders come with lubricant under the boot. But “by gravity” this lubricant will not reach the entire surface of the piston-cylinder pair and the sealing ring. If you take the cylinder apart you will see the following. There will be a few drops of grease under the boot, and the inside of the cylinder will be ABSOLUTELY DRY. The result is “dry friction”, and then scuffing of the surface and the sealing ring.
Pay attention to the cylinders AT LEAST when replacing pads. There are only two criteria. This is a intact, unfractured piston boot and the piston moves when pressed with a finger. And finally, an excerpt from the manual for the military Gelendvagen, especially for “Russian drivers”. *It is recommended to inspect rubber seals twice a year, and MANDATORY service of brake system cylinders once a year*. The Germans' annual operation is equivalent to 20,000 km. Toyota has similar recommendations.
Previously, I created a topic on brakes, on which I never received any practical advice - www.drive2.ru/l/454464990473094080/ Today, the day came when I gathered my thoughts and decided to completely go through the brakes. This part concerns the front brakes, namely rebuilding the calipers, replacing rubber and metal tubes. I will write step by step, maybe someone will find it useful))
So, we jump-start the car, put stands, and remove the wheel. Pull out the clamp for the upper caliper clamp and remove the caliper. We need to press the pistons out of the caliper body. I do it this way: I rest the caliper against the brake disc with the outer pistons so that nothing prevents the central piston from coming out. Literally 3 pumps of the brake pedal and the piston came out.
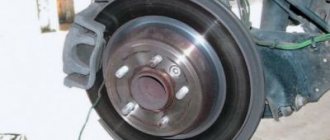
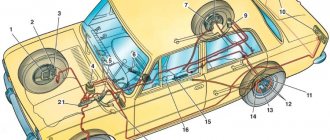
Replacing wheel bearings and brake discs
Replacing wheel bearings and brake discs
Post by muzolya » Mar 20, 2010, 4:02 pm
I will change Thor. Disks.
Re: Changing brake discs.
Posted by ALK » Mar 20, 2010, 9:50 pm
replacing bearings... note that the disc is simply knocked off the hub. those. If you do not unscrew the hub nut, you can knock the disc off the bolts. however, I am not saying that this is how it should be done
Who knows what's going on behind the fence of the zoo? ©
Re: Changing brake discs.
Post by muzolya » Mar 20, 2010, 10:38 pm
Re: Changing brake discs.
Post by Suicide » March 21, 2010, 00:37
Re: Changing brake discs.
Post by ALK » March 21, 2010, 00:42
Who knows what's going on behind the fence of the zoo? ©
Re: Changing brake discs.
Post by muzolya » Mar 21, 2010, 02:06
Re: Changing brake discs.
Post by Suicide » March 21, 2010, 02:57
There are conical bolts. You can knock it inside the disk. But to push a week out of there =) Although, if they try REALLY hard so that not a single one fails..
For example, pull it off with a puller ala for brake drums, then carefully put a new one in place and press it in with nuts.
If you try without taking it apart, then yes.
And so, you put the car on supports, unscrew the ball and steering rods, the hub nut, take out the knuckle, hub, CV joint, knock out the disk... put everything back and adjust the bearings...
Re: Changing brake discs.
Post by Pilot » March 21, 2010, 03:12
Disassembling the front brake mechanism
We hang and remove the front wheel.
Using a 10mm socket, unscrew the bolt securing the hose guide brackets
Using a 14mm socket, unscrew the bypass bolt of the brake hose of one circuit.
We remove the hose with the bypass bolt.
The hose fitting is sealed on both sides with copper washers
Similarly, disconnect the brake hose of the other circuit.
Remove the cylinder block with the brake caliper (see Replacing the front brake pads).
We take out the brake pads.
Clamping the brake caliper in a vice with soft metal jaw linings, use a drift to remove the cylinder block retainer.
At the same time, we recess the cylinder block retainer with a rod with a diameter of 3–4 mm and, hitting the cylinder block with a hammer with a plastic striker, we begin to move the block along the guides of the brake caliper.
After moving the cylinder block by 1.5–2.0 mm, remove the rod.
Using a hammer with a plastic striker or mallet, knock out the cylinder block from the caliper guides.
Cylinder block and brake caliper.
We remove the clamp and its spring from the socket of the brake cylinder block
The retainer fits into the caliper hole and limits the movement of the cylinder block
We assemble and install the front brake mechanism in the reverse order.
To facilitate assembly, use a file to remove the chamfers from the guides of the cylinder block. Having sunk the latch into the block socket, insert the block into the grooves of the caliper.
Using a hammer with a plastic striker, hammer the cylinder block until the retainer fits into the caliper hole.
To remove the pad guide, remove the upper clamping lever in the same way as the lower lever (see Replacing the front brake pads).
Using a 10mm socket, unscrew the bolt securing the front casing to the pad guide.
Using a chisel, loosen the two bolts securing the shoe guide to the steering knuckle.
Using a 17mm wrench, unscrew the bottom bolt.
It is more convenient to unscrew the top bolt with a head.
Removing the front casing
Remove the pad guide.
The brake disc and its protective casing can be dismantled only after removing the hub (see Replacing the hub bearings).
When tightening the bypass bolts, note that the position of the brake hoses is determined by the guide brackets.
We carry out the assembly in the reverse order and bleed the brake system (see the article - “Bleeding the brakes”).
Lada 4×4 3D › Logbook › Replacing the caliper cylinder
Last Sunday I changed the rear left brake cylinder, it was rusty and simply didn’t work.
In general, I also wanted to change the cylinder in the right front caliper, but decided not to do it. And as it turned out, he did the right thing. The reason for the need is below. If anyone is aware of the design of the Niva brakes, then there are two fittings on the front caliper cylinder. As you can see, there is only one here, and the other one is filled with some kind of shit. When bleeding the brakes last time, it turned out that it was rattling, and since there is no second fitting, it is better to remove the old part and replace it.
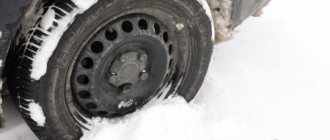
But before replacing, you need to jack up the right front wheel. And here a failure awaits us, the old Soviet jack does not fit into exactly one jack of the right front wheel. Well, okay, I took another jack, since I have them, and jacked it up under the threshold. We take off the wheel, spray it with a bucket and wait.
Well, everything seems to be soaked. We try to turn it, it doesn’t turn. We spray some more and wait. It won’t spin, okay, take the key and carefully remove the hammer, twist it and begin to lose the brakes quickly. By the way, how to close the brake hoses so as not to leak? Screw on the nut? In the end, I solved the problem by screwing the hoses onto a new cylinder, but in the end I came to really like the brakes.
Next I remove the caliper. It's quite simple, you just need to remove one pin, cotter pin and springs. And then you can’t sift through it all. I twist it in my hands and realize that everything has soured so well. Don't forget to take either a core or a drift. Otherwise you will not be able to remove the cylinder. It is additionally held in the bracket by a fixator, which must be recessed.
We put it on the floor, take a hammer and hit it. After a while, we begin to regret the lack of a vice and a workbench. But still we knock the cylinder out of the bracket. What is called: - Done! Broke!
Well, then it was easier: I cleaned the bracket a little, scraped off the dirt from the old cylinder and took out the retainer with the spring. I changed the cylinders so that the slurry does not leak. I worked the new cylinder with a file according to the instructions, installed the cleaned retainer and drove the new one into place with a rubber hammer.
Then I just put the caliper back. Next I screwed on the hoses, of course the first time I screwed them into a cross