Some owners of practical LADA Kalina have a problem caused by poor unlocking of the rear doors. This malfunction can occur not only in older LADA Kalinas, but also in completely new ones. This defect can rightly be characterized as a manufacturing defect. The manufacturer, it seems, has not yet taken measures to eliminate this defect in the handle mechanism, so the problem is still very relevant today.
Note that the front door handles do not suffer from such problems, but the rear mechanisms are much less fortunate.
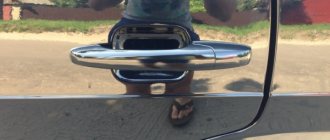
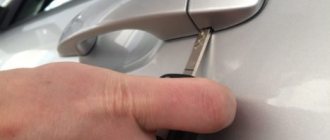
So on this particular Lada Kalina, after several attempts to open the rear door, applying increased force to the handle, it broke. It is unlikely that a repair kit for this mechanism can be quickly found, so the only rational measure would be to purchase and install a new handle. The price is not high - about 350 rubles. In this article we will tell you how to remove and replace a broken door handle.
Replacing the outer handle on the rear door of a Lada
To carry out repairs, we stock up on the following tools:
- An “8” size head paired with a ratchet or wrench.
- Extension cord.
Let's start removing.
- First, we dismantle the inner trim of the door card.
- Unscrew the nut located on the inside of the door.
- Unscrew the bolt at the end of the door.
- The handle is removed from the outside of the door panel. We remove the assembled mechanism!
- We install the new product in strictly reverse order.
- We return the previously unscrewed fasteners (nut and bolt) to their original places. We tighten, observing the required torque. Let's not overdo it.
The rear door handle replacement is complete.
Analysis of the condition of door handle assemblies
During the inspection, the appearance and functionality of the opening mechanisms are assessed. A common problem with Lady Kalina handles is that the outer handle dangles, but it works normally. Such a defect can lead to mechanical failure, so it is necessary to dismantle it and check the condition of the entire structure.
Signs of malfunction:
- Great efforts are made to open the doors.
- Creaking and other extraneous sounds appear.
- When pressed, the lock does not open the first time.
- The handle does not return to its original position.
It is important to choose the right replacement components and find out the exact scheme for restoring functionality.
For a full analysis, you need to disassemble the door cards and visually assess the condition of the parts. This is necessary for self-repair; in some cases, it is not necessary to contact a car service.
What tends to break down in a mechanism?
Sometimes the iron tongue breaks off. It is necessary to drive the lock rod. Through this action, the handle unlocks the door.
Visual view of the breakdown:
If you can find a repair kit, then only the part needs to be replaced, and there is no need to replace the handle assembly.
Repair/maintenance: Repair of door handles and treatment of cavities of VAZ-2107
Hi all! In winter, both door handles of the rear doors broke almost simultaneously, that is, the left handle was skewed and although the door opened, the handle was jammed in the upper position and scratches appeared.
The reason was discovered almost immediately - the handle body, which held the axis that helped push the rod to open the lock, burst under the scratches.
Therefore, I purchased a new one in advance, an analogue one.
It was not clear with the right door, the handle simply moved freely up and down and the door did not open, it was the fault of the unhooked rod, so I decided to find out the reason during disassembly.
To begin with, I disassembled the left door trim.
To remove the handle, you need to unhook the rod from the lock mechanism, unscrew the bolt and unscrew the 2 nuts securing the handle itself to the door - in principle, everything is simple.
I previously marked the position of the rod relative to the bolt with a marker so that I wouldn’t have to re-adjust it later. Using a flat screwdriver, press the handle away from the door and pull it up, removing it along with the rod.
The breakdown location is on the right.
We move the rod to the new handle, not forgetting about the fixing rubber band, and put it in the reverse order. I pre-coated all the rubbing parts and the rubber seal with silicone grease.
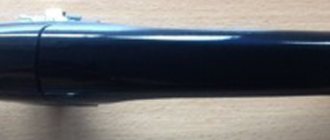
The new handle fits perfectly, the door now opens easier than before. True, the color of the handle differs from the factory chrome, but I did not take the original, since it is almost twice as expensive as the analogue, and the quality looks the same.
At the same time as replacing the handle, I decided to thoroughly seal the door cavity; before that I had already tried to push Movil and kindling through the holes in the trim, but it didn’t work out very well, only the door card got dirty.
The factory Shumka swelled and began to rust under it in places.
I decided to completely rip it off and coat it; by the way, it was glued to bare metal, and not tightly at that. The material looks like ordinary tar, and on top there is paper, something like roofing felt and roofing felt. It is quite easy to scrape off with a sharpened spatula.
First, I coated it with rast-stop so that it penetrated into the small pores of the rye and metal, and then covered the main protective layer with heated pushsal on top. I sprayed the corners where I couldn’t reach with a brush with Movilya from a spray can and thoroughly coated the glass and lock lowering mechanisms with it. First, of course, cleaning the bottom from dirt and adhering dust.
Work progress
Let us immediately note that before removing the door handle of the Lada Kalina, it is necessary to dismantle the trim.
Front door
First of all, you need to use a flat screwdriver to pry the plastic end of the rod together with the lock switch lever to disengage it.
Next, the lock drive rod is disconnected from the lever of the external handle - it also needs to be pryed off with a screwdriver.
Then you need to unscrew the nut securing the (front) handle.
Behind it, unscrew the mounting bolt (rear).
When this is done, all that remains is to remove the Lada Kalina door handle.
If you need to replace the lock cylinder, you will need to press out the lock cylinder retainer using a flat-head screwdriver.
Backdoor
Removing the rear door handle of the Lada Kalina is even easier.
First you need to unscrew the front handle mounting nut.
Then the rear mounting bolt.
All that remains is to pull the handle forward (in the direction the car is driving) and remove it.
Installation occurs in reverse order.
Note. If you tighten the fastening bolt during installation, the handle will become crooked - there will be a large gap, which is shown in the photo below. In this case, you only need to adjust the tightening force.
The process of replacing the Lada Kalina door handle is demonstrated in more detail in the video.
DIY repair option
One of the common reasons for replacing handles is play and rattling. This occurs due to a poor-quality plate located inside the structure. A fixation screw is screwed into its hole. After a certain period of operation, the porous metal is damaged and backlash appears.
Option to temporarily eliminate the defect:
- Remove the handle.
- Disassemble it and remove the steel plate.
- Make a hole in it and on the plastic cover for the screw.
- Connect the structures and check for any play.
The screw needs to be cut to 3-4 turns, since the installation depth will be small. The head is semicircular, but does not extend beyond the plane of the plastic cover.
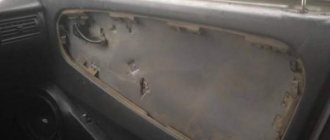
Removing the rear door trim
Unscrew the lock button by hand
Having turned the inner handle so that the screw securing it to the lever is accessible, use a Phillips screwdriver to unscrew the screw and remove the handle.
Using a screwdriver with a thin blade, pry up two decorative plugs and remove them from the holes in the armrest handle.
Using a Phillips screwdriver, unscrew the two screws securing the armrest handle
Use a screwdriver to press out the window handle socket.
Pull out the latch and remove it.
Remove the handle and socket from the shaft.
Using a screwdriver, placing soft material under it, we press the lower edge of the upholstery away from the inner door panel, overcoming the resistance of the pistons.
It’s better to start from the bottom, gradually moving the screwdriver around the entire perimeter of the upholstery.
Removing the rear door trim
The location of ten pistons on the inside of the upholstery
Install the rear door trim in the reverse order.
Installation of power windows on a VAZ 2107
Electric windows designed for models 2104-05-07 are suitable for the front doors of the 2107 car; the easiest way to install a rack and pinion design. We install rack ESPs as follows:
- disassemble the door from the inside - remove the window handle (using a special tool or screwdriver);
- unscrew the lock release button;
- unscrew the armrest screws (three fastenings - front (top), middle and back)
- dismantle the door trim (main part);
- remove the upper part of the casing (“loaf”);
- Using a 8mm wrench, unscrew the mechanism bolts;
- unscrew the bolts of the glass guide bar, remove the guide, it will not be needed;
- we take the SME out of the door;
- unscrew the screws securing the mechanism to the glass (4 pieces - two screws on one side and two on the other);
- unscrew the window lift cable tension nut and remove the cable roller;
- completely pull out the window lifter mechanism;
- drill two holes in the door with a diameter of 6 mm (one of them is next to the hole in the door closing handle);
- We do the drilling on the same plane, and fasten the gearmotor in place of the mechanical window lifter. All screws must be taken from the kit; standard screws will not fit - they are long and will rest against the lift mechanism. If there are no short screws with the window regulators, you need to shorten the standard screws;
- We fasten the glass holders to the electric window with standard screws;
- We take out the wires from the lifts, install the buttons either on the door itself or on the central armrest, next to the gearshift lever console.
We assemble the door, and this completes the installation of the window regulator on the VAZ 2107.
Design of VAZ-2109 locks and disadvantages
The lock cylinder is a cylinder that is equipped with a secret mechanism. In all locks with a flat key, the cylinder is replaceable. For example, on VAZ-2109 cars it is replaced like this.
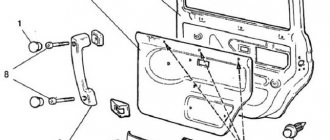
Door mechanism VAZ-2109
The rotating part that is connected to the rod is called the “drive”. As we can see, this drive has a hole for removing the cylinder. By applying pressure with a thin axle or an awl, the larva is pulled out.
Actions after releasing the fastener
There is only one drawback - it is hardly possible to complete the steps indicated here without first removing the lock completely.
It should be noted that even when the mechanism is removed, it will not be easy to pull the larva out of it.
Therefore, before dismantling, be sure to insert a key into the cylinder and turn it left or right 90 degrees. The purpose of this action is to be able to dismantle the larva. This action is performed effortlessly, and the key is then simply pulled towards you.
Selection of new mechanisms and handles
There is a fairly large selection of accessories and spare parts in retail and online stores.
When selecting, special attention should be paid to the following issues:
- Typically, external handles are sold in three colors: white, black and unpainted.
- Different manufacturing companies are engaged in the production of pens of a new form, respectively, their prices and quality are different.
- The use of locking mechanisms from 8 Series cars will require modifications to the devices and doors themselves.
In the process of selecting the necessary spare parts, the quality of their manufacture is assessed. Silumin and plastic parts do not have sufficient strength, especially at low temperatures. High-quality installation of new handles is possible only if its dimensions and seat configuration exactly correspond to the standard ones.
Preference should be given to those manufacturers of Euro handles for the VAZ 2107 car who have proven themselves accordingly. This kind of information can only be obtained from car owners who have previously purchased such parts and installed them. In preparation for installing parts, they must be painted in the same color as the body, if this is in the owner’s plans.
Replacing the larva in Kalina
First of all, replacing the lock elements means that the door trim will be completely missing. Therefore, first we will figure out how to dismantle the trim on Lada Kalina cars. The second chapter is devoted to how to remove the larva and install a new one in its place. The last step will actually be the simplest.
Removing the door trim yourself
The casing is attached not only to screws, but also to plastic pistons. The number of screws holding the part in question is four:
Front door trim 1118
Numbers here indicate all fastening elements. But to get to them, you need to remove the screw cap “3”, as well as the inner door handle. The pawl handle also needs to be unscrewed.
If these actions are completed successfully, the casing begins to be dismantled, moving it away from the metal. Dismantling is carried out starting from any of the corners, but care must be taken: the pistons holding the plastic are fragile.
How to remove plastic trim
If the package includes power windows, you will need to disconnect the connector connected to the button block. Also, another similar connector is present in most trim levels - where there is a central lock. Both connectors must be disconnected.
All the steps described here involve electronics in any case.
Therefore, at the stage before dismantling the trim, you need to open the hood, take the “10” key and unscrew the negative terminal. We are talking about the battery terminal, which can be connected last (when the last screw is screwed in). Anyone who breaks this rule will look for blown fuses. Draw a conclusion.
How to get to the door mechanism
According to the recommendation of the magazine "Behind the Wheel", in the absence of casing, access to the lock is always available. Simply put, there will be no need to remove the inner lining made of metal. The steel sheet is simply bent to the side.
Lock mechanism
The rotating part with the protrusion is called the “drive”, and this is what you will need next.
Replacing the larva will be easy:
- The key in the cylinder currently fixed in the door is turned 90 degrees;
- Using a steel ruler, knife or thin screwdriver, you need to press the locking tongue located opposite the slot in the body of the cylinder. You need to place a screwdriver between the rotating and stationary parts of the mechanism. Know that in the driver's door the slot is made from the bottom (looks “to the floor”), in the passenger doors - from the top!
- By pulling the key towards you, the larva is pulled out;
- The new cylinder is installed like this: with the key inserted, it is pushed into the lock until it stops. The locking tab will need to be pushed inward.
The following photo illustrates the “second step”.
Slot above the locking tongue
The slot itself, when the mechanism is assembled, is located between the drive and the lock body (at least that is how it is designed). You need to manage to squeeze a screwdriver into the space between these parts. Sometimes this action does not lead to a positive result, and then the lock has to be removed as an assembly.
Causes
Replacing the Kalina door handle in the driver's seat accounts for less than 1% of all body damage to the first generation configuration. The mechanism for opening the rear element is less reliable; craftsmen note that every tenth Kalina has a problem opening the rear left or right door, this is about 10% of all body repairs. Reasons for handle breakage:
- mechanical damage to the latch;
- breakage of the lock cylinder;
- defective components.
In severe frost, due to the ingress and freezing of moisture in the lock drive, it is necessary to apply an inappropriately large force to the outer handle to open the door. As a result, its opening mechanism fails.
It is recommended to spray the lock with anti-freeze or anti-ice spray, which is used to clean the windshield, before opening the door.
The external elements of opening the rear doors of the Lada Kalina deserve attention. As practice shows, they break much more often than the front ones. And the reason for this is a factory defect in one of the parts of the handle mechanism.
Recommendations from the magazine “Behind the Wheel”
Let’s turn again to the “Behind the Wheel” review, which discusses how to remove door locks in a VAZ-1118 Kalina. If the casing has been dismantled, this is not bad. Next, according to the recommendations, unscrew the screw securing the inner handle:
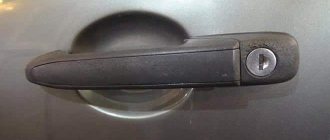
The door handle is attached here
The lock mechanism is connected to two rods made in the form of rods. Both of them are dismantled by disconnecting the plastic clips:
Disconnect the rods from the lock
To disengage the latch, press on the plastic tab with a screwdriver.
At the last step, as you might guess, all that remains is to unscrew the screws holding the mechanism motionless.
Three screws, cross head
But first, you need to dismantle the external handle. To do this, unscrew two bolts equipped with an “8” hex head.
Two bolts hold the handle
By the way, if the central locking connector is attached to the mechanism module, it is also disconnected.
Central lock connector built into the module
Let the wiring harness for the central locking drive remain in the door.
Of course, all door locks must be unlocked with one key, which is supposed to be used in the future.
The work indicated here is carried out on each of the four doors. In addition, it is very desirable that the ignition key also unlocks the doors. However, replacing the cylinder on the steering column will not be so easy. Can you handle the total amount of work that needs to be done? Decide for yourself.
Review of spare parts prices
| Name/article | Price, rub.) |
| 00001003833121 Bolt M5x10 with serrated shoulder | From 100 |
| 00001003831801 M5 nut with serrated shoulder | From 100 |
| 00001002624101 Washer 5 mm | From 50 |
| 00001003275901 Screw M6x10 | From 50 |
| 00001002605371 Lock washer 6 mm | From 50 |
| 21230610542000 Lock cylinder | From 550 |
| 11180610515000 External front right handle | From 650 |
| 11180610515100 External front left handle | From 650 |
| 21900610518000 Inner front right handle assembly | From 950 |
| 21900610518100 Inner front left handle assembly | From 950 |
*prices are current as of November 27, 2018.
When choosing spare parts, always give preference to original ones. Good, high-quality parts are always 10 - 15% more expensive than analogues. At the same time, by purchasing a factory part, you can count on a long service life of the mechanism.
A cheap counterfeit does not provide even a third of the required resource. The final choice is up to the owner of the technical device. The deciding factor is the budget.
Removing and installing the outer rear door handle on Kalina
So, before starting this repair, you will need to perform a procedure such as removing the door trim. After this you need to do the following:
- Unscrew the fastening nut from the inside of the door
- Unscrew the bolt from the end of the door
- Remove the handle assembly from the outside
- Install the new part in reverse order
- Secure the bolt and nut into place
What exactly breaks down in the mechanism?
In this case, the metal tongue that moves the lock rod was broken off, thereby opening it. This breakdown looks like this:
If you had repair kits, you could easily replace the broken part and that’s it, but I personally couldn’t find one.
I had to change the handle assembly, about which there will be a detailed report below in the video.
Since the problem is quite common, we hope that the material will be more useful for Lada Kalina owners. Now we realized that the rear door handles of the car we reviewed should be handled especially carefully so that the rear door handle does not need to be replaced.
You can buy popular viburnum mats of good quality and at affordable prices on aliexpress.
On AliExpress we offer thousands of varieties of products of all brands and specifications, for every taste and size. If you want to buy viburnum rugs and similar products, we offer you 388 items to choose from, among which you are sure to find options to suit your taste.
If specific characteristics tell you more than obscure names, perhaps the following information is for you: for the entire volume of products found for your search for “Kalina mats”, Vehicle manufacturer can vary over a very wide range, there are Opel, Acura, Aston Martin, Audi, Bentley, BMW, bugatti, CADILLAC, CHEVROLET, CHRYSLER, and many others.
Besides, if you're looking for viburnum mats, we also recommend related products, such as air filter for audi a3 , lada car mat , for lada kalina mat , interior car mat , central ford , priora mat , largus mat , lada carpet , automatic tape cutter dispenser, carpet, interior car mat, largus mat, for granta lada, carpet lada, for viburnum, grant lada, car mat, car mat, for priora, car door groove mat. Come visit us on AliExpress, you will find everything here!
Removal and installation of the outer handle on Kalina
Regardless of the body configuration or year of manufacture, reinstallation and repair of locks and handles remains the same for hatchbacks and station wagons. The order of work differs when repairing the front and rear elements. The arrangement of the parts is considered simple, so it takes about 30 minutes to reinstall one element. For independent work you will need the following tool:
- crosshead screwdriver;
- flat screwdriver;
- knob;
- head at 8;
- extension;
- sharp knife or awl.
Front door
The procedure for performing the work necessary to remove and install the outer front door lever on the Lada Kalina:
- Disconnect the negative terminal from the battery.
- Remove the inner trim of the outside rear view mirror by first prying it off with a screwdriver.
- Unscrew the locking lock.
- Using an awl or sharp knife, remove the plug.
- Use a Phillips screwdriver to remove the armrest mounting screw.
- Pull the inner handle of the lock and unscrew the screw using a Phillips screwdriver.
- Remove the inner lever.
- Unscrew the armrest mounting bolt located in the niche.
- Unscrew the two pocket screws.
- Wrap a flat-head screwdriver in a rag and insert it between the trim and the door frame. Carefully pulling the screwdriver towards you, unclip the first clip that holds the trim. Also unclip all the other clips, there are 8 of them in total.
- Carefully remove the trim from the iron door frame.
- Disconnect the two wire connectors from the power window assembly.
- Move the trim to the side.
- Disassemble the lower link of the outer door handle drive.
- Unscrew the handle fastening bolt located at the end; for this, use a 8-mm socket and a knob.
- Disconnect the outer arm drive upper link.
- Remove the faulty part and replace it with a new one.
Lubricate all moving parts of the lock drive and assemble everything in reverse order. Most often the tongue or pawl breaks. Experts do not recommend replacing the element separately; it is better to reinstall the entire assembly, since the lock rod loses its performance characteristics over time.
Backdoor
Step-by-step repair of the rear door handle:
- Unscrew the locking lock.
- Using a flat-head screwdriver, press out and move the window regulator lever lock to the side.
- Remove the retainer and window lift lever from the shaft.
- Unscrew the fastening screw by pulling the lock handle.
- Remove the lock handle.
- Remove the two plugs using a sharp knife.
- Unscrew the two fastening screws that were under the plugs and remove the inner handle of the lock.
- Wrap a flathead screwdriver with a rag or electrical tape. Slide it between the door trim and frame.
- While pulling back the screwdriver, unclip the clips located along the perimeter of the casing one by one.
- Remove the casing and set it aside.
- Using a socket 8, a wrench, unscrew the nut that holds the handle on the inside of the door.
- Using the same head with a knob, remove the bolt, which is located at the end.
- Remove the old faulty part and replace it with a new one.
Tools and Supplies
Reinstallation and repair of the part can be done in the garage; for the work you will need the following tools and consumables:
- Set of car keys.
- Set of heads, ratchets and cranks.
- Set of special plastic tools.
- Ruler for opening the door of a Lada Granta car.
- Phillips and flat head screwdrivers.
- Anti-corrosion lubricant WD-40.
- Litol lubricant.
- Rags.
New Lada: Suspension kits | SS20-SHOP.RU
The work does not require special skills; the driver only needs to carefully dismantle and install new parts according to our instructions.
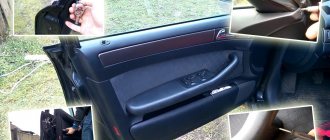
Removing the door trim of the Lada Kalina with your own hands
The doors of any passenger car, including the Lada Kalina, are lined from the inside with special decorative panels. For various reasons, sometimes it becomes necessary to remove this trim, and here ignorant motorists are faced with a problem - there are no fastenings for the door card on the outside. In reality, the disassembly technology is not complicated, although it does include a couple of nuances that need to be taken into account.
Why is the door trim removed?
Most often, the trim of the rear or front doors is dismantled in order to get to the internal cavities where the window lift mechanisms are installed. Although during the entire period of operation of the car there are other situations when it is necessary to remove the trim:
- for installing acoustic speakers built into door cards;
- in case of failure of the electric window lift buttons;
- for dismantling glass for the purpose of tinting or replacement;
- to repair or lubricate window lift mechanisms;
- to replace facing panels that have become worn or scratched over the years of use of the machine.
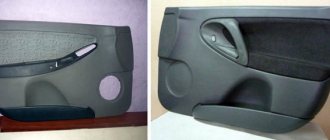
Front door cards Lada Kalina
It is also necessary to remove the trim during body work, when it is necessary to weld rotten elements, renew the car’s paintwork, or carry out anti-corrosion treatment.
Note. Many motorists remove the upholstery to make additional vibration and sound insulation of the body themselves.
Lada Kalina rear door trim
Preparation for dismantling
To unscrew the fasteners and remove the door trim, you need to prepare a simple set of tools:
- screwdriver with cross slots;
- long flat screwdriver;
- a pointed tool, such as an awl.
Door disassembly tool
Preparation for dismantling
To unscrew the fasteners and remove the door trim, you need to prepare a simple set of tools:
- screwdriver with cross slots;
- long flat screwdriver;
- a pointed tool, such as an awl.
New Lada: The pressure in the fuel system drops and decreases
Door disassembly tool
Since the door card of the Lada Kalina car is held on by plastic fasteners (otherwise known as clips, pistons), there is a warning regarding the working conditions.
It is strictly not recommended to dismantle door trim in the cold, when the plastic becomes brittle and easily destroyed. Hence, there is a risk of breaking all the clips during the process of removing the decorative panel.
Therefore, in winter, perform this operation in a heated garage or box.
In the summer, there are no requirements for premises; remove the casing even in the open air. There is only one recommendation: in windy weather it is better to drive the car into the garage, otherwise a lot of dust will be brought into the interior when the doors are open.
Removing the front door trim
Required tool : Phillips and straight screwdrivers. Disconnect the negative terminal from the battery.
- Use a screwdriver to pry off the cap of the screw for the upper fastening of the upholstery;
- Remove the plug;
- Unscrew the screw;
- Unscrew the screw securing the upholstery inside the door pocket.
- Pry off the door handle trim with a flat screwdriver;
- We remove it and unscrew the two screws located under the cover;
- Unscrew the two screws at the bottom of the door trim;
- Unscrew the door lock lock;
- On car versions that do not have power windows, remove the joint lever seal;
- We insert a long slotted screwdriver between the trim and the door, one by one snapping off the clips along the entire perimeter of the trim;
- We remove the upholstery from the door;
- Disconnect all connectors with wires from the control unit.
| The door trim is held on by 9 pistons (clips). Remember their location, then removal will be much easier. |
How to disassemble the trunk lid on a hatchback and station wagon
The interior lining of the Kalina rear hatch in hatchback and station wagon bodies is held on by 4 regular clips, 2 special black plastic fasteners (installed after installing the panel) and 2 screws securing the handle. In addition, the panel is hooked onto a metal protrusion by two brackets located in the lock area.
Handle screws
The procedure for removing the upholstery is as follows:
- Unscrew the 2 screws with a Phillips screwdriver and disconnect the handle.
- Place a flathead screwdriver under the glass side of the panel and unlock the lock. Release the remaining latches with your hands, pulling the panel along the contour.
- Remove the trim, lastly releasing the staples near the trunk lock.
Electric windows "FORWARD" for VAZ-2101, 2106 (front doors)
- Review
- Reviews 1
| Cars | Domestic |
| Types | Cars |
| Brand | VAZ |
| Model | 2101, 2103, 2106 |
| Goods | Window lifters |
| Manufacturer | Steklopodem |
| Window type | rack and pinion |
| Installation location | front, left, right |
| Completeness | set of window regulators with gear motors for 2 doors |
| Drive unit | electric |
| Product brand | Forward |
Rack and pinion power windows "FORWARD" R161 and R161-01 are designed for installation in the front doors of VAZ-2101, VAZ-2106 cars and their modifications if there is electrical wiring installed on the car to connect the windows. If there is no installed electrical wiring, it is recommended to use window regulators together with an electrical installation kit.
The window lifter is a single unit of the glass movement mechanism and the gear motor. The design of the window lifter uses a rack and pinion mechanism, compactly placed inside the glass guide, on which the gear motor is fixedly mounted, which determines the main consumer qualities.
The window regulator does not have components, such as a cable, that are subject to stretching, chafing, or the appearance of backlash. All components of the window lifter have a service life exceeding the level of traditional requirements for similar products and are insensitive to load levels, which is confirmed by life tests in various conditions. Friction losses in the mechanism for moving the window lifter are minimized, due to which there is almost no wear on its elements during operation.
Specially selected plastics used in the manufacture of the window regulator have an operating temperature range from -45 o C to +100 o C.
The fixed electric motor eliminates the risk of damage to the window regulator power cables.
The gearmotor has the property of self-braking, which prevents the glass from moving when exposed to vibration, and also provides the necessary level of protection against opening the car by an intruder.
The window motor winding is protected by a self-resetting bimetallic fuse.
Installation of the window regulator is intuitive (in place of the central glass guide of the window regulator being replaced), and uses a minimum number of fasteners. The radius of curvature of the guide corresponds to the radius of curvature of the glass.
Door modifications are not required for most window regulator models. If necessary, it consists of drilling two holes.
All metal parts are coated with Ts12.khr. (galvanized).
In the production of window lifters, a quality management system is used that meets the requirements of GOST R ISO 9001-2001 and is confirmed by a certificate of conformity.
Specifications
Operating voltage range Nominal force on the drive plate Allowable force on the drive plate Time of movement of the plate from one extreme position to another at a supply voltage of 13.5 V and rated force Current consumption at a supply voltage of 13.5 V and rated force, no more
Completeness
Electric window regulator R161 front right Electric window regulator R161-01 front left Screw M5 Screw M6 Bolt M6 with locking skirt Locking washer Adapter plate right Adapter plate left Decorative plug Plug retainer Self-tapping screw fastening the plug Packaging Passport
Electrical installation kit as a gift from Steklopodem.RF.
The warranty period for the products is 3 years from the date of manufacture.
Selection of new mechanisms and handles
There is a fairly large selection of accessories and spare parts in retail and online stores.
When selecting, special attention should be paid to the following issues:
- Typically, external handles are sold in three colors: white, black and unpainted.
- Different manufacturing companies are engaged in the production of pens of a new form, respectively, their prices and quality are different.
- The use of locking mechanisms from 8 Series cars will require modifications to the devices and doors themselves.
In the process of selecting the necessary spare parts, the quality of their manufacture is assessed. Silumin and plastic parts do not have sufficient strength, especially at low temperatures. High-quality installation of new handles is possible only if its dimensions and seat configuration exactly correspond to the standard ones.
Preference should be given to those manufacturers of Euro handles for the VAZ 2107 car who have proven themselves accordingly. This kind of information can only be obtained from car owners who have previously purchased such parts and installed them. In preparation for installing parts, they must be painted in the same color as the body, if this is in the owner’s plans.