We have a VAZ 2105 car, manufactured in 2010, with a mileage of 58 thousand km under repair; it is necessary to replace the reaction rods (rods) on the rear axle suspension. We will show you how to do this procedure yourself; the instructions are also applicable for VAZ 2107, VAZ 2106.
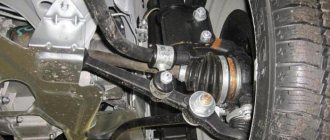
We lift the car. We press the bridge with a hydraulic strut so that the shock absorber is untied and the spring does not fall out. If you will be working on the ground, you can use an additional jack. Nuts 19, unscrew the lower mount of the rear shock absorber:
And another bolt next to it:
Now let's move on to the fastenings of the rods themselves:
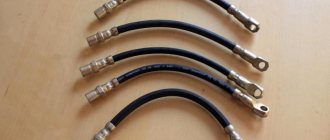
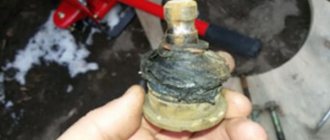
We take out the old rod and take a new one, we have rods from the KEDR company, order number MK-01-2919100, new fastening bolts were also purchased for them in advance, their order number is 21010-2919000-86. Before installation, lubricate all fasteners with copper grease so that during further repairs they can be unscrewed without any problems. Install in reverse order.
Then unscrew the top short reaction rod:
Then the front bar:
There are washers on both sides at the front, remove them and replace them with new ones. Using a mounting tool, unscrew the bridge a little to insert the bolt:
After tightening your pants, you can remove the panhard rod:
Fasteners on the other side:
In order to then insert a new bolt into this place, you will again need a mounting tool, which we will use to press out the spring.
Rear suspension of the VAZ-2107 - design and methods for checking serviceability
The design of the rear suspension of the 7 is practically no different from the suspensions of other classic models of the VAZ family. The dependent suspension modification is somewhat outdated and is associated with the presence of a rigid connection between the rear wheels. Of course, a rigid connection has a great advantage - high reliability, as well as ease of maintenance, but there are also some disadvantages. To find out about them, let’s take a closer look at the rear suspension design of the VAZ 2107.
Seven rear suspension design
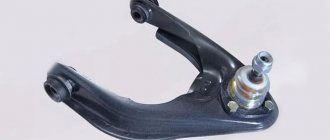
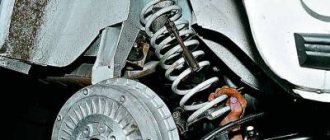
The rear suspension design of the VAZ 2107 is quite simple, which is required by the presence of a rear axle. It is due to the presence of the rear axle that the rear wheels are rigidly connected to each other. The rear axle beam is suspended from the body using reaction rods, of which there are only 5 in the design - four longitudinal rods and one transverse rod.
The main purpose of the longitudinal rods is to prevent and prevent the beam from moving in two directions - forward and backward. Transverse traction is needed in order to prevent the beam from moving when lateral loads occur. You need to know all the suspension parts in order to identify faults and make correct repairs.
This is interesting! To combine the rods with the body part and the beam, special hinges are used, which are made of rubber material and are called silent blocks.
We continue to study the structure of the rear suspension of the seven, and it is worth highlighting another important element - the springs. The lower part of the springs is in contact with the bowl on the bridge beam. To soften contact and prevent squeaks, a thick rubber gasket is placed between the spring and the bowl. The upper part of the springs also rests against the body bowls through an insulating gasket.
Vehicle vibrations are damped using a pair of telescopic shock absorbers. The load that is formed when the vehicle moves on uneven roads is reduced due to the presence of seven three rubber compression seals in the rear suspension design. Two seals are located in the spring structure, and the third is located on the bottom above the rear axle housing. For ease of understanding of all of the above, below is a diagram of the rear suspension of the seven.
- springs;
- telescopic shock absorbers;
- rod or transverse rod;
- axle beam connecting the wheels;
- longitudinal upper rods or rods;
- longitudinal lower rods.
How to check the condition of the rear suspension elements of a VAZ 2107
The opinion that the seven’s suspension has increased strength and wear resistance is not at all a reason for not monitoring its condition. The suspension condition of a car that is operated in off-road conditions or on poorly paved roads (there are still a large number of them left in the post-Soviet countries) especially needs to be checked.
The easiest and most effective way to check the condition of the rear suspension of the seven is a visual inspection. To do this, the car needs to be driven onto an overpass or placed over an inspection hole. Particular attention should be paid to such suspension elements as:
Removing the lower arm
When a VAZ 2106 chassis is being repaired, it may be necessary to replace the lower front suspension arm. To work, you will need wrenches 13 and 22. First, remove the front suspension spring, and then, using a wrench, unscrew the two nuts that hold the arm to the cross member. Remove it from the cross member bolts without removing the silent blocks, axle and ball joint. If necessary, replace the ball joint or change the lever. Reinstall it in the reverse order of disassembly.
How to change jet rods on a VAZ 2107 with your own hands
If the car remains stable while driving, it will be safe. This rule is equally relevant for passenger cars and trucks. The VAZ 2107 was no exception. The car could never boast of high handling. That's why engineers developed a system with jet thrusts. But even such elements can fail, raising questions about independent replacement.
- Purpose of thrust rods on the VAZ 2107
- Jet thrust malfunctions and possible consequences
- Checking the condition of the jet rods on the VAZ 2107
- Test sequence
- Video checking jet rods on a VAZ 2107
- Selection of thrust rods
- Replacing jet rods on a VAZ 2107
- Removing jet rods
- Repair and installation of jet rods
- Video of changing jet engines on a VAZ 2107
- Replacing bushings and silent blocks on VAZ 2107 rods
- Sequencing
- Conclusion
Purpose of thrust rods on the VAZ 2107
Tie rods provide protection against swaying and loss of control on the road, during sharp turns and obstacles. Even earlier versions of the car had similar problems. But inside the cars there were only ordinary springs; no one knew anything about the system with rods.
It is for this reason that the vehicle caused many problems when driving. Only over time the suspension was modified. A system was installed with several long rods. This part carried the main load.
Classic VAZ 2107 cars and other models contain the following version of the torque rod kit:
- Long.
- Short.
- A large transverse one, which also serves as the basis for the entire system.
Installation location - near the car axle located at the rear. The system is visible only from the inspection hole, where repair work is usually carried out if the reaction rods are replaced.
Jet thrust malfunctions and possible consequences
If the load causes the axle to sway or shift, the impact will be taken by the jet thrust. The appearance of defects in parts leads to a deterioration in the overall behavior of transport. Damaged parts need to be replaced as quickly as possible.
The following factors often cause breakdowns:
- Exposure to chemicals from road compounds in winter;
- Impact of torsional loads. Occurs more often when colliding with obstacles. Only reducing the speed before these elements reduces the risks;
- Static loads. This factor is only reduced by the absence of overloads; it is impossible to completely get rid of it when operating rods on a VAZ 2107.
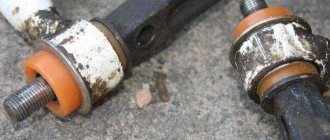
It is important to detect deformation, chips and cracks in a timely manner, for which periodic inspection of the entire system is organized. Welding seams and silent blocks are weak points that receive the most attention during inspections.
Silent blocks of any type are rubber, so they wear out faster than metal parts. Due to their wear, backlashes appear, becoming an obstacle to the stabilizing function. Welded joints, when they break, also lead to unpleasant consequences. It is recommended to remove them as quickly as possible.
With broken parts, driving is worse. Added to this is the unstable behavior of the body when defects appear in the jet rods.
Checking the condition of the jet rods on the VAZ 2107
100 thousand kilometers - new parts from the car are enough for this period, according to existing instructions. But the actual service life rarely exceeds 80 thousand kilometers, given real conditions.
The same instructions say that it is recommended to organize checks every 20 thousand kilometers. And here the experts recommend reducing the period by 5-10 thousand km to make it easier to avoid unpleasant surprises. You can’t do without an inspection hole and a mounting blade; this is the only way the jet thrust can be opened for viewing and other actions.
Test sequence
The steps are not that complicated:
- Installation of transport on a viewing hole or on an overpass;
- Mounting blades are inserted behind the traction eyes;
- The spatula rests against the jet thrust bracket. An attempt is made to shift the part, together with the silent block. If the action is successful, it means the part is worn out and needs to be replaced;
- Repeating a similar procedure with each silent block. If it moves sideways by a few mm, the need for replacement is obvious.
The rods themselves, along with the eyes, are also checked for wear. If any defects are detected, in this case the bushings and other parts are replaced.
Video checking jet rods on a VAZ 2107
How to detect a fault
You can check the serviceability of the control rods without the help of others; for this purpose you will only need an inspection ditch or overpass. to do such a check on a VAZ 2106 every 5 thousand km, as it is also called, after each long trip on bad roads. Such a small interval is justified by the quality of production of the parts in question; on average, they last 15-20 thousand km.
To perform diagnostics, you need to park the car over a ditch or drive onto an overpass and secure the vehicle with the hand brake. Grasping the rod near the tip with one hand, you need to sharply push it up and then down. A serviceable tip either has no free play at all, or it is only a couple of mm, you can feel it with your hand.
If the free play is not easy, but at the same time the thrust rod simply rotates in both ball pins, then changing the ends of the VAZ 2106 is inevitable. Using this method, we need to check that our client has 6 fingers left, and if they are clearly worn out, it is better to change the entire control trapezoid, consisting of 3 rods.
Replacing jet rods on a VAZ 2107
It is necessary to prepare a kit with tools and consumables in advance. Their main list is as follows:
- Hammer;
- Set with open-end wrenches. The reinforced double type parts are sometimes difficult to remove without additional tools;
- Blades for installation;
- WD-40 – this composition removes rust;
- A set with new reaction rods, including a transverse one.
When everything is ready, they begin the work itself.
Removing jet rods
Removing old parts is the first step where work begins.
The process involves the following sequence:
- A wire brush is used to remove rust and dirt from threaded connections. Then WD-40 is used for processing. You will need to wait some time before the work can continue. The instructions are also relevant for the classic model.
- Completely unscrew the nut, due to which the washer is held on the free side. This process is difficult, it is better to take a long wrench and, if necessary, re-treat the surface with WD-40.
- Dismantling the bolt and nut, moving to the other side. The rear parts are dismantled in almost the same way.
- Unscrewing the nut from the lower shock absorber mounting. The bolt with the spacer sleeve is also removed.
- Shift towards the shock absorber itself. Otherwise you won't be able to access the second bolt.
- Clean the bolt threads with a wire brush, then apply WD-40 again.
- Unscrew the nut and pull out the bolt. The elastic band also changes if necessary.
The bolt is simply cut off if the nut cannot be unscrewed. Removing the reaction rods involves using a spatula for installation. Remains of the fastening must be removed if the bolt had to be cut off.
Reverse welding of cracks will not help when they appear on the surface. The seam then still cannot withstand the load. Such parts can only be replaced in full.
Repair and installation of jet rods
Reuse is permissible only if the metal part remains intact. Rubber silent blocks must be replaced in any case. The old parts are removed from the lugs and then new ones are installed. Treating the surface with dishwashing detergent simplifies this process.
New rods are installed in the following order:
- The traction eye is mounted in the front bracket;
- The securing bolt is lubricated with nigrol, lithol. Everything is inserted into the bracket and tightened with a nut;
- The tie rod eye is inserted into the rear tie rod bracket;
- Insert the bolt with lubricant, then secure with a nut.
A situation is acceptable when the holes at the traction eye and the bracket do not coincide with each other. Then take a mounting blade and, if possible, correct the current position.
The lower part of the shock absorber at the rear is secured when the bulk of the work is completed.
Video of changing jet engines on a VAZ 2107
Operation of articulated rods
On most modern cars, the wheels are turned by a gear rack. But on cars of the classic Zhiguli family, instead of a rack, outdated technology is used using special rods, called “steering linkage”. This mechanism is not very reliable. The maximum you can count on is 50,000 kilometers, although in reality the resource rarely exceeds 30 thousand km. The structure of the mechanism is simple, and if you have experience in car repair and knowledge of the subject, you can carry out repair work or replace components yourself.
What is a trapezoid for and how does it work?
The articulated rods serve as an intermediate link between the steering shaft and the wheel hub at the front; the force is transmitted through the steering knuckles. The main purpose is to turn the front wheels simultaneously in the direction in which the steering wheel turns.
This mechanism is attached to the front side members and structurally consists of the following parts:
- medium traction;
- right thrust;
- left pull.
The middle part is a tube with hinge mechanisms on both sides. The side parts consist of a short and a long tip. They are connected to each other with a special clamp and two bolts.
The principle of operation of a trapezoid is as follows.
- When you turn the steering wheel, the steering shaft and the gearbox shank begin to rotate. Thanks to the worm mechanism, more torque is transmitted to the bipod at a reduced number of revolutions.
- The bipod begins to rotate, and with it the middle rod on the left. At the same time, the middle rod transmits force to the right side of the trapezoid via a bracket.
- All three parts turn in one direction or another depending on which direction the steering wheel goes, and at the same time the front wheels begin to turn synchronously.
A pendulum-type lever is attached to the second spar, which serves as an additional hinge. At the ends of all three rods there are conical pins, thanks to which the trapezoid is always in a strictly horizontal position, regardless of the travel of the car’s suspension.
Design features of articulated rods
The middle element is the simplest in its structure. It is a non-separable rod, at the ends of which there are hinges. The conical fingers of the rods are installed in the holes of the bipod and secured with castle nuts, and a cotter pin is used for additional fastening.
The right and left rods consist of an outer tip with a pin and an inner tip with a hinge. They are connected to each other using a threaded clamp and two bolts. The design of the side rods consists of several parts and can be separated. This was done to be able to adjust the wheel alignment/camber. The length can be changed by twisting or unscrewing the threaded clamp, thus adjusting the position of the front wheels.
The hinged ends of all rods are identical in design and consist of the following parts:
- threaded pin and hole for a cotter pin;
- boot (protective cover made of rubber or silicone);
- durable metal body;
- cracker (support liner);
- spring;
- cover installed in the housing.
A ball joint (hinge) works on the same principle as a bearing, i.e. a metal ball rotates in a plastic housing. On more expensive and high-quality ball bearings, manufacturers cut a grease fitting into the cover on the body to allow lubrication using a syringe. External or external rods on both the right and left are the same, internal ones have differences. The right lever is bent so that it does not touch the gearbox housing when moving.
Selection of new steering rod parts for VAZ 2106
Repairing the steering linkage allows you to replace only the failed part. Rarely does anyone change all the components at once. As a result, the articulated rods on many cars are assembled from different parts that differ in quality. At the moment, finding original spare parts for the VAZ 2106 is becoming increasingly difficult, since the car has long been out of production.
Due to the low resource, standard kits have long become a rarity. However, there are many other manufacturers that produce analogues of factory steering linkage parts:
- BelMag;
- Track;
- VIS;
- Delphi;
- Kedr et al.
These brands have proven themselves well among car enthusiasts; their products are of good quality. When choosing, it remains to recommend not to buy spare parts in dubious places, since the likelihood of purchasing a fake in this case increases sharply. You should not chase low prices; high-quality parts cannot be suspiciously cheap.
All steering rods of VAZ 01-07 models are identical, so when purchasing, do not worry about reading the numbers 2101 on the packaging. The only thing worth paying attention to is the mobility of the ball pin in the rod end. In the new product, it should be difficult to turn in the socket due to manual effort. After successfully replacing even just one tip, you cannot drive right away; you must definitely adjust the toe angles of the front wheels at the nearest service station.
Replacing bushings and silent blocks on VAZ 2107 rods
Silent blocks with bushings are disposable parts that need to be replaced immediately. In a garage, restoring parts becomes impossible. To replace you will need to acquire the following things:
- The beard is 10 mm in diameter.
- Hammer.
- Press-fitting device. It may also be needed when the rear axle is being repaired.
Sequencing
Follow the above instructions when removing the traction. Parts must be pre-treated with WD-40. A wire brush helps remove dirt and dust. Further actions are performed according to the specified algorithm:
- After removing the rod, the bushing should be removed without problems;
But this behavior is typical for parts without serious rust, with severe wear. Otherwise, you will have to use a hammer to knock the structure out of its place. The beard is inserted inside first.
- They get rid of the silent block if the rubber part is damaged too much. Use a screwdriver or a mounting shovel to pry up parts that prevent everything from being freed;
- Using a sharp knife or sandpaper, carefully clean the surface of the eyelet inside. Remains of rubber and rust should then disappear completely;
- A new bushing is placed in the eye and pressing is carried out using new equipment;
- The beard helps to cope with this part of the work. The main thing is to act carefully to avoid damage.
How to adjust the front bearings?
Very often the front bearings on the front suspension of a car break. It is advisable to inspect them every 10,000 km. Diagnostics and configuration are as follows:
- Use a jack to hang the wheel.
- Remove the dust cap.
- Unlock the nut on the hub.
- Using a 27 wrench, you need to tighten or unscrew the nut.
Please note that you should not use too much force when tightening. Once you have tightened the hub nut all the way, you need to turn it back 60 degrees and fix it by knocking off the edge of the nut with a hammer. The bearings have a cone shape, so if the permissible tightening torque is exceeded, they are destroyed. But they can easily withstand heavy loads, since the rollers and the holder have a very large contact area.