Many people are interested in which generator is better to install on the VAZ 2106 and 2107. After all, the standard device has some disadvantages that negatively affect the performance. Standard generators were developed quite a long time ago, and they were not designed for a large number of energy consumers. At that time, a couple of light bulbs and a starter were used. It is not surprising that with a large number of devices, the generator cannot cope with its responsibilities.
We have to look for a suitable replacement for him. To do this, it is important to take into account all the features of the electrical circuits of the machine. The new device must fit them completely.
Which generator is better to put on a VAZ
A breakdown of the generator leads to the car losing power and draining the battery.
It is important to know what signs indicate a malfunction of this unit and when it needs to be replaced. The generator in Russian VAZs breaks down quite often. One of the common causes of breakdowns is increased energy load and the installation of additional current-consuming devices and devices. We will tell you which generator is better to install on the VAZ 2106, 2107, 2109, 2110, 2112, 2114, and also introduce you to the recommendations of specialists regarding the purchase and replacement of this equipment.
What will it take to improve?
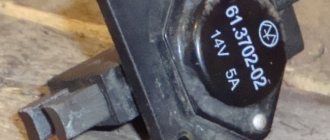
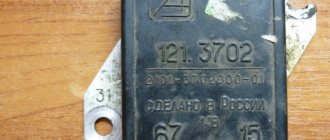
First of all, of course, the generator itself and the VTN type voltage relay (9111.3702). Later you will feel the difference why we chose it.
In addition, you will need a fastening mechanism from a VAZ 21214, a bracket, a bracket and a bolt for the generator itself, but from a VAZ 2110. In terms of mechanical installation, there should be no problems. The old fasteners are removed and installed in their place from Niva - anyone can do it.
The hardest part is the connection.
When is a generator replacement necessary?
A generator is an electrical device, the main elements of which are a stator (electromagnetic coil) and a rotor rotating inside it on bearings. Rotation is transmitted to the rotor from the crankshaft by a drive belt.
The current (with a voltage of 13.8-14.7V) generated by the generator powers electrical devices and instruments installed in the car. The generator also charges the battery, which supplies an electrical discharge to the engine at startup and powers the on-board network when the engine is turned off.
The generator may experience:
- mechanical damage to the housing, fasteners, bearings, pressure springs and other structural elements;
- electrical faults (carbon brush wear, winding breakage, failure of the rectifier or voltage regulator).
Depending on the type and complexity of the problem, the generator is repaired (for example, replacing a diode bridge, brushes, bearing) or completely replacing it.
Specialists at car repair centers advise checking the technical condition of the generator every 15,000 km in order to diagnose and eliminate the malfunction in a timely manner. It is recommended to completely replace the unit every 5 years, when the service life of the parts inevitably ends and fragmentary repairs become unprofitable. Using a new generator will avoid the risk of a sudden car stop on the road and an emergency situation.
It is also necessary to install a new generator if the driver installs additional electronic devices on the car:
- more powerful audio system;
- fog lights;
- air conditioner;
- DVR;
- control sensors, etc.
Remember! Generators of older VAZ modifications are not designed for the use of devices with high power consumption, since low-power radios and cassette recorders were previously installed in cars.
The main signs of a generator malfunction:
- Difficulty starting the engine, insufficient battery charging.
- Weak and flickering headlights.
- An illuminated light on the dashboard indicates that the battery is not charging enough. After a few tens of kilometers the battery is completely discharged.
- A whistling noise under the hood coming from a loose drive belt. The appearance of traces of smoke and the smell of burning rubber indicates overheating and destruction of the belt.
- Rattling noise under the hood due to broken bearings.
- The appearance of a hum, indicating a short circuit in the stator winding.
Malfunctions and their elimination
Let's start with the simplest and most obvious. From the work of indicators. These are the difficulties that may arise.
Constantly lit indicator (even when the ignition is turned off)
To eliminate the problem, you will need to replace the diode bridge with a new one. The reason for this was a short circuit on it. You can try to repair it, but this requires knowledge. Replacement cost is low.
Devices and sensors do not work
To do this, you will need to check all wiring and contacts. Often the cause of such an incident is the fuse box. It is necessary to check the voltage in all areas to determine the location of the fault. If the cause is the generator, then you need to check the belt tension and the stability of the pulley. Next, the “chocolate”, brushes, and diode bridge must be checked.
The battery indicator is always on when the ignition is on
You need to start by checking the battery. In this case, the inspection is carried out both on a cooled down car and on a warm one. If overheating and boiling occurs, then you need to check the voltage regulator unit on the generator and check the wear of the brushes. We must not forget about the belt, pulley and bearings. To avoid unnecessary work, you need to measure the voltage between the generator and the battery. Most often this is a signal that the battery is not charging.
The indicator flashes
If in the previous case there is often not enough charging, here, on the contrary, there is a recharge. The regulator and brush assembly need to be replaced.
Noise
The noise may be caused by worn bearings, excessive tension or loosening of the belt. You need to make sure that all fasteners are secure and the gaskets are intact. Less commonly, the cause of this is a malfunction of the rotor or stator. And, again, the same generator brushes can make the most unpleasant sounds. In this case, they are changed or wiped with gasoline.
Voltage drops
This is best seen at night. If the headlights burn unevenly and constantly change light intensity, then the voltage regulator needs to be replaced.
What factors should you consider when purchasing a new generator?
When choosing a generator for VAZ cars, it is necessary, first of all, to calculate the total power of all energy-consuming devices and devices in the on-board electrical network. The power of the power source must exceed this total value by 20%.
The type of engine must be taken into account when choosing a generator model. A generator paired with a gasoline engine can be compact and more economical. A diesel generator should be larger and more expensive.
The choice of generator also depends on the technology of combustion of the fuel-air mixture in engines of various types:
- In gasoline engines, fuel is supplied using a carburetor or injector. Here, the fuel-air mixture is sucked into the combustion chamber due to the vacuum created. There it is compressed and ignited by a spark from the spark plug. In this case, the supply of mixture to the combustion chamber is not regulated (does not depend on engine speed).
- Diesel engines use only an injector. Here the combustible mixture is injected into the combustion chambers under pressure and enters through the nozzles. Their opening is regulated by an electronic device (controller) with many sensors that respond to the speed of the vehicle, the voltage in the on-board electrical network and other indicators. Such engines consume less fuel, but are more energy-intensive due to the presence of auxiliary electronic devices. A car with such an engine requires a more powerful generator.
Installing a weak power source on the “injector” will lead to its rapid breakdown and damage to the battery.
Important nuance
If your car was produced between 1985 and 1989 , then none of the proposed options will suit you. Now we will look at how the generator was connected on these cars and what difficulties may arise with Nivovsky.
The fact is that on machines of this production a warning lamp relay was used. On constant excitation to the generator through fuse 9, the wire left the ignition switch. With this scheme, the charge control lamp never turned on, only in the absence of that same charge while the engine was running.
In this case, the connection will also depend on the type of generator:
1. G222. We also bite off the diodes and connect the wire to the generator.
2. If the excitation came through the lamp, then you need to do the following: simply remove the excitation wire from the fuse block in place 3 and connect it to place 7. Now the test lamp works. This wire is brown with a white stripe.
Photos are taken from the Internet and are not the property of the author!
Source
Which generators to choose for various VAZ car models
Generators of individual models can be installed in various models of VAZ cars. Replacing one brand with another is possible if the following conditions are met:
- the electrical parameters of the new and “native” devices are identical;
- gear ratios from the engine to the generator are the same;
- the new generator fits the car's mounting sockets;
- generators have similar electrical circuits.
Service station experts advise giving preference to electrical equipment from Russian manufacturers, since spare parts for it are available and are relatively inexpensive.
VAZ 2106 and VAZ 2107
These models are equipped with G221 brand generators with a maximum current of 42 A. When equipping the machine with additional heaters and audio systems, it is possible to install G222 (produces 50 A), which has a similar design. Generators from VAZ 2108 (55A), VAZ 2107i (80A) are also suitable for replacement.
VAZ 2109 and VAZ 2114
For cars of these brands, experts recommend more powerful generators Lada Priora, Lada Kalina (115 A) or ELDIX units (135 A), StartVolt LG 0110 (1210 A), ATEK (90 A), DECARO (90 A, 100 A).
VAZ 2110 and VAZ 2112
Initially, they are equipped with KATEK generators (80 A). For replacement, StartVolt LG 0110 (120 A), Autoelectric (100 A), ATEK (90 A) or DK (80 A) are recommended.
The best foreign manufacturers of car generators are considered to be Bosch, Delphi and Denso.
In conclusion, it should be noted that when purchasing generators for VAZ cars, one must take into account that these cars were not initially designed to install a large number of energy-consuming devices. Equipping with modern control devices and electronic comfort elements requires the installation of a more powerful power source.
When choosing a generator for a VAZ, you should take into account the type of engine (gasoline or diesel, carburetor or injection), the dimensions and technical characteristics of generator units of different brands, their interchangeability, and adaptability to mounting elements in the car.
Choosing a quality generator
To replace a failed generator, both original spare parts and analogues are used. Products from domestic and foreign manufacturers have stable quality and sufficient resources.
To extend the life of the generator, avoid forcing deep fords and do not overload the power grid with non-standard equipment. If a neighbor asks you to “light up”, do it correctly, do not allow sparks and polarity reversal.
Stable electricity and bright headlights!
How to independently connect a generator to a VAZ 2107
Any modern car has a generator - a unit designed to generate energy that is used to power all electrical equipment. And domestically produced cars VAZ 2107 were no exception. How to connect a VAZ 2107 generator, what elements does this unit consist of and what is its principle of operation? You will find answers to these questions below.
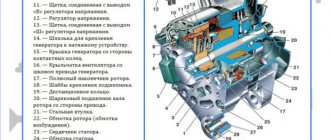
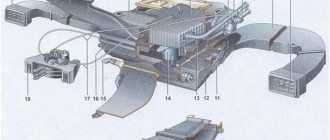
VAZ 21074 engine control system diagram
Wiring diagram of electrical connections of ECM VAZ 21074 - circuit elements. 1 — controller connector; 2 — mass air flow sensor; 3 — coolant temperature sensor; 4 — crankshaft position sensor; 5 — throttle position sensor; 6 — oxygen concentration sensor; 7 — speed sensor; 8 — ignition module; 9 — solenoid valve for purge of the adsorber; 10 — electric fan relay; 11 — electric fuel pump relay; 12 - main relay; 13 - fuse for the power circuit of the electric fuel pump relay: 14 - fuse for the power circuit of the main relay; 15 — fuse-link; 16-fuse protecting the constant power supply circuit of the controller; 17 - diode; 18 — idle speed regulator; 19 — nozzles; X1 - diagnostic block; X2 - connection block to the vehicle electrical system.
Description of the generator on the seventh VAZ model
In VAZ 2101, 2106, 21074 cars with a carburetor or injector, the generators have identical technical characteristics. Where is this unit located, what generators are suitable for installation on the “seven”, how to connect the device and what is its operating principle? To begin with, we suggest that you familiarize yourself with the purpose, location and design features.
Location, purpose and device
A powerful generator G222 or any other model is a device that is used to generate current, the strength of which should be up to 80 amperes. Thanks to this unit, all electrical equipment of the car without exception is powered while driving, and the battery charge is also replenished. As for the design, it is essentially an electric motor. Two windings are installed in the unit body, which are hidden by two covers with bearings.
Over the years of production of the VAZ 2107 model, developers were able to improve the technical characteristics of the device and ensure that the unit produces a current of 80 A. In other words, this made it possible for the device to become more powerful. The generator device is a three-phase unit with electromagnetic excitation.
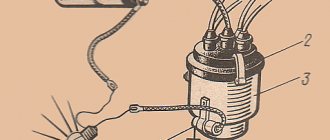
Voltage regulator
Installed on the back of the generator and secured with two screws. The regulator is a non-separable element. Regardless of the engine speed, it maintains voltage in the electrical circuit. With the engine running, the generator winding is powered by diodes installed on the rectifier unit. At this moment, no current passes through the control lamp and it does not light up. When the warning lamp is on, a generator malfunction signal is given.
Also, on the back cover, there is a capacitor installed that suppresses radio interference. The regulator also controls the charging of the battery, producing less voltage at elevated temperatures.
How to independently connect a generator to a VAZ 2107?
Every G7 car owner should know what the generator set connection diagram is.
Despite the fact that this unit is quite reliable and has a long service life, sooner or later it will still fail, the reasons may be as follows:
- burnt out windings inside the unit;
- interturn short circuit formed in the system;
- damage and other defects in the device body, etc.
If you do not plan to repair the generator or the repair work is not successful, then you will need to replace the device.
To do this you need to do the following:
- First you need to turn off the power to the vehicle's on-board network. To do this, turn off the ignition, then open the hood and disconnect the negative terminal from the battery.
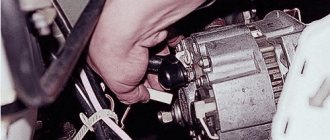
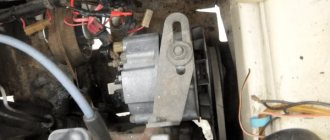
- Then you will need to find the generator itself - as we reported above, it is located on the right side of the power unit. Wires and a power cable with a plug are supplied to the generator - it must be disconnected. It is advisable to remember the location of the wires.
- Next, it is necessary to dismantle the mudguard on the right, as well as the motor protection, if any.
- Now comes the hard part. Using a wrench, you will need to unscrew the nut of the screw that secures the unit to the power unit housing. If you have difficulty unscrewing the nut, treat it with WD-40, after which the screw itself will need to be removed from its seat. Try hitting it with a hammer from the other side, but not too hard, this will knock out the bolt. If you were unable to remove the screw, you will have to dismantle the unit with the bracket on which it is fixed.
- To dismantle the bracket you will need to unscrew two screws; some modifications of the VAZ 2107 use three-screw fastenings. In any case, when performing these actions you must be guided by the design features of the vehicle. Sometimes, to remove the unit, you also need to remove the radiator device or move it a little to the side to gain access to the bracket. In this case, there is no need to disconnect the pipes connected to the radiator.
- After the unit is removed from its installation location, you will need to remove the drive belt and remove the generator.
- This way the knot is removed. To dismantle it, you must perform all these steps, only in reverse order. Before installing the device, you must familiarize yourself with the installation wiring diagram and the electrical connection diagram; all this must be indicated in the service book for the car.
- When the knot is installed, it is necessary to adjust the strap tension. To perform these steps, you will need to loosen the two screws that secure the assembly. Using a pry bar, you need to tighten the strap and secure it in the appropriate position with a nut located on the adjusting plate. When adjusting, be sure to check the degree of belt tension; to do this, press the belt in the free space between the pulleys. The belt will bend, and the deflection should be at least 1 cm and no more than 1.7 cm, otherwise the generator will not work correctly, and the belt may wear out earlier. When the adjustment procedure is completed, you need to tighten all the nuts.
Photo gallery “Changing the generator with your own hands”
DIY belt replacement process
front part
Having gained access to the required element, inspect it. Replacing the alternator belt on a VAZ 2107, then watch the video on replacing the clutch on a VAZ 2107. If there is no visually visible damage on the belt, just check the tension, it may have weakened. Generator belt. Replacing the VAZ 2107 generator belt. Checking the tension of the VAZ 2107 generator belt To check the tension of the generator belt, you need to use a ruler to determine the amount of deflection in the area between the pump pulley and the crankshaft. This is easy to do, just press the belt with your fingers, simulating a pressure of approximately 10 kg, and by the distance of deflection you can determine whether the element is in acceptable tone. The maximum standards in a narrower place are 10-15 mm, and in those where the space between the pulleys is wider - 12-17 mm.
You only need to remove the belt from the pulleys if it is completely replaced; you do not need to do this to retighten it. At the bottom of the car, unscrew the nut securing the generator underneath by one turn. In the engine compartment, loosen the upper fastening nut of the same device a few turns. Under no circumstances should you completely unscrew the fasteners, just loosen them until they begin to turn freely.
To remove the belt, you will need to press the alternator slightly against the engine, but under no circumstances do this with your bare hands. Replacing the rear brake discs of a Ford Focus 2 video, removing and replacing the front and rear brake discs of a Ford Focus, how to change the rear struts on a VAZ 2112 with your own hands, video, fuse. Then remove the belt. You need to start with the top pulley, and then with the rest. Only in this order will it be easy to remove the element. On injection car models, you will also need to remove the crankshaft position sensor, otherwise it will interfere with the removal of the belt.
After the manipulations have been completed, check the belt tension again using the previously described method.
To put on a new belt, you need to know some of the nuances of this process. For example, one of the most important points: you need to put the belt on, starting with the crankshaft pulley, then on the generator pulley, and only finally on the pump pulley.
Thanks to the video instructions, you can learn in more detail and clearly how to change or tighten the alternator belt if you plan to do it yourself for the first time.
How does the generator 2106 2107 work?
Correct operation of the generator 2106 2107 ensures the proper functioning of all vehicle devices. According to the attached operating instructions, the technical condition of the VAZ 2106 generator is checked at least once every 4 months. Failure to pay attention to this requirement leads to wear and tear of the device. As a result, the question of which generator is better to install on the VAZ 2106 becomes relevant.
If the car is involved in an accident or major repairs, it is imperative to ensure that the device is in working order. Otherwise, the voltage drop will cause serious damage to all electricity consumers in the car. In most cases, a VAZ generator malfunction can be repaired in a garage.
Standard option
Which generator is better to install on VAZ 2106 and 2107? The question is quite complicated. It needs to be considered starting with the most common option. After all, any manufacturer will say that it is the standard version that should be installed on the car. Let's look at the features of the standard version G221.
In this type of relay generator, the regulator is installed separately from the brush assembly. This makes it easier to troubleshoot some problems to some extent. The advantage is the ease of installation, there is no need to adjust the wiring for connection, everything is done according to the standard scheme. But such a generator is low-power; it produces a charge of a maximum of 42 A, which is not enough for most modern batteries.
From all this, we can conclude that a standard generator is certainly good. But, if you have additional devices, it is not very profitable to use it. It is best to choose a more powerful option.
This generator is intended for use on Niva cars. It is capable of delivering 50 A of current, which is quite enough for full-fledged electrical work. It differs from a standard “six” generator in the presence of a built-in regulator relay. Here it is assembled into one unit with brushes. Therefore, to install it on a VAZ 2106, you just need to make some minor modifications. This electric machine is installed on 2107 without any special interference or modifications.
There are several ways to refine such a generator. The easiest way would be to install brushes from the G221 generator. They fit perfectly in place of the relay assembled with the brush assembly. No modifications are required, this allows you to install such a generator, even for people without special skills. It is possible to install the G222 with a standard regulator, but to do this, you will have to redo the generator connection diagram. Otherwise, nothing will work out.
Possible causes of malfunctions
There are several common reasons that require the driver to look under the hood of the “iron horse”:
- partial or complete combustion of the VAZ 2107 winding;
- cases of interturn short circuit;
- physical wear of parts;
- external physical influence;
- mechanical damage.
Inexperienced drivers of the VAZ 2108 or earlier modifications need to remember one nuance. When choosing lighting fixtures, you need to take into account their power. For example, if you decide to install fog lights, the power of which is 40-50 W each, you should look at the technical description of the VAZ 2106 or 07. Their installation is allowed only if the vehicle’s generator produces more than 55 A of current.
Failure to comply with this rule leads to dire consequences. The increased load of the VAZ generator leads to its rapid wear. The power of the unit gradually decreases, which is mistakenly perceived as a minor breakdown. That is why the total power of all voltage consumers should not exceed the maximum current level of VAZ 2107, 08 or 06.
The problem described above leads to another one - improper charging. The 2107 passenger car is designed in such a way that the generator is charged while driving. All electricity consumers are selected taking into account the power of the device. If individual elements are replaced without taking into account their power, the VAZ generator receives less energy than necessary.
Forced “starvation” leads to accelerated wear and failure. A great danger is posed by gadgets that significantly exceed the maximum level of current generated by the VAZ 2108. In this case, the “iron horse” risks stopping along the way. It will not be possible to revive a VAZ generator on site or even within the walls of a service station.
Options for replacing a broken unit
The main thing to remember is that to replace a broken generator, it is forbidden to take the first one you come across. Failure to comply with this rule will lead to lengthy and expensive repairs of the VAZ 2107 or other modifications. The most common modification is G-221. To carry out a technically correct replacement, it is necessary to study the following manufacturer’s recommendations:
- Replacing a VAZ generator is possible using a unit from modification 2105. The maximum current level is 55 A, which is suitable for cars with a small number of consumers. Replacement does not imply modifications or modifications.
- It is allowed to use a unit from a VAZ 2106, whose maximum current level is 55 A. The main thing is to first make sure that there are no large number of powerful consumers. Installation will require minor modification of the fasteners, which are slightly different for the VAZ 2106 model.
- For cars with a large number of consumers, a unit similar to that installed on the VAZ 2107 is suitable. Its maximum power is 73 A. Experienced drivers say that in some cases it is difficult to decide which generator is best to install on a VAZ. The problem lies precisely in the inability to accurately determine the required power consumption in the long term.
- In case of increased load on the generator, it is recommended to choose a model for the Niva. It produces almost 80 A, which is quite enough to install a large number of light bulbs and amplifiers. There is only one limitation when using it. You cannot install a powerful unit on the 2106 model, which is not designed for such power.
- In extreme cases, it is possible to install a unit from model 2110, whose power exceeds 110 A. The use of such a VAZ generator is justified only in case of increased loads.
Generator tuning - increasing output
What should owners of classics and carburetor “nines” do if they need more electricity? Installing heated seats, mirrors, and “music” with an external amplifier requires its own amperes, which are nowhere to be found in a jam at idle.
When there is not enough electricity only at idle, we select or grind a pulley of a smaller diameter. This will increase the output at low speeds. But you will have to avoid prolonged movement at maximum engine speed to avoid overloading the bearings.
Are the headlights shining dimly, is there not enough electricity throughout the entire operating range of the engine? Clean the battery terminals. We measure the voltage at idle speed. If it is less than 13.5 V, we will increase the voltage using a diode added to the excitation circuit. The drop across the semiconductor will be about 1 volt, so we will “deceive” the relay regulator.
The optimal charging voltage is considered to be in the range of 13.4-14.4 volts.
Is your carbureted car still running low on amps? We replace the “dynamo” with a similar model from the “injection” modification, specifying the correspondence of the mounting points. If necessary, repress the old pulley.
Example of compatibility by models (families) and generated power:
- "Samara" 2108 (55A) - 2111 (80-110 A). The option without modification is “KZATE” for 73 A.
- "Classic" 2101 (50A) - 2107 (80A). The recommended replacement is “Pramo”.
- Niva 2121(50A) - 21214 (80-100A). For example, 100-amp "Iskra"
Data on interchangeability are approximate. Any tuning is done at the owner's responsibility. Therefore, if you just want to replace a broken generator, buy the “original”. It is guaranteed to fit your car. If you love experiments, go for it, your efforts will be rewarded.
Review of generator 9402.3701-14 for VAZ-2170, VAZ-2190, VAZ-1117-1119
Generating Device Replacement Procedure
Before starting work, check the serviceability of the regulator relay. It is advisable to choose a model with the highest possible temperature compensation. This characteristic allows models 2106-2107 to operate at high speeds without failure. This indicator should be studied especially carefully if the VAZ 2106 or later modifications are used in areas with a hot climate.
Removing a broken device and installing a new one does not cause problems, thanks to the clear mounting method.
Difficulties arise at the stage when you need to connect a new VAZ generator. To begin with, the wires coming from the relay regulator are disconnected and subsequently insulated. Further connection of the VAZ 2108 generator is carried out as follows.
The wires, formed in the form of a ring terminal, are connected to the old place in the VAZ 2108. It is imperative to insulate the gray wire, which is not connected anywhere. Completes the installation procedure by connecting the yellow wire to the terminal. If the car owner was unable to find a device with the required power, then a model from a VAZ 2108 to a VAZ 2106 can be installed, provided that the total power of consumers is taken into account.
Careful attitude and regular preventive inspections will ensure long-term reliable operation of the machine. Even with a slight drop in speed or problems when starting the engine, there is a reason to look under the hood. The faster this is done, the less likely it is that the problem will spread further.
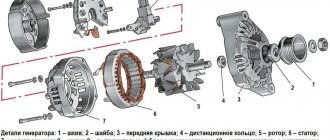
We are sorting out the VAZ 2107 37.3701 generator
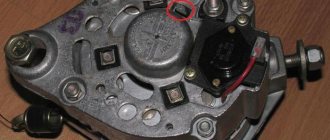
So in this article I will describe the generator overhaul. We will talk about the 37.3701 generator, although everything on the G-222 generator is almost identical and this article will be suitable for it with some adjustments. I bought for replacement: 1. Diode bridge - 190 rubles 2. Generator capacitor - 15 rubles 3. Bearings - I took Andycar - 65 rubles 4. four nuts for 8. The relay regulator on the generator is new, so I decided not to change it. We will also need a universal puller (I personally used a rod puller instead, it wasn’t very convenient, but after fiddling around I removed the bearing with it). It is very desirable to have a brush for metal; I bought a set of three brushes and some sandpaper.
So the generator itself
Clean the generator from dirt with a brush. And unscrew the pulley nut. We place the generator so that the pulley rests on the floor, put a 19mm wrench on the nut and, holding the pulley with one hand from turning it, apply strong and sharp blows to the wrench with a hammer. The pulley will of course turn, but the nut will eventually begin to unscrew, I knocked like this for 2-3 minutes
Using a 10mm wrench, unscrew the four bolts and remove the studs holding the generator together.
Further, unfortunately, several photos were lost, but I will explain in words. In the photo above, you can see a key on the shaft that keeps the pulley from turning. So, using a chisel, you need to knock out this key. We place the generator with its shaft at the top. We place a chisel on the key from top to bottom and knock it out with gentle blows of a hammer. Having knocked it out, remove the front cover of the generator. If it is difficult to walk, lift the generator by weight and lightly hit the ball with a hammer. The cover can be removed easily. Next, remove the relay regulator from the generator. And through the hole under the relay we knock out the rotor using a drift.
We apply several strong blows, turn the rotor, apply a few more blows, and so on in a circle until we knock it out.
Next, use a 8mm head to unscrew the three nuts securing the stator and diode bridge. Here, pay attention: if the bolts start to turn, you need to hold them with pliers on the other side of the cover.
And remove the stator. In order to remove it, I had to pour a little WD-40 on the joints and gently knock it out with light blows of a hammer. After removing the stator, remove the diode bridge by unscrewing the capacitor if you have not already done so. Next you need to press out the rear rotor bearing, it is better to do this with a universal puller, but I pressed it out with a steering rod puller.
Next, take the front cover and unscrew the tightening plates. The bolts there are locked and the nuts can be damaged when unscrewing (that’s why we took 4 nuts for 8), but for me they remained intact. When unscrewing, the bolts again fall out of the grooves and begin to scroll, so we hold them on the other side. We remove the plates and press the bearing out through the mandrel.
Well, the generator is completely disassembled, we clean everything with a metal brush, I also needed a knife and some sandpaper when cleaning, it’s just easier to scrape off large deposits of dirt with them. New spare parts. A capacitor, two bearings and a diode bridge, you may also have a regulator relay, but mine was new.
By the way, please note that since 1996, the location of pin 61 has been changed. My old diode bridge was of an old model. The difference can be seen in the photo, on the old one the contact is on the wire and on the new one it is sewn into the diode bridge.
We press the bearings back through the mandrel, there is one very important point here - when pressing the rear bearing onto the rotor, the mandrel must be placed only on the inner ring of the bearing, and when pressing the front one only on the outer one. otherwise you may simply damage the bearing when pressing. We assemble the generator in reverse order. If you had an old-style diode bridge, then pin 61 will not fit well into the hole in the back cover, I had to modify the hole with a file
By the way, I advise you to sand the seating surface of the capacitor for better contact (visible in the photo above. We hammer the rotor back with gentle blows of a hammer, in order not to damage the thread, I put the head on the shaft.
When assembling the front bearing linings, do not forget to secure the bolts with a chisel.