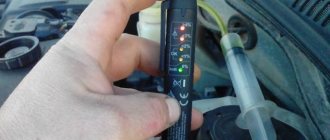
Why do you need a pressure regulator?
Not every owner of a domestic “ten” will understand why the brake pressure regulator on a VAZ 2110 needs to be replaced. Simply, this name is not familiar to everyone.
A popular designation for a regulator is a sorcerer. This very sorcerer is located on the rear suspension of your car. It has a lever with a movable position. Depending on the moment of load on the spring, its position changes.
The voltage generated during actuation is directed and distributed to the brake piston. Pressing the piston pedal reduces the load on the rear pads. If the brake system is working properly, the loads are distributed evenly.
In order for the unit to function efficiently and without errors, it is necessary to adjust the brake pressure regulator on your VAZ 2110. This way you can prevent untimely wheel locking.
Which brake fluid is better to choose?
We recommend choosing the fluid class recommended by AVTOVAZ, that is, DOT-4. To decide on a brand or manufacturer, you can rely on reviews from VAZ car owners. According to a survey, about 66% of motorists buy brake fluid in Dzerzhinsk. And not in vain, because in the tests of the ZaRulem magazine it is in good positions:
- SINTEC EURO DOT-6 (class 6)
- ROSDOT 6 DOT 4 (class 6)
- SINTEC SUPER DOT 4
- Lukoil DOT 4
- Hi-Gear DOT 4
- ROSDOT 4
- Sibiria Super DOT 4
- Rosa 4
- Felix DOT 4
- VITEX DOT 4
- RSQ PROFESSIONAL EURO DOT 4
- CHIMLUX DOT 4
- UNIX DOT 4
- PROMPEK DOT 4
DOT-4 Brake Fluid Test Results
. All brake fluids of the same class are compatible with each other. Are they different from each other? The answer to this question is given by the experts at Behind the Wheel.
Boiling point of “dry” liquid*
Source
Why does the brake pedal fail when the engine is running?
Most often, the brake pedal fails when the car is running for the following reasons:
the main brake cylinder is faulty;
there is not enough brake fluid or it is of poor quality;
discs or pads are worn out;
the brakes are heated to too high a temperature, etc. If the pedal does not fall, but after starting it seems tight, and the car does not brake well, make sure that the VUT is in good working order. There are other signs of problems with this node:
engine speed fluctuates when you press the brake, although the fluid remains in the brake system reservoir;
When the engine is turned off, the pedal is always elastic, and not after several presses.
The vacuum brake booster is designed to reduce the driver's effort on the corresponding pedal during braking. Often problems arise due to damage to the vacuum diaphragm of the amplifier. Remember that this mechanism only works when the car is running.
Defects or wear in the diaphragm interfere with the vacuum in the booster chamber, so the brake feels very hard when applied after the engine starts. You can verify this by simply pressing the brake with the engine turned off: after 2-3 pumps, your leg should feel elastic, after which the engine starts. If the pedal does not become softer, you need to check the vacuum booster.
Filling volumes and brands of oils and liquids LADA (VAZ) 2112
Lada 2112 is a representative of a large automobile family that was produced at the Russian AvtoVAZ plant for 15 years. The car is popularly known as a “dvenashka”. The five-door hatchback has a number of advantages - a modern exterior, good dynamics, low price and maintainability. It is these advantages that often become the deciding factor when choosing a car.
The Lada is equipped with several types of power plants, 1.5 liters with a capacity of 78 and 94 hp, 1.6 liters with a power of 80 and 89 hp. It picks up speed of 100 km/h quite quickly - in just 12 seconds. It can accelerate to 180 km/h. The owners are pleasantly pleased with the economical gas consumption - 7 liters in the city, 5-6 liters per hundred kilometers on the highway.
The car causes virtually no trouble to its owners. Most malfunctions and problems are due to improper maintenance. Changing engine and transmission oil must take place at a certain frequency, which is set by the manufacturer. If the car is operated in harsh conditions, then deviations are possible. So, the fluid in the engine is replaced every 15 thousand km. The table below will help you figure out which oil is best to use for this and how much is needed.
How to properly bleed the brakes on a VAZ 2110 yourself
Self-bleeding the brakes of a VAZ 2110, 8 valves or 16 – it doesn’t matter (as well as the type of power supply, carburetor or injector), is available in three ways:
- exposure to pressure;
- exposure to rarefaction;
- by gravity.
Self-pumping under pressure
On the VAZ 2110, bleeding the brakes under the influence of external pressure is possible using additional equipment.
You will need:
A device for bleeding the brakes for one person (a cap with a nipple to create pressure in the system). Can be used as a special device such as a pump, compressor, inflated wheel (chamber)
- compressor, pump or tank with compressed air (a spare tire will do);
- air supply hose;
- nipple for tubeless wheel;
- TZ tank cap without sensor (from Zhiguli);
- drill of a diameter corresponding to the fitting diameter of the nipple.
Before you bleed the brakes on a VAZ 2110 yourself, you need to take the reservoir cap and drill a hole in it. The nipple should be inserted into it so that it sits there tightly. This cap must be screwed onto the GTZ tank, after adding fluid to the maximum.
Then you need:
- Get to the brake fitting, remove the cap from it, put on a 8 or 10 key and a hose, immersing its end in a container (as described above).
- Connect the air supply hose to the nipple in the reservoir cap.
- Apply pressure to the tank through the nipple by pressing the compressor gun, pumping the pump or putting the hose on the spare tire.
- Unscrew the fitting to bleed air bubbles from the brake circuit.
- Wait until the fuel fluid flows through the hose in an even stream without bubbles.
- Tighten the fitting and stop the pressure supply.
- Repeat steps 3-6 for the remaining wheels.
Bleeding the brakes with vacuum
Instead of excess pressure, vacuum can be used to bleed the brakes of the VAZ 2110. To do this, you will need a large syringe (from 100 cubic meters) and a hose to connect it to the fitting.
The procedure is as follows:
- Open the reservoir on the GTZ and fill in the maximum amount of liquid.
- Place the key on the fitting and connect the fitting to the syringe with a hose.
- Open the fitting and pull the syringe plunger towards you, creating a vacuum in the brake circuit.
- After filling the syringe, close the fitting and drain the fuel fluid into the container.
- Repeat the manipulations from steps 2-4 until the liquid begins to flow into the syringe in an even stream without bubbles.
- Repeat steps 2-5 for all wheels, following the order of bleeding the VAZ 2110 brakes.
This method is less efficient and consumes more fuel fluid, so it is used when pumping with pressure is not possible. It should be remembered that it is not worth reusing the pumped-out fuel fluid, due to the presence of contaminants from the circuit and atmospheric moisture in it.
Bleeding VAZ 2110 brakes by gravity
Bleeding brakes 2110 by gravity is the simplest, but most expensive method in terms of using brake fluid. All you need is hoses, drainage containers and a DOT-4 bottle. Pumping is carried out in this order:
A dropper with which it is convenient to bleed the brakes yourself
- Open the GTZ tank.
- Place the hoses on the fittings and insert their free ends into the containers under the drain.
- Unscrew the fittings on the brake cylinders.
- Start pouring fresh fuel oil into the GTZ tank, while simultaneously observing the streams from the fittings.
- When the liquid begins to flow through the hoses smoothly and without bubbles, tighten the bleeder fittings one by one.
If, as a result of pumping, the liquid in the tank does not reach the Max level, you need to top it up. If there is too much TJ, the excess must be pumped out with a syringe. It is not recommended to reuse the fuel fluid drained from the fittings; it must be disposed of.
How to bleed the brakes of a VAZ 2110 without removing the wheels
It is not necessary to remove the wheels to bleed the brake system. This is necessary to facilitate access to the fittings, but you can do without this item if:
- drive the car into a pit or overpass;
- raise it on a lift;
- use a high jack.
Since you can pump the front brakes on a VAZ 2110 purely by turning them out, this operation can be performed on any flat surface. To access the fitting for the left wheel, you need to turn the steering wheel all the way to the right, and for the right wheel, turn it all the way to the left. The gap between the wheel and the arch will be quite enough.
A pit, overpass or lift is needed to access the rear wheel fittings. You can use a jack to raise the rear end and straighten the strut spring to its highest position. The wheel will lower relative to the arch and the resulting gap will be enough to reach the fitting by hand. But since it is more convenient to unscrew 4 bolts, it is better not to “reinvent the wheel” and pump the brakes by removing the wheel.
Where to fill brake fluid in a VAZ 2112 16 valves
Lada VAZ-2110 (2111, 2112).
CHECKING THE LEVEL AND ADDING BRAKE FLUID INTO THE BRAKE SYSTEM HYDRAULIC RESERVOIR When replacing brake fluid in the system, remember or write down the brand of fluid that will be filled in so that when topping up, use the same brand of fluid.
Despite the fact that the fluid level sensor is built into the master cylinder reservoir, we recommend that you periodically check the fluid level visually.
Take precautions when working with brake fluid: it is toxic. Avoid getting brake fluid in your eyes. If brake fluid gets into your eyes, rinse them immediately with plenty of running tap water.
In order to avoid exposing yourself in the future to unforeseen expenses for repairing the brake system, or even the entire car as a whole, promptly replace the brake fluid with fresh one. It is very hygroscopic, i.e. absorbs moisture from the air, which, in addition to causing corrosion of brake system parts, lowers the boiling point of the fluid itself, and this can lead to brake failure during frequent heavy braking.
Do not reuse the fluid drained from the system: it is contaminated, saturated with air and moisture.
If brake fluid gets on wires, plastic or painted body parts, it can cause damage, so always use a clean cloth when filling. If liquid gets on these parts, wipe them immediately with a clean cloth.
1. Check the brake fluid level in the reservoir. It should be located between the “M IN” and “MAX” marks marked on the tank body.
2. If the brake fluid level is below the “MI N” mark, unscrew it.
A gradual decrease in the brake fluid level in the absence of leaks most likely indicates the need to replace the brake pads. Check the condition of the brake pads. Untimely replacement of pads leads to expensive repairs (replacement of brake discs and calipers)! Pay special attention to the condition of the clutch master and slave cylinders. They can also cause a decrease in the level of brake fluid in the reservoir.
4. Add brake fluid to the “MAX” mark and tighten the reservoir cap. Wipe up any spilled liquid with a clean cloth.
Source
Need for replacement
Replacing brake fluid (hydraulic solution) in a car can be done if its properties are lost, as well as if a malfunction occurs in the braking system. Loss of properties of the brake compound may occur during prolonged use under high load conditions.
Similar news
How to Install a Towbar on a VAZ 2115 Video... How can you install a towbar on a VAZ 2114? The towbar on the VAZ 2114 is a device that allows you to couple the trailer and the car. A similar device allows owners of passenger vehicles to transport cargo on attached trailers. Experts distinguish 3 types of towbars: Welded construction is more reliable and affordable than its removable counterpart. The product is…
How to Remove the Steering Rack on a VAZ 2112... Replacing the steering rack on a VAZ 2110, VAZ 2111, VAZ 2112 The steering rack is responsible for turning the wheels of the car, inside the rack there are mechanisms due to which it becomes not so difficult to turn the wheels, using the steering wheel, but comparable to this However, if you were to rotate the wheels by hand, the amplification is also responsible for the slight rotation of the wheels, in addition to the steering rack...
This is due to the fact that during braking the solution is compressed. As a result, it loses its viscosity and becomes more liquid. In addition, it is highly hygroscopic and becomes saturated with water during long-term use. Such water saturation reduces the boiling point of the working composition and leads to the loss of its properties.
In addition, during the operation of the vehicle, various mechanical malfunctions of the brake system may occur. For example, a grinding or knocking noise may appear when braking. In this case, creaking and vibration indicate complete wear of the pads. And most often the knocking is caused by caliper elements that have lost the strength of their fastening.
Such malfunctions lead to leakage of the hydraulic solution and the appearance of air in the system. Air pockets are not allowed because they prevent the vehicle from stopping effectively.
What brake fluid is used on Lada cars
All modern Lada cars have a working brake system with a hydraulic drive. Brake fluid is changed according to technical regulations based on time or mileage. Let's figure out how much fluid is needed for replacement, as well as which brake fluid is best to choose.
The table is compiled based on data from the vehicle operating manual and books on repair and maintenance of Lada models.
| 515-535 ml | "ROSA", "ROSA-3", "ROSA-DOT-4", "SPECTROL BRAKE FLUID", "AGIP BRAKE FLUID", "HYDRAULAN 408" | ||
| Lada Priora, Granta and Kalina | DOT-4 | 450-550 | "ROSDOT" Dzerzhinsk, "KAPROS-DOT" |
| Lada Largus | 500 ml | ELF 650 SAE J 1703 | |
| Lada Vesta | 559 ml*/517 ml** | ||
| Lada XRAY |
How to replace brake fluid on a VAZ 2113-VAZ 2115?
Note! To change the fluid, we recommend that you take an assistant with you, since with an assistant this operation will be much easier to perform than alone, and also perform this operation on a lift or on an inspection pit!
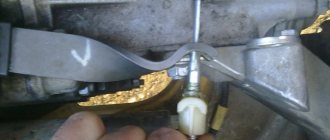
1) At the very beginning, first unscrew the cap (Indicated by the arrow, but it has already been removed) from the brake reservoir.
2) Then go down under the bottom of the car and be sure to look for the fitting on the rear right wheel, which is indicated by an arrow in the photo, but this fitting will be closed with a protective cap that you will need to remove (the cap in the photo has already been removed and it is in the person’s hand) .
3) Now that the fitting has been found, pick up the plastic bottle that you should have prepared earlier and then fill this bottle with a little new brake fluid, and after filling, first put the end of the hose on the fitting itself, and with the other end lower it into the bottle and be sure to in the bottle, immerse it in the brake fluid that you just poured into the bottle.
4) Next, ask your assistant to smoothly press the brake pedal several times (6-7 times), and on the last press, warn him to push the brake pedal all the way down and hold it there.
5) At this time, use a wrench to carefully loosen the fitting by 3-4 turns and see how the used brake fluid immediately flows into the bottle.
Note! While the used fluid is being poured into the bottle, be sure to monitor the level of fluid in the brake reservoir, under no circumstances lower it below 10-15 mm, otherwise air will get into the system and you will have to bleed the system, so there will be little brake fluid left in the reservoir , screw the fitting completely and tell the assistant to remove his foot from the pedal and then go up to the top and add new liquid to the MAX mark, and after adding, continue operations 2-5 from the beginning until new liquid begins to flow into the bottle!
And when new liquid begins to gradually flow into the bottle, immediately tighten the fitting and perform the same operations with the remaining three wheels in the sequence: Front left wheel, then rear left and then front right, but this is provided that you started pumping from the rear right wheel !
6) When you finish changing the fluid, press the brake pedal a couple of times and pay attention that the pedal travel and its resistance are the same, if the pedal travel and resistance differ, let’s say the pedal was pressed lightly the first time, hard the second time and lightly again the third time, then this means that air has entered the system, in this case you will need to bleed the brake system on the car. (For information on how to bleed the brakes, see
in the article entitled: “Bleeding brakes on a VAZ”)
REPLACEMENT
Some drivers don’t even know where to fill the brake fluid in the VAZ 2114 (even though the VAZ brake fluid reservoir is visible), not to mention the rules. DOT-4 needs to be added only if its level in the tank has dropped below the halfway point between the MIN and MAX marks. To do this, simply unscrew the tank cap and fill it to the top mark. The brake fluid volume should not exceed the maximum mark.
Do not under any circumstances mix products from different manufacturers and brands. This may lead to system failure, which will adversely affect your financial situation when contacting the service. Be sure to ask an expert how to add brake fluid.
In general, if all necessary conditions and rules are observed, everything is done quite simply. Any measures to normalize the operation of a car require certain tools and special clothing. This should not be forgotten, since contact with human skin of chemicals contained in fuels and lubricants is extremely dangerous to health.
But whatever one may say, in the quest for durability and reliability of your car there is nothing you can do. The acquired skills can be applied not only to the VAZ 2114, but also to other models of the domestic automobile industry. For example, the VAZ 2115 has an absolutely identical device.
We pump the brakes of a VAZ 2110 ourselves
Actually, bleeding the brakes alone is no more difficult than with a partner, and in some cases even easier. If, of course, we have certain additional equipment. This gadget is made from an old expansion tank plug and a nipple from the chamber (or a fitting of the appropriate diameter).
The purpose of the stray is to build up pressure in the system without affecting the brake pedal. To do this, we will use a spare tire (or an inflated chamber) with a pressure of no higher than 1 atm.
The pumping scheme is the same - add fluid to the maximum, tighten the auxiliary plug with the fitting and apply pressure to the system.
Controlling the liquid level, we bleed air from the system according to the diagram presented above. Instead of a spare wheel or a camera, you can carefully use a simple pump or compressor, but make sure that the pressure does not exceed 1 atm. After pumping, we check the level again, add fluid if necessary and test the operation of the brake system while driving.
Special equipment for pumping
There is a special valve for bleeding the brake system. It fits onto the fitting and prevents air from flowing back into the lines. Thus, the liquid in the system is hermetically sealed when the fitting is closed. If you don’t have this kind of device, this is not such a big problem.
Special valve
Instead of a specialized valve, it is quite possible to assemble a very ordinary liquid seal. It is assembled from a small piece of hose of a suitable size, a 0.25-0.5 liter plastic bottle and a small amount of brake fluid in it. The effectiveness of this “old-fashioned” method is no worse than the modern one.
The main nuances of pumping the brake system on VAZ 2110 cars
The correct algorithm for bleeding the system should be observed, taking into account the diagonal separation of the brake circuits. If you do not quite understand what the diagonal separation of the contours of the VAZ brake system is, just follow the following sequence of actions:
- bleed the system through the fitting of the rear right wheel, close it;
- go to the front left, follow a similar procedure;
- open the rear left fitting;
- We complete the procedure on the front right wheel.
After all work, be sure to check the tightness of all fittings. Ask your partner in the car to press the brake pedal to the floor, and you yourself, wiping the fitting with a dry cloth, visually check for any leaks. Make sure the brake hoses and lines are completely dry. Only after you have checked all the fittings do you put caps on them.
If after several days of driving the brake pedal again becomes sluggish and the performance of the brakes has worsened, you should not be overly upset. Most likely, shrinkage of the brake fluid occurred (re-foaming of the brake fluid and bubbling of the lines with air). This could happen due to corrosion of both the system itself and poor quality of the liquid itself.
Replacing brake fluid on a VAZ 2110 sometimes results in the above-mentioned problems. Nothing wrong with that. We call our partner back and repeat the pumping procedure again. Checking the brake fluid level. Afterwards you definitely shouldn’t have any problems.
Design
The task of the driver and car owner part-time is to constantly monitor the condition of the brake system.
Failure of one of its elements can lead to serious consequences. Therefore, you should know what exactly is included in the braking system.
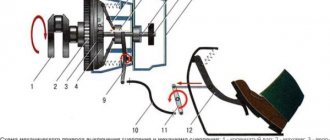
The components of the vehicle are:
- Brake fluid reservoir mounted on the GTZ;
- Metal pipelines of two circuits;
- Flexible brake hoses for front and rear wheels;
- GTZ (brake master cylinder located in the engine compartment);
- Brake cylinders of front and rear wheels;
- Pressure regulator;
- Brake fluid level sensor;
- Vacuum booster.
Tank with TJ
According to the recommendations of specialists, the replacement of the TZ is carried out once every 3 years, but at least once every 45 thousand kilometers.
The main nuances of pumping the brake system on VAZ 2110 cars
The correct algorithm for bleeding the system should be observed, taking into account the diagonal separation of the brake circuits. If you do not quite understand what the diagonal separation of the contours of the VAZ brake system is, just follow the following sequence of actions:
- bleed the system through the fitting of the rear right wheel, close it;
- go to the front left, follow a similar procedure;
- open the rear left fitting;
- We complete the procedure on the front right wheel.
After all work, be sure to check the tightness of all fittings. Ask your partner in the car to press the brake pedal to the floor, and you yourself, wiping the fitting with a dry cloth, visually check for any leaks. Make sure the brake hoses and lines are completely dry. Only after you have checked all the fittings do you put caps on them.
If after several days of driving the brake pedal again becomes sluggish and the performance of the brakes has worsened, you should not be overly upset. Most likely, shrinkage of the brake fluid occurred (re-foaming of the brake fluid and bubbling of the lines with air). This could happen due to corrosion of both the system itself and poor quality of the liquid itself.
Replacing brake fluid on a VAZ 2110 sometimes results in the above-mentioned problems. Nothing wrong with that. We call our partner back and repeat the pumping procedure again. Checking the brake fluid level. Afterwards you definitely shouldn’t have any problems.
The brake system is one of the important systems in a car, because without brakes it is impossible to imagine a single trip, even the shortest one. The brake system is made up of many parts, but the blood in its veins is brake fluid. We choose high-quality brake fluid for the VAZ 2110.
Why do you need to change the brake fluid? Brake fluid is used under difficult conditions, as a result of which, even during quiet driving, it can heat up to +150-180°C. New high-quality brake fluid copes with its duties without difficulty. But during operation it inevitably absorbs moisture, which causes the boiling point to decrease. As soon as the brake fluid collects a large amount of water, it can already boil at 145-160°C. What causes “vapor blocking of the brakes” is when, due to the sharp expansion of the formed bubbles, part of the liquid is squeezed into the reserve tank, and when the pedal is pressed, the liquid remaining below cannot create the required pressure, because is saturated with bubbles, and the pedal falls through. How to check the condition and level of the brake fluid? The brake fluid level is checked by the level on the barrel. The condition of the brake fluid is determined by its color. If it is darkened or has a rusty color, then it should be replaced.
How long does it take to change the brake fluid in a VAZ 2110? According to the regulations, after 45,000 km or 3 years, whichever comes sooner.
Which brake fluid to choose for the VAZ 2110? Brake fluid, like fuels and lubricants, should be purchased from a trusted brand and in trusted places, this way you will protect yourself from buying a low-quality product. When choosing, you can rely on a review of VAZ brake fluid. survey results or comments.
What type of brake fluid should I choose for the VAZ 2110? Brake fluid is classified into DOT 3, 4, 5 and 5.1.
- DOT 3 (glycol base) – for relatively low-speed vehicles with drum brakes or front disc brakes;
- DOT 4 (glycol base) – on modern high-speed cars with predominantly disc brakes on all wheels;
- DOT 5.1 (glycol base) - on road sports cars where the thermal load on the brakes is significantly higher.
- DOT 5 (silicone) is practically not used on conventional vehicles.
Glycol-based brake fluid absorbs water and corrodes paint. Silicone brake fluid does not absorb water or corrode paint, but requires good brake bleeding. Otherwise, all the moisture in the hydraulic system will accumulate in one place and can cause localized corrosion in the hydraulics.
Brake fluid compatibility All brake fluids are interchangeable in nature. That is, DOT 3, 4, 5.1 are interchangeable, and DOT 5 is only interchangeable with itself.
How to replace brake fluid in a VAZ 2110? You can change the brake fluid according to these instructions.
So, let’s vote and leave reviews about brake fluid for VAZ 2110-12:
- What brand of brake fluid did you choose?
- What type of brake fluid do you use?
- What brake fluid was added before?
- How often do you change the brake fluid?
- Impressions and comments on brake fluid?
ps Off-topic comments will be deleted.
Properties of brake fluid
Liquid differs from gases in that it practically does not compress. When pressure is transferred to it in a short period of time throughout the entire volume that it occupies, the pressure will be the same, and with rapid braking it can reach 100 atmospheres. The transmission of fluid pressure occurs similarly to the transmission of electric current in a network. Just like wires, which are made of a special material, brake fluid must have certain properties for sufficient pressure transfer. The most important of them:
- Remain liquid under all operating conditions: do not freeze or boil.
- Retain its properties for a long time.
In recent years, brake fluid has been produced on the basis of dihydric alcohols - glycols and their derivatives. The DOT classification makes it possible to produce mixtures that are interchangeable and neutral to the metal and rubber parts of the vehicle’s braking system.
Advice: Do not mix liquids from different manufacturers and different classes, as this may change their properties. Glycol fluids should not be mixed with castor fluids.
The quality and properties of brake fluid depend on:
- Boiling point, which also takes into account moisture absorption from two to four percent. The higher the temperature, the better the quality.
- Viscosity-temperature indicators and their stability.
- Lubricating and anti-corrosion properties.
- Compatible with rubber materials.
- The brake fluid on the VAZ 2112 should be replaced every one and a half to two years. Or 40,000 kilometers of car mileage.
Advice: Fluid that has changed its color to gray-brown must be replaced immediately. This indicates the accumulation of decomposition products, wear of parts or their friction. Dirt particles can cause brake failure or jamming.
- The highest price is for “original” TOYONA, NISSAN, HONDA fluids, which can be used on cars of any brand, including VAZ 2112.
- Brake fluid absorbs moisture from the environment, so it cannot be stored in an open container.
How to replace brake fluid on a VAZ 2112
The order of work, how and where to fill the VAZ 2112 brake fluid is as follows:
- Unscrew the cap on the master cylinder reservoir and place it on a clean cloth.
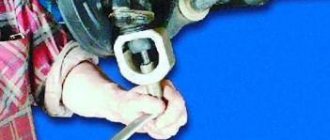
- On a vehicle with the rear wheels suspended, you must first unlock the pressure regulator for the rear brakes. To do this, you need to insert a screwdriver between the piston and the plate, and remove it after finishing the work.
- The air release valve at the rear right brake device is cleared of dirt.
- The protective rubber cap is removed from the valve.
- A rubber hose is placed at one end onto the valve fitting, and the other end of the hose is immersed in a transparent, clean vessel.
Tip: It is better to take a transparent hose for work, for easy monitoring of the condition of the flowing liquid.
The hose is put on the valve fitting and immersed in a transparent vessel
- At the request, the assistant sharply presses the brake pedal 4–5 times. The interval between presses is one or two seconds. The pedal is held down after the last pedal stroke.
- On ? or ? turn, the air release valve opens. Old brake fluid begins to flow out of the hose. At this time, the brake pedal should smoothly reach the stop.
- After the liquid stops leaking, you need to close the valve to release air.
- It is necessary to constantly monitor the level of fluid that remains in the brake fluid reservoir. It is not allowed to fall below the minimum level. In this case, new brake fluid is added. The operation is repeated four or five times until clean brake fluid begins to flow out of the hose. How and where to fill brake fluid on a VAZ 2112 can be seen from the photo.
Replacing brake fluid on a VAZ 2112 car
- The brake fluid is changed in the same way in the front left brake mechanism, then in the second circuit.
- The instructions indicate that after filling is completed, you need to press the brake pedal several times. With each press, the pedal resistance and travel must be constant. If this is not the case, then air has entered the brake system, which needs to be bled.
- Protective caps are placed on the air release valves.
- Brake fluid is added to the maximum mark.
- The lid is screwed on.
You can find out how to correctly and where to fill brake fluid for a VAZ 2112, a description of the work can be found in the video and relevant sites. Correct and timely replacement of brake fluid on a VAZ 2112 car is the key to traffic safety and saving the lives of the driver and his passengers.
VESKO-TRANS.RU
AutoNews / Reviews / Tests
How to Bleed Brakes on a VAZ 2112 Video
As it is also called, together with a partner they brake a VAZ 2110
Almost all car owners are faced with the need to pump their brakes, regardless of the brand of car they drive. But let's talk about how to turn off the brakes
, read the rules, pumping order.
When it is necessary?
If our customer has nothing left to do, the brake components are working properly, the brake water paths are tight, then they do not require bleeding. But if there is a TJ leak due to the "overpass" being damaged and its level falling, it will be useful to repair the brakes and the stable pump.
This is a particularly necessary procedure, because airing the accounting system leads to the fact that at the moment when everything still needs to be done for our client, seconds are decided, the brakes do not work. Nothing will pump right now, no one.
Therefore, we will immediately take such a step if we find that the brake pedal has increased its travel; it becomes “soft,” as car owners say. brake. "cotton".
Hydraulic brake circuit
There are already other prerequisites for pumping:
- For you, you had to interfere with the accounting system;
- Cracks appeared in the hoses, TJ leakage;
- The brake fluid turned out to be bad and requires a complete replacement;
- You've changed your brake discs (sometimes you need to do this);
- The water content of liquid fuel has increased (it is hygroscopic, i.e. it absorbs and retains water), so it must be changed as needed.
What can't be done?
You must add TZ for all brake repair work. Remember: you can only add “native” liquid. exactly the brand that is already filled in your VAZ 2110.
Brake water from different manufacturers
It is impossible to combine different brands under any circumstances, because the result is unpredictable! If not, this is the only way out. completely change TJ in the system.
a priority
There is a strict sequence for bleeding the brakes
on a VAZ 2110. It’s better not to violate it. To do this you need to drive right rear first and then front left. Later. rear left, and the last one. front right.
We work with a partner
The best thing. It's more convenient, safer, to turn off the brakes together. When more than 80% of VAZ 2110 owners create this operation.
First of all, make sure that TJ is not leaking anywhere, and everything else is tight. Then add water until it reaches the Maha rice.
Now let's start bleeding the brakes:
- The wheel where you will pump the mechanism needs to be hung; how to rotate the wheels correctly has already been said;
- The rear brake has a special pressure regulator. It must be unlocked by inserting a screwdriver between the piston and the plate;
- Locate the release valve on the appropriate brake mechanism. Wipe it down, remove the cap and put the rubber hose on your head;
- Pour some of the same brake water that is in the system into a previously prepared three-liter jar (otherwise into another transparent container), lower the end of the hose so that the hole is immersed in the liquid;
- The driving assistant presses the brake pedal sharply about 4 or 5 times at full speed. Holds the pedal when pressed for the last time;
- At this time, you open the valve halfway, saying ¾, and watch the TG run down the hose. There need air bubbles there. When the leak stops, close the valve completely;
- Only then can your assistant release the pedal;
- Then again the assistant “presses” the brake and holds the pedal down, and you repeat the manipulation of the valve;
- The brake mechanism is considered fully inflated when no more air bubbles are emitted. This is natural, it will take 3-4 steps;
- Now remove the hose, wipe the fitting, attach the protective cap to it;
- Repeat the same procedure with all brake mechanisms. Remember to use the diagonal principle correctly;
- Pull out the screwdriver in which the pressure regulator is blocked.
How to bleed the brakes on video 2112.
Certainly
If there is no assistant, it is possible, although not so convenient, to brake the VAZ 2110 without assistance.
Naturally, the special device is the aerator, which they purchase, as they call it, without the help of others.
For this you will find:
- brake reservoir cap (“classic”). without sensor, normally dark;
- auto nipples;
- Drill 14mm (use round ratchet).
Make a hole in the lid, insert the nipple tightly without gap. It's all on the device. It is necessary to connect the wheel valve (spare wheel or removed from the connected vehicle) to the tank valve.
WHAT IS THE BEST BRAKE FLUID TO CHOOSE?
We recommend choosing the fluid class recommended by AvtoVAZ, that is, DOT-4. To decide on a brand or manufacturer, you can rely on reviews from VAZ
.
According to a survey, about 66% of motorists buy brake fluid in Dzerzhinsk. And not in vain, because in the tests of the ZaRulem
it is in good positions:
- SINTEC EURO DOT-6 (class 6)
- ROSDOT 6 DOT 4 (class 6)
- SINTEC SUPER DOT 4
- Lukoil DOT 4
- Hi-Gear DOT 4
- ROSDOT 4
- Sibiria Super DOT 4
- Rosa 4
- Felix DOT 4
- VITEX DOT 4
- RSQ PROFESSIONAL EURO DOT 4
- CHIMLUX DOT 4
- UNIX DOT 4
- PROMPEK DOT 4
DOT-4 Brake Fluid Test Results
. All brake fluids of the same class are compatible with each other. Are they different from each other? The answer to this question is given by the “Behind the Wheel” experts.
Bleeding the system - (methods of execution: two people)
We prepare a clean glass vessel, a plastic or rubber tube corresponding to the volume of the outlet nipple, and a key for the nipple.
Remove the protective cap from the first nipple according to the order of work. We put the tube and key on the nipple, place the other end of the tube in a glass jug and fill it with brake fluid so that it closes the end of the tube. We check that the level in the reservoir with hydromechanical fluid is kept slightly above the MIN degree estimate in the operation of the entire process.
The assistant must depress the brake pedal all the way to the stop a number of times in order to generate pressure, then leave it in this state.
Unscrew the nipple (approximately one turn) and allow the liquid to drain into the jug. At the same time, the assistant must press the pedal all the way to maintain pressure and release it. if necessary. When all the liquid has drained. tighten the outlet nipple and tell the assistant to slowly release the pedal, then check the fluid level in the reservoir.
Repeat these steps until there are no air bubbles in the liquid coming out of the nipple.
What brake fluid is used on LADA cars
All modern Lada cars have a working brake system with a hydraulic drive. Brake fluid is changed according to technical regulations based on time or mileage. Let's figure out how much fluid is needed for replacement, as well as which brake fluid is best to choose.
The table is compiled based on data from the vehicle operating manual and books on repair and maintenance of Lada models.
Modern Lada Vesta/XRAY cars are filled with Safebrake DOT4 from the factory.
Bleeding brakes on a VAZ 2110
Structurally, the brake system on the VAZ 2110 is unified; exactly the same configuration is used on other VAZ models. For beginners, it is better to use the method with an assistant who is more experienced in car repair and maintenance. The brakes are pumped strictly according to a certain pattern. First the back right side, then the left front, then the left back and finally the right side in front.
Method of pumping with the participation of an assistant
The procedure looks like this:
- Add fluid to the expansion tank to the maximum mark.
- If the vehicle is on a lift and the rear wheels are off, you should unlock the rear brake pressure regulator by inserting a flat-head screwdriver between the piston and the pressure plate.
- Clean all dirt from all outlet fittings on the wheel brake cylinders.
- Remove the protective rubber cap from the fitting for bleeding the system, put a rubber hose on it (suitable for a dropper) and lower the other end into a transparent bottle with brake fluid so that the end of the hose is in the liquid.
- At this time, the assistant should be in the driver’s seat and, at intervals of one or two seconds, press the brake pedal all the way, and then hold it pressed.
- When the brake pedal is pressed, you need to unscrew the fitting on the cylinder no more than one turn. Liquid with air bubbles will flow through the hose into the container. When the flow stops, you need to tighten the valve and repeat the procedure until clean liquid without air bubbles comes out into the container.
In this case, you need to constantly monitor the fluid level in the expansion tank and, if necessary, top up to the maximum mark.
After pumping one side, you can move to the other, so all circuits are pumped.
Bleeding the brakes without an assistant
To bleed the brakes alone without an assistant, you need to use a special device called an Aerator; it costs no more than 70 rubles, and if you wish, you can easily do it yourself. To do this you will need to purchase the following parts:
- cap of the expansion tank of the “classic” VAZ without a sensor;
- car wheel nipple;
- round file or needle file
A hole with a diameter of 14 mm is made in the lid, where the nipple is installed. After this, the valve on the tank is connected to the valve on the wheel. The car is jacked up and the wheels are removed. After this, you can unscrew the bleeder fitting half a turn, and the pressure from the nipple will quickly expel all the air from the system. One tire inflated to 2 atmospheres is quite enough. In this case, air can be supplied in other ways, for example, with a car compressor for inflating tires. It is not recommended to supply pressure above one atmosphere to the system, especially if a compressor is used, which can create excess pressure.
Every car enthusiast should know how the brake system is pumped, because safety on the road depends on serviceable and effective brakes, not only for the driver, but also for passengers, as well as other road users. This simple procedure does not take much time, but if it seems too complicated, you can always contact the service, where the procedure will be carried out even faster and will give a guarantee on the quality of the work performed.
We recommend reading:
- The procedure for replacing the VAZ 2110 timing belt
- Malfunctions and replacement of the fuel level sensor on a VAZ 2110 car
- The procedure for replacing engine mounts on a VAZ 2110
- VAZ 2110: how to approach replacing the heater radiator?
- Support bearings for VAZ 2110
- We replace the pump on a VAZ 2110
Required tools and supplies
To work you will need:
- A set of keys.
- Transparent container for draining waste liquid.
- Small hose.
- Syringe (medical).
Replacing brake fluid
Important! A partner will be required to carry out the work. If it is not there, the work will be more difficult to complete, and you will also need a special device for pressing the brake pedal.
Changing brake fluid is done while wearing gloves. You should also try to ensure that the liquid does not get on the wires or paintwork of the car. When the liquid gets on the skin, the area should be rinsed with water.
Process:
- At the very beginning, you need to unscrew the cap on the tank, which is located in the engine compartment on the passenger compartment side.
- Next, using a syringe, you need to pump out all the liquid from the tank. It is recommended not to drain all the liquid, but simply bring it to about. If you drain it completely, the system will depressurize. Then the brake system will have to be bled.
- Then you need to fill the tank with new fluid until about.
- Next you need to crawl under the car. An assistant must be behind the wheel.
- Remove the protective cap from the fitting on the caliper and unscrew the fitting itself, first placing a hose on it.
- The assistant should press the brake pedal smoothly. This must be done 5-6 times. Then press the pedal all the way and leave it like that.
- At this time, you need to loosen the fitting a little with a wrench so that the old fluid is squeezed out of the system. We must wait until the moment when it stops draining completely or when new liquid from the tank flows into the container. You can distinguish it by color.
- Screw the fitting back after draining the liquid. The assistant must release the pedal.
- Such operations must be repeated on each wheel.
When clean fluid begins to flow from all fittings on the wheels, the work can be considered complete and the system is completely filled with new fluid.
Video algorithm for replacing brake fluid
When should I replace it with a VAZ-2112?
This question worries many VAZ-2112 owners. Experts say that since brake fluid is hygroscopic, it will begin to absorb moisture over time. As a result, the car will brake worse, and the liquid itself will begin to boil at a lower temperature.
It usually boils at 250 degrees. But the brake fluid cannot boil at all, since when you press the pedal, it puts pressure on the brake cylinder and presses the pads to the disc.
If the liquid begins to boil, it will not be able to press on the cylinder with a certain force. Air will also appear in the system. During normal driving in urban conditions (if the car has good brake hoses), the fluid can heat up to 150-170 degrees, sometimes less.
Also when moisture gets into the fluid (it can get there depending on the period of use of the fluid, if the brake system is sealed). This time for moisture to enter the liquid is usually 2-3 years. It should be changed approximately at this frequency.
Also, on the packaging of the liquid itself, the manufacturer indicates its expiration date. You need to pay attention to it when choosing.