Today there are fewer and fewer classic cars on our roads, and over the past few years not a single one has come to me for repairs. Therefore, when a client showed up in the morning with an old seven and offered to replace the crosspieces and suspension, I could not refuse because of the memories that came back.
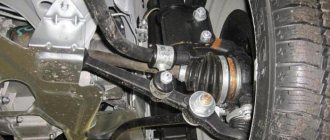
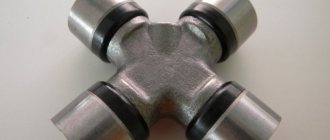
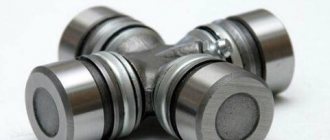
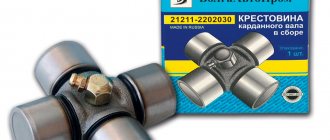
But this is all rhetoric, and today we have to replace the VAZ 2107 driveshaft crosspiece and, as well as a bunch of outboard bearings, we still have to disassemble. The main signs of wear on the crosspiece are a characteristic loud click when starting, as well as vibration.
Signs of a faulty VAZ 2107 suspension bearing and how to check the driveshaft yourself
The first signs of malfunction and wear of the VAZ 2107 (PP) suspension bearing are vibration and knocking of the cardan when the car begins to move. After accelerating the car, the knocking gradually disappears, turning into vibration and noise. If there were no problems with balancing the axle before, but knocking suddenly appeared, then it is necessary to immediately diagnose the PP.
Diagnosis is performed in the following order:
- Place the car on an overpass, lift or pit;
- Locate the driveshaft under the car;
- Check the play of the PP by moving the part by hand in the axial direction - free movement is not allowed;
- Rotate the cardan and listen to how the bearing works - vibration, rolling, grinding, knocking are not allowed;
- Inspect the product body, including the tightness of the bearing seals - lubricant leakage is not allowed;
- Make sure that the outboard bearing and bracket are not loose;
- The presented videos show how the VAZ 2101-2107 suspension bearing (injector) hums, as well as how to determine if the intermediate support is faulty.
Video: “How an outboard bearing hums”
Video: “How to check the universal joint support”
Useful tips
To increase the service life of the VAZ 2107 driveshaft, you need to follow a number of simple recommendations.
- Avoid excessive contamination of the driveshaft couplings.
- Systematically check the tightness of the fastening elements and the presence of lubricant in the connecting units.
- If shaft malfunctions are detected, do not delay repairs.
- When purchasing spare parts for a cardan, pay attention to the manufacturer and compliance with GOST or ISO requirements.
- After repairing the driveshaft, be sure to have it balanced at a service station.
Diagnosing a malfunction, repairing and replacing the suspension bearing and elastic coupling of the VAZ 2107 propeller shaft with your own hands is quite simple. This requires minimal plumbing skills, a standard set of tools and careful adherence to the recommendations of professionals.
Source
Suspended bearing for the VAZ 2107 propeller shaft: dimensions, prices, how to choose, which one to buy
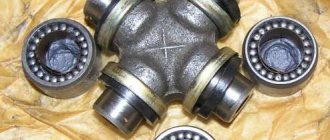
The design of the intermediate support for the propeller shaft VAZ 2101 - VAZ 2107 consists of a closed-type, lubricated, single-row radial ball bearing, which is located inside a housing made of metal and rubber. The ball bearing is secured with a retaining ring. The PCB body has fasteners in the form of a bracket with holes.
Ball bearing marking:
- according to GOST 6-180605;
- according to ISO 62305.2RS;
- Factory (serial or catalog) number of the VAZ 2107 suspension support: 2105-2202078.
It is important to know:
Inspect the old suspension assembly to make sure the ball bearing is working properly. You may not need to replace the support and it will be enough to just change only the bearing, but more often the assembly is changed, and experts also recommend it.
The VAZ 2107 suspension bearing for replacement, the prices of which are presented in the table , is selected based on the recommendations of experienced auto mechanics and service station workers.
Below is a list of preferred manufacturers to purchase parts from. To the question “How much does a suspension bearing for a VAZ 2107 cost?” This table will answer in detail. Pay attention to the photographs of the original repair kits presented in the list.
Cost table for suspension bearing VAZ 2107
| No. | Brand | Catalog number (article) | Price 2022, rub. | Equipment | |||
| Retaining ring | Bearing 6-180605 | Bolts | Instructions | ||||
| 1 | VBF (VPK) Russia Analogue | 2105-2202078 | 580 | + | + | + | + |
| 2 | AvtoVAZ Russia Original | 2105-2202078-82 | 400 | + | + | + | + |
| 3 | Rosteco Russia Analogue | 20072 | 400 | + | + | + | + |
| 4 | SEVI Russia Analogue | 3103 | 420 | + | + | + | + |
Outboard Bearing Size Chart 6-180605 (62305.2RS)
| Characteristic | Unit | Value according to GOST (TU) |
| Inner diameter, d | mm | 25 |
| Outer diameter, D | mm | 62 |
| Nominal height, B | mm | 24 |
| Radius of mounting chamfers, r | mm (min) | 2,0 |
| Dynamic load capacity | kH | 22,5 |
| Static load capacity | kH | 11,4 |
| Nominal speed | rpm | 7500 |
| Radial clearance | mm | 0,01-0,024 |
| Steel type | — | SHH-15 |
| Lubricant type | — | S17 (Litol-24) |
| Hardness of steel and rollers | H.R.C. | 61-65 |
| Contact angle | hail | — |
| Torque | kN*M | — |
| Ring roughness | Ra | 0.32 |
| Number of balls | PC. | 7 |
| Ball diameter | mm | 11,509 |
| Weight | G. | 325 |
Preparing tools
Replacing a car suspension cardan bearing is quite possible without the assistance of car service employees.
The main thing is to carefully review the book, which describes how to repair and operate a specific vehicle. You also need to own the right tools and have a lift or overpass at your disposal. You may need a vinegar solution or a special liquid to decarbonize the fastening bolts if they have become rusty. In principle, changing the outboard bearing of a VAZ-2107 or VAZ-2106 cardan will not differ much from replacing the same component on a Ford or Toyota. The scheme is similar everywhere, with some differences, but not dramatic ones.
To replace the bearing you will need two open-end wrenches for 12 and 13 mm, a hammer, a metal attachment, and at the same time pliers, thanks to which you can remove the locking rings. We must not forget about the special bearing puller, without which such a process simply cannot be carried out.
Car owners may have a question: can an outboard bearing be repaired? Yes it is possible. But here there are 2 options - either the bearing housing is disassembled for lubrication, or the bearing itself is replaced. In the second case, this is more appropriate, but only if it is not difficult for the car owner. In particular, for Toyota the following scenario is possible - the price of a new spare part costs 1500-6000 rubles, and a simple bearing of the same size costs 100-300 rubles. You can save money here.
Replacing the gearbox bearing
First, to carry out the replacement, the gearbox is removed. Next, you will need to completely or partially disassemble the box. To remove the box basket, you must first disconnect the negative wire of the car's electrical system and disconnect the speedometer sensor. In any case, you will have to disconnect the exhaust pipe (“pants”) of the exhaust gas system. Next, the wizard performs the operations described below.
The box is well cleaned of dirt, its body is checked for defects. The bearing on the shaft is secured with additional retaining rings. The master carefully pries out and unclenches the rings using a flat screwdriver. Among the list of special auto repair tools there is also tweezers for removing retaining rings. Next, you need to pry off the bearing with a screwdriver, while the shaft moves forward. A thin pry bar is inserted between the bearing and the box and the mechanic begins the operation of removing the gearbox input shaft bearing. The bearing is pressed in and needs to be knocked out - with precise, careful and, at the same time, strong blows. In this case, the shaft must rotate. This entire operation is performed by a master with the help of an assistant and can take quite a lot of time, usually up to 30 minutes. Also, the workshop can use a special puller for such cases.
Before replacing the old input shaft bearing, it must be carefully prepared. Preparation involves thorough lubrication. To press the bearing in, you can use a pipe of a suitable diameter or special tools. The worker drives the part into its proper place with precise, uniform and neat blows. After the technician makes sure that the bearing is seated properly (the shaft should rotate lightly and smoothly), the box is assembled in the reverse order and installed back on the car.
The bearing does not always need to be changed; sometimes you can simply lubricate it well. A gearbox is a vehicle component that operates constantly. That is, the smear on the bearing “burns” quite intensely. The reason for the “disappearance” of the lubricant, according to many car owners, is also the synthetic oil poured into the gearbox - it is this that “corrodes” and “washes” the lubricant out of the bearing.
There is no need to rush into purchasing this part (as with purchasing any parts). Its price is low, VAZ bearings cost about 300-500 rubles (you can find them cheaper in advertisements) and that is why purchasing can be difficult. Current traders and manufacturers prefer to sell cheap parts as “repair kits”. The most important thing is what was mentioned at the beginning of the article - the only sign of complete destruction of the bearing is jamming and knocking. If a “whistle” is heard, then most likely it will be enough for you to simply lubricate the part.
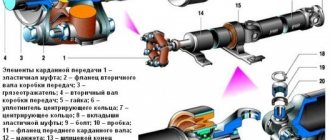
OPERATING FEATURES OF THE CARDAN TRANSMISSION
A feature of this hinge is uneven rotation. When the angle of position of the drive shaft relative to the driven one changes, the latter accelerates or slows down at certain points, that is, the angular velocity increases or decreases. Moreover, as the angle increases, the speed of advance or lag of the driven shaft from the drive shaft increases, so this transmission of rotation is cyclic in nature. A significant angle (more than 20 degrees) between the shafts increases the load on the hinge components, which can lead to failure.
Let's look at the principle of operation of a cardan joint using an example when the drive shaft is positioned strictly horizontally, and the driven shaft is positioned at an angle downwards (standard position of the cardan joint). The initial position of the inner hinge fork is also horizontal. When transmitting rotation due to the angled position, the downward portion of the fork accelerates relative to the drive shaft. Maximum advance is achieved at the bottom point.
At the same time, part of the driven shaft fork, which began to move upward during rotation, slows down and lags behind the driving one in rotation speed. The maximum lag is at the highest point.
Due to these features of the operation of the joint of unequal angular velocities, rotation is transmitted unevenly.
To reduce the unevenness of rotation speeds and loads, the design of the cardan transmission uses two hinges - at the ends of the hollow shaft. Moreover, for maximum smoothing, the internal forks are located in the same plane.
Due to the use of two hinges, the position angles of the shafts and, accordingly, the unevenness of rotation speeds are reduced.
Due to the uneven rotation between the shafts, the cardan transmission is not used in the transmission design of front-wheel drive vehicles. On such models, the unequal velocity joint is replaced by a constant velocity joint, in which transmission is carried out evenly regardless of the angle between the shafts.
Causes of driveline vibration
- Play in the bearings of the crosspieces exceeds the permissible values. This malfunction, as well as the next one on the list, is eliminated by replacing the cross that has become unusable.
- Loss of mobility of crosspiece needle bearings due to corrosion. You can detect this defect with your own hands if, before repair, you disconnect the fastening of at least one end of the cardan drive from the transmission flanges and try to move the free end to the side.
- Deep cracks in the elastic coupling. Repair consists of replacing this part.
- Misalignment of the crosspieces after alteration of the driveshaft or due to incorrect assembly of the unit with two crosspieces at the edges and a splined connection between them. For repairs, restore the alignment of the hinges.
- Loosening of the flanges of the cardan and the axle gearbox.
- Unscrewing the nut securing the flange to the gearbox shank.
- Suspension bearing failure.
- Excessive spline play.
- Deformation of the cardan transmission pipe.
What is a gearbox bearing?
Gearbox bearing (gearbox bearing) is a part of the gearbox of automotive equipment; a rolling bearing of one design or another, acting as supports for gearbox shafts and gears.
In a gearbox, depending on its type, number of gears, method of transmitting torque between elements and design, from 4 to 12 or more bearings of various types can be used. Bearings solve several problems:
- Performing support functions for all or only individual shafts (in most cases - two supports for all shafts, in some boxes there are simpler or more complex schemes - one support for the primary shaft, three supports for the secondary shaft, etc.);
- Acting as a support for gears mounted on the secondary shaft (in gearboxes with synchronized gears and gears freely rotating on the secondary shaft);
- Reduced friction forces in the bearings of shafts and gears (reduced torque losses in the transmission, reduced heating of its parts).
The use of bearings ensures the correct installation of the moving components of the gearbox and greatly reduces the friction forces arising between these parts. The operation of the gearbox, its ability to normally transmit and change torque, and generally ensure vehicle controllability, depend on the condition and characteristics of the bearings. Therefore, worn and faulty bearings must be replaced, and in order to make the right choice of these parts, it is necessary to understand their design, types and applicability.
Spare parts
As for parts and spare parts for the VAZ-2107, it is better to buy a new outboard bearing (propeller shaft support) than a factory-made one.
All this is because there are a lot of low-quality products on sale now, and buying a factory suspension bearing from a VAZ will help avoid getting a pig in a poke. To get a factory part, you just need to contact the sellers who sell goods from the manufacturer. Finding such a person is not difficult, you just need to try. In order for the part to function well in the future on your VAZ-2107, when purchasing the selected outboard bearing, you should check its movement, that is, the movement of the outboard bearing must be smooth with elastic adjacent rubber. Rotating the outboard bearing from its hooks is a bad sign, and it is better not to take such a part. Otherwise, the cost of your negligence will result in unpleasant noise in the cabin of the VAZ-2107.
In the case when a replacement is necessary, but you do not have experience in such matters, you should take care of purchasing one cross with an outboard bearing already present. The purchase will be made with the intention that when a replacement is made, one crosspiece will need to be removed and it may be damaged.
If you don’t have to replace the entire propeller shaft support, for example, because only the outboard bearing was broken, and it’s a pity to throw away the rubber, then only the bearing is bought and replaced.
To do this you will need:
⦁ remove the support ring;
⦁ knock out the old bearing;
⦁ carefully hammer in a new one.
And it is advisable to purchase retaining rings, since old ones are often deformed or even broken. In addition, it makes sense to buy bolts, nuts, etc., the old ones may already be “licked”. Replacing parts will be much more convenient in a viewing hole or overpass, and for convenience, one of the rear wheels should be jacked up.
So, to begin with:
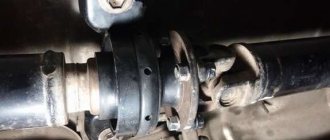
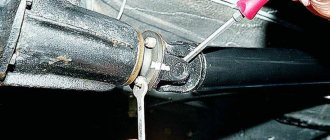
⦁ it is necessary to unscrew the cardan shaft. Using a 13mm wrench, remove the bearing mount that secures it to the transverse support (a pair of bolts);
⦁ now unscrew the nuts with which it is attached to the shank.
To further avoid vibration of the cardan and its beating on your VAZ-2107, it is best to place marks on all joints of the cardan before removal. And assembling according to your marks will save you from such unpleasant moments. A chisel can be useful when placing marks.
⦁ it is more convenient to remove all available retaining rings using round pliers with a bend;
⦁ knock out the cup of the cross with a hammer;
⦁ turning over the cardan shaft, take out the cup;
⦁ knock out the next cup and the remaining ones;
⦁ we clean all the recesses and everything else from dirt and rust.
⦁ it is necessary to remove two bowls on both sides of the cross;
⦁ the crosspiece must be placed in the eyes;
⦁ put on the cup, to do this you should move everything to one side;
⦁ Next, you should push the cup until a groove for the retaining ring appears;
⦁ install the retaining ring;
⦁ now, having turned the cardan over, you need to direct the cross towards the cup, put it on, also until the groove appears;
⦁ install the retaining ring.
Assembling the second part may be a little more difficult:
⦁ after removing the crosspiece, it is necessary to insert the splined end of the cardan shaft into the flange of the elastic coupling;
⦁ using a 27 wrench from the opposite end, unscrew the fastening of the fork to the front shaft;
⦁ it is necessary to tighten the hinge fork using a puller;
⦁ remove the suspension bearing from the shaft.
When removing the bearing, you can simply try to knock it down.
This is where the replacement for the VAZ-2107 ends, but the assembly is done directly in the reverse order.
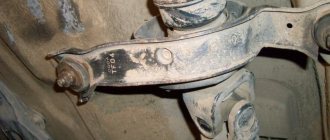
Suspension support design
Where is the outboard bearing located?
Basic dominant
the object is a rolling or sliding bearing of a specific design, inserted into a metal frame. The free zone between the outer race and the inner sphere of the housing is covered with a rubber ring designed to dampen vibrations of the cardan. The leakage of lubricant and the penetration of dust are prevented by rubber bands with sealing covers that cover the gaps between the rings of the product.
The purpose of the bearing bushing is to hold the joint shaft in a calculated position with allowable displacement.
The structure, assembled into a single load-bearing unit, is attached to the machine frame through the mounting brackets of the base support.
How to properly lubricate the cardan?
We'll tell you about proper lubrication of the driveshaft without removing parts from the car.
First, as usual, we put the VAZ 2107 on the inspection hole, tighten the handbrake, put the gearshift lever in the “neutral gear” position, manually remove dirt and dust from the cardan drive, then check how tight all the available bolts and nuts are and tighten what "dangling"
- You can insert a screwdriver and wiggle it, this way you can determine the play in the hinge bearings. In this case, the part will have to be removed from the car, as described above, and the crosspiece replaced or the O-rings replaced.
- In addition, we grasp the front shaft firmly with one hand and rotate (pump), inspecting the coupling: is there any angular play?
- To lubricate the driveshaft splines, you need to take an 11 mm wrench, unscrew the plug on the coupling flange and take an oiler in which you can supply oil under pressure. Then, using a syringe, squeeze the grease (CV joint - 4, Fiol - 2u) into the splined joint until it “comes out” from under the oil seal, then put the plug in place.
These simple tips will allow you to keep the VAZ 2107 transmission in good condition for a long time, without having to repair the driveshaft.
Recommendations from professionals for repairing CV joints
In this subsection, we invite you to familiarize yourself with practical advice from professional craftsmen:
- If it is necessary to change the hinge, perform a complete replacement. The only exception may be the reinstallation of anthers and other small parts from this category. In addition to lubricants in the CV joint, you need to change all the clamps and, with a certain degree of perfectionism, monitor cleanliness during assembly;
- A hammer and a wooden stand are perfect for installing the CV joint in place. Carry out installation work carefully - movements should be smooth and not forceful. In other words, you place a wooden attachment against the part and knock until everything falls into place. If you do not use a “gasket”, there is a high probability of damage to the part, which will become unusable;
- Once the CV joint is installed, install the boot. First, use pliers to clamp the clamp onto the shaft. Equalize the pressure in the part - use a screwdriver to hook the edge of the boot and unscrew it. Now clamp the clamp from the outside. A plastic plug is placed at the end of the shaft.
All other steps are performed in reverse order, as during disassembly.
As a result, performing repair work when it is necessary to replace the VAZ 2109 CV joint may seem labor-intensive. If you have enough free time, try to figure it out yourself. Otherwise, it is better to turn to professional craftsmen. Any service station will replace your CV joint or boot in a short period of time, because this is a fairly common problem on any car.
Sources
- https://mylada.net/remont/zamena-granaty-na-vaz-2114.html
- https://mylada.net/remont/zamena-granaty-na-vaz-2110.html
- https://ladaautos.ru/vaz-2109/kak-zamenit-shrus-na-vaz-2109.html
Cardan transmission assembly
When assembling the cardan transmission, you must:
- press 2 oil seal holders 9 needle bearings onto the necks of the cross with an interference of 0.02-0.03 mm, screw in the valve and oiler;
- saturate plug seals 4 with cylinder oil and install them in the holders;
- insert the crosspiece into the fork 1 (when assembling the sliding fork, before installing the crosspiece, insert the plug 10 of the spline connection of the fork), put support washers 6, cups 8 with needle bearings 7, bearing caps 12 on the necks and screw locking plates 11 with screws; connect the crosspiece with the second fork in the same sequence; if the cardan joint has steel bushings, install them on the necks of the cross with a gap of 0.07-0.15 mm, and in the fork socket with an interference fit of 0.04-0.08 mm;
- screw oiler 13 and safety valve 3 into the crosspiece;
- place the oil seal cover 18 and its support washer 17, as well as the oil seal 16, pre-impregnated with oil, onto the splined end 15 of the propeller shaft;
- insert the splined end of the shaft into the fork and tighten the oil seal cover 18 by hand when installing the sliding fork, make sure that the axes of both crosses lie in the same plane (the GAZ-51 car has indicator arrows on the fork and shaft, which during assembly should be located on the same straight line );
- install oiler 13 into the splined fork.
Source
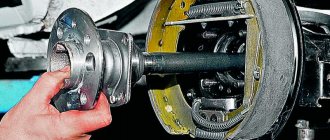
Replacing the front wheel hub bearing
We replace the bearing when it fails. There are two ways to replace a bearing. The first is by removing the steering knuckle assembly, the second is without removing it from the car. The work is shown on the right wheel bearing. The left wheel hub bearing is replaced in the same way. We carry out the work on an inspection ditch or overpass. We remove the wheel.
Using a screwdriver, remove the protective cap from the hub. We install the wheel and tighten the two bolts that secure it. We lower the car onto its wheels.
Use a beard to straighten the collar of the hub bearing nut, which has been dented in two places. Apply the parking brake, engage first gear and place chocks under the wheels.
Use a 30mm socket to loosen the hub bearing nut. The nut is tightened with a large torque, so the head and driver must be strong enough to transmit the necessary force. We hang up the front part of the car (namely both front wheels, because otherwise the anti-roll bar interferes with dismantling, pushing the suspension elements up). We remove the wheel. Unscrew the hub bearing nut completely...
...and remove the puck. Remove the front wheel brake disc (see “Removing the front wheel brake disc”). Disconnect the right wheel drive from the hub (see “Removing the front wheel drives”). In order not to disturb the wheel alignment angles, you can replace the bearing without removing the steering knuckle. To do this, connect the ball joint to the knuckle...
...and compress the hub by striking it through a soft metal drift. You can also compress the hub using the front wheel brake disc.
We pass M12×1.25 mm bolts about 130 mm long through two diametrically opposite holes in the disk and screw them into the holes of the hub to a depth equal to its thickness. By sharply hitting the bolt heads with a disk, we compress the hub. If it was not possible to remove the hub in this way, remove the steering knuckle. To do this, unscrew the nuts of the bolts securing the shock absorber strut to the steering knuckle, remove the bolts (see “Removing the shock absorber strut and disassembling it”). Disconnect the ball joint and remove the steering knuckle.
We install the steering knuckle on the jaws of the vice and press the hub out of the knuckle through a mandrel or head of a suitable diameter, applying force to the end of the hub.
We remove the hub from the fist. In this case, the outer part of the inner ring of the bearing remains on the hub.
Remove the mud ring from the hub.
We insert a blunt chisel between the ends of the inner ring of the bearing and the hub and, striking the chisel with a hammer, move the inner ring.
Use a puller to compress the inner ring of the bearing.
Using circlip pliers, remove the circlip.
Use a cup puller to press the bearing out of the steering knuckle...
...and take it out with the puller. Remove the bearing from the puller. Clean and lubricate the inner surface of the steering knuckle. Using a needle file, we clean out the nicks from the chisel on the hub. We press the new bearing into the steering knuckle, applying force to the outer ring of the bearing. We install a retaining ring in the groove of the steering knuckle socket. When pressing the hub, we use the puller washer to rest on the inner ring of the bearing. We carry out further assembly in the reverse order, tighten the bearing nut to the prescribed torque (see “Appendices”) and be sure to lock it by jamming the collar. If the bearing was replaced with the steering knuckle removed, then it is necessary to check and adjust the wheel alignment angles at a service station.
Summarize
Now we can safely state that the replacement process is complete. As it turned out, the work did not cause any difficulties, but it did require stocking up on some special tools. Buy bearings for LADA Granta cars that are of only high quality and from trusted manufacturers in order to have confidence in your safety on the road.
A wheel bearing malfunction is a common failure during the operation of a technical device. The reason for premature wear is poor-quality road surface and aggressive driving style.
Front wheel bearing
Replacing a wheel bearing is done independently, without special equipment, experience, or skills. Subject to the availability of spare parts, the replacement process will take no more than an hour, without the cost of car service.