Auto repair school – DIY car repair
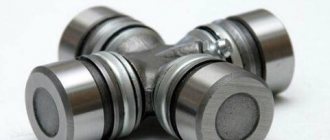
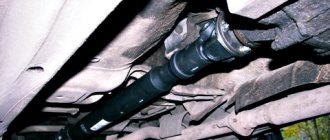
External view of the VAZ 2107 cardan cross
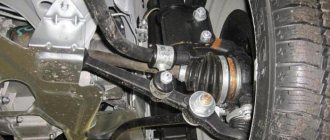
When the car is not loaded, its axle is located lower than the gearbox. If the car is heavily loaded or driving on an uneven road, the bridge constantly moves up and down. A driveshaft is attached to the bridge. Consequently, its angle of inclination is also constantly changing. The purpose of this shaft is to transmit torque from the engine to the wheels. A cross-shaped joint called a cross is attached to it. It allows you to effectively transfer torque from the engine to the wheels regardless of the position of the cardan.
The device of the VAZ 2107 cross
The VAZ 2107 driveshaft crosspiece is a flexible connection between the gearbox and the rear axle of the car. This hinge ensures the coincidence of the rotation axes of the cardan parts and makes it possible to transmit torque when bending the cardan parts. The cross connects the forks of the cardan halves, which are attached to its ends. The main element of the cross is needle bearings, which ensure the mobility of the hinge. The bearings are inserted into the fork holes and secured with retaining rings. Bearing wear causes joint play, knocking and other extraneous noise when moving. In this case, it is necessary to replace the VAZ 2107 crosspiece.
Diagnostics
If you heard the characteristic sounds of a driveshaft malfunction, or sensed something was wrong based on the car’s behavior, you need to quickly understand the situation and determine the reasons. It is not necessary to go to a service station, since diagnosing and replacing the crosspiece on a VAZ 2107 can be done with your own hands.
To diagnose the problem you need to do the following:
- Drive the car into the pit and go down yourself.
- Pressing the flange leading to the gearbox with one hand, grab the shaft with the other;
- Make turns in different directions and listen to the sounds that appear. If you notice play in the connection, it means that the surfaces are seriously worn.
- Perform the work of replacing the crosspiece.
- In some cases, the play may go unnoticed. This happens if one bearing fails.
- Under such circumstances, trust your eyes by visually examining the mechanism.
- Arm yourself with a 13mm wrench and unscrew the driveshaft from the flange. Look at the condition of the entire unit.
- Do not forget to apply the installation marks during disassembly, which will allow you to reassemble the system in the correct sequence and according to the placed marks without any problems.
When buying a new crosspiece for a VAZ 2107, you don’t need to try to save money. Everyone knows that “the miser pays twice,” so it’s better to buy an original part right away than to change a couple of crosses in six months.
The body of the crosspiece is made of heat-treated steel. This is necessary to ensure the special hardness of the studs. Thus, the quality of the material plays a big role in the service life of the part. How long can a car run without replacing crosspieces? It is believed that approximately 500 thousand km!
The retaining rings and bearing also need replacement. Please note that the rubber of the bearing itself must be sufficiently elastic.
Replacing the driveshaft
Replacing a driveshaft, support bearing or crosspieces is a very simple process that does not require any special knowledge or skills from you. However, it is impossible without knowledge of its structure.
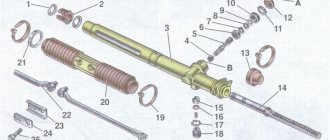
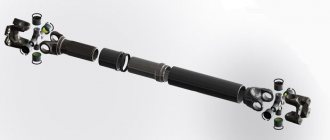
Note: The cardan (propeller shaft) is designed to transmit torque (rotating) moment from the engine to the wheels. It consists of two crosspieces, a suspension bearing and two shafts. The first shaft is connected to the gearbox through a splined connection with an elastic coupling, then a suspension bearing is attached to it and a cross fork is attached to the second end, through which it is connected to the second shaft. The second shaft is connected through the same crosspiece to a flange, which is screwed to the bridge flange.
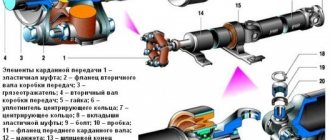
Photo No. 2. The device of the VAZ 2101 cardan
In Photo No. 2 we see:
- 1 – elastic (rubber) coupling
- 2 – centering sleeve
- 3 – coupling flange
- 4 – oil seal
- 5 – outer race of the oil seal
- 6 – cardan shaft
- 7 – dust deflector
- 8 – support bearing
- 9 – circlip
- 10 – nut
- 11 – cardan fork
- 12 – second dust reflector
- 13 – elastic cardan support
You can tell that the crosspiece bearings are worn out by the vibration that occurs at certain speeds. More often, the rear crosspiece, attached to the final drive flange, wears out. It is subject to heavy loads and pollution. The simplest diagnosis of the cross is carried out in the pit:
- We go down under the car, grab the gearbox gear flange with one hand, and the shaft with the other, and try to twist them in different (opposite) directions.
- If the wear is large, play is immediately felt, but the failure of only one crosspiece bearing can be detected only by disconnecting the cardan from the gear flange using a 13mm wrench.
- We apply preliminary installation marks.
- Having discovered that it was the cross that caused the vibration, prepare a replacement tool and purchase a new part.
Regarding spare parts
- To make replacement easier, it is recommended to take a standard VAZ 2101 crosspiece (the VAZ one - its price is reasonable) and be sure to purchase new retaining rings (the installed ones are often deformed or broken)
- When buying an outboard bearing, we first check the elasticity of the rubber and the smoothness of its movement.
- If it catches when you turn it, don’t buy a suspended one, it won’t last long.
- The rubber of the outboard bearing should be elastic and soft.
- If the tires are “oak”, after installing such a bearing, strong vibration from the cardan will be transmitted to the body of your car while driving.
- The rubber itself will not last long.
- It is advisable to purchase new nuts and bolts securing the driveshaft. Because the old ones (as a rule) will be “slicked” when unscrewing, and sometimes you have to cut off the nuts with a chisel.
Selecting a tool
We will need:
- Rozhkovo - ring wrenches for 13 and 12
- Socket wrenches for 27 and 13
- Copper or aluminum attachment
- Hammer
- Retaining Ring Puller
- Tension puller
- Flexible coupling flange
Note: You will only need the flange and puller if you are replacing the cardan outboard bearing.
So:
- We recommend that the work be carried out on an overpass or inspection pit
- If you have driven the car into a pit, to make it easier to unscrew the nuts securing the cardan to the rear axle flange, lift the rear wheel (any one) with a jack.
- We remove the driveshaft from the car. First of all, unscrew the bolts (there are two of them) securing the suspension bearing to the support (using a 13mm wrench)
- Then, unscrew the nuts securing the cardan to the rear axle flange
Unscrew the universal joint fastener to the rear axle flange
- It is important to put marks in order to install the cardan in the same position (the cardan is balanced, changing the position will disrupt the balancing, which will lead to vibration and rapid failure of its parts)
- After removing the cardan, you should put marks on its parts (which will be disassembled and replaced)
- We assemble the driveshaft using these marks, otherwise vibrations and beatings of the driveshaft are inevitable
- We place the marks with a core or a chisel; the chalk ones will rub off during disassembly.
Possible causes of premature wear of crosspieces
- Lack of lubrication; The splines and needle bearings of the spiders must be constantly lubricated with a suitable lubricant, otherwise wear will increase significantly as the load conditions are high, especially when driving on gravel roads at high speed. Bridge vibrations with high amplitude and frequency create critical loads on the moving parts of the cardan . For periodic lubrication, there are oil nipples or threaded holes with plugs into which the oil nipples are screwed during lubrication.
- Damage to the seal seal; The oil seal may lose its protective properties from mechanical stress (if it gets into a deep puddle), improper installation (misalignment, pinching) or loss of elasticity from exposure to chemicals (in winter from reagents). At the slightest violation of the protective seal, dust, dirt penetrates into the needle bearing and, through abrasive action, wears out the rollers and the inner surface of the race and requires premature replacement of the VAZ 2105 crosspiece.
- Violation of assembly technology; Failure to align the crosspiece due to incorrect selection of retaining rings, or changing the position (accidentally turning the fork over when assembling the rear propeller shaft) of the mating parts relative to each other leads to an imbalance of the entire assembly, which causes destructive vibration when driving.
Attention: To eliminate alignment errors, before disassembling, the mating parts are marked with identical points; during assembly, it is necessary to control the coincidence of the marks on all nodes.
There is no need to hope that if one node is checked, the second will exactly match; multi-stage control must be observed. Moreover, it is not at all difficult.
VAZ 2101 crosspiece replacement
Begin:
- Use a ring puller to remove the retaining rings from the crosspiece.
- We place the cardan so that the crosspiece we need is “in weight”
- We take a mandrel and a hammer, knock out the cup of the cross
- Turn the cardan and take out the cup
- We knock out the next cup with a hammer
- Knocking out the remaining cups of the cross will not be difficult for you
- Thoroughly clean the cardan eyes from rust and dirt
- We clean the grooves in which the retaining rings are installed.
Installing the cross
- We take a new cross and carefully two cups on its opposite sides (so as not to scatter the needles)
- We insert the cross into the eyes
- We move it to one side, put one cup on carefully, otherwise the needles may fall out of the cup
- Using an aluminum or copper adapter, we seat the cup until a groove (groove) for the retaining ring appears.
- Insert the retaining ring, then turn the cardan over
- Here too, carefully, move the cross towards the cup and put the cup on
- and plant until a groove appears
- Installing the retaining ring
- The second part is assembled according to the same principle, not much more complicated, but doable with your own hands.
This is how the replacement is made, a new crosspiece is installed on the VAZ 2101, we move on to the outboard bearing. In addition, you can watch the video of replacing the crosspiece in the VAZ 2101.
Changing the suspension bearing
- After the crosspieces have been removed, we insert the end (splined) of the propeller shaft into the flange of the rubber coupling (we have it prepared in advance)
- On the other hand, unscrew the nut using a 27 wrench that secures the hinge fork to the shaft
- We pull off the hinge fork using a puller (it is also prepared in advance)
- We remove the outboard bearing using the same puller, after cutting off the outer ring of the bearing
- Or we just knock it off the shaft
- We naturally do the assembly in reverse order.
- We crush the side of the nut that locks the universal joint fork.
- We install all the parts in their places according to the marks.
- Lubricate the spline joints with FIOL-1 grease
- When connecting the parts, we match the marks made with a chisel on the parts before disassembly.
- Having assembled the spline connection, we press the oil seal with an axial load of 0.3–0.5 millimeters
- We compress the clip located on the groove of the cardan fork
- Tighten the nut securing the propeller shaft yoke using a torque wrench and caulk it.
- When assembling the intermediate support, we press the bearing with a mandrel and install a spring lock ring into the groove of the support.
- We put a dust deflector on the rear end of the propeller shaft
- We use a mandrel to press the support together with the bearing and put on the second dust reflector.
- Press the front cardan fork onto the shaft and secure it with a nut
We assemble the universal joint in this order:
- We remove the old grease, fill the cavities of the crosspiece studs and lubricate the inside of the bearing housings with special grease FIOL-2U (0.4–0.6 grams for each)
- Lubricate the spikes of the crosspieces with a thin layer to avoid the formation of an air cushion inside the bearing during assembly. We insert the spikes of the cross back into the fork.
- We put the bearing housings together with the needles on the spikes of the crosses and press them into the holes of the forks with a force of about 7840N (800 kgf).
- We install all the parts in their original places, according to the applied marks.
- We insert the retaining rings into the grooves of the forks
- Then we check the axial travel of the crosspiece; it is allowed to be no more than 0.01–0.04 millimeters. We replace one ring of the smallest thickness, if the free play is greater than specified, with a thicker one.
- When replacing the parts of the cardan joint, we select the retaining rings using a gauge that contains 4 thick petals (1.53 millimeters; 1.56 millimeters; 1.59 millimeters; and 1.62 millimeters).
- By pressing the bearings when the cross rests against the housing (in this case there are no gaps), using a feeler gauge we determine the distance between the housing of the installed bearing and the end of the groove for the retaining rings.
- Based on the measurement obtained, taking into account the axial gap equal to 0.01–0.04 millimeters, insert a second ring of the required thickness.
Warning: Standard rings come in five sizes (differentiated by thickness, in millimeters), each size has its own color:
- 1.50 – comes unpainted
- 1.53 – painted dark brown
- 1.56 – is blue
- 1.59 – black
- 1.62 – yellow
- After completing the installation of the retaining rings, hit their forks with a rubber hammer or a hammer with a plastic striker.
- Under the influence of impact and compressed oil seals, the gap between the bottoms of the needle bearings and the retaining rings disappears, and gaps are formed between the ends of the studs and the bearing housings of the cross.
- After completing the assembly, we check the balancing of the cardan and the ease of turning of the hinge forks.
The replacement of the VAZ 2101 crosspiece has been completed, the video will help you.
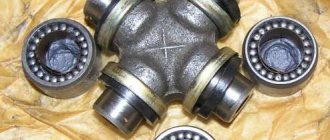
How to check the universal joint of a VAZ 2107.
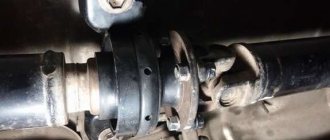
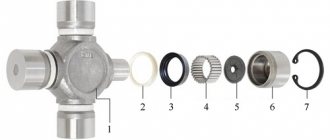
To understand what can knock on a part, you need to know how it works. The photo below shows its components: 1 - the cross itself. 2 - plastic plugs. 3 - sealing rubber rings. 4 — caps with a bearing inside.
Crosspiece and its components
The first sign of failure of the crosspiece is knocking noises when starting from a stop and when changing gears in the area of the bridge. To accurately determine the malfunction, we climb into an inspection hole or hang the car on a lift (here, who has what capabilities). Now we hold the rear axle shank with one hand, and with the other we try to rotate the driveshaft alternately in different directions. A faulty crosspiece will make a knocking noise, and you will also feel play. Even if there is seemingly small play, it is worth replacing the faulty part as soon as possible, since it can pull the suspension bearing, elastic coupling and other parts with it.
VAZ 2106 replacing the crosspiece yourself
The photo shows the universal joint of a VAZ 2106
Note: The driveshaft is a mechanism that transmits torque from the gearbox to the wheel drive. Used in a variety of vehicles. The main feature is a cardan transmission, invented by Gerolamo Cardano, which allows the transmission of torque between two non-parallel axes. The main working part of the cardan transmission is the crosspieces. They most often require replacement. The VAZ 2106 cardan contains two identical crosspieces. Our instructions will help you replace the VAZ 2106 crosspiece yourself; the replacement is quite simple and will allow you to save on car service costs.
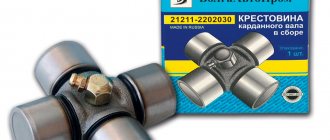
Replacement of VAZ 2107 cardan crosspieces
Faulty crosspieces cannot be repaired. Theoretically, the universal joint is considered a very reliable part with a service life of more than 500 thousand km. In reality, even the highest quality crosspiece requires replacement after 50–70 thousand km. The reason for this is bad roads, intensive use of the car, etc. To replace the VAZ 2107 CC you will need the following tools and materials.
- set of wrenches;
- hammer and spacer made of soft metal;
- the spacer is slightly smaller than the diameter of the crosspiece lugs;
Dismantling the VAZ 2107 cardan
Before replacing the CC, it is necessary to dismantle the cardan drive. This is done as follows.
- If the car has been in use for quite a long time, the cardan mounting nuts are filled with WD-40 or kerosene. After that they can be easily unscrewed.
- Use a sharp chisel or other tool to place marks on the flanges of the cardan and axle. This is necessary to ensure mutual alignment during subsequent installation of the cardan.
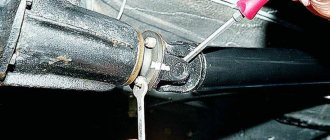
- Using a 13-mm wrench or socket wrench (preferably curved so as not to damage the threads of the nuts), unscrew the cardan mounting nuts. If the bolts start to spin, you should fix them with a screwdriver.
Removing the VAZ 2107 cardan cross
The cups and bearings can be removed from the driveshaft clamped in a vice using a special puller. However, this device is not very convenient and is used extremely rarely. Usually a standard set of tools is used. Dismantling the cross is carried out in the following order.
- Using round-nose pliers or pliers, remove the retaining rings from four sides of the cross.
Before installing new CCs, the lugs, fork and grooves for the retaining rings are cleaned of dirt and rust with a metal brush. The installation itself is carried out as follows.
- Any two cups facing each other are removed from the new crosses.
- The crosspiece is inserted into the eyes of the end of the cardan.
- Cups with bearings are generously lubricated with grease or G' Energy grease and installed in place.
- Using a hammer and a soft metal spacer, the cups are driven in until a groove appears for the retaining ring.
Installing the cardan
When installing a cardan with new crosspieces in place, you must:
- lubricate all connections with grease;
- make sure that the lubricant does not get sand or dirt;
- check the condition of the crosspiece seals and, if necessary, replace them;
- install parts in accordance with the marks made during dismantling;
- First insert the splined part into the flange, and then tighten the cardan bolts.
Video: replacing the VAZ 2107 universal joint
Thus, to replace the cardan cross, all you need is the car owner’s desire to do it himself and a standard set of mechanic’s tools. Carefully following the instructions of specialists will allow you to do the work efficiently and avoid possible mistakes.
We remove the cardan
Any work must be done in stages. And this one is no exception.
Preparing to remove the cardan
Replacing crosspieces in the driveshaft of a VAZ 2105 will require a set of tools and accessories:
- Wrench 13 mm. (preferably with wide cheeks);
- Socket head 13 mm. with a collar;
- Clamp for a force of at least 1500 kgf. (67.7823.9522);
- Bench vice;
- Soft metal trims;
- Needle-nosed pliers or narrow-nose pliers;
- Steel bushing for removing bearings;
- Brass punch;
- Kern;
- Hammer;
- Large flathead screwdriver;
The bottom is washed and dried, the car is installed on a viewing hole or a lift. If they are not there, do-it-yourself dismantling will be much more complicated; you will have to lift or tilt the car to provide access to the driveline mounting bolts. You can drive your rear wheels along the guides onto a height of at least twenty-five centimeters, at least one wheel must be removed or raised so that it can rotate freely, the front end must be jacked up and placed on strong supports. If you drive over the front wheels, the elevation can be made lower, but then the rear part will have to be raised by two rearrangements of the supports, since the axle flange needs to be raised somewhat higher. The gear shift knob is set to neutral, the handbrake does not engage. Before starting disassembly, it is advisable to watch a video of the work of professionals.
The sequence of dismantling the cardan transmission
So:
- Marking of parts; First of all, random marks are placed on all joints with paint, and a photo is taken so that during assembly the parts will return to their original place to eliminate eccentricity and imbalance of the entire shaft.
Applying paint marks on mating parts
Tip: After removing the cardan, it is recommended to duplicate the marks with a core, since the paint may wear off during operation.
- Disconnecting the cardan from the axle flange; When replacing the VAZ 2105 driveshaft crosspiece, use an open-end wrench to unscrew the four self-clamping nuts on the axle flange in sequence. Each nut is installed sequentially into an accessible position by turning the cardan a quarter turn; to allow free rotation, the handbrake is first removed and the gearbox is placed in the neutral position.
- If the nuts do not unscrew, you need to moisten them for twenty minutes with a special liquid for impregnating threaded connections or brake fluid. If even after processing the edges of the nut come off, you will have to use a chisel to cut the nut or cut off the bolt.
- When the nut is unscrewed two turns, the bolt splines can come out of the flange grooves and rotate in the hole. To prevent this, you need to prevent the bolt from moving, keep the head pressed against the flange, using a pry bar or a screwdriver as a lever, resting on the crosspiece.
Method of pressing a bolt when unscrewing a nut
After unscrewing all the nuts, the bolts are removed. If corrosion is keeping the parts glued together, the assembly is separated by gentle blows of a hammer on the edge of the flange fork. To prevent the cardan from falling, it is temporarily suspended on one bolt.
Tip: To be on the safe side, you need to attach a nut to the bolt, since when disconnecting the intermediate support, you will have to move the cardan slightly.
- Releasing the front driveshaft spline;
Removing the oil seal race to dismantle the cardan
To free the front propeller shaft, simply remove the oil seal race from the elastic coupling flange. To do this, use a flat screwdriver to sequentially bend all four fixing tendrils, and the cage moves along the splined tip of the shaft.
- Removing the intermediate support from the cross member; All that remains is to disconnect the intermediate support. Socket head 13 mm. Use a knob to unscrew the two bolts attaching to the cross member. The cardan drive can be removed towards the rear axle. You need to pull out the bolt on which the rear cardan was hanging and pull the cardan drive; the splines of the front cardan will slide out of the coupling and come out along the safety bar and cross member.
Tip: There is no need to remove the front driveshaft safety bar and cross member, they do not interfere with removal and installation.
It is quite possible to clean and lubricate the place where the intermediate support is attached to the cross member on site.
The sequence of dismantling cardan joints
We do:
- Removing the middle joint retaining rings; In a vice, the front cardan is clamped through the pads as close as possible to the intermediate support; the retaining rings are marked with a core so that they can be installed in their original places, if suitable. The rings are sequentially carefully compressed with needle-nose pliers and removed from the grooves of the forks. For ease of operation, the cardan is rotated in a vice to the desired position.
- Pressing out needle bearings; The clamp screw must be rested against the housing of any bearing and pressed along the axis of the cross. In this case, the housing will be pressed into the fork, and the opposite bearing housing will be squeezed out. Then, by pushing the offset fork back, the spider will push the first bearing housing out.
- In the same way, the bearing housings of the second axis are squeezed out, the spikes of the crosspiece come out of the housings and the crosspiece is freely removed. It is impossible to completely press out the housings with a clamp; they will be held in the holes of the forks by the lower edge. They can be completely removed with a mandrel and a hammer; they are knocked out quite easily.
Removing the cross from a cardan with wide forks
The new hinge design provides wider fork walls, so pressing is carried out in several stages:
- A support with a height of at least 16 mm is installed on the press table. with a hole with a diameter of 32 mm., it should fit the bearing housing, which the press will squeeze out. The bearing housing is pressed through a mandrel with a diameter of 29 mm. squeezed out until the forks stop;
- The cardan turns half a turn, by pressing the press through the U-shaped mandrel onto the fork, it moves back all the way on the other side, while the cross pushes out the second housing and opens the gap to the lower edge of the first bearing housing;
- A steel bushing is inserted into this gap, acting as a release extension;
- The cardan turns back half a turn, pressing the press again until the forks stop, the bushing will push the bearing housing further, and it will fall out of the fork;
- The bushing is moved to the other side and the housing of the second needle bearing is pushed out;
- On the other axis of the cross, all operations must be repeated sequentially.
To dismantle the second hinge, similar actions are performed on the rear universal joint, free from other parts.
The process of selecting retaining rings and assembling universal joints
New crosspieces are initially sufficiently lubricated and do not require additional lubrication, but there are situations when replacing a crosspiece on a VAZ 2105 creates the need to remove the factory lubricant and apply a new one. For example, if a bearing fell and dirt got inside, the crosspiece had to be washed. The spikes and body are lubricated with a thin layer of FIOL-2U or LITOL-24 grease.
Attention: Grease in a volume of 0.4-0.6 g should be evenly applied to the bearing housing and stud. A larger volume can form an air plug, which will spring back and will not allow you to accurately determine the gap and select the thickness of the retaining rings.
- All four bodies are pressed one by one into the holes of the forks with a clamp so that the ends of the crosspiece tenons fit between the lower edges. After the alignment of the forks has been checked using the marks, the housings are pressed deeper, manually guiding the spikes of the cross into the needle bearing.
Attention: The passage of the bearing along the tenon must be constantly monitored; by rocking the crosspiece, no pinching should be felt; the crosspiece should swing freely and smoothly.
- When a groove appears in the fork hole, a medium-sized retaining ring is inserted into it, as required by the instructions, 1.56 mm thick. The opposite bearing housing is pressed with a force of 800 kgf. The opened gap between the plane of the body and the edge of the groove in the fork hole is measured. The measurement is made with a feeler gauge or caliber 41.7834.4992. with petals of different thicknesses (the difference between the petals differs by 0.03 mm).
Cross retaining ring 2202043
The measurement allows you to accurately determine the thickness of the second retaining ring. The correct selection of a pair of rings allows you to center the cross within the standard tolerance, which reduces the cost of replacement. Retaining rings are produced in sizes from 1.45 mm. up to 1.67 mm. with a difference of 0.03 mm., each size, for clarity, is assigned its own color, in which the locking ring is painted. It is best when rings are placed of the same color, which means they are of the same thickness, the difference should not exceed 0.03 mm.
Instructions for removing the steering wheel
Removing the VAZ classic steering wheel is necessary in the following situations:
- to repair the horn button or steering mechanism;
- to align the transverse bar after the camber procedure - toe-in of the front wheels;
- in order to replace the standard steering wheel with another, more comfortable or sporty one.
Thin and uncomfortable steering wheel of the VAZ 2101-02
Reference. On classic models, the manufacturer installed 3 types of steering wheels - a “two-spoke” one with a thin bar (VAZ 2101-02), the same with a thickened cross member (VAZ 2103, 06) and a “four-spoke” one with a massive central part (VAZ 2104.05, 07).
The steering wheel on the six is prettier, but just as uncomfortable
All of the listed elements can be removed equally easily, although there are minor differences in the disassembly technology, which is carried out using this set of tools:
- 2 types of screwdrivers - flat and Phillips;
- 24 mm nut head, extension spacer and knob;
- rags.
The most comfortable steering wheel was installed on the fourth, fifth and seventh VAZ models
Also, keep some thick grease of the “Solidol” type for applying to the splined part of the shaft.
Disassembly procedure
Removing the steering wheel on any classic VAZ model is performed in the following sequence:
- Place the car in a garage or on a level area so that the front wheels are as level as possible. Secure the car with the parking brake.
- Disconnect the battery from the on-board network by removing the negative terminal. During the disassembly process, you will probably touch the horn several times, which will buzz when there is tension.
- Sit in the driver's seat. In VAZ 2101-02 models, carefully remove the thin steering lining by prying it off with a flat screwdriver. The soft insert is pulled out from the VAZ 2104-07 steering wheel in the same way. Only on the “four”, “five” and “seven” this trim is located in the center (the AvtoVAZ logo is stamped on it). In the third and sixth models, the decorative trim is held in place by 2 screws, the heads of which are recessed into holes on the back side of the strip.
- Insert a 24 mm socket with a knob into the opened hole. While holding the steering wheel, loosen and unscrew the nut. Don't screw it all the way.
- Grab the steering wheel with both hands and pull it towards you with a sharp movement. If the part does not jump off the splines, tap it on the back side with your palms and in this way knock off the steering wheel.
- Unscrew the nut completely and remove the steering wheel.
Removing the decorative trim on the fourth model
Note. The nut holding the steering wheel must not be completely unscrewed for safety reasons. When you pull on a loose steering wheel, you can injure your head if it suddenly comes off. The nut will prevent the element from completely flying off the shaft.
If you unscrew the VAZ 2104 trim from the back, it will come off entirely
You can get to the nut of the “four-spoke” steering wheel of the VAZ 2107 in another way, by unscrewing 2 screws on the back of the wheel. Then the entire signal button made of plastic, equipped with springs, will be removed. After dismantling, take a rag and carefully wipe the shaft splines to remove old grease that has hardened in places. Now you can begin repairing or installing a new steering wheel.
On a penny, the signal key can be easily removed by hand
Advice. If you remove a part for repairs and plan to put it back, then before dismantling it is recommended to mark the end of the shaft and the steering wheel hub with a marker. This will help you immediately place the element in the correct position during assembly.
On the six, to remove the trim you need to unscrew 2 screws on the other side of the steering wheel
Photo of removing the steering wheel
Disassembly process on video
What steering wheel should I put on a VAZ classic?
It must be admitted that the steering wheels installed on the first modifications of Zhiguli leave much to be desired in terms of convenience and aesthetics. Of the entire line of classic models, only the “four”, “five” and “seven” had a nice steering wheel with a comfortable grip for the hands. Accordingly, the owners of “kopecks” and “sixes” sought to purchase and install the same one for themselves.
Nice factory steering wheel Lada Kalina
At the moment, there are other options for replacing the steering wheel on the “classic”:
- steering wheels from front-wheel drive VAZs of later years of production - VAZ 2115, Kalina, Priora.
- various steering wheels made in China;
- tuning sports steering wheels from famous brands - Sparco, Momo and so on.
This is what the sports steering wheel looks like on a VAZ 2106
Note. Tuning and sports steering wheels available for sale are universal. That is, they are installed on different cars using an adapter designed for a particular car model.
It is strictly not recommended to install cheap products from unknown Chinese brands on rear-wheel drive Zhigulis. The fact is that in the first VAZs the front wheels are turned by a worm mechanism, and not by a rack, as on new cars. Since there is no power steering there either, situations often occur that require the driver to put more pressure on the steering wheel. By installing a low-quality product, you run the risk of ending up with a steering wheel in your hands and a broken car - at best.
Adapter for mounting a sports steering wheel
Hence the conclusion: in addition to convenience and ergonomics, the steering wheel must meet safety requirements. These include factory parts from AvtoVAZ, properly tested, and steering wheels from well-known European brands.
Advice. Do not rush to buy products of a smaller diameter, in which the steering wheel itself is not moved forward relative to the central part. Firstly, such steering wheels are not comfortable for everyone, and secondly, out of habit, you will begin to touch the steering column switches with your hands when turning. If someone you know already has a small steering wheel on their car, test it and make sure that it will be convenient for you.
Sports steering wheel Sparco forward
Installation instructions
First of all, before assembly, lubricate the shaft splines with grease, then proceed in the reverse order:
- Place the steering wheel onto the splines, aligning the previously made marks. If the task is to level the position of the bar or install a new product, try to install it as evenly as possible.
- Place the nut inside the head, slide it onto the threads using the extension and tighten.
- Hold the steering wheel and tighten the nut with a wrench.
- Connect the battery and try driving the car 50-100 m on a road free of traffic. This way you will make sure that the steering wheel position is set correctly. Otherwise, unscrew the nut again and move the element 1 tooth to the right or left.
- Reinstall the top trim.
The position of the steering wheel can be fixed using a ruler
When installing a sports steering wheel, use an adapter for VAZ 2101-07 cars, which is a cylinder with holes for bolts (included in the kit) and a splined part in the center. It is installed simply: screw the steering wheel to the adapter, and then put it on the shaft, as described above.
Reassembly video
Signs of a faulty VAZ 2107 suspension bearing and how to check the driveshaft yourself
The first signs of malfunction and wear of the VAZ 2107 (PP) suspension bearing are vibration and knocking of the cardan when the car begins to move. After accelerating the car, the knocking gradually disappears, turning into vibration and noise. If there were no problems with balancing the axle before, but knocking suddenly appeared, then it is necessary to immediately diagnose the PP.
Diagnosis is performed in the following order:
- Place the car on an overpass, lift or pit;
- Locate the driveshaft under the car;
- Check the play of the PP by moving the part by hand in the axial direction - free movement is not allowed;
- Rotate the cardan and listen to how the bearing works - vibration, rolling, grinding, knocking are not allowed;
- Inspect the product body, including the tightness of the bearing seals - lubricant leakage is not allowed;
- Make sure that the outboard bearing and bracket are not loose;
- The presented videos show how the VAZ 2101-2107 suspension bearing (injector) hums, as well as how to determine if the intermediate support is faulty.
Video: “How an outboard bearing hums”
Video: “How to check the universal joint support”
Do-it-yourself replacement of the VAZ 2107 driveshaft crosspiece
Replacing the driveshaft crosspiece of a VAZ 2107 with your own hands is quite simple. To put it bluntly, repairing any car is not a problem if you have direct hands, basic knowledge of technology, a few skills, and most importantly, tools and spare parts. Or at least the means to buy them.
Tired of repairing the basin? Buy a real big Chinese HAVAL h3 and don’t worry! You can view the various configurations here: elan-motors.ru/auto/haval/h3
And today we will talk about such a procedure as replacing crosspieces. The manual can be used for cars of the classic VAZ 2101-2107 series. The driveshaft consists of two halves that are at an angle to each other. The centers of the axes of the flange on the gearbox and the gearbox shaft do not coincide - they are at different levels. For this reason, such a cunning cardan design is used.
What is a cross
Please note that replacing the VAZ 2101-2107 driveshaft cross must be carried out carefully and accurately. Otherwise, you risk stopping in the middle of endless fields with a fallen driveshaft. This happened when the retaining rings were installed crookedly and did not fit into the grooves. The crosspiece, which has the shape of a cross with equal axes (it’s easy to guess from the name), is all-metal (made of alloy steel), and there are cups with rollers on its edges. Try to work carefully, as it is very easy to lose all those needle bearings. But assembling them is difficult, sometimes even impossible, you have to buy a new spare part.
As was said earlier, replacing the VAZ 2101-2107 driveshaft crosspiece is carried out even without the participation of such amenities as a pit or overpass (it’s not worth mentioning the lift, its price is at best 80 thousand, not every owner of a classic will afford it). The main purpose of the cross is to bend the cardan to transfer motion to a parallel plane. Probably, this is exactly what it would be correct to say, if we rely on the above-mentioned design features of rear-wheel drive cars. There are two crosses in total: approximately in the middle of the cardan and directly at the flange.
How can you identify a breakdown and understand that the VAZ 2107 driveshaft crosspiece needs to be replaced? Here are a few signs, all of them are external and clearly manifest themselves:
- The appearance of a terrible howl that comes from under the back seat.
- Extraneous sounds – grinding, crunching.
- Increased vibration inside the car.
Moreover, as a rule, the outer crosspiece fails. The middle one is less susceptible to destruction. To be extra sure, climb under the car and pull the driveshaft with your hands - if there is any play, then repairs need to be carried out. Also evaluate the condition of the outboard bearing, it can be a source of vibration and hum.
Replacing the driveshaft crosspiece of a VAZ 2107
All repairs are carried out with your own hands quite simply; no pitfalls will be identified in the process. First, you need to prepare yourself by raising the rear of the car off the ground. Moreover, the larger your belly, the higher you need to raise it. Secondly, you will need some tool:
- A set of keys (in particular, for “12”, “13”, “14”).
- Screwdrivers.
- Hammer.
- Retaining ring remover.
- Wooden spacers.
That's all, now you climb under the car and unscrew everything you see. Namely:
- Suspension bearing with a key “13” from the body of a VAZ 2107.
- Four nuts from the flange, using wrenches “12” and “13”. Sometimes it is needed for “14”, it all depends on what spare parts were used during the previous repair.
Then the cardan falls to the ground and needs to be knocked out of the gearbox. To do this, you can use a hammer and a wooden spacer. Ideally, use a wooden mallet or a bronze hammer to avoid damaging the driveshaft.
Then arm yourself with a ring puller and pull them out one by one. What to do next? The instruction manual advises using a special puller, but practice shows that a few sharp blows with a mallet on the edge of the VAZ 2101-2107 driveshaft are enough for the glasses to fly out. Before installing a new cross, be sure to clean the seats to ensure there is no dust or dirt.
First place it on the flange, and then on the cardan - this is the most optimal sequence. And I would also like to note: when replacing the VAZ 2107 driveshaft crosspieces, there is no need to install the retaining rings that come with the kit. The fact is that they can be several microns wider, and this will lead to destruction of the mechanism. Therefore, it is better to leave the old rings.
vaz-remzona.ru
Phased dismantling
First you need to dismantle the car unit:
- Since it is not possible to replace the crosspiece without removing the driveshaft, you first need to remove this unit from the car. To do this, you will need a size 13 wrench; use it to simply unscrew the two clamps that secure the suspension bearing to the transverse support.
- The fasteners are unscrewed from the junction of the rear axle shank with the vehicle assembly. To make it easier to assemble the entire structure in the future, experts recommend placing marks before unscrewing the fasteners. Quite often, if the cardan is assembled incorrectly, vibrations and even beating are felt when operating the machine.
- Using pliers, carefully remove the cross from the propeller shaft.
- The locking wheel is removed.
- Next, you need to rotate the cardan to such a position that the crosspiece takes on the so-called “hanging” position.
- Using a hammer and a mandrel, you need to knock the “cup” out of the cross.
- After removing the “cup,” the cardan rotates to a different position to make it more convenient to repeat this process with the next element.
Before installing a new cross, the surface of the assembly must be thoroughly cleaned of dirt and do not forget to inspect the condition of the grooves that are used for the retaining rings.
How to independently replace the driveshaft crosspiece on a VAZ 2101
Replacing the driveshaft crosspiece on a VAZ 2101 with your own hands
You can guess that the driveshaft crosspiece needs to be replaced by the characteristic knocking and vibration coming from outside when the car is moving at a certain speed. The cause of problems that arise is most often an increase in play in the connection of the gear flange with the main gear. Its appearance can be caused by heavy loads when driving over rough terrain or excessive axle loads.
If the backlash is not eliminated initially, over time it can turn into severe runout.
It should also be noted that the driveshaft crosspiece is subject to constant exposure to dust, dirt, and water, since it is located close to the road surface.
Diagnostics of faults does not require serious knowledge or professional equipment. In addition, based on its results, it will become clear whether the driveshaft crosspiece needs to be replaced or can be dispensed with.
Diagnostics of malfunctions of the VAZ 2101 driveshaft
First of all, you need to install the car on a viewing hole or lift. Hold the shaft with one hand and fix the drive gear flange with the other. Holding the connection with both hands, try to turn it (as if twisting them in opposite directions). If you succeed, or if play becomes obvious, you can conclude that the crosspiece is badly worn and needs to be replaced. Delayed repairs in this case will only worsen the situation (the outboard bearing will perform its functions worse, and this will lead to even more serious breakdowns and greater financial costs).
Worth checking out:
You can entrust the replacement of the crosspiece to a service station specialist or do it yourself at home. Next, we will consider the actions of the car owner who chooses the 2nd option.
Required parts:
- cardan shaft crosspiece;
- retaining rings;
- suspension bearing
- New mounting bolts and nuts for the propeller shaft.
Required tools:
- lift or inspection pit;
- Phillips screwdriver;
- copper or aluminum soft metal attachment;
- hammer;
- socket and open-end wrenches: “12”, “13”, “27”;
- pliers that will be needed to remove the retaining rings;
Dismantling the VAZ 2101 crosspiece
- Using a 13mm wrench, unscrew the pair of bolts that secure the outboard bearing to the transverse support and remove the propeller shaft.
Replacing the driveshaft crosspiece on a VAZ 2101 with your own hands
Also check out
- Unscrew the fastening nuts where the rear axle shank connects to the cardan. It is better to immediately put marks in order to avoid possible future beating or vibration of an inaccurately installed cardan.
Replacing the driveshaft crosspiece on a VAZ 2101 with your own hands
- Using pliers, dismantle the cardan shaft crosspiece and remove the retaining ring.
Replacing the driveshaft crosspiece on a VAZ 2101 with your own hands
Replacing the driveshaft crosspiece on a VAZ 2101 with your own hands
- Unfold the cardan so that the cross hangs. Use a hammer and a mandrel to knock out her cup.
Replacing the driveshaft crosspiece on a VAZ 2101 with your own hands
- Clean the eyes from dirt and corrosion, and take care of the grooves for the locking wheels. Only after this can you proceed to replacing the cross.
Information on how to replace the silent blocks of the VAZ front suspension can be found here
Installation of a new driveshaft crosspiece VAZ 2101
- Remove both cups from the cross.
- Install the cross into the eyes.
- Slowly put on the cup (while making sure that the needles from the cup do not fall apart).
Replacing the driveshaft crosspiece on a VAZ 2101 with your own hands
- Squeeze the cup until a groove is formed for the retaining ring (a soft metal socket is useful here).
- Install the locking ring, rotate the cardan, moving the cross towards the cup, and put it on.
- Compress the cup and install the retaining ring.
At this point, the replacement of the VAZ 2101 crosspiece can be considered successfully completed.
We recommend reading
prostovaz.ru
Replacement and repair of muffler for VAZ 2104–2107 cars
To replace the muffler you will need:
- inspection hole or lift;
- screwdriver;
- a set of car keys;
- hammer.
Removing and installing the muffler
To dismantle the “glushak”, repair it, and then return it to its place, follow this sequence of actions:
- Drive the car into the inspection hole. Stop the engine and turn off the ignition. Wait until the exhaust manifold cools down.
- Unbend the hooks of the rubber suspension straps of the muffler.
Using a screwdriver, straighten the hooks of the rubber straps on which the muffler is suspended
Unscrew the exhaust pipe fastening to the rubber cushion with a wrench
Loosen the clamp between the pipes of the main and additional muffler
Carefully knock the resonator out of the mount by hitting it with a hammer through a wooden spacer
Unscrew the exhaust pipe from the gearbox bracket
Carefully bend the stoppers and unscrew the exhaust pipe from the manifold
Install the new muffler in the opposite order of removal. However, do not use a used gasket. Before assembly, treat the pipes at the places where they are connected with clamps with graphite lubricant.
Video: replacing a VAZ 2107 muffler in a garage
In 1979, at VAZ, a car was built especially for “dear Leonid Ilyich,” which received the common name “half past six.” This happened after the presentation of the VAZ-2105 and 2107 models to the country's leadership, the serial production of which was still quite far away, and Brezhnev wished to give such a car to one of his family members. The result was a unique car, the body and interior of which was a hybrid of a “six” and a “seven” - hence the name.
Innokenty Kishkurno
Wheels