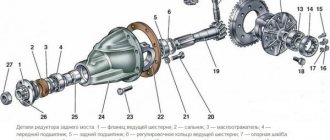
Why block him?
In certain situations this is necessary. To make it clearer, let's look at everything in order. If a car turns sharply or goes over rough terrain, its drive wheels travel different lengths. For example, when turning, the path of the outer wheel will be longer, and the path of the inner wheel will be shorter. Previously, when car speeds were low, this circumstance did not particularly worry anyone. But gradually the speed of the cars increased, and problems began to arise:
- tires wear unevenly;
- handling is seriously degraded.
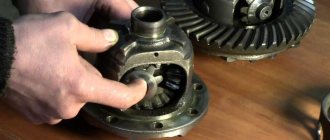
All this happens due to the fact that the torque on the drive wheels of the car is always the same. Therefore, it became necessary to separate the drive wheels so that each of them had its own torque. This task is performed by the VAZ 2107 differential. If the road is smooth, there are no problems with this unit. But as soon as the car finds itself on rough terrain with the differential engaged, the wheels begin to slip, and driving the car becomes much more difficult. It is in this situation that the driver should lock the differential to increase the vehicle's maneuverability.
Pros and cons of installing a self-locking gearbox
So, when installing a self-locking differential, you purchase:
- increased wheel traction on drive axles;
- increased cross-country ability off asphalt road surfaces;
- improved acceleration dynamics;
- improved cornering.
The price to pay for the installation is deterioration in handling (for a rear-wheel drive VAZ):
- it is difficult to hold the car when accelerating on a straight line;
- when turning, the “classic” has an increased tendency to skid;
- With any design, additional high-friction links appear, which increases, even slightly, wear and fuel consumption.
Types of blocking
There are three of them: manual (forced), automatic (self-locking differential) and partial.
- The driver turns on the manual locking himself when he finds himself on rough terrain. It's simple: a switch is pressed in the cabin, after which a special limiting unit begins to operate, preventing torque from being distributed to the drive wheels depending on the path they travel. The advantages of such a lock are obvious: the driver himself decides when to engage the limiting mechanism, and the rest of the time this device does not work and, accordingly, does not wear out. There are also disadvantages: to lock the differential manually, the driver will have to take his mind off the controls. And he gets distracted in extremely difficult road conditions. The driver should also not forget to disable the lock when he is on a flat road. If you don't do this, you can break the differential itself. And finally, you will have to install not only the limiter itself, but also the system that will operate it, which is associated with certain technical difficulties.
An example of forced differential locking on VAZ and Niva cars
- Automatic blocking - works constantly. That is, while the driver’s foot presses on the gas, the lock works and adapts to the driving style of the car owner. Pros: the driver does not need to be distracted by turning on the device, and installing automatic locking is much easier than manual locking. There are also disadvantages: since the automation works constantly, you have to make a significant effort to turn the steering wheel. On sharp turns the tires are noisy, literally biting into the ground. And when the gears of the device engage, clicks are clearly audible, which not everyone likes.
An example of a finished lock on a VAZ from Val-racing - Finally, there is partial blocking. It also prevents wheel slipping, but does it less intensively. Partial locking is also automatic and does not require constant driver control. And its main advantage is that it does not heavily load the transmission, which prevents its premature wear.
Self-locking differential
This is a cross between the simplest hard locking system and a free differential. The simplest self-locking differential is a disc. It is the same free mechanism, but with friction discs on each axle shaft, operating like a clutch. This mechanism is good because it allows you to regulate the pressing force of the clutches, and as a result, the distribution of torque between the drive wheels. The pressing force can be either fixed or adjustable by a pneumatic drive, hydraulics or electronics. Such differentials are used in sports car axles and as center differentials in some SUVs, the previous generation Nissan Patrol, for example.
A viscous coupling, or viscous coupling, is a kind of torque converter. This is a set of disks that are located close to each other and are located in one housing filled with silicone liquid. This liquid tends to harden as the temperature increases, which is what happens when some disks begin to rotate faster and others slower. As soon as the wheels begin to equalize angular speeds, the fluid cools and the viscous coupling is unblocked.
Video: differential lock
There are also electronic differential locking systems, but in fact, this is just an imitation, since the brakes act as a mechanism compensating angular speeds, not the transmission, and the system is triggered by a signal from sensors. There are quite a few of these systems, but the most famous are EDS in most cars (Nissan Pathfinder, Renault Duster), or the ETS system in Mercedes cars. Volkswagen installs more advanced systems, ETS with advanced functions, XDS. These complexes are installed on Skoda Octavia, Volkswagen Passat, Tiguan. Electronic systems cannot be considered as differential locks, but only as means of increasing safety.
Sometimes, to increase the cross-country ability of a VAZ 2107, radical measures are needed. Differential locking is just one of them. But before carrying out this procedure, it is necessary to take into account several important nuances, which we will tell the reader about in this article.
Which one to choose for VAZ 2107
The answer to this question directly depends on the operating conditions of the vehicle. If the car owner never goes into the city and moves exclusively on country roads and rough terrain, a full manual differential lock is suitable for him. If the driver drives around the city, but the quality of the roads there leaves much to be desired, it makes sense to opt for automatic disc locking. Finally, if a car owner drives on good city roads all year round, a partial differential lock mechanism is quite suitable for him. The best devices of this type are produced by Quaife, Lokka and Torsen. These are expensive components, the installation of which is best left to qualified specialists. At the same time, you can do simple blocking yourself. This is exactly what will be discussed below.
Removing and disassembling the gearbox
Replacing a VAZ 2110 bearing
Needless to say, before you start replacing the bearing, you should remove the box from the car and disassemble it.
Removing the car box
Replacing a bearing on a VAZ 2110
Started:
- We install the car on the inspection hole;
- we lift the hood of the car and fix it tightly with something so that it does not wobble;
- remove the battery terminals;
- drain the oil from the gearbox.
Note. It is easier to dismantle the gearbox from a VAZ 2110 with an assistant.
- we start by dismantling the crankcase protection (it is secured with bolts that should be unscrewed);
- the ground wire must be removed by unscrewing the bolt;
- we find the tip of the clutch cable, which disengages the clutch and loosen the tightening of the nuts;
- remove the cable end;
- remove the starter and traction relay from the car;
- Now you should loosen the clamp holding the gear shift rod;
- the cable is disconnected from the speedometer drive;
- the reverse light wire is disconnected;
- we separate the guy wires from the car's suspension arms.
Note. To be able to separate the stretch marks, you will first need to loosen the nut.
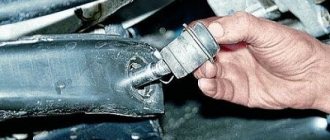
- we find how the tie rod ball joint is attached to the swing arm (this is a nut that should be unscrewed);
- Now you should press out the ball joint pin (a special puller is used for this);
- remove the ball joint by unscrewing two bolts;
Bolts securing the ball joint
We take a pry bar, with which we squeeze out the shank of one grenade of the front wheel drive from the gearbox (the CV joint should be moved to the side);
You need to insert something instead of the grenade shank. For example, it could be an old CV joint (see VAZ 2110 replacing a CV joint - how to do it) or another technological plug.
- repeat the same operation with the second grenade;
- it's time to unscrew the clutch housing shield;
- Now you need to start removing the crankcase itself, which is attached to the cylinder block.
Note. To secure the process of dismantling the box, it is necessary to place appropriate wooden blocks on the components of the wings, which are located near the supports of the front pillars. It is on them that the engine will be hung. Don't forget that the wooden beam should only rest on the wing flanges!
- we proceed to removing the engine, which needs to be attached to a beam by a special eye, using a long bolt with a hook for this;
- unscrew the nuts securing the engine to the gearbox;
- we move the box away from the engine, removing the input shaft from the clutch;
- remove the box.
Analysis of the gearbox
The gearbox has been removed and now needs to be disassembled. Let's start the process:
The box should be thoroughly cleaned of oil and dirt.
Note. You can even wash the box, but do it only from the outside, making sure that water does not penetrate inside the part.
- now the box is placed on its butt (in other words, vertically upward);
- the rear gearbox cover is dismantled (to do this, unscrew six nuts);
- Now you will need to remove the clutch cable bracket;
Dismantling the clutch cable bracket
- We carefully move the back cover of the box from its place, to do this, hitting it with a rubber hammer;
- completely remove the rear cover from the gearbox housing;
- Next, the sealing gasket of the gearbox housing is removed.
Note. This gasket must be removed very carefully so as not to damage it. When collected, if it remains intact, you will not have to buy a new one.
- now you need to engage third and fourth gears;
- then, after unscrewing the bolt securing fifth gear, engage 5th;
- move 5th gear down so that the coupling splines engage the gear.
Note
At this stage it is important to check that the shafts do not rotate
- we unscrew the nut on the secondary shaft, first unlocking it;
- the same thing is done with the input shaft, or rather with its nut;
- the 5th gear synchronizer together with the fork is removed;
- the driven gear is also removed from the secondary shaft;
- The needle bearing is also dismantled, if necessary.
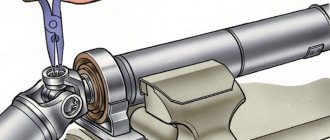
Replacing bearings on a VAZ 2110
After this, you need to dismantle the following parts and elements of the gearbox in order to easily get to the differential:
- input shaft drive gear;
- primary and secondary shaft;
- rear engine mount;
- clutch housing;
- gearbox housing.
Note. Remember that between the two crankcases (box and clutch) there are three places where you can conveniently insert a screwdriver or a long pin. This is done so as not to damage the sealing gasket. The screwdriver should be inserted into the grooves carefully and turned until the crankcases are separated.
In addition, the following must be extracted:
- fork and rod of first and second gears;
- third and fourth gear shift fork;
- reverse fork with gear and axle.
Features of use
- When the lock is turned off when turning, there is a strong jerk. This is due to a sharp reduction in the load on the transmission. When the differential lock is turned on, the wheels crash into the ground with a characteristic noise;
- the angle of rotation is greatly limited when the differential is locked 2107;
- you cannot lock the differential when driving on normal roads;
- When towing and checking the brakes on a stand, you also do not need to turn on the differential lock.
vote
Article rating
How to set preload
Preload adjustment is carried out by installing a package of special spring washers that push the gears inside the lock. A complete package of such special washers, when folded together, is 1 cm thick, but all the washers are different in thickness so that you can adjust the differential preload moment.
To adjust the preload you will need:
- pointer torque wrench (a wrench with clicks is not suitable, it will take a long time to set up);
- a homemade special part made from a simple internal grenade (cut off and a bolt welded to it) - see the video below;
- set of spring washers (rings);
Procedure for adjusting preload:
- Disassemble the locking differential (remember the sequence). After removing the cover, pull out the axle shaft auger gear; behind it comes a narrow gear with a large internal hole, but which has a side; then come those same adjusting spring washers. You can pull out the screw satellites (the preloads themselves) to check how much wear they have.
- Install new washers.
- Collect.
- Using a torque wrench and a special homemade part, we determine the tightening torque. When the key begins to turn, at this moment the arrow shows the tension torque.
This video discusses the option of adjusting the locking washers of a VAZ 2108 car.
A preload of up to 5 kg does not flatten the washer to a flat state; such a tension moment is considered a resource tension. Locking with a tension of up to 5 kg will help not significantly lose its characteristics for about 4 years. Any blocking with tension in the first couple of months loses about 1 kg of tension.
Experts recommend making a preload of no more than 5 kg for a self-locking front differential, and no more than 7 kg for a rear differential. At a maximum differential preload of, for example, 9 kg, all spring washers will already be pressed and the effect of the springs will be lost.
Sequencing
- Before starting work, 2 bushings are made from bronze or brass according to the drawing given below.
Locking brass bushing for VAZ 2107 gearbox
A pair of bushings in a spring from a valve of a VAZ 2110 car