How to clean injectors on a VAZ 2107 injector at home
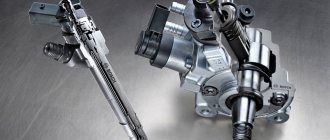
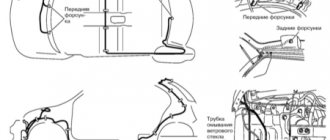
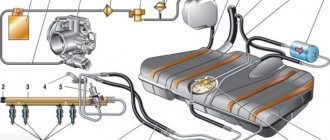
The injector nozzle operates on the principle of a spray, dispensing the mixture into the working chamber of the engine. The duration of the injection cycle and the amount of fuel supplied are set in the program of the internal combustion engine control unit. For each of the injectors these parameters are the same. The fuel injector is located inside the intake manifold. The air flow passes through the manifold and carries the fuel particles ejected by the injector into the combustion chamber. The diagram of the "Seven" fuel system is shown in the picture below.
Comprehensive diagnostics of the operation of injectors on the ramp
For such a check, the fuel rail will need to be removed from the engine along with the injectors attached to it. After this, you need to connect all electrical contacts to the ramp and injectors if they were disconnected before removal. It is also necessary to return the negative terminal of the battery to its place.
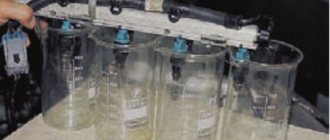
- The ramp must be placed in the engine compartment so that a measuring container with a scale can be placed under each of the injectors.
- It is necessary to connect the fuel supply pipes to the ramp and additionally check the reliability of their fastening.
- The next step is to turn on the ignition, after which you need to crank the engine a little with the starter. This operation is best performed with an assistant.
- While an assistant rotates the engine, check the efficiency of all injectors. The fuel supply must be the same on all injectors.
- The final step will be to turn off the ignition and check the fuel level in the containers. The specified level must be equal in each container.
In addition to self-checking, you can use the injector diagnostic service at a car service center. This operation is performed on a special testing stand. Testing an injector on a bench allows you to accurately determine not only the efficiency of fuel supply, but also the shape of the torch during fuel spraying.
Injector malfunctions - causes and characteristics
During operation, injectors more often than other components of the fuel supply system have to come into contact with aggressive environments. If the injectors on the “seven” are faulty, this can be determined by the following signs:
- “Stalling” of the car when trying to move away;
- Significant drop in power;
- Extraneous noise and vibration during engine operation;
- Excessive amount of exhaust gases released;
- Change in fuel consumption;
- Unstable “behavior” of the internal combustion engine at idle.
The deterioration in the functional state of the "Seven" injectors is primarily due to their contamination. Due to low-quality fuel, deposits appear on the walls of the injectors, reducing the throughput of the injection holes.
Signs of a dirty injector
Determining the most optimal time for cleaning injector nozzles is quite simple. Faulty or clogged fuel injectors have a negative impact on the operation of the engine and the entire system as a whole:
- Unstable engine operation at idle;
- difficulty starting the engine when cold;
- significant reduction in car power;
- increase in fuel consumption.
Thus, we get that in order to achieve the most efficient operation of the VAZ 2107 injector, it is necessary to take care of the condition of the injectors, with the help of which fuel is supplied to the engine cylinders. I won’t linger for long, let’s get straight to the point.
Injector purpose
Installing an injector in the VAZ 2107 made it possible to significantly improve engine performance. Changing the type of fuel system increases the amount of energy that is produced during the combustion of gasoline. Compared to a carburetor engine, a fuel injection system is more efficient in the initial stages, but over time its performance decreases. What does this depend on?
The injector plays the role of the final element in the fuel system of the car. The air mixture, together with a cloud of atomized gasoline, creates a huge amount of energy. Over time, this atomization may become less effective, the fuel jets will become weaker, and all due to low-quality gasoline.
The main cause of injector failure is poor fuel. Car fuel consists of many chemical components; in addition, various impurities are added to it, which should improve the overall performance of the engine. This factor cannot be ignored, since such gasoline leaves sediment on the walls of the fuel system. The thinnest channels are in the injectors, and it is these devices that suffer first. During operation, deposits from fuel only accumulate. What needs to be done to stop this?
When to clean injectors
Cleaning of injectors on Lada cars is carried out according to the condition of the car. If there are no problems with your car, then there is no need to clean them. Also, to find out for sure whether the injectors need to be cleaned, you first need to diagnose the fuel system. You can learn more about how to diagnose the fuel system in our article.
The manufacturer recommends cleaning the injectors every 50,000 km. Since the fuel at our gas stations leaves much to be desired, just before this mileage they begin to become clogged and flushing them will be useful. You can wash it at a service station, or you can do it yourself. Next, we will look in detail at how to wash the injectors on a VAZ car at home.
Self-check of injectors
Let's start with the fact that automobile injectors are divided into several types, of which two types have found widespread use at different times: mechanical injectors and electromagnetic (electromechanical) injectors.
Electromagnetic injectors are based on a special valve that opens and closes the injector to supply fuel under the influence of a control pulse from the engine ECU. Mechanical injectors open as a result of increased fuel pressure in the injector. Let us add that modern cars often have electromagnetic devices installed.
To check the injectors with your own hands without removing them from the car, you can use several methods. The simplest and most affordable way to quickly check injection nozzles without removing them from the car is to analyze the noise emitted by the engine during operation.
Self-cleaning of VAZ 2110 injectors. How to wash the injectors with your own hands
Cleaning injectors is one of those types of work that needs to be done only in case of emergency, that is, according to the principle “don’t touch it while it’s quiet.” This is not surprising, given the fact that the ramp in which the injectors are located and, in principle, the injectors themselves can be called the heart of a car engine. Therefore, it is recommended to clean injectors only as a last resort, for example, when problems occur with starting the engine, increased fuel consumption, tripping or a sharp drop in power.
There are plenty of various additives on the automotive chemicals market that are added to fuel to clean the injector, but they are not always able to cope with the task assigned to them or do not perform it very well. Often, cleaning additives in fuel can cause irreparable harm to the engine, due to the fact that acidified dirt and other deposits can create a blockage that prevents the normal passage of the fuel-air mixture or completely block the access of fuel. In this article I will talk about how to wash injectors with your own hands using the example of a VAZ 2110.
Causes and symptoms of malfunctions of the seven injection nozzles
Injectors are one of the most important parts of the fuel injection system. If it fails, which happens extremely rarely, the operation of the engine is disrupted. Most often, fuel injectors become clogged, which occurs due to contact with aggressive media. An aggressive environment is not only the fuel, but also the burned fuel assemblies. Before cleaning the injectors on a VAZ 2107, you need to determine by the signs that diagnostics of these particular parts is required:
- At idle, unstable operation of the internal combustion engine is observed.
- When trying to move away, the engine stalls.
- Reduced power and agility.
- When moving, jerks and dips occur.
- Excessive amount of exhaust gases from the muffler.
- Increased fuel consumption.
- Extraneous sounds and noise are observed when the engine is running.
If these signs are detected, you will need to check the condition of the injectors. The reason for their clogging is low-quality gasoline, which causes deposits to form on the walls. If your car has a faulty or missing fuel filter, then the need to clean the fuel nozzles arises quite often.
After removal, you will need to check the devices, or rather their condition. How to check the injectors on the seven, we will figure it out in the next section. If diagnostics show that they are unsuitable for use, they will need to be replaced.
It is important! When purchasing, you need to know the article number of the device, which has the number 21110-1132010-82.
Device diagnostics
To make sure that the injectors need to be cleaned or replaced, you will need to first perform some diagnostic procedures:
- Testing performance by ear. The principle of testing is that you need to start the engine and listen to the work. The presence of a ringing sound indicates that the fuel nozzles need to be cleaned.
- The injector is checked with a multimeter. This method is more objective, as it allows you to obtain more accurate information. The principle of checking is that you need to disconnect the chip from the atomizer and connect the probes of the device to the contacts. The device is set to resistance measurement mode. If the resistance value fluctuates between 12-17 Ohms, then the device does not need to be cleaned.
- To make such a diagnosis, you will first need to remove the injectors from the car by disconnecting them from the fuel rail and cylinders. The test consists of installing the injectors on a special stand. The stand is used to pass fuel through nozzles under appropriate pressure. Based on the parameters of the resulting jet, the serviceability of the nozzles is assessed. If the fuel in the nozzles is sprayed unevenly, the device needs to be cleaned.
If, after diagnostics, it is determined on the injection seven that one or more injectors need cleaning, then it is necessary to resort to this procedure. Regardless of how many nozzles need cleaning, the procedure must be carried out for all four.
How to clean injectors with additives
If, during diagnostics using a multimeter, it was determined that one or more nozzles need cleaning, then the easiest way to do this is to use special chemicals. In this case, the injectors do not need to be removed from the car. However, this method is not appropriate in all cases. If the sprayers are in a neglected state, they will need to be removed and cleaned on a stand.
Washing of VAZ 2107 injectors is carried out on a special diagnostic stand. To carry out the procedure, you will need to remove all 4 sprayers from the car and install them on the stand. Special products are used as cleaning fluids. The disadvantage of this method is that its implementation will require an expensive stand. Such stands are available in car service centers, and the principle of washing nozzles is as follows:
- All 4 sprayers are secured to the stand.
- A cleaning liquid is poured into a special container; as a rule, it is a carburetor cleaner.
- The program starts, and the stand automatically cleans the injectors for a certain time.
How to clean injectors
Methods for cleaning sprayers may vary; the use of one method or another depends on the level of contamination of the holes and the nature of the deposits. If you carry out preventive cleaning or remove light contamination, you can use special chemicals, the use of which does not involve removing the injectors.
If the injectors are in a neglected state and cleaning with additives does not make sense, then you will have to dismantle the injector and replace the injectors.
First cleaning method
For this method, you will need injector cleaner, carburetor cleaning fluid (spray), a spare O-ring and a pump with a pressure gauge. The first thing you need to do is remove all the nozzles, because if you decide to clean it, you need to do this with all the nozzles, and not just one. Find a suitable container and pour the injector cleaning fluid into it. Place all the injectors in a container and leave them there for a while to allow them to acidify. While the injectors are in the container, take the prepared carburetor spray and clean the idle air control with it. Now inspect the area around the injector nozzle; carbon deposits form there - coke, which in its consistency resembles resin. You will have to take some kind of metal object and tinker with this type of contamination. In order to carry out internal cleaning of the injectors, you need to prepare a power source (from 3 to 12V) and a foot-operated mechanical pump equipped with a pressure gauge.
Remove the tip from the hose and pour injection cleaner into the resulting hole. After this, put the end of the hose on the nozzle. Pump up the pump to 6 atmospheres and apply a voltage of 3V to the injector. If you do not hear the injector click, then you need to add voltage. You need to apply voltage periodically, while not forgetting to pump up the pump to six atmospheres. Clean all injectors in this manner.
Second way
For this method you need a carburetor cleaner spray and also a pump with a pressure gauge. We repeat all the operations indicated in the previous method, only change the injector cleaner to a carburetor cleaner. It is mandatory to carry out external cleaning to remove carbon deposits. To do this, take a clean cloth and apply the cleaner to it. Treat all fuel units with this cloth. Gradually, under the action of the cleaner, the coke will soften and be cleaned off without any problems. You can help yourself with a screwdriver or toothpick.
Both operations should take an average of two hours of your time, but you will save a lot and learn how to clean injectors.
Fuel rail of a VAZ 2107 car – removal – installation
We remove the fuel rail from the VAZ 2107 car to check or replace the injectors, as well as when removing the intake manifold pipeline. To check the injectors you will need an ohmmeter.
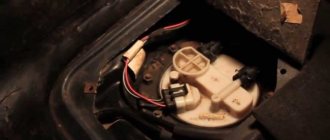
Removing the fuel rail and injectors from a VAZ 2107 car 1. We prepare the VAZ 2107 car for operations (see “Preparation of the VAZ 2107 car for maintenance and repair”). 2. On a VAZ 2107 car, we relieve the pressure in the engine power system (see “Relieving pressure in the power system of an injection engine”). 3. Disconnect the wire from the negative terminal of the battery (see “Battery VAZ 2107 - removal and installation”). 4. Having released the latch, disconnect the injector wiring harness block from the engine harness.
5. Using an ohmmeter, we check the resistance of the injector windings by connecting one probe to terminal E (“ground”) of the wire block, and the other - alternately to four terminals (F, G, B, C), measuring the resistance of each injector, which should be within 12 -14.5 Ohm. 6. Remove the receiver from the VAZ 2107 car engine (see “Receiver - removal and installation”). 7. Using a 17 mm wrench, unscrew the fitting of the fuel drain tube from the fuel rail, holding the hose tip with a wrench of the same size.
How to remove the ramp and check the injectors of the VAZ-2107-20
We carry out the work on a cold engine. Relieve pressure in the fuel system.
Unfasten or cut the plastic clamp securing the injector wire block to the front panel.
Disconnect the injector wire block from the control system wiring harness block.
Using a 17mm wrench, unscrew the fuel supply pipe fitting, holding the hose tip with a wrench of the same size.
Similarly, disconnect the tube fitting from the drain pipe hose.
Having disconnected the tubes and hoses, we check the condition of the rubber sealing rings placed on the ends of the tubes.
Use a 5mm hex to unscrew the two screws securing the fuel rail to the intake pipe
By pulling the ramp along the axes of the injectors, remove all four injectors from the holes in the intake pipe and remove the ramp assembly with the fuel pressure regulator, fuel pipes, injectors and wiring harness.
All injectors must remain on the fuel rail.
If any injector remains in the intake pipe, the retaining spring and injector body O-ring will need to be replaced.
To remove the fuel supply tube to the ramp, use a Phillips screwdriver to unscrew the screw securing the tube holder.
We remove the tube from the ramp.
The tip of the tube is sealed with a rubber ring.
To remove the injector, compress the spring clamp of the wire block and disconnect it from the injector.
Use a screwdriver to move the injector retainer along the ramp.
While rocking the nozzle, remove it from the ramp.
We check the resistance of the injector winding with a tester.
The resistance should be between 11–15 ohms.
To replace the injector sealing rings, use a screwdriver with a thin blade to pry the sealing rings off the injector body and sprayer.
We dismantle the other injectors in the same way.
We install the injectors on the ramp in the reverse order.
To check the injectors, we connect the block of their wiring harness to the block of the wiring harness of the engine management system, and connect the fuel hoses to the tubes of the ramp and pressure regulator.
We install the electric fuel pump fuse in the relay and fuse block of the engine control system.
Having placed transparent bulbs on the intake pipe under the injectors, we turn the engine crankshaft with the starter.
The shapes of the spray patterns, as well as the amount of fuel injected by each injector over a certain period of time, should not differ noticeably.
We check each injector separately by placing a transparent bulb under it and disconnecting the wire block from it.
We supply 12V voltage from the battery with two wires to the injector and turn on the ignition.
A characteristic type of jet should emerge from the nozzle holes of the nozzle, forming a conical torch.
After turning off the power from the injector, check whether fuel is leaking through the nozzle holes.
If the injector's electrical resistance is not correct, the performance and spray pattern are very different from other injectors, or if the injector is leaking, it will need to be replaced.
Install the ramp in reverse order.
We replace damaged rubber O-rings with new ones and apply engine oil to them during installation.
The tightening torque of the ramp mounting screws is 9–13 Nm, and the fuel pipe fittings are 20–34 Nm.
Repair of injectors VAZ 2114/2115
Repairing injectors involves carrying out a number of works at once:
replacement of rubber seals.
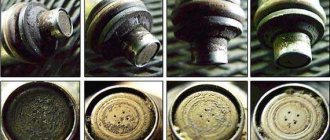
After the products have been removed from the fuel rail, you need to take a good look at each of the four nozzles. If there are visible signs of leakage on the body, repair will not be practical. You will have to immediately replace the nozzle with a new one. The differences in flushing and cleaning procedures for 8-valve and 16-valve engines are not significant. Therefore, you can be guided by the same scheme.
If the body is clean and there are no deformations or cracks on it, then repair work is allowed. To do this, you will need to remove the seal from the body and the sprayer. It is recommended to leave these parts in acetone or solvent for 1.5–2 hours. While the parts are being washed, you can use a vacuum cleaner to clean the fuel rail. Next, you need to carefully clean the place where the injectors fit into the ramp using a toothpick or a needle.
After this, you can start purging the nozzle from the inside. You will need a roll of electrical tape, an aerosol can for cleaning carburetors and a syringe. An aerosol cleaning liquid is supplied through a thin syringe into the nozzle cavity. It is better to wrap the joint between the syringe and the tube of the canister for sealing with electrical tape. It is recommended to repeat washing the nozzle from the inside three times. Afterwards the product must dry. As soon as the body itself, as well as the seal and sprayer dry after washing, you can assemble the nozzle and install it on the ramp.
A cheap product will perfectly remove dirt and deposits from the nozzle
Before installation, each nozzle is tested for resistance. The tester readings should be in the range of 11–15 ohms.
There is also a simple way to clean the injectors, without dismantling the fuel rail. However, it is only appropriate in cases where the injectors have not yet exhausted their entire service life (120–150 thousand kilometers). The use of cleaning additives in gasoline is allowed. In this case, all elements of the fuel system will be cleaned, but its closed nature does not allow removing dirt and sediment from low-quality gasoline.
The liquid is poured into the gas tank and, together with fuel, cleans all elements of the system
Replacing rubber rings and seals on injectors
Usually, when washing or repairing injectors, car enthusiasts immediately change all rubber elements. This is due to high wear rates. The cost of rings and seals is very low, but after replacement you can immediately observe the stability of the motor.
Rings and seals can be removed with one movement of the hand. However, installing new ones will require care, as it is easy to damage the rubber. The plastic element is first lubricated with gasoline, and then pulled in place of the old seal.
Spare parts for VAZ injectors can be purchased at a minimal price
Almost every driver can clean or replace the injectors on VAZ 2114/2115 cars on their own. Difficulties can arise only in the process of unscrewing the fuel rail or reconnecting the wires to the injector contacts. However, if each stage of work is carefully carried out, even a beginner can independently maintain this element of the fuel system.
Cleaning the injector nozzles. Kazan
Phone 8-917-925-67-84
Washing and cleaning of injector nozzles on a stand. With removal from the car.
The injectors are washed on an ultrasonic stand. If you wish and it is more difficult to remove the injectors, we can wash the injector using Winn's technology without removing it from the car.
Prices for washing a set of 3-4 nozzles on a stand with control of performance and spray pattern:
VAZ 8-valve 1.6 (ramp without return) - 1200 rubles!
VAZ 8-valve 1.5 (ramp with return) - 1500 rubles
VAZ 8 E-Gas valves - 1500 rubles
VAZ 2112, Priora 16 valves - 1500 rubles
VAZ 2112, Priora 16 valves with power steering and (or) air conditioning - 1,700 rubles
VAZ Kalina 16 valves - 2000 rubles
VAZ 2114 16 valves - 2500 rubles
VAZ classic and Niva - 1500 rubles
Gazelle - 1500 rubles
Foreign cars in which the injectors can be removed without removing the intake parts - from 1,500 rubles.
Foreign cars in which to remove the injectors you need to remove any additional parts and components - the cost is determined during the inspection of the car and is announced before the work is performed.
Flushing a set of 5-6-8 nozzles - from 2500 rubles.
Washing a removed set of injectors up to 4 pcs. — 800 rub.
Washing the removed set of injectors 5-6-8 pcs. — 1200 rub.
The most frequently asked questions are: after what time and using what technology should the injectors be washed?
Various sources recommend flushing injectors in the range from 30,000 to 50,000 km. vehicle mileage. These are preventive flushes - they allow you to clean the injector openings at the initial phase of contamination. This is correct - why wait until the car stops moving or starts to stall - it’s better to wash it in advance.
Removing and washing injectors
In this article I will describe the process of removing injectors on a VAZ-2107 car. The owner complained about tripping and rough operation of the engine when running on gasoline. After diagnostics, it was discovered that the injectors were clogged. The car is additionally equipped with 2nd generation gas equipment, the so-called “cracker”. In this regard, the view in the photographs may differ slightly from yours (presence of a firecracker, injector emulator, etc.). In Fig. Figure 1 shows the appearance of the engine compartment of the vehicle being serviced.
Let's get started. We unscrew the clamps securing the air pipe using a Phillips screwdriver or a 7 mm socket.
We remove the pipe.
Remove the throttle cable clamp using a “flat” screwdriver, carefully prying it up.
Open the throttle valve and remove the throttle cable.
We unscrew the fastening of the throttle cable using a 10 mm “head”.
We unscrew the fuel lines with two 17 mm open-end wrenches. We unscrew the fastening of the tubes with a Phillips screwdriver.
Remove the vacuum hose from the fuel pressure regulator.
Remove the brake booster hose by unscrewing the clamp with a flat-head screwdriver.
We unscrew the two nuts securing the throttle assembly using a 13 mm “head”. We remove it, holding the washers on the studs, and move it to the side.
Unscrew the intake manifold mounting nuts using a 13 mm “head”. We remove the washers.
Removing the fuel line fasteners
Remove the intake manifold and put it aside.
Unscrew the fuel rail mounting bolts with a 5 mm hexagon.
Remove the injector harness connector by slightly pulling the lock towards you.
We take out the ramp along with the injectors. If the injectors fit tightly on the rings, then you can carefully pry off the ramp with a pry bar.
Remove the injector harness by pressing the latches on the connectors.
Remove the injector clamps by sliding them to the side along the fuel rail.
We take out the injectors. To do this, we stagger and pull them towards ourselves.
We see rust both in the injectors themselves and in the fuel rail. Somewhere a man was filled with gasoline and water.
If you are installing new injectors, you can skip the next few steps. Otherwise, wash the dirt on the injectors with a brush in gasoline. We wash them in an ultrasonic bath. We check injectors for performance and leakage in a test bench.
We install new sealing rings on the injectors, having first removed the old ones, prying them off with a screwdriver.
It is better to put a brown rubber ring on the bottom of the nozzle; it is more heat-resistant and will last much longer. If the condition of the old rings is good, then it is better to leave them, since the quality of the new ones leaves much to be desired.
If necessary, replace the injectors with new ones. You need to buy according to the number on the nozzle. In our case, Bosh 0 280 158 502.
We wash the fuel rail with gasoline or Abro carburetor cleaner and blow it with compressed air.
Before installing the injectors into the fuel rail, the rings on the injectors must be lubricated with something, for example WD-40. This helps to avoid damaging the rings during installation.
We install the injector clamps in place. Please note that the fourth injector is installed with the connector in the opposite direction.
We put on the injector harness. We install the nozzles in place, also lubricating the rings with WD-40.
Before disassembling, we noticed that the clapper and the throttle valve were very dirty.
Now is the time to wash the throttle assembly, idle air control (IAC) and gas firecracker.
Next, we collect everything in reverse order, but take into account some points. Don't forget to put the hose on the fuel pressure regulator.
We look at the condition of the throttle assembly gasket and, if necessary, replace it with a new one.
We install new sealing rings for the gas lines.
Be sure to change the fuel filter. For VAZ cars there are filters of the old (with “screws”) and new (with “snaps”) models. In our case, an old-style filter is installed.
To remove the fuel filter, first unscrew the fuel lines using a 17 mm open-end wrench, holding the filter housing with a 19 mm open-end wrench. Then unscrew the filter itself with a 10 mm head.
This is what came out of the filter in our case.
We install a new fuel filter and gas line O-rings. Do not forget to take into account the direction indicated by the arrow on the fuel filter housing.
We tighten the fuel lines without overdoing it and hold them, excluding cutting the fuel rings.
Let's check if we have any extra spare parts left ;). We start the engine and check for fuel leaks and air leaks.
Cleaning the VAZ 2107 injector
The method of cleaning the injector largely depends on the nature of the deposits and how seriously the injectors are clogged. In some cases, you can wash them without removing them, but most often you have to dismantle the structure. Because only a few injectors are washed for preventive purposes, most drivers think about the need for cleaning work when the condition of the injectors is already neglected.
I recently cleaned the injector nozzles on my car manually, although there are other options: using chemicals. funds, at the stand, etc. But personally, I think the first method is the most effective and reliable. To successfully complete all the work, you need to arm yourself with: a 5-7 ml syringe, a rag, a set of screwdrivers, a jar of injector cleaner. So, we proceed according to the following instructions:
- We remove the clamps for fixing the air pipes, the throttle cable clamp, the accelerator cable and the bracket.
- Then the fuel line and pipe mountings.
- Next, remove the VUT hose, fuel line brackets and intake manifold.
- Loosen the fuel rail fasteners, loosen the injector mounting harnesses.
- We dismantle the injectors themselves.
We blow through each injector using an injector cleaning spray. You can simply pour additives into the system and not disassemble anything. But I can’t say anything about the effectiveness of this method. I always do all the work by hand. I recommend Lavr ML 101 or Wynn's as a cleaner. I used two products and the results were amazing.
Cleaning by removing injectors
Heavy contamination of the injection system is removed in a way that involves removing the injectors and cleaning them separately. This method allows you to achieve the best results. The main advantage of cleaning injection nozzles with liquid is the restoration of the performance of such injectors, which structurally have a complex configuration of their internal channels.
The injector is dismantled and each nozzle is individually cleaned on a special stand. This approach allows you to compare productivity, torch shape, spray direction and quality before and after cleaning. Additionally, you can compare and analyze the performance of the entire group of injectors together.
The principle of operation of the cleaning stand is that its control system simulates the operation of the injectors on the engine. Instead of gasoline, liquid is passed through them to flush the injectors. The stand operator controls the frequency of electrical oscillations of the nozzle valve. The main task is the occurrence of cavitation in the fuel supply channel. Cavitation refers to the formation of air bubbles in a liquid.
Hydrodynamic cavitation ensures the movement of the nozzle needle in the flow of cleaning liquid at high speed. A vacuum is created behind the various convex parts. Under the pressure of the surrounding liquid, the vacuum instantly divides into a large number of microscopic bubbles that “pop.” The effect of micro-explosions is obtained, and the energy from them affects the varnish and dirt deposits that have formed inside the fuel channel of the injector and on the needle itself.
The result of this operation is the effective destruction and removal of deposits and dirt in the nozzle channels, as well as the washing of the injector strainer. The operator determines the cavitation that has arisen visually. The stream of light liquid coming out of the nozzle turns brown. The color of the liquid at the outlet changes due to exfoliating slag.
The stand allows you to additionally identify changes in the operating parameters of the electrical and mechanical elements of the injectors. Thanks to this, you can make a decision in advance about the need to clean the injectors, the advisability of their continued use without flushing, or a complete replacement.
The injector performance indicator is determined both before and after cleaning. In cases where cleaned injectors show different performance indicators with a variation of more than 5%, then they need to be replaced. Faulty injectors are replaced either one at a time or in groups.
Flushing reveals that the solenoid valve is worn out and does not close completely. This means that such a nozzle flows at a time when no electrical impulse is applied to it. This malfunction leads to excessive fuel consumption, increasing carbon deposits on valves, pistons, etc. It is better to replace injectors with a similar problem immediately.
Cleaning the injector with ultrasound
One common way to clean injectors is to use a unit that cleans previously removed injectors in a special ultrasonic bath. This method provides good results, although some experts consider the best way to clean injectors using hydrodynamic cavitation.
An ultrasonic bath is an open container that is filled with cleaning liquid. From the outside, a device is mounted into the bottom of such a bath, which is an emitter of ultrasonic vibrations. The cleaning nozzle is lowered into the bath. While passing through the cleaning liquid, the ultrasonic wave starts the cavitation process. During cavitation, bubbles are formed, which burst and form shock waves. These waves have a destructive effect on the dirt and deposits that accumulate on the surface of the injector nozzle and in the channels.
Do-it-yourself cleaning of injectors on VAZ-2113, 2114, 2115
An important element in the entire engine system are injectors.
They are responsible for fuel injection, which means the operation of the entire engine depends on their lifespan. Injectors can become unusable due to many factors. The VAZ 2114 injectors themselves last approximately 100-120 thousand kilometers.
However, this is provided that gasoline complies with European standards, but in Russia the standards are often not met, which is why the injectors fail after 60-80 thousand kilometers, or even earlier.
Failure of injectors can adversely affect many vehicle systems. However, the life of the injectors can be increased if they are cleaned in a timely manner.
Why do you need to clean injectors:
- to extend the life of injectors;
- Dirty injectors increase fuel consumption and reduce the vehicle's dynamic performance.
In other words, cleaning the injectors will help the car drive smoother.
Injector malfunctions
You can understand that the nozzle requires cleaning by the following signs:
- unstable engine operation;
- unexpected sharp increase in fuel consumption;
- misfires at idle;
- reducing the acceleration speed of a car when the pedal is fully pressed to the floor.
Remember that with these signs the nozzle may no longer be working, so you need to check its functionality before cleaning. This is checked this way: with the engine running but cold, you just need to touch the injectors - they should pulsate.
There is also another way - the car is added to idle speed, after which the cap nuts on the injectors are loosened - the result of this should be a decrease in speed, if this does not happen, then the injector needs to be cleaned.
However, it is much wiser to clean the injectors ahead of time before problems arise. Timely prevention is much more profitable than cleaning when problems arise. Therefore, let's talk about the process of replacing injectors.
Replacing injectors
Of course, a car service center can replace the injectors for you. The price for this service starts from 1500 rubles. However, to save time and money, it makes sense to change the injectors yourself.
Removing injectors yourself
Here is a simple algorithm for removing injectors that all car owners can perform.
1.Disconnect the negative terminal from the battery
2.Take two 17mm wrenches and relieve the fuel pressure by unscrewing the fuel pipe fittings.
3. Separate the electrical connector from the fuel rail.
4.Take a Phillips screwdriver, unscrew the screw on the bracket on which the fuel pipes are attached, and remove it.
5.Use a 5mm hexagon to unscrew the two screws on the fuel rail mounting
6. Move the ramp in the direction of the injector axis, remove all 4 injectors from the engine and remove the ramp towards the left side of the vase.
7.Press the spring clip (1) located on the injectors, move it aside, and disconnect the electrical connector (2)
8.Using a screwdriver, move the injector clamp along the ramp and remove it (on new ramps, the bracket is simply removed).
9.Remove the nozzle from the hole on the ramp, slightly rocking it from side to side.
10.Remove the O-rings that are located on the nozzle body and sprayer using a thin screwdriver
That's all, now the injectors are ready for cleaning.
Do-it-yourself injector cleaning
For cleaning you will need electrical tape (wire) to secure the joints, a carburetor cleaner in a can, a syringe and a thin tube. The cleaning algorithm is as follows.
1.Insert the tube into the cap (nozzle) of the can 2.Insert the end of the tube into the hole of the syringe (without a needle) 3.Attach the end of the syringe to the nozzle 4.Start injecting the product through the tube, simulating fuel injection.
You need to inject until the coming out stream becomes smooth and clean. Then this will mean that the injector is clean.
Another way, if you have a battery nearby, you can try applying voltage to the injector with ordinary wires (polarity does not matter) simulating their operation and at the same time spraying liquid to clean the carburetor.
After this, you need to put on new O-rings and you can begin assembly, having first checked the resistance, which should be in the range of 11-15 Ohms. Reassemble the injectors in the reverse order of disassembly.
Result of cleaning
You now have a clean injector. Its service life, which means the normal operation of the engine, is increased.
How to convert a VAZ 2107 carburetor engine to an injection engine
Some owners of carburetor “classics” independently convert their cars to an injector. Naturally, such work requires a certain amount of experience in auto mechanics, and knowledge in the field of electrical engineering cannot be done here.
What will you need to buy
The kit for converting a carburetor fuel system to an injection system includes:
- electronic control unit;
- gas tank;
- cylinder head (new or used from VAZ 21214);
- receiver;
- ramp with nozzles;
- fuel pump assembly;
- fuel filter;
- fuel line with rubber hoses;
- throttle assembly;
- accelerator pedal with cable;
- air filter assembly with sleeves;
- front engine cover;
- crankshaft pulley;
- ignition module;
- sensors for mass air flow, damper position, detonation, coolant temperature, oxygen concentration, crankshaft position, detonation;
- high voltage wires;
- harnesses, cables, wires, terminals, thermal casings;
- brackets.
The cost of all these elements is about 30 thousand rubles. The electronic control unit alone costs approximately 5–7 thousand. But costs can be significantly reduced if you buy used parts rather than new ones.
Removing the cylinder head on a VAZ 2107 1.5 injector
- 809 20 681k
This line of cars was equipped with an injection engine with the index “2104”, embodied in the VAZ 2103 cylinder block. Cylinder diameter 76 mm, displacement 1.5, power 68 hp, complies with the Euro 2 standard. Removing the cylinder head on a VAZ 2107 1.5 l injector has its own nuances compared to the car that has a conventional carburetor engine.
The reason for removing the cylinder head can be many factors, such as:
- replacing valve seals
- replacing piston rings
- valve burnout
- burnout of the gasket in the cylinder
- burnout of the gasket between the cylinders
- gasket breakdown outwards
- breakdown of the gasket between the lubrication circuit and the cooling circuit
Necessary tool:
- container for draining antifreeze
- open-end wrenches 10,13,17x2 pcs
- screwdrivers + and -
- socket heads 10.13
- socket head type torx E16
This photo report provides a detailed description of how to remove the cylinder head of a VAZ 2107i.
We remove the battery. Disconnect the negative terminal-1, the positive terminal-2 and unscrew the battery mount-3.
We remove the air supply corrugation along with the crankcase gas pipe. Unscrew and move the accelerator pedal cable to the side.
To facilitate assembly, we mark, with a corrector, the sequence of connecting high-voltage wires (HV).
Disconnect the explosives from the spark plugs. We also turn off the temperature sensor.
Disconnect the hoses: vacuum booster-1, absorber-2, crankcase gases-3.
Drain the antifreeze from the radiator.
We also drain the block by unscrewing the plug with a 13 key.
Disconnect fuel lines-1. To do this, you will need two 17mm wrenches. Unscrew and move fuel filter-2 to the side.
We select plugs for the fuel lines to prevent debris from getting into the injectors.
Disconnect the three coolant pipes.
You also need to disconnect one of the stove pipes.
Immediately turn off the fuel injectors.
We disconnect three chips in the throttle valve area.
Unscrew the “insidious” ground terminal.
We move the washer reservoir to the side.
We unscrew the 4 bolts securing the pants and the two bolts supporting the manifold.
The next step is to remove the heat shield of the starter, it is attached in three places, two 13mm nuts and one 10mm bolt from the bottom.
From the bottom of the car, in the area of the gearbox, unscrew the support for the exhaust pipe.
It should look like this.
Unscrew the 8 nuts securing the valve cover and remove it.
We combine the timing marks. The camshaft star mark must coincide with the casting on the camshaft bed.
Crankshaft mark. The drilling on the pulley should match the casting on the front cover.
For convenience, we put marks with a proofreader.
Unbend the lock washer and remove the camshaft star bolt.
Unscrew the timing chain tensioner. Two M6 nuts for 10mm spanner.
Remove the camshaft star and unscrew the 9 nuts securing the camshaft bed.
We remove the rocker with the springs that secure them.
Unscrew the 11 mounting bolts and remove the cylinder head. Attention, the cylinder head mounting bolts 2-11 can be either for an E16 head or for a regular 12 end head.
Dismantling
Before replacing or cleaning the injectors, they will need to be removed from the fuel rail. To achieve this, the following activities are carried out:
- Make sure the engine has cooled down properly. It is not safe to work on a hot engine;
- Disconnect the power wires from the fuel pump to de-energize the device;
- Try to reduce the pressure in the engine power system as much as possible. To do this, the engine starts, and then you need to wait until it stalls at idle speed;
- Repeat this procedure several times until the car simply stops responding to turns of the ignition key;
- That's it, now our goal is the fuel rail. To remove it, you must first remove the terminals from the battery, turn off the power to the ramp itself, disconnect the fuel supply hoses, and also disconnect all electrical appliances going to it. These are pressure, idle, throttle position sensors;
- If you have an 8-valve engine, then you do not need to remove the receiver. This step is relevant for engines with 16 valves;
- Experts do not recommend removing the intake manifold without dismantling the throttle valve and the hose going to it. It is better to unscrew and disconnect everything at once, which will allow you to continue working more conveniently;
- Cover the exhaust manifold openings with something to protect them from foreign objects;
- Using a hex wrench, you can unscrew a couple of bolts and remove the fuel rail along with the injectors;
- Make sure that there are no distortions when removing the ramp, otherwise problems may arise with the dismantling processes;
- We remove the injectors. To do this, remove the mounting brackets that hold the electrical connector. You also need to remove the bracket that holds the injector in its seat.
After dismantling the elements, be sure to close the seats to prevent debris and other objects from getting in, and place the nozzles themselves on a table or floor, after laying down a dry rag.
Here you can decide whether to change or clean the elements of the fuel system. If replacement is required, install new injectors in place of the old ones and follow the assembly procedure.
Cleaning
Here proceed as follows.
- Remove the rubber rings from the injectors, and when cleaning is finished, replace them with new seals.
- The cleaning process should begin with the nozzles, on which various deposits form as the car is used.
- Be sure to thoroughly clean the funnel-shaped surfaces where tar deposits accumulate.
- The next step is the fuel mixture supply channels.
- To open the solenoid valve to supply fuel, you will have to trick the device with a 5-7 V power supply.
- Some use stabilized voltage sources, phone chargers, or even a car battery. If using a battery, the voltage should be supplied through the light bulb. It will play the role of a current damper. Otherwise you risk burning the winding.
- Electricity is supplied through two wires, in the gap of one of which a button is installed. It will close and open the network. This creates an imitation of the operation of an injector in an engine due to the influence of a pulsed electric charge.
- You can supply the cleaning liquid to clean the injectors through a can of carburetor cleaner. Inexpensive and effective, even better than specialized chemicals.
- Be sure to tightly connect the cylinder and nozzle with a rubber tube, clamps and any other means.
- All is ready? You can then apply electricity to open the injector. At the same time, press the button on the cleaning agent canister.
- Soon the torch of the liquid jet, which will exit through the fuel atomizer of the injector, will change its “clumsy” direction and will begin to uniformly exit the nozzle. This indicates that you have removed all carbon deposits.
Homemade cleaning device Before putting the cleaned nozzle back in place, check its actual condition.
Examination
To check you need:
- Measure the injector resistance using a multimeter. If the readings are within 10-15 ohms, the injector is working;
- If you deviate from these limits, cleaning is pointless. You only need to change the injectors;
- Check devices for leaks;
- To do this, when cleaning, do not turn on the electrical pulse so that the nozzle does not open;
- Under pressure, a device with a broken seal will begin to show signs of leakage. Therefore, the element must be replaced.
Troubleshooting
Before removing the injectors on the VAZ 2107, you need to make sure that they are really clogged. There are several ways:
- Hearing test: the old-fashioned method of diagnosis. Applicable only when the holes are significantly dirty. “Experienced” people recommend listening to the audio coming from the cylinder block. If muffled ringing sounds are clearly audible in the sound of the engine, then the fuel nozzles need to be cleaned;
- Assessing the condition of injectors using a multimeter: a much more objective method of analysis compared to the previous one. First you need to know what type of sprayers is installed on the car. As a rule, the “seven” was equipped with high-resistance injectors. For correct diagnostics, it is necessary to disconnect the “high voltage” going to the injector. Now you need to connect the diagnostic wires of the device to the injector terminals. If the voltmeter readings give values in the range of 12-17 Ohms, then everything is in order with the injectors;
- Diagnostics of the mechanical parameters of the sprayer. This diagnostic operation is only available with professional equipment; it is performed only at specialized service stations. The point is that the injectors are dismantled and attached to a stand. Large quantities of fuel are continuously passed through the part. The technician evaluates the parameters of the torch that is formed when fuel passes through the nozzle. If the fuel flows unevenly, then the device is clogged.
Things to take note
To repair the fuel system yourself on a VAZ, you will need to remove the receiver.
This is carried out in several stages:
- First, remove the throttle controls from the receiver, then loosen the retaining clamp and disconnect the vacuum hose.
- The fuel pipe holder is being dismantled.
- The bracket-clamp of the throttle drive cable is removed.
- The 5 fastening nuts are twisted and the pressure adjustment hose is disconnected. After this you will be able to remove the receiver from the studs.
This is the only way to gain access to the fuel rail.
When cleaning injector nozzles may be useless
Routine washing of the injector and injectors without removing it yourself or at a service center should be carried out every 10-20 thousand kilometers. If you clean the injectors after a longer distance, there is a risk that this procedure will no longer be useful.
Such neglect can ultimately lead to severe damage not only to this part, but also to other interconnected engine components. In this case, simply cleaning the injector will not get rid of it; the engine will need repair.
Buying new components, including injectors, is labor-intensive and not cheap. Therefore, cleaning the injector should not be put on hold, especially in cases where signs of a malfunction have already appeared.
But the best option is to prevent the problem from occurring by cleaning the injectors from time to time without removing them, for example, before changing the engine oil. Such prevention will help protect your car from unnecessary problems with engine injectors.
How to clean injectors
There are many different methods for cleaning injectors. The use of a specific option will depend on the degree of contamination of the holes. For preventive cleaning or removing light blockages, special chemicals can be used, the use of which does not require removing the injectors.
Cleaning injectors with additives
This method makes it possible to clean not only the injectors, but also the fuel system in general. However, this method is effective only with the systematic use of cleaning chemicals.
It is worth noting that additives must be used every 17,000-20,000 kilometers. To clean, the fuel injection line must be connected to a reservoir through which the cleaning agent is transferred under pressure, and the standard fuel pump must be turned off.
The engine must be started and should be idling for the next fifteen minutes. Then you need to turn off the engine and wait about fifteen minutes.
After this, the engine should be started again, but this time the speed should be increased to the maximum speed to remove sludge fragments. In this mode, the internal combustion engine should run for about thirty minutes.
Manual cleaning
If we are talking about an advanced case, when cleaning with additives is virtually meaningless, it is necessary to dismantle and subsequently replace the injectors.
To clean the injectors manually you will need:
- Clean rags;
- Can of cleaner;
- Syringe 5-7 ml;
- Set of spanners;
- Screwdriver set.
In order for the event to be a success, you must adhere to the following algorithm:
- Dismantling the clamps securing the air pipe and its subsequent removal;
- Dismantling the throttle cable locking mechanism;
- Removing the accelerator cable and its bracket;
- Dismantling fuel lines and pipe fasteners;
- Removing the vacuum brake booster hose;
- Dismantling the fuel line brackets;
- Removing the intake manifold brackets;
- Removing the fuel rail mounting bolts;
- Loosening of the injector mounting harness;
- Removing injectors with fuel rail.
Cleaning should be carried out according to the instructions on the packaging of the chemical product.
Cleaning injectors with additives
Additives allow not only to remove deposits from fuel nozzles, but also to clean the fuel system by and large. This method is only effective if cleaning chemicals are used periodically. Additives must be used every 17-20 thousand kilometers. For cleaning, the standard fuel pump is turned off, and the fuel injection line is connected to a container through which the cleaning liquid is supplied under pressure.
How to Drag the Ceiling on a VAZ 2107... The VAZ 2107 (seven) is a classic, in the past the pride and beauty of the Volga Automobile Plant. Currently, this morally and technically outdated car has ceased to be produced, but until recently it was not only sold by the car plant, but what is most surprising was that it found its buyers! In fact, the answer is simple - the simplicity of the design...
How to Remove a Torpedo VAZ 2108 VAZ 2109 - removing a high instrument panel There are quite a lot of reasons why you may need to remove a high instrument panel on a VAZ 2109 car, including replacing the panel itself, disassembling the interior heating system, various body repairs, including work related to painting the car . Before we can remove the panel without any problems, it is necessary...
The engine is started and idles for a quarter of an hour, after which it is turned off for the same amount of time. During this period of time, the deposits become soft. Then the engine is started again, but this time the speed is evenly increased to the highest in order to remove pieces of sludge. In this mode, the internal combustion engine should operate for about half an hour.
How to determine that injectors need to be cleaned
Fuel injectors are an important part of the injector. With their help, gasoline is sprayed into the combustion chambers. There is a misconception that parts become dirty due to bad gasoline, which contains sand and various harmful additives. But in fact, the gasoline supply system to the internal combustion engine is equipped with filters that clean gasoline from various contaminants.
Clogging of the injector does not occur immediately, only during operation of the machine. The main version of contamination is that heavy fuel components are deposited on the walls of the injectors. This happens mainly after turning off the car, when the heat rises at the base of the injectors.
Sources
- https://ServizNaBis.ru/rul/forsunki-vaz-2107-inzhektor.html
- https://TeamsPro.ru/transmissiya/zamena-forsunok-vaz-2107-inzhektor.html
[collapse]