The door can be removed as a whole (together with the equipment installed on it). It is more convenient to disassemble and reassemble the door when it is installed on the car. At the same time, there is less chance of damaging the paintwork.
An assistant will be required to complete the work.
Removal
1. We remove the window regulator.
2. We remove the glass from the door.
3. Remove the outer door handle.
4. Remove the door lock.
5. Unscrew the nut securing the wiring harness and disconnect the wiring harness block from the door harness block.
6. We release the three latches and remove the wiring harness block from the door hole.
7. Disconnect the wiring harness from the inner door panel and remove the harness through the hole in the door.
8. Removing the door stop
9. While an assistant holds the door, use a 13 mm spanner wrench (on some TORX T40 cars) to unscrew the lower hinge axis.
10. Using the same key, unscrew the upper hinge axis and remove the door.
Installation
Having coated the working surfaces of the hinges and axles with any grease, install and assemble the door in the reverse order.
Source
Why is the door trim removed?
Most often, the trim of the rear or front doors is dismantled in order to get to the internal cavities where the window lift mechanisms are installed. Although during the entire period of operation of the car there are other situations when it is necessary to remove the trim:
Front door cards Lada Kalina
It is also necessary to remove the trim during body work, when it is necessary to weld rotten elements, renew the car’s paintwork, or carry out anti-corrosion treatment.
Note. Many motorists remove the upholstery to make additional vibration and sound insulation of the body themselves.
Lada Kalina rear door trim
Adjusting the spring and power steering
Very often, the cause of a knocking sound when turning the steering wheel is a weakening of the pressure spring. It provides the required force for pressing the steering rack gear against the main shaft gear, which is set at the factory by adjusting and fixing the spring. As the vehicle is used, the spring loses its elasticity and relaxes.
In order to increase the pressing force of the spring, it is necessary to tighten it, which is done after disconnecting the steering mechanism, but without removing the steering rack. Repairing the steering rack in this case consists of setting the required gap between the rack and the shaft gear. The steering rack is installed in the middle position and is secured against movement.
The rubber plug is removed, and the indicator probe is placed in the hole of the stop adjusting nut so that it comes into contact with the rack stop. It is better to use a dial indicator. Then, turning the gear shaft that pushes the stop, the indicator measures the size of the stop's movement. The length of movement should not exceed 0.05 mm.
If this value is exceeded, it is eliminated by turning the adjusting nut. The steering rack is fixed in the position corresponding to the required clearance, and the ease of rotation of the pinion shaft is checked within the entire possible movement of the rack.
The adjustment nut is rotated using a special wrench for adjusting VAZ steering racks. It is not recommended to tighten the nut too much, which can have a negative effect when turning the steering wheel at maximum speed. If there is play when turning the steering wheel, the spring can be tightened by practically selecting the correct force.
In this case, initially the adjusting nut is turned by 20-25°, and the presence of knocking is checked when the rack is turned. If the noise is not eliminated, then tighten the nut again by 10-15°, and so on until the knocking noise is eliminated. If tightening the spring does not help, the steering rack needs to be repaired.
Adjusting Kalina's electric power steering is best done after removing the steering rack, but it can be done without dismantling with some inconvenience. The car is placed on the repair pit so that from below there is access to the mounting of the front part of the amplifier.
The clamping nut is tightened by turning clockwise from below, and when tightening the nut from above, respectively, counterclockwise. For the purpose of prevention, you should check the condition of the oil seal, since when the steering wheel is turned too much, the oil seals quickly wear out. At the same time, all elements are lubricated, especially the steering rod boots.
Preparation for dismantling
To unscrew the fasteners and remove the door trim, you need to prepare a simple set of tools:
Door disassembly tool
Since the door card of the Lada Kalina car is held on by plastic fasteners (otherwise known as clips, pistons), there is a warning regarding the working conditions. It is strictly not recommended to dismantle door trim in the cold, when the plastic becomes brittle and easily destroyed. Hence, there is a risk of breaking all the clips during the process of removing the decorative panel. Therefore, in winter, perform this operation in a heated garage or box.
In the summer, there are no requirements for premises; remove the casing even in the open air. There is only one recommendation: in windy weather it is better to drive the car into the garage, otherwise a lot of dust will be brought into the interior when the doors are open.
This is what the door card lock looks like
Advice. In cars that are 5 years old or more, the plastic from which the retainers are made dries out and becomes brittle. When separating the trim from the door of such a car, you will probably ruin some of the clips. So it’s worth buying new ones in advance, there are 8 pieces in the front door, and 10 pieces in the back door.
Carrying out preparatory work
For domestic cars, a flathead and Phillips screwdriver is often enough to get everything in order. In foreign-made cars, you will additionally need special keys TORX15/20/30. You also need to stock up on repair plastic clips
Beginners can break them through negligence, the risk is especially high in the cold season
Before carrying out work, you need to remove the terminal from the battery to protect the electrical wiring and devices from damage. It will be possible to preserve surfaces as much as possible from scratches if you install the screwdriver closer to the holders and bolts.
Simply wrapping the screwdriver with electrical tape or a clean cloth will help reduce the number of scratches.
Instructions for removing the cladding on Kalina
The first three operations are performed the same way for all Lada Kalina doors. The exception is the trunk hatches of hatchback and station wagon cars, where the disassembly procedure is much simpler. Here's what to do:
Unscrewing the blocker and acoustics
Advice. The acoustics can be attached either to the door card itself or to the metal door frame. If, after removing the speaker, you observe the first option, then during assembly it is better to redo the fasteners by drilling holes for self-tapping screws. The acoustics should be mounted to the door, not to the upholstery.
Attaching the speaker to the casing is wrong
The further procedure of work differs depending on the location of the door that you are disassembling.
Front passenger door
Here the decorative panel is held on by 8 clips, 2 screws securing the internal handle and two self-tapping screws located under the plastic pocket. The algorithm for dismantling it is as follows:
Passenger side panel removed
Advice. When prying up the edge of the door card with a flat-head screwdriver, you should place a rag under it so as not to scratch the paintwork on the inside.
Photo instructions for disassembling the door trim on a Lada
Video: How to properly remove the trim
Nuances of disassembling the driver's door
On this side, the decorative panel is removed in the same order as on the passenger side. But due to small differences in the design, it is necessary to take into account the following nuances:
The plastic socket for the mirror drive can be easily removed by hand
The panel on the rear view mirror adjustment is removed using a flat screwdriver, which is used to pry it off from below. On vehicles equipped with electrically controlled mirrors, there is no adjustment lever, and instead there is a plug on the panel.
On the driver's side, the screw is hidden in the armrest
Reference. Some drivers unknowingly try to pick out this plug to disconnect the panel. The action is useless, since the element is easily removed by hand, but unsuccessful attempts leave unsightly scratches on it.
Screw securing the lever for opening the door
Removing the driver's side trim - video
Rear door trim
Here the upholstery is pressed to the door by 10 plastic clips and 2 screws securing the handle. The disassembly technology is as follows:
Scheme for dismantling the decorative panel
Note. Please note that the opening handle lever on Kalina 1 will have to be unscrewed and removed, but on Kalina 2 there is no need to remove it, since it is screwed directly to the door and is not connected in any way to the decorative panel.
To remove the window lifter handle, you need to pull out the half ring
Otherwise, the upholstery on the doors of the second generation Lada Kalina car is removed in the same way, there are no differences.
This is what the removed rear door trim of Kalina looks like
How to remove rear door panels - video
The procedure for removing glass and installing a new one
I think that everyone already knows - the design of the side glass fastening on the Grant is the same as on the Kalina. Therefore, the differences in performing this work will be minimal. The only thing that will be different is the removal of the door trim, but I don’t think that this procedure will cause any problems for Granta owners.
Video review of glass replacement on Grant
Of course, the most visual repair guide is a video review, in which everything is clearly visible and understandable.
Well, below the whole process is discussed in the form of a photo report, in case someone has problems with the video review.
So, when the upholstery is removed, you need to pry off the seals (velvet covers) on one side with a flat screwdriver:
And with the internal one in the same way:
Of course, it is possible that when these rubber seals are dismantled, they will simply become unusable, but you can, if you wish, leave them intact if you try!
After this, with the glass raised all the way, unscrew all the bolts securing the glass to the window regulator. There are four such bolts in total, as is clearly shown in the photo below.
They are clearly visible through special technological holes. Now you can unscrew all 4 mounting bolts. But first, be sure to secure the glass so that it does not fall when it is completely released.
After this, you can lower the front part of the glass down, which is clearly visible in the photo.
And we try to pull the glass out of the door using the rear upper corner, acting extremely carefully so as not to damage the glass, otherwise it will shatter into small pieces.
The result of the work done is shown below. The entire procedure should not take more than half an hour, especially if you always have the necessary tool at hand.
If the new glass does not have special clips onto which the window lift holders are then screwed, then they must be removed from the old glass and try to be carefully installed on the new one. The main thing here is the tight fixation of these strips on the glass, so that there are no problems when lowering and raising the glass in the future.
The price for Granta starts from 900 rubles, if we consider the original glass from the BOR company with a greenish tint.
Lada Kalina, the body of which is of great interest to motorists today, is considered one of the best creations of the Togliatti plant. Kalina is not a separate model, but a whole family of Russian small-class cars produced since 2004. We will find out from the article how much it costs to repair body parts, whether the body of this car can be replaced, and what are the features of its design.
How to disassemble the trunk lid on a hatchback and station wagon
The interior lining of the Kalina rear hatch in hatchback and station wagon bodies is held on by 4 regular clips, 2 special black plastic fasteners (installed after installing the panel) and 2 screws securing the handle. In addition, the panel is hooked onto a metal protrusion by two brackets located in the lock area.
Handle screws
The procedure for removing the upholstery is as follows:
The panel is detached from the glass side
Note. You need to start snapping the pistons away from the glass, because you won’t be able to remove the lining from the lock side without damaging the clips. This is prevented by 2 brackets hooked to the metal frame of the hatch.
The mounting brackets for the trunk hatch are located near the lock.
As practice shows, it takes no more than 10 minutes to remove the trim of one door of a Lada Kalina car. The operation is really simple, but if you lack experience, it is better not to rush, so as not to break all the fasteners and scratch the plastic facing panels. The door cards are installed in the reverse order: first, the clips are snapped on, then the handles are installed, and finally the plastic elements are attached. Don't forget to connect the connectors to the power window buttons.
Source
In a station wagon
Today, many experts see the station wagon as the best creation of the Kalina family. Indeed, although its exterior is not distinguished by noticeable and catchy solutions, in order to appeal to a certain caste of consumers, it is an ideal vehicle of the classic type.
Initially, the designers were given the goal of inventing and constructing a car that would meet the needs of the masses. It was supposed to become a universal vehicle for every day. Both men and women had to like the car.
Regarding body production technology:
- 33 new materials were used in assembling the station wagon body to ensure European quality standards and compliance with safety standards. This includes not only metal parts, but also plastics, paints and much more;
- The corrosion resistance parameter has been increased several times, thanks to competent and complete galvanizing of parts exposed to greater exposure to aggressive environments
- The design of the body and interior parts was obtained entirely using computer geometric modeling. Thanks to this, it was possible to increase the rigidity and safety coefficient several times. This also affected the quality of manufacturing and mating of the front body parts;
- Welding work is carried out exclusively by robotics. Today, according to the plant administration, about 360 robots are used.
Among other advantages of the body, we can highlight the large spaciousness of the interior and luggage compartment. This, in turn, was achieved due to a successful layout solution aimed solely at increasing the volume of internal space. In addition, the car was designed with a high seating position, which provided good visibility.
Regarding comfort:
- It's easy to get in and out of the station wagon thanks to the large door opening angles;
- The rear seats are equipped with convenient settings that allow you to place cargo of different sizes;
- The interior is well protected from excess noise. For this purpose, additional door seals are provided;
- The interior is protected at the highest level from fading and ultraviolet radiation due to athermal glazing;
- The cabin provides high sound comfort. This is facilitated by proper sound insulation.
For safety:
- The Kalina station wagon has a durable design. A corresponding crash test was carried out. Body deformation measurements were carried out after impacts from the front, side and rear. The following weak areas were identified, which were immediately significantly strengthened: the floor near the driver’s feet, the central door pillar, the crossbar under the seats, upholstery, side members and much more;
- In a situation of poor visibility, when there is fog or twilight outside, visibility deteriorates. This directly affects the PB. To increase safety, it was decided to install electric and heated mirrors. True, such mirrors are installed only in the “Lux” configuration.
Regarding driving performance:
- Thanks to the successful combination of body and suspension, good handling and maneuverability appeared. The station wagon is comfortable to drive, both in the city and outside it.
If you are the owner of a Lada Kalina, learn to care for it competently. Above was information revealing the features of the body of this car and a step-by-step algorithm for replacing the body. Instructions for taking geometric dimensions with your own hands are also described. Find out more about this from photos and videos.
Lada Kalina front door repair
In this article we will fully consider the dismantling and disassembling of the front door of a Lada Kalina car
Removing the outside mirror
Use a slotted screwdriver to pry off the exterior mirror trim
Using pliers, remove the locking bracket of the ball joint housing of the handle rod
Use a Phillips screwdriver to remove the three mirror mounting screws.
We remove the mirror along with the cables and the ball joint
Install the outside mirror in reverse order
Removing and installing front door trim
We turn off the lock button by hand.
Having turned the inner handle so that the screw securing it to the lever is accessible, use a Phillips screwdriver to unscrew the screw and remove the handle.
Use a screwdriver to pry off the switch block, pressing the fastening latches
We take it out of the hole in the armrest and, unfolding it as shown in the photo, lower the block into the resulting hole so that it does not interfere with the removal of the door trim
Using a Phillips screwdriver, unscrew the two screws for the lower fastening of the upholstery.
Use a screwdriver with a thin blade to pry the plug in the armrest and remove it from the hole.
Using a Phillips screwdriver, unscrew the screw securing the upholstery
Unscrew the self-tapping screw for fastening the upholstery located in the armrest niche
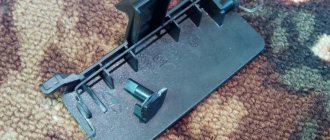
With our hands we move the lower edge of the upholstery away from the inner door panel, overcoming the resistance of the pistons.
We remove the upper edge of the upholstery from the groove of the internal glass seal and, lifting the upholstery, remove it from the front door
Location of the pistons on the inside of the upholstery
If necessary, use a Phillips screwdriver to unscrew the four screws securing the energy-absorbing element of the door
Install the upholstery in reverse order
Sheathing installation
The fabric sheet should be removed after removing the fasteners on the back. Actions step by step:
- A new piece of material is attached. First, the outer side of the panel is lubricated, a cloth is applied and smoothed well.
- The edges are fixed at the back with hardware. It is better to use a construction stapler. The panel must be left alone for an hour so that the glue sets and the material spreads across the card.
- If there is a car radio, then a niche is cut for the speaker. At the back, around the rim of the hole, a special plate is attached to which the column is attached.
- The lower fixing pins are attached and the electrical wiring is connected.
- After the handle is in place and secured with bolts, the top fasteners are fastened.
- The overhead fragment is installed, the mounting screws are screwed in and the plugs are attached.
We must not forget about the mandatory treatment of internal elements with an anti-corrosion agent and silicone lubricant; they are performed as a preventative measure. It is advisable to carry out these actions at least twice a year: before the onset of winter and in the spring.
Removing the front door glass
Removing the glass trim
Install the glass in the upper position
Using a 8mm head, unscrew the four bolts securing the glass to the two sliders and remove the glass
If necessary, peel off the protective film from the glass holder. Install the front door glass in reverse order.
Removing the front door power window
Remove the front door glass.
Disconnect the wire terminal from the negative terminal of the battery.
Before disconnecting the power window mechanism wire block from the switch block wire block, unroll the wrapping material on the connection of the blocks and disconnect the blocks
Using a 10mm socket, unscrew the 11 nuts securing the power window mechanism.
We remove the power window mechanism from the door through the lower hole in the interior panel.
We install the power window mechanism in the reverse order.
In order to prevent knocking on the doors, we cover the connection of the pads with soft material (foam rubber).
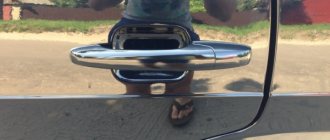
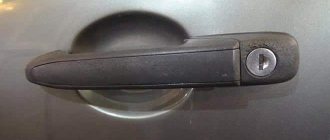
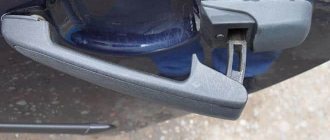
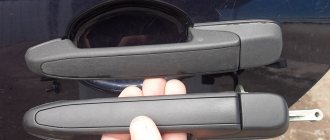
Removal and installation of the external handle and lock of the front door
Front door lock with locking drive and outside handle2.
Removing the front door trim
Using a Phillips screwdriver, unscrew the screw securing the base of the inner handle and remove it from the mounting pin.
We bend the edge of the protective material behind the inner door panel.
Using a screwdriver, we disconnect the rod from the cylinder mechanism of the outer handle lock.
Similarly, disconnect the rod of the outer handle.
Use a 8mm socket to unscrew the bolt securing the outer handle.
Use a 8mm socket to unscrew the handle securing nut.
Remove the outer handle.
Using a Phillips screwdriver, unscrew the three screws securing the door lock.
Slide the red block lock up and disconnect the block from the locking drive
Using a screwdriver, press out the rod lock, turning it around its axis.
Having disconnected the rod of the inner handle from the lock, remove the rod.
We remove the front door lock together with the locking drive and rods through the technological opening in the inner door panel
Install in reverse order
Removing and installing the door opening limiter
Remove the door trim.
To avoid damaging the door, do not swing it open after removing the door stop.
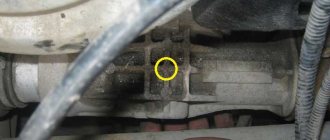
Using a 13 mm socket wrench, unscrew the bolt securing the limiter to the body pillar.
Using an 8 mm socket wrench, unscrew the two bolts securing the limiter to the door.
We remove the limiter of the internal cavity of the door.
We install the limiter in the reverse order, and then coat it with any grease
Removing and installing the front door
The door can be removed as an assembly (together with the equipment installed on it).
It is more convenient to disassemble and reassemble the door when it is installed on the car. At the same time, there is less chance of damaging the paintwork. An assistant will be required to complete the work.
We remove the glass from the door.
Remove the outer door handle.
Remove the door lock.
Unscrew the nut securing the wiring harness and disconnect the wiring harness block from the door harness block.
We release the three latches and remove the wiring harness block from the door hole.
Disconnect the wiring harness from the inner door panel and remove the harness through the hole in the door.
Remove the door stop.
While the assistant holds the door, use a 13 mm spanner to turn out the axis of the lower hinge
Using the same key, unscrew the upper hinge axis and remove the door.
Having coated the working surfaces of the hinges and axles with grease, install and assemble the door in the reverse order.
To ensure reliable contact in the connecting block of the door wiring harness, we treat its terminals with a special agent for cleaning and protecting electrical contacts.
Source
Installation
As you can already guess, installing the window regulator is carried out in exactly the reverse order of dismantling it; the only thing is that you first need to treat the guide of the device with lubricant.
The installation procedure for the front lifts is as follows:
- We fasten the new device with nuts (11 pieces);
- We connect the wires and the motor;
- We find the bolt securing the inner handle of the lock and tighten it, using a key, tighten the glass fasteners.
- We remove the now unnecessary tape and check the work.
You need to look at how the window opens and closes, whether there are any distortions, whether all the screws are tightened well. If a mistake was made, what to do, you will have to repeat the work again. If everything goes well, you can praise yourself for a job well done.
The rear window lifters are installed in the same way, in the reverse order.
- Through the niche at the bottom of the back door, we put the device in place of the old one.
- Using a 10mm wrench, tighten the bolts and nuts.
- Using a size 8 wrench, secure the mechanism with three nuts.
- We remove the tape.
Removing the Kalina/Granta door
| Unfortunately, road accidents are not uncommon and sometimes it is not advisable to repair the door; it is more convenient to simply install a new part. Do you know how to remove the doors on the Kalina/Grant assembly? |
You will need : remove the door trim (for Kalina, for Granta), prepare socket wrenches “8”, “10”, “13”, socket wrench “13” (for some TORX T40 cars).
All door wiring is connected into one common block, which makes replacing Kalina/Granta doors easier than on previous domestic cars. On the other hand, the presence of this connector makes it difficult to lay new wires in the car doors (for example, heated mirrors).
The door mounting diagram is as follows:
First you need to remove the door stop:
Next, the process for the front and back doors is slightly different.
Gearbox lever rattling
For LADA Kalina, a typical malfunction is rattling in the area of the gearshift lever, which mainly becomes noticeable when the engine is running at speeds of about 3000. The source of the side sound is the bushing, which is made a little thicker than necessary, and because of this, a gap appears in the mount. To resolve this problem you need to do the following:
- remove the handle cover, which is attached with latches;
- using two 13mm wrenches, unscrew the nut and bolt;
- remove washers and bushings;
- to eliminate rattling, the bushing in the middle needs to be slightly sharpened in width or the mount should be lubricated with sealant;
- Having done this, mount everything back. The sealant does not help out every time, but if you sharpen the bushing by 0.3 mm, the result is guaranteed.
It’s safe to say that repairing a Lada Kalina car yourself is not so scary. Every car enthusiast has the opportunity to eliminate minor malfunctions of this car. You just need to believe in yourself, follow our advice and everything will work out!
- Seven tuning
- Tuning VAZ 2108
Removing the front door
Remove the front door from the car. Installation in reverse order.
Straightening tool
Body parts can be restored either using the simplest tools or using professional tools and stands. Simple tools for restoring body geometry include:
- hammers and mallets of various types;
- all kinds of supports (anvils, metal bars of all sizes);
- special spoons for pulling out metal:
- levers and hooks;
- grinding tool.
There is also more complex equipment, as well as entire sets of tools. A standard set of straightening equipment usually contains:
- hydraulic pumps and cylinders;
- nozzles of all shapes;
- impact plates;
- adapters.
In professional body repair, rack-and-pinion platform stocks and special stands are used. Using special equipment, when restoring the geometry of a body element, the impact on damaged areas is achieved with greater force and precision, the metal is straightened faster and with less labor costs, and the straightening is of a higher quality.
Removing the rear door
Remove the rear door from the vehicle.
Installation in reverse order. By the way, it is recommended to dismantle the door assembly with an assistant, because The weight of the car door is quite large (especially after sound insulation).
Source
The nuances of door straightening
Smooth dents without creases or folds have the least consequences. We can say that the car owner is lucky if the paintwork is not damaged. But such delicate damage can only be caused by relatively “soft” objects.
The dent on the door can be very large, and there is also a so-called “cracker”. In this case, rows of points are placed by welding on the back side of the door with an interval of 15-20 mm. The dots can also be placed on the front side, but then after straightening they will have to be ground off.
Creases or folds are classified as complex damage. It is impossible to straighten them by simply squeezing them out. Most likely, the door will have to be removed and worked on on the slipway. In the most difficult cases, opening the door is required. On the slipway, the geometry of the part is restored using hydraulics.
You can straighten the creases using a special device - a spotter and a reverse hammer, which is hooked onto washers specially welded to the casing. To straighten the door from the inside, you may need to cut out part of its frame, which is then welded back.
The method that involves working with a reverse hammer is traditional. But after such straightening, small bumps may remain on the surface of the door. You can get rid of them with a metal plane followed by processing with an angle grinder with a flap disc.
When a dent is formed after an impact at an angle close to a straight line, the door often moves inward a little. If the blow is strong, then it may not close at all. This is due to the pull of the hinge on the door itself. You can drown them by hitting them with a hammer through a wooden spacer.
Many experts believe that for complex dents without creases, preference should be given to straightening from the outside of the door. In this case, it is easier to control the process, which means that leveling will occur faster. To make it easier to attach the rods, use a spotter or welding washers, welded with low current, so that they can then be easily rolled up.
If the door is straightened from the back side, then the most important point in this case is to control the force of impact. To avoid cutting the door frame, some straighteners resort to the pneumatic method. It involves placing an inflatable cushion (soccer ball) opposite the dent, which, when inflated, will gently straighten the doors.
The decision to choose a straightening method is always made after examining the dent and depends on its characteristics. Sometimes a door dent can be straightened out with a regular pry bar, which is pressed against the stiffener on the reverse side. In this case, you can control the straightening by installing a large mirror opposite the door.
After straightening the door, there is no need to rush into painting. First you need to install it in place and check the gaps. They should be uniform around the perimeter. You should take similar gaps on the door on the opposite side as a sample.
Body and its replacement
In some cases, the body is so deformed that there is no need to talk about repairing or replacing certain elements. What should the owner of the Lada Kalina do in this case? Definitely, the body should be replaced, but here’s the problem - the latest amendments to the law prohibit this from being done at the official level.
Below is the standard algorithm of actions required to formalize a body replacement (was in force before the amendments to the law):
There is little to explain the tightening of rules in the traffic police. There is no justifying logic. Those who converted numbers from the old body to the new continue to do so with impunity to this day.
Approximate cost of repair work on the Kalina body at a service station
Here are the prices offered today at various repair services.
In principle, the prices are not that low. It would be better to learn how to replace (which is much easier) or repair it yourself. We are not talking about competently taking body dimensions to compare geometry. This, of course, should be done only with high-quality equipment, which is almost impossible to provide in a garage workshop.
On the other hand, useful information about the geometric dimensions of Kalina’s bodies will be presented below, which will make it possible to remove them yourself using a regular tape measure.
Watch a video about problem areas of the Lada Kalina body
Instructions for removing the cladding on Kalina
The first three operations are performed the same way for all Lada Kalina doors. The exception is the trunk hatches of hatchback and station wagon cars, where the disassembly procedure is much simpler. Here's what to do:
Unscrewing the blocker and acoustics
Attaching the speaker to the casing is wrong
The further procedure of work differs depending on the location of the door that you are disassembling.
Front passenger door
Here the decorative panel is held on by 8 clips, 2 screws securing the internal handle and two self-tapping screws located under the plastic pocket. The algorithm for dismantling it is as follows:
Passenger side panel removed
Nuances of disassembling the driver's door
On this side, the decorative panel is removed in the same order as on the passenger side. But due to small differences in the design, it is necessary to take into account the following nuances:
The plastic socket for the mirror drive can be easily removed by hand
The panel on the rear view mirror adjustment is removed using a flat screwdriver, which is used to pry it off from below. On vehicles equipped with electrically controlled mirrors, there is no adjustment lever, and instead there is a plug on the panel.
On the driver's side, the screw is hidden in the armrest
Screw securing the lever for opening the door
Rear door trim
Here the upholstery is pressed to the door by 10 plastic clips and 2 screws securing the handle. The disassembly technology is as follows:
Scheme for dismantling the decorative panel
To remove the window lifter handle, you need to pull out the half ring
Otherwise, the upholstery on the doors of the second generation Lada Kalina car is removed in the same way, there are no differences.
This is what the removed rear door trim of Kalina looks like
Removing the trim from the driver's door
The algorithm for disassembling the driver's door structure is similar, but there are some subtleties of this process:
- First, the plugs are removed from all fasteners. They are pryed off with a screwdriver.
- The panel plastic will be easier to remove if you first unscrew the fragment for adjusting the mirror structures. Unlike the passenger door, the driver's door has one screw. It is located under the plug.
- The opening mechanism is removed last.
- If your car is equipped with electric mirrors with remote control, then to remove the rear view adjustment panel you need to unscrew the screw located at the bottom.
Preparation for dismantling
To unscrew the fasteners and remove the door trim, you need to prepare a simple set of tools:
Door disassembly tool
Since the door card of the Lada Kalina car is held on by plastic fasteners (otherwise known as clips, pistons), there is a warning regarding the working conditions. It is strictly not recommended to dismantle door trim in the cold, when the plastic becomes brittle and easily destroyed. Hence, there is a risk of breaking all the clips during the process of removing the decorative panel. Therefore, in winter, perform this operation in a heated garage or box.
In the summer, there are no requirements for premises; remove the casing even in the open air. There is only one recommendation: in windy weather it is better to drive the car into the garage, otherwise a lot of dust will be brought into the interior when the doors are open.
This is what the door card lock looks like
Door straightening: main points
In many cases, to straighten out most of the dents, you will need to remove the upholstery and press out the dent from the inside. The metal will play and fall into place. The more the metal is stretched, the more effort must be applied to completely return the surface to its previous shape.
Small irregularities are tapped with a hammer and various mandrels. Then they are sanded down to metal with a grinder (grinder), and the remaining dents are pulled out with a spotter. If you don’t have such a tool at hand, you can do it the old fashioned way - weld the hinges with a semi-automatic machine and pull them with a reverse hammer.
Straightening the door does not end there, because the work must be completed. After leveling the metal, the door needs to be puttied. In the event that small irregularities remain, you can use putty with fiberglass, as it perfectly fills the recesses and at the same time gives minimal shrinkage.
Next you need to use a universal putty and a finishing putty. It is important to understand that the less putty there is on a part, the less likely it is that it will subsequently peel off . Then the part is primed, and the next day it is processed and painted. If necessary, it is polished after the paint or varnish has dried.
At the end, all the door accessories are installed in place, and the molding is glued with double tape (it is better to buy a branded one, for example “3M”).
The result of door straightening depends not so much on the quality of the tools, but on the skills of the master. In general, modern car straightening allows you to achieve colossal results.
Why is the door trim removed?
Most often, the trim of the rear or front doors is dismantled in order to get to the internal cavities where the window lift mechanisms are installed. Although during the entire period of operation of the car there are other situations when it is necessary to remove the trim:
Front door cards Lada Kalina
It is also necessary to remove the trim during body work, when it is necessary to weld rotten elements, renew the car’s paintwork, or carry out anti-corrosion treatment.
Lada Kalina rear door trim
Basic information about LADA Kalina
LADA Kalina has been produced since 2004; production of the popular second-generation car began in 2013. Kalina-1 is available in three body types: hatchback (model 1119), sedan (model 1118), station wagon (model 1117). There are cars available with petrol engines of three modifications: a 1.4-liter 16-valve engine with a power of 89 hp. s., 1.6-liter 8-valve engine producing 81 hp. s., 1.6-liter 16-valve engine producing 98 hp. With. The LADA Kalina-1 has only a manual transmission with five gears. The front axle has a classic MacPherson suspension, the rear axle has a beam with stabilizer, springs, and shock absorbers.
Typical faults of LADA Kalina-1
Significant malfunctions with Kalina rarely occur, but there are a lot of various undesirable trifles. The car’s clutch is not very reliable and has an impressive service life, regardless of the type of engine, so it can malfunction after 40-50 thousand kilometers. The main source of malfunction is a broken clutch disc.
You need to constantly monitor the oil level in the engine - sometimes it leaks through the gaskets or burns through the piston rings. On the instrument panel there is only an oil pressure warning light, but there is no dial indicator. If the indicator lights up all the time, there is a possibility that the crankshaft is knocking.
A common malfunction of VAZ gearboxes is increased noise. It is difficult to get rid of the humming of the gearbox; sometimes neither replacing the bearings nor refilling with first-class transmission oil comes to the rescue. The transmission is noisy even in new cars, because of this the Volzhsky Automobile Plant has repeatedly completed the transmission.
A problematic element since the days of the VAZ 2108 and VAZ 2109 has been the thermostat in the engine, moreover, the valve in the thermostat was capable of jamming in any position. It's annoying when the engine doesn't heat up to the required operating temperature, but if the engine overheats, it's more problematic.
Electrical problems on LADA Kalina appear mainly of three types:
- the ignition module is often damaged;
- very soon the bearings and diode bridge “die”;
- The window lift cable on the driver's door breaks.
When the ignition coil sparks, the first and fourth cylinders or the second and third cylinders stop functioning. The ESP cable breaks when it falls off the guides.
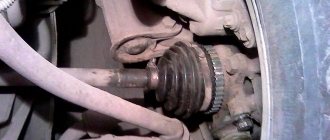
The main source of cracking noise in outer CV joints is insufficient lubrication; At the factory, in order to save money, they put it in sparingly. The consequence of this is severe wear of the hinges, and as a result, the “grenade” needs to be replaced.
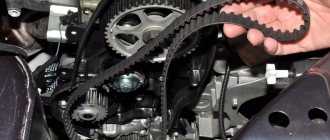
A broken timing belt is a very annoying problem. And if on the 8-valve engine 21114 it is possible to change the belt drive and move on, then on engines 11194 or 21126 the valves bend from the oncoming push from the pistons, repairs will be quite expensive. In addition, a break can occur through a jammed water pump, because of this, if the pump begins to make noise, it must be replaced immediately.
Design and types of window lifters
Window regulators are a device designed to raise or lower car windows.
At the moment, there are a huge number of options for these devices, but the design, despite the differences in component parts for different models, is similar, it includes:
A window regulator of any design consists of two main elements:
The drive is divided into two types:
In addition, window regulators differ depending on the mechanism of glass movement:
Each option has its pros and cons and technical features. All these device options have one thing in common: one day they fail; this problem especially often occurs in a model that is so popular today as the Lada Kalina.
There can be dozens of reasons why power windows malfunction, but the most common are the following:
When it is impossible or too problematic to repair the device, it is more advisable to replace it with a new one. The following options are suitable for the Lada Kalina:
Of course, the price is directly related to quality, but if the budget is limited, then the domestic option is not bad.
Now let's talk about how to install window regulators yourself.
Advantages and disadvantages of updating
The main advantage of replacing door trim is a significant change in the interior, since European trim makes the interior more attractive. At the same time, owners of an expensive audio system will have the opportunity to install larger speakers in the opening for audio preparation. In addition, the fabric covering is reupholstered separately; the owner does not have to completely disassemble the door.
The main disadvantage of installing modern trim on a VAZ 2110 is the need to modernize the car's interior, since the new panels do not provide openings in the doors for ventilation. High-quality European cladding is not cheap, and more affordable panels are made too sloppily in the edge parts, where there are almost always noticeable flaws made during production.
If you want to replace worn upholstery with a new one, you must remember that although this process is simple, it takes a lot of time. The work is small and voluminous, since you will have to upholster each of the doors separately. You should decide to install Euro upholstery only if you are not bothered by the cost of the kit and the amount of time that needs to be spent on its installation.
We check the quality of work
As you can see, this work is not at all difficult, it can be done independently, saving a lot of money on a car service, which will charge you a tidy sum for it.
In addition, since we had to remove the door trim, we can also carry out sound insulation, which in the Lada Kalina is also not at the highest level.
At the end, a small bonus on how to make the power windows work without the ignition.
We wish you a good journey and good luck!
Damage to the side windows of doors (sliding doors) is a fairly rare occurrence, and sometimes, even with serious side impacts, the windows remain intact. On a Lada Granta car, the side windows can be changed without any problems, and to perform this repair you will need the following tool:
Do-it-yourself car straightening
If you really want to, you can straighten body parts yourself, but you need to rely on your strength.
If there is no appropriate experience, the owner can ruin the appearance of his car, and in the future the car owner will only complicate the work of the craftsmen. As a rule, at home the driver does not have special equipment, so a jack and a rubber hammer are mainly used for straightening. The easiest way is to straighten small dents yourself, and if the body element is removable (front fender, door, hood), it is still better to remove it.
The easiest way to straighten the front fender yourself is to level the deformable surface; the part must first be removed from the car. After dismantling, the wing should be placed on a flat surface, covered with thick fabric (felt) - a soft base is necessary here to soften impacts. When striking, you should regularly inspect the wing to check how level the metal can be. If, as a result of straightening, the paint flies off, you need to prepare this area for painting - putty, sand, degrease and then prime.
To straighten out dents on the door, the body element should also be dismantled. After dismantling, the door is disassembled and the door trim is removed from it. If the dent is located approximately in the middle of the door trim, the defect can be easily eliminated - the iron can be tapped from the inside. “Garage diseases” are more difficult to cure, and straightening here should still be entrusted to professionals - it is unlikely that you will be able to do the job well on your own, and a thick layer of putty is not a solution, the putty may fall off.
How to disassemble the trunk lid on a hatchback and station wagon
The interior lining of the Kalina rear hatch in hatchback and station wagon bodies is held on by 4 regular clips, 2 special black plastic fasteners (installed after installing the panel) and 2 screws securing the handle. In addition, the panel is hooked onto a metal protrusion by two brackets located in the lock area.
Handle screws
The procedure for removing the upholstery is as follows:
The panel is detached from the glass side
The mounting brackets for the trunk hatch are located near the lock.
As practice shows, it takes no more than 10 minutes to remove the trim of one door of a Lada Kalina car. The operation is really simple, but if you lack experience, it is better not to rush, so as not to break all the fasteners and scratch the plastic facing panels. The door cards are installed in the reverse order: first, the clips are snapped on, then the handles are installed, and finally the plastic elements are attached. Don't forget to connect the connectors to the power window buttons.
Basic information about LADA Kalina
LADA Kalina has been produced since 2004; production of the popular second-generation car began in 2013. Kalina-1 is available in three body types: hatchback (model 1119), sedan (model 1118), station wagon (model 1117). There are cars available with petrol engines of three modifications: a 1.4-liter 16-valve engine with a power of 89 hp. s., 1.6-liter 8-valve engine producing 81 hp. s., 1.6-liter 16-valve engine producing 98 hp. With. The LADA Kalina-1 has only a manual transmission with five gears. The front axle has a classic MacPherson suspension, the rear axle has a beam with stabilizer, springs, and shock absorbers.
Typical faults of LADA Kalina-1
Significant malfunctions with Kalina rarely occur, but there are a lot of various undesirable trifles. The car’s clutch is not very reliable and has an impressive service life, regardless of the type of engine, so it can malfunction after 40-50 thousand kilometers. The main source of malfunction is a broken clutch disc.
You need to constantly monitor the oil level in the engine - sometimes it leaks through the gaskets or burns through the piston rings. On the instrument panel there is only an oil pressure warning light, but there is no dial indicator. If the indicator lights up all the time, there is a possibility that the crankshaft is knocking.
A common malfunction of VAZ gearboxes is increased noise. It is difficult to get rid of the humming of the gearbox; sometimes neither replacing the bearings nor refilling with first-class transmission oil comes to the rescue. The transmission is noisy even in new cars, because of this the Volzhsky Automobile Plant has repeatedly completed the transmission.
A problematic element since the days of the VAZ 2108 and VAZ 2109 has been the thermostat in the engine, moreover, the valve in the thermostat was capable of jamming in any position. It's annoying when the engine doesn't heat up to the required operating temperature, but if the engine overheats, it's more problematic.
Electrical problems on LADA Kalina appear mainly of three types:
- the ignition module is often damaged;
- very soon the bearings and diode bridge “die”;
- The window lift cable on the driver's door breaks.
When the ignition coil sparks, the first and fourth cylinders or the second and third cylinders stop functioning. The ESP cable breaks when it falls off the guides.
The main source of cracking noise in outer CV joints is insufficient lubrication; At the factory, in order to save money, they put it in sparingly. The consequence of this is severe wear of the hinges, and as a result, the “grenade” needs to be replaced.
A broken timing belt is a very annoying problem. And if on the 8-valve engine 21114 it is possible to change the belt drive and move on, then on engines 11194 or 21126 the valves bend from the oncoming push from the pistons, repairs will be quite expensive. In addition, a break can occur through a jammed water pump, because of this, if the pump begins to make noise, it must be replaced immediately.