Of course, there are other ways to solve the problem. Instead of buying a new part, you can repair the VAZ 2106 gearbox. However, doing this in a garage is highly not recommended, since you simply will not be able to set the gap in the gear meshing correctly. That is why the most reliable solution would be to purchase a new element. Fortunately, its cost is not that high (about 4 thousand rubles), so from a financial point of view, your costs will be minimal.
In order to replace the rear gearbox of a VAZ 2106 quickly and correctly, we need to prepare the following set of tools:
- Set of wrenches and spanners.
- “Plus” and “minus” screwdriver.
- A solvent like White Spirit or a bottle of gasoline.
Have you changed the gearbox on your VAZ 2106?
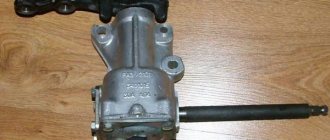
The familiar “six”
VAZ 2106 has rear-wheel drive. The transmission of this classic car consists of a dry single-plate clutch, a gearbox with synchronizers in all forward gears, a cardan drive with 2 driveshafts and a rear axle with a removable gearbox.
Malfunctions of the VAZ 2106 gearbox mainly arise due to untimely replacement of transmission oil in the rear axle housing of the car. The presence of problems is indicated by a special noise that appears only at certain vehicle speeds. This noise signals increased friction of the gears of the mechanism.
If you hear a noise like this, first try checking for oil in the rear axle housing and the tightness of all holes and connectors. If necessary, add oil and replace worn gaskets. If the noise does not stop after this, you will have to open the rear axle and repair or change the gearbox. Replacing the gearbox is an easy task. It can be performed without the help of specialists in any clean, lighted room where there is an inspection hole or a hydraulic lift.
Replacing the gearbox of a VAZ 2106 Zhiguli
/ VAZ/ vaz-2106/ Rear axle/ Replacement gearbox
Repairing auto parts yourself is a responsible task that should be taken as seriously as possible. Sometimes a faulty spare part takes the driver by surprise, forcing him to spend a lot of time and money searching for a good service station, but there is an alternative solution to the problem; this requires a small amount of knowledge and a set of tools.
When a VAZ 2106 Zhiguli gearbox is being repaired, you need to be extremely careful and not neglect the little things. To get acquainted with the issue, car enthusiasts often use various Internet portals dedicated to auto parts. Some of them use narrowly focused forums. But, as a rule, only generalized information is provided there, which is known initially. Where can you find a reliable source that offers really useful things? Our portal is open for this 24 hours a day. Online mode allows us to help clients at any time convenient for them. Moreover, a mobile version has been developed that is available to everyone.
A detailed description of such a unit as replacing a VAZ 2106 Zhiguli gearbox has a good structure with thematic headings. In addition, there is always the opportunity to familiarize yourself with the intricacies of installation. There are often situations when a driver is confident in his abilities, but when he gets down to work, questions begin to arise. Thanks to our portal, such moments can be easily avoided. The site is a database that is updated regularly. By using it as a support during repair work, the car enthusiast receives a serious advantage. Each of the articles has reliable support, tested in practice.
In addition to the repair manual, the owner of a personal car will be able to prevent a lot of breakdowns that occur due to the human factor, thanks to the information located on the site. Users are presented with a lot of useful recommendations for proper operation, which will help significantly extend the life of the unit and avoid many negative consequences.
Online support is an excellent and most convenient way to obtain the necessary information. Another significant plus is that articles are written for people. We understand that the reader will do everything with his own hands, and we try to make it as convenient and efficient as possible. Use the resource at any time of the day and find the answer to any question you may have regarding cars.
Comments
No comments yet
Leave a comment Cancel reply
| EXECUTION ORDER |
Diagnosis of gearbox failures
Accurate diagnosis of the rear axle of a VAZ 2106 is only possible while the vehicle is moving. Malfunctions are detected by sound.
This is the car part
First you need to find a flat, straight section of a country highway without holes or potholes. It is better to carry out tests early in the morning, while there is no heavy traffic. First you need to remove all noisy things from the trunk and interior.
- First we set off and reach a speed of 20 km/h, after which we move at this speed and 1st gear for several minutes. We remember the noises that appear.
- Then, at a normal pace, we accelerate to 90 km/h, gradually switching from low to high gear. We listen to the sounds that the car makes when driving in different gears and speeds.
- We release the gas pedal and, without pressing the brake, sequentially shift gears from 4 to 3.2, 1 and then to neutral. We roll until the car comes to a complete stop, monitoring the noise that occurs in different gears and speeds when decelerating.
- After stopping the car completely, we accelerate from standstill to 100 km/h, move the gearshift lever to neutral and turn off the engine. It is important not to lock the steering wheel.
- After turning off the engine, we roll in neutral until the car comes to a complete stop.
If the sounds emanating from the car during the first test fully correspond to the noises that appeared during the second, then the rear axle gearbox of the VAZ classic is working. If during the first test noises are detected that were not present during the second test, remember them and continue diagnostics while parked.
- Set the gearshift lever to neutral and start the engine.
- Slowly increase the engine crankshaft speed at idle to 4500.
- We compare the sound from the engine with the sound that arose during road tests.
If the sound noted after the first 2 tests corresponds to the noise of the motor, we stop the diagnosis, there is no breakdown. If the noise is not related to the engine, we carry out the last test.
- We hang up the rear wheels and put the car on supports.
- We start the engine, put it in high gear and listen to the noise at various speeds.
If the noise noticed during the first test does not repeat during the remaining tests, then it is time to remove the gearbox.
Dismantling a faulty unit
In most cases, if a malfunction is detected, the manufacturer recommends replacing the VAZ classic rear axle gearbox assembly. The reason is that after replacing individual parts, precise adjustment of this mechanism is required, which is almost impossible to perform without special tools.
Dismantling the VAZ classic gearbox is performed as follows.
- First, we lift the rear of the car with a jack and put the car on supports. We place stops under the front wheels.
- Lower the handbrake all the way down.
- Drain the oil from the rear axle housing.
- Remove the wheels and drums.
- We rotate the axle shaft flange so that the large holes in it coincide with the 2 nuts securing the oil deflector.
- We unscrew these nuts along with washers.
- In the same way, unscrew 2 more nuts securing the reflector.
- Now we unfold the brake drums and screw them with the convex side to the flanges of the axle shafts, using 2 wheel bolts for the right and 2 for the left.
- We grab the drum with both hands and with a strong jerk we pull the right axle shaft out of the bridge beam by about 25-30 cm.
- We repeat the procedure with the left axle shaft.
- After this, unscrew the brake drums and calmly remove the axle shafts completely.
- Holding the rear cardan from turning with a pry bar, unscrew the nuts of the bolts securing the cardan joint flange to the drive gear flange of the gearbox.
- We disconnect the hinge flange from the gearbox flange using a pry bar.
- We unscrew all the bolts securing the gearbox to the beam.
- We take out the gearbox.
That's all - the dismantled mechanism can be sent for repair or replaced with another. When purchasing a new gearbox, it is important to make sure that its markings are the same as the old one. The marking with the number of the final drive is located on the toothless side of the driven gear. When installing a new or repaired gearbox, it is important not to forget to install all the gaskets, coat the fastening bolts with sealant and pour transmission oil into the rear axle housing.
When installing both axle shafts, the oil deflectors should be turned with the screws down. The bolts securing the reflectors to the rear axle beams must be screwed with the short part of the cap to the axle shaft.
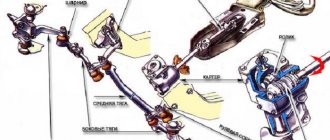
Removing and replacing the steering gear
Activities that are necessary to replace the steering mechanism of a vehicle:
- Removing the steering wheel.
- Disconnecting the steering shaft.
- The middle and left side tie rods are disconnected from the bipod and moved to the sides.
- Next, using two wrenches, unscrew 3 bolts that secure the steering gear to the car body. Before performing this procedure, it is necessary to remove the left fender liner.
- After unscrewing the nuts, you need to remove the bolts. This should be done carefully so as not to lose washers and gaskets, the main purpose of which is to adjust the ratio of the two shafts.
- The gaskets are removed (their locations must be marked, since they will be placed back when installing a new steering gear).
- The gearbox is carefully lowered and should hang on the machine body.
- Afterwards, through the top of the hood, the steering gear is removed.
The removed steering mechanism of the VAZ 2106 car must be completely cleaned of dirt. Work is also being carried out to clean the gearbox mounting area. If necessary, work is carried out to defect a section of the body if traces of corrosion or mechanical damage are detected.
It is unacceptable to ignore any, even insignificant in your opinion, problem with the mounting location of the steering gear, since in the future this may negate the work expended now. It is not recommended to leave damaged and suspicious areas of the body without proper care.
Installation of the steering gear is performed in the reverse order. However, in order for the replacement to take place correctly, during assembly work you must adhere to the following recommendations:
- When screwing in bolts and nuts, do not immediately tighten them.
- After completing the process of installing fasteners, you need to get behind the wheel and turn it to the right, and then to the left a few turns. Thanks to this action, automatic adjustment occurs - all parts and elements are finally adjusted to their seats.
- After performing the manipulations described above, it is necessary to finally tighten all bolted connections and reinstall all additionally removed parts and elements in the reverse order.
Why does oil leak from the rear axle gearbox of VAZ 2107, 2106?
It is important to understand when the seal is leaking and when there is simple fogging. If after using the machine no drops of oil are visible near the oil seal, we can assume that the oil seal is simply sweating. In a situation where drops of oil or a trail followed by a drop are visible, we can assume that the oil seal is leaking.
Causes of leakage of the rear gear axle seal of VAZ 2107, 2106:
- Wear of oil scraper elements of the oil seal.
- Rupture of the compression spring of the oil seal.
- Oil seal defect.
- Development on the flange.
- Faulty or clogged gearbox breather.
Replacing the rear axle oil seal on a VAZ 2107 with your own hands.
First, let's prepare spare parts and tools. Of the new parts we will need:
- The seal itself.
- Spacer sleeve.
- Oil deflector washer.
- New gear oil.
You will need 1.35 liters of oil. According to Murzilka, it is recommended to change it together with the oil seal. Ideally you need:
- Head 24
- The key is 17 (you can have a head) .
- A dynamometer (can be replaced with spring scales up to 15 kg) or a torque wrench of at least 150 N*cm.
- Open-end wrench 13.
- A good, thick flathead screwdriver.
- Mandrel for oil seal.
- Hammer or mallet.
- Container for old oil.
- Rags.
- Marker.
- Jack.
We've prepared everything and are starting the replacement!
Preparing and dismantling the gearbox oil seal.
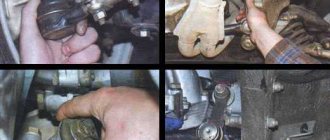
We drive the car into a pit or overpass and drain the oil from the bridge (do not forget to immediately screw the drain plug back). We make a mark with a marker at the junction of the cardan with the gearbox (so as not to throw off the balancing during installation). We take a 13 mm wrench and a strong screwdriver or some kind of mounting tool and unscrew the nuts securing the cardan to the gearbox.
We disconnect the driveshaft from the gearbox and see the 24 nut, but do not unscrew it. This is where a torque wrench or dynamometer comes in handy. We need to measure the force at the input to the gearbox until the suspended wheel begins to spin. Use a jack to jack up any rear wheel and then proceed according to the situation:
- If you have a torque wrench, then simply turn the nut 24 degrees until the wheel starts spinning and look at the readings on the wrench at this moment. We remember them because When assembling, we will tighten with the same force.
- If you have a dynamometer (or scales), then we hook it onto the bolt and pull until the suspended wheel moves. We remember the readings because When assembling, we will tighten the nut until we achieve the same readings.
- if you have nothing at all, then make a mark on the flange, nut and gearbox and count how many turns you unscrew the nut to tighten it the same number of turns.
We remove the wheel from the jack (but do not remove it far) and unscrew the nut by 24. To unscrew it, we place bricks under the wheels as stoppers, or we screw in 2 bolts and make a stop from a mounting or pipe as shown in the photo below.
Next, use a mallet or hammer to knock down the gearbox flange through a wooden spacer.
Now you can see the oil seal itself and you can remove it with a screwdriver or wrench.
Installing a new oil seal in the rear axle gearbox.
Wipe the oil seal installation area from dust and debris. Check the flange for wear or rust. Before installation, lubricate the outer part of the oil seal with lithol. Press the new oil seal through the mandrel to a depth of 1.7-2mm from the edge of the gearbox. If there is a large hole on the flange , then it is better to drive the oil seal a little deeper or, conversely, slightly undercut it. Focus only on the outer edge of the oil seal, otherwise you may damage it.
After installing the oil seal, use an oil can to lubricate its inside with oil. And install the flange.
How to tighten the flange nut of the rear gearbox of a classic.
We tighten the nut based on what you had in order to measure the force with which it was tightened. After tightening, check that there is no play either axial (forward-backward), up-down, left-right.
We assemble further in the reverse assembly process. Don't forget to add oil to the gearbox.
Have smooth roads!
Still have questions for the author? Ask them in the comments!
↑ Rear axle gearbox assembly
When assembling, replace the cuff, flange nut and spacer with new ones.
If the gearbox is assembled in the same crankcase, then the change in the thickness of the drive gear adjusting ring can be calculated as the difference in deviations in the manufacturing dimensions of the old and new gears. The deviation in size with a “ ” or “–” sign in hundredths of a millimeter is engraved on the drive gear shaft.
For example, the old gear is engraved with –12, and the new gear is 4. The difference between the two corrections will be 4–(–12)=16. This means that the new adjusting ring should be 0.16 mm thinner than the old one. With the opposite ratio of corrections (4 on the old one, and 12 on the new one), the ring should be 0.16 mm thicker than the old one.
To more accurately determine the thickness of the adjusting ring, we make a device from the old drive gear.
We weld a plate 80 mm long and trim it to a size of 50–0.02 mm relative to the plane for the bearing. The serial number and size deviation are engraved on the conical part of the shaft.
We grind the seats under the bearings (can be treated with fine sandpaper) until they fit smoothly.
We press the outer rings of the front and rear bearings into the crankcase.
We install the inner ring of the rear bearing on the manufactured device and insert the device into the crankcase. We install the inner ring of the front bearing, the flange of the drive gear and tighten the nut with a torque of 0.8–1.0 kgf.m.
We set the crankcase to a horizontal position and level.
We place a round, even rod (an extension from a set of socket heads) in the bearing bed and use a flat feeler gauge to determine the size of the gap between it and the device plate.
The thickness of the adjusting ring is determined as the difference between the gap size and the deviation in the size of the new gear (taking into account the sign).
For example, the gap value is 2.8 mm, and the gear size deviation is 15. This means that it is necessary to install an adjusting ring with a thickness of 2.8–(–0.15)=2.95 mm.
We install an adjusting ring of the required thickness on the shaft and, using a piece of pipe of a suitable size, press on the inner ring of the bearing.
We insert the shaft into the crankcase. We install a new spacer, front bearing inner race, collar and drive gear flange.
Gradually tighten the nut with a torque wrench to a torque of 12 kgf.m.
We determine the moment of rotation of the drive gear shaft.
To do this, tightly wrap a strong thread around the neck of the flange in several turns and attach a dynamometer to it. The force at which the flange begins to rotate evenly should be 7.6–9.5 kgf (which corresponds to a torque of 16–20 kgf.cm) (for new bearings). If the force is not enough, tighten the flange nut. In this case, the tightening torque should not exceed 26 kgf.m.
If, when tightening the nut, the turning torque exceeds 20 kgf.cm (9.5 kgf), disassemble the gearbox and replace the spacer sleeve.
We install the differential housing together with the bearings into the crankcase and tighten the bolts of the bearing caps.
If axial play is detected in the axle gears, then during assembly we install new, thicker support adjusting rings. The side gears should fit tightly into the differential housing, but can be turned by hand.
We make a wrench from a steel sheet 2.5–3 mm thick for tightening the adjusting nuts.
Typical malfunctions of the rear gearbox
Most often, the breakdown of this element of the car transmission is associated with the exhaustion of the service life of some parts that require subsequent replacement. The main causes of malfunctions of the rear axle gearbox are:
- wear of the shank oil seal;
- wear of the shank or differential bearings;
- breakdown of differential elements;
- wear or breakdown of parts of the main pair.
Signs of a breakdown of the rear axle gearbox of the VAZ 2106 cannot be ignored. An oil leak from the gearbox or a characteristic “howling” sound emanating from this unit when driving immediately reveals the cause of the malfunction. And if transmission oil leakage can be easily eliminated by simply replacing the shank oil seal, then the noise emanating from a broken transmission is not so easy to deal with.
First, you need to check whether the noise disappears when the car coasts. If it disappears, then the reason is certainly in the main gearbox pair. If the noise or hum remains, the cause of the malfunction is most likely a failure of the shank or differential bearings. The principle of this simplest diagnosis is that when coasting there is no forceful contact between the elements of the main pair, and, accordingly, their condition does not affect the hum emanating from the car.
First of all, it should be noted that most often the main pair is subject to increased wear due to low oil levels. Insufficiently lubricated gearbox parts are naturally subject to severe thermal and frictional overloads. In turn, a drop in the oil level occurs when the oil seal is faulty, which becomes unusable when the shank nut is loosely tightened. The second reason that often leads to replacing the VAZ 2106 gearbox is the increased load on the transmission that occurs during long-term operation of the vehicle with heavy overload. Thirdly, we cannot exclude a factory defect in the parts installed on the rear gearbox, the price of which is unreasonably high.
Failure of the steering mechanism
When the gearbox finally fails, the ability to drive the vehicle is completely or significantly lost. How to timely determine the “quick end” of the steering mechanism of a VAZ 2106 car, so as not to encounter this at the most inopportune moment? There are several “warning lights” that indicate that the mechanism in question needs replacement.
| Problem | Causes and consequences |
| 1. Extraneous squeaks are heard when turning the steering wheel | This may indicate that a foreign substance of an abrasive type has entered the gearbox, or an internal breakage of the worm or gear. Possible jamming of the unit, loss of control over vehicle control functions |
| 2. Significant play in the steering wheel | In most cases, play is caused by loosening the adjustment bolt and is eliminated by tightening it. If such a measure does not produce results, therefore, the gearbox of the VAZ 2106 car must be replaced |
| 3. Oil leak | This may mean either a rupture of the sealing gasket or a crack or hole in the housing. This is fraught with high oil consumption, insufficient lubrication of the steering mechanism and acceleration of its inevitable failure. |
| 4. Difficulty turning the steering wheel | The reason is insufficient lubrication, displacement of the engagement angle of the worm and gears, partial jamming of moving parts and mechanisms. It is fraught with increased driver fatigue during a long trip, complete jamming of the unit, loss of control over vehicle control functions |
| 5. Knocks and vibrations in the gearbox, which are felt through the steering wheel | The reasons may be: a loose adjustment bolt, failure of sealing couplings and gaskets, or wear and tear of mechanisms moving in mesh. Possible jamming of the unit, loss of control over vehicle control functions |
Replacing a vehicle gearbox is not a particularly difficult task, but this does not mean that it does not require careful preliminary preparation. First of all, you need to decide on the tools that will be used for the removal: which ones are available and which ones need to be prepared or purchased.
In order to replace the steering mechanism on a VAZ 2106 car, you need to acquire a set of wrenches, pliers, pliers, and a device for pressing out the pins of ball joints. Without the latter, the replacement process will become quite noticeably more complicated, which may affect the quality of the work performed. Therefore, you should not save at the expense of your own safety and comfort.
Because due to poor installation of the control mechanisms of the VAZ 2106 car, they can fail at the most inopportune moment, which will expose the lives of the driver, passengers and other road users to unreasonable danger. Next, it is necessary to carry out a superficial inspection of the gearbox housing for damage and assess the external condition.
It is located in the engine compartment, under the main brake cylinder of the car. In case of significant contamination, it is advisable to clean it from dust, dirt and oil stains. This will increase the speed and convenience of replacement work.
Rear axle repair and gearbox replacement
Depending on the cause of the breakdown, the following repair work may be necessary to restore the transmission’s functionality:
- replacing the VAZ 2106 gearbox oil seal;
- replacement and adjustment of the main pair;
- Troubleshooting differential and shank bearings and replacing them if necessary;
- replacement of VAZ 2106 gearbox.
Repair with replacement of bearings and (or) elements of the main gearbox pair is very difficult in technical terms. It requires special knowledge and tools in the process of adjusting the VAZ 2106 gearbox. As a rule, this unit is adjusted either at the factory or in specialized workshops. By watching a video about repairing a VAZ 2106 gearbox, you can see this for yourself. Meanwhile, in order to prevent damage to this transmission element, it is necessary to monitor whether the shank nut is tightened and whether there is any oil leakage from the seals.
Replacing the VAZ 2106 gearbox oil seal is necessary in case of transmission oil leaking from under it. Simply tightening the nut is not enough. Therefore, before we learn how to adjust the VAZ 2106 gearbox, we will learn how to replace a leaking oil seal. To carry out repair work you will need:
- a set of open-end wrenches and socket heads;
- puller for removing the oil seal;
- Litol-24 lubricant;
- mandrel for installing a new oil seal;
- hex wrench for unscrewing the drain plug;
- hammer;
- container for draining oil;
- transmission oil.
It is best to carry out work on replacing the rear axle gearbox oil seal in the inspection pit.
Replacement is carried out in the following order:
- We unscrew the plug to drain the oil, and, replacing the container, drain it.
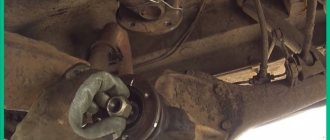
- Unscrew the driveshaft from the rear axle gearbox flange.
- Unscrew the flange nut, counting the exact number of turns, and write down the value.
- Remove the flange. It usually comes off easily, but you can easily tap it with a hammer once it's firmly in place.
- If there are shells on the surface of the flange, or wear in the place where the oil seal fits, it must be replaced.
- Using a puller, remove the worn oil seal of the VAZ 2106 rear axle gearbox.
- Lubricate the new oil seal with Litol-24 grease to facilitate its installation.
- Using a mandrel, lightly hammer the oil seal into place.
- We install the flange and tighten the nut exactly the same number of turns that we wrote down.
- We attach the driveshaft to the rear axle.
- Fill the VAZ 2106 gearbox with oil to the level of the filler neck. It is recommended to use gear oil from well-known manufacturers. It would be useful to add a molybdenum additive to it to reduce friction between parts.
After repairs, it is also necessary to check the condition of the breather and, if necessary, clean it. If there is a need to completely replace this unit, then you need to know that the gear ratio of the VAZ 2106 gearbox is 3.9, and the car’s speedometer readings are guaranteed. Read about how to remove a VAZ 2106 gearbox in other articles on our website.
Replacing the VAZ-2106 gearbox oil seal
How often do you look under your car? Many car enthusiasts do not do this at all, subsequently facing huge costs. Only with the help of a visual inspection can serious faults be identified, prevented and eliminated. In particular, a leak in the area of the VAZ-2106 gearbox may indicate the need to replace the oil seal.
Purpose and features
What is an oil seal anyway? This is an ancient version of the name for a rubber cuff. The term appeared at a time when ordinary felt or felt was used to seal shafts with casings of various components, which were previously lubricated with ordinary fat or, more often, lard. Hence the name – “oil seal”.
Modern products have already moved far from past technologies and are high quality parts made of resistant rubber in accordance with a number of GOSTs. The purpose of the seals is not only to seal the joint, but also to reliably protect the system unit from the ingress of various debris, moisture and even dust. In this case, the seals can be different in diameter and shape (it all depends on the purpose of the product).
Oil seals operate over a wide range of temperatures - usually from -60 degrees Celsius to +170 degrees Celsius. The material used for manufacturing is rubber (butadiene-nitrile or silicone based) or fluorine rubber. Oil seals are able to withstand various working environments and are not destroyed by the action of mineral oils, diesel fuel and water. The maximum pressure that the oil seal can withstand is about 0.04-0.05 MPa.
Device
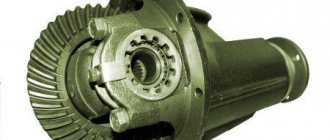
In order for the car to move, it is necessary to transfer the rotation of the engine to the wheels. But the engine speed is too high, and in order to correctly distribute the torque, a mechanism is needed that changes the gear ratio. Due to the gearbox and different engine speeds, the speed of movement changes, and the main pair of the rear axle takes over the rotation and transmits it to the wheels through gears.
- flange, it is fixed on the drive gear (shank) of the RZM, and is an intermediate link between the driveshaft and this gear;
- the shank of the main pair, at one end of which there are splines for pressing the flange, at the other end there is a bevel gear with a small number of teeth;
- driven gear (planet gear), it is in mesh with the drive gear, and it is with it that it forms the main gear;
- center differential, allowing the rear wheels to spin at different angular speeds.
The differential design is very simple - the mechanism consists of two axle gears, two satellites and a satellite pin. From the gearbox, the movement is transmitted to the axle shafts, on which the wheels are mounted.
Gearbox device
In order to understand the design of the gearbox, you need to simultaneously consider other parts included in the assembly.
The design of such a unit must be considered together with other elements included in its composition.
The main constituent elements are two parts:
- Main gear;
- Wheel differential.
In addition, it includes:
- Direction pin;
- Drum;
- Bearings and their fastenings;
- Oil seals;
- Breather;
- Satellite;
- Flange and much more.
When the engine is running, a certain force is created. Due to the operation of the gearbox, it moves between the gears. It is the combination of these gears that is called the main gear, which transforms the torque and directs it to the wheels. Due to the cross-axle differential, the load is distributed between the wheels and allows them to rotate at the required frequency when the direction of movement changes. This is exactly how the gearbox works on a VAZ 2106 car. Due to the simplicity of the design, its use is ensured without problems in any conditions.
Differences in VAZ rear axle gearboxes
RZMs differ in the gear ratio of the main pair; in total, there are four types of gearboxes on the VAZ classic:
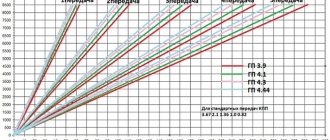
The slowest one is the RZM 2102, its drive gear has 9 teeth, and the driven gear has 40 teeth. To calculate the gear ratio, you need to divide the number of planetary gear teeth by the number of teeth on the drive shaft; for the VAZ 2102 the drive gear is equal to 4.44.
The “penny” gearbox (2101) accordingly has the number of teeth on the gears 10/43, so its IF is 4.3. The next, faster one is RZM 2103 - it has a ratio of 1041, which means the gear ratio is 4.1. And finally, the “fastest” will be the 2106 gearbox, with the number of teeth 11/43 and an inverter frequency of 3.9, respectively.
Many VAZ 2101-07 owners strive to install the fastest gearbox, but this is not always necessary. If the car often carries cargo, that is, the car is a “workhorse”, high speed is of no use, but high-torque power will be very useful. It should be noted that RZM 2102 was not supplied as spare parts; it was installed only on station wagons.
Communities › VAZ: Repair and Improvement › Blog › Rear axle gearbox, replacement. BASICS
Most often on classics you have to change the gearbox because it makes a buzzing noise.
The easiest option is to install another gearbox, since repairing the existing one is problematic. The second cause of the hum may be the cardan, so before replacing it is best to hang the axle, start the engine and listen to where the hum is coming from. We start with choosing a gearbox
You can install any gearbox from a rear-wheel drive classic, the only difference is the gear ratio.
There are four standard gearboxes:
they differ only in the gear ratio 2106 gear ratio 3.9 2103 gear ratio 4.1 2101 gear ratio 4.3 gearbox with gear ratio 4.44 (installed on the VAZ 2102)
Gearbox marking
The gearbox is marked on the large gear, for example the numbers 2106 1143 mean: gearbox with a gear ratio of 3.9, which is obtained by dividing 43/11 = 3.9. where 43 and 11 are the number of gear teeth.
The gear ratio affects the dynamics of acceleration and maximum speed, the higher the gear ratio, the lower the maximum speed, but the car has more dynamic acceleration, but there is a limitation.
On my seven I had a 2106 gearbox with a 3.9 pair, I bought it with a 4.1 gear ratio, acceleration became more dynamic, but the maximum speed decreased slightly, but this does not scare me much since I mostly drive around the city.
If the gear ratio changes, the speedometer will display the speed incorrectly; to correct this, you need to change the speedometer drive (installed on the gearbox).
HOW TO REPLACE THE GEARBOX?
option one - car service + 1 thousand rubles. option two - change it yourself + invaluable experience,
First of all, I washed the purchased gearbox with gasoline; if the gearbox is clean, you don’t need to wash it.
To make it easier to change, you need an inspection hole and a set of heads; if there are no heads, the axle shaft will be very difficult to unscrew (with a 17 key), and you will have to remove one or two pads, and it will be problematic to unscrew the screws on the gearbox itself (with a 12 head).
First, use a 12mm hex to unscrew the plug from the bottom of the bridge and drain the oil into a container. It is better to do it immediately after the run, so that the oil is hot and drains better.
Next, after removing the rear wheels, we begin to remove the brake drums. If the drum is stuck, hang it up, unscrew the pins, accelerate the drum and brake sharply, it should break off.
Bridge flushing
After this, use a 17 key to unscrew the top plug, fill in flushing oil, start the engine and engage first gear for 5 minutes, then drain the oil and fill in transmission oil, the rear axle oil volume is 1.35 liters.
I am satisfied with the work done, the new gearbox does not hum, the car has become more playful!
Replacing the rear axle gearbox of VAZ 2106, 2107
The main disease of REM is increased noise (hum), and the gearbox can hum for various reasons:
- there is insufficient oil in the bridge, or it is completely missing;
- the gap between the gears of the main pair is not adjusted;
- the gears are worn out, they have chips and other damage;
- the main pair has a manufacturing defect, the gears are not ground in from the factory;
- the shank nut has become unscrewed or loosened;
- bearings are worn out.
The main malfunction of the center differential is the wear of the gears of the axle shafts and satellites, when the surfaces of the parts are heavily worn, play forms between the differential gears, but the rear axle usually does not make noise due to wear of the differential gears.
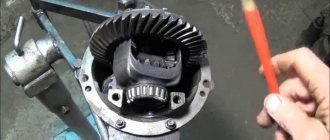
↑ Disassembling the rear axle gearbox
Having installed the gearbox on the workbench, use a 10mm wrench to unscrew the two bolts securing the locking plates of the differential bearing nuts and remove the plates.
We use a core to make marks on the bed and the corresponding bearing cover so that during assembly we can install the covers in their places.
Using a 14mm wrench, unscrew the bolts securing the bearing caps.
Remove the outer bearing rings and adjusting nuts from the differential housing.
If we do not change the bearings, then we mark the outer rings so as not to mix them up during installation, because The bearings are individually worn in and it is not advisable to disassemble them.
We check the absence of radial play in the axle gears.
Use a puller to compress the inner rings of the tapered bearings.
Using a 17mm wrench, unscrew the eight bolts securing the driven gear to the differential housing and remove it.
We use a beard to knock out the satellite axis.
We turn the axle gears and remove the satellite gears.
We take out the axle gears with adjusting washers, marking their position.
We remove the drive gear and the deformed spacer from the crankcase. When assembling the gearbox, we replace it with a new one.
Using a soft metal drift, knock the inner ring of the tapered bearing off the drive gear shaft.
An adjusting ring is installed under the bearing to ensure the correct relative position of the main gear gears.
Use a suitable tool to knock out the outer rings of the tapered bearings from the crankcase.
Defects in the gearbox
Increased play in the RZM can be formed due to wear of the differential pinion pin - if you grab the driveshaft and rotate it clockwise and counterclockwise, this play can be felt. Also, increased clearance can be formed due to wear of the splines inside the differential housing itself.
If the gaps in the main pair of gearboxes are not adjusted, a characteristic noise occurs when the car moves:
- when the load increases (sharp acceleration), a characteristic howl is heard in the bridge;
- When I let off the gas the noise goes away.
The engine can hum in a different way, but the characteristic feature described above can most often be heard on VAZ classic cars. Worn teeth of the main pair are clearly visible on the planetary gear - they become rounded, and they often show traces of rust.
Adjusting the VAZ rear axle gearbox
If the main pair in the gearbox is worn out, it must be replaced. But you can’t just put the gears back in place; the gaps in them must be adjusted. In total, two types of basic adjustments are made:
- The thickness of the adjusting sleeve (washer) is selected for the shank (drive gear). The washer can have a thickness from 2.6 mm to 3.5 mm;
- The gap between the gears of the main pair is adjusted using two adjusting nuts of the differential housing.
The washer for the shank is selected in such a way that the shaft with the drive bevel gear rotates in the gearbox housing without backlash with a force by hand (0.3-0.4 kg). In this case, the shank nut should be tightened with a force of 12 to 26 kg, usually 18-19 kg are tightened.
After installing the shank, the differential housing with the planetary gear attached to it is put in place. The housing is secured with two covers (4 bolts, a knob with a 17mm head). The adjusting nuts are tightened from the sides of the bearings, the differential is installed so that there is play between the gears of the main pair, and the planetary gear should not be clamped. By moving the adjusting nuts to the right and left, the shank gear is brought to the planetary gear. By adjusting, you select the moment when the gap between the gears practically disappears.
The last stage is to adjust the preload of the differential bearings; the adjusting nuts are tightened from the sides. This work must be done with an indicator; the device should show from 0.14 to 0.18 mm, the gap between the gears should be within 0.08-0.13 mm. After the operation, the adjusting nuts are fixed with plates so that they do not turn.
It should be noted that adjusting the VAZ rear axle gearbox is a very difficult matter, and it is better to trust it to professionals.
Repair of the rear axle gearbox on VAZ 2101-VAZ 2107
Rear axle gearbox - it transmits torque from the gearbox and to the rear wheels, if you remove it, then the car will no longer move, over time, depending on the driving style, the teeth of the gears that are in it wear out and the gearbox requires replacement, but a new one costs quite a lot of money and therefore it makes sense to disassemble and repair the old gearbox, but you just need to understand the fact that if you make a mistake, the car may not move at all when you start it, this will all happen if the gears are not installed correctly, so finesse is needed in assembling the rear axle gearbox and the clarity of installation of all parts.
Note!
To disassemble the axle gearbox assembly, you will need quite a few tools, namely: A pencil, a set of wrenches and socket wrenches, a hammer, a chisel, a drift, a punch, you will need all this, in addition, you will need a special puller to remove the bearing ring (You can do it without it) , it’s more convenient with it), various screwdrivers as well, a ruler, a caliper and, of course, a torque wrench!
Where is the rear axle gearbox located?
The bridge itself, as is clear from the name, is located at the rear, the gearbox is accordingly located inside it and is attached to the bridge itself with eight bolts (Some of them are indicated by red arrows), the driveshaft is connected to the other side of the bridge gearbox, which is already disconnected from it in the photo, the place where The cardan is attached to the gearbox, indicated in the same photo with a blue arrow.
adjusting the rear axle gearbox of a VAZ 2106 at home
When is it necessary to repair the rear axle gearbox?
It changes when the noise in it increases, this is especially noticeable when you accelerate the car and at this time there is a strong hum in the rear (If the gearbox is in good working order, there should be no hum), but keep in mind the fact that you are unlikely to understand which part of the car this sound is coming from comes from the fact that it can radiate to the front part, and in the central part there may be, in addition to this sign, vibrations from the axle gearbox increase and all this is due to its improper operation (the car often slips and drives at too high speeds) or from poorly poured oil into it, by the way, exactly the same signs will appear if the oil is not poured into the gearbox, check it, maybe you don’t have it there at all, but how to check the oil level in the axle gearbox and, if necessary, top up or even replace it, read in article: “Changing gearbox oil on a VAZ.”
Repair or replacement, which is better?
Car owners of VAZ classics often cannot decide what is best to do - buy a complete ready-made REM assembled or purchase individual parts and repair the gearbox. It’s really difficult to decide here - the price of a new gearbox, of course, is higher, but the owner of the car is freed from the headache of adjustment. The thing is that it’s not so easy to find a good specialist in VAZ gearboxes, and there is no guarantee that the new main pair will not hum.
If a car owner buys a new gearbox, but it hums, the part can be exchanged under warranty, but the car owner loses money on removing and installing the gearbox. If you purchase a defective main pair, the repair itself will be more expensive - you will have to pay a technician for a secondary overhaul of the gearbox.