At the same time, problems with the handbrake can lead to serious trouble if an uncontrolled car crashes into some obstacle or, even worse, into another car. Let's look at problems with the handbrake and how to fix them yourself without contacting specialists at a service station.
Advice! If the cable tension on the handbrake is insufficient, in addition to the handbrake, the car must be left “at speed”, this will protect you in case of unforeseen circumstances.
When the linings on the rear brake pads wear out and the drive cables are pulled out, a problem often arises in adjusting the handbrake stroke (parking handbrake). The examples that will be described in the article will help to cope with this problem not only for the VAZ-2110, but also for other domestically produced cars.
How to adjust the parking brake on a VAZ 2110, 2111, 2112.
An article about how to independently adjust the parking brake on cars of the tenth LADA family. Checking the condition of the handbrake.
Attention! The manufacturer provided the following data on the operation of the parking brake:
- The travel of the parking brake lever when adjusting should be 2-4 clicks;
- during operation 2-8 clicks.
If the parking brake is adjusted correctly, it will hold the vehicle on a slope of up to 25%. If the lever rises above 8 clicks, then the car will not hold on the slope. If there are less than 2 clicks, the car will slow down when moving. In these cases, the parking brake must be adjusted.
When everything is in order with your parking brake, you can safely go to the service station to undergo a technical inspection, or you can order a diagnostic card online
1. Place the car in a pit or on an overpass.
2. Lower the handbrake lever all the way down.
3. Loosen the locknut of the tensioning device, holding the adjusting nut from turning. After this, tighten the adjusting nut until the parking brake cable is tensioned.
4. Check the operation of the handbrake: the full stroke should be 2-4 clicks.
5. After checking, tighten the equalizer locknut.
6. Check the rear wheels. They should spin evenly and without jamming. If during adjustment it was not possible to tension the cable as required, then it is necessary to replace the cable with a new one.
Malfunctions and their symptoms
Determining that a cable needs adjustment or replacement is quite simple. Signs of a faulty mechanism appear as follows:
- The handbrake is pressed effortlessly - the cable is loose, you need to tighten it.
- The mechanism does not respond to pressing the lever - the drive is torn or flew out, or the reason may be the wear of the rear pads.
- If the handbrake is stuck, the drive is damaged and needs to be replaced.
Having taken out the main element, you can visually determine its condition. Replacement is required in the following cases:
- Up to 2% are damaged or torn.
- The cable moves with difficulty even after applying lubricant.
- The drive tips have grooves.
How to tighten or loosen the handbrake
With a sufficiently high mileage of the VAZ 2110-2112, the rear brake pads and drums wear out, which leads to a decrease in the effectiveness of the handbrake. In this case, it is necessary to adjust the handbrake, or rather tighten the cable.
To do this quickly and without much difficulty, the ideal option would be to have the following tool on hand:
- 13 mm deep socket head;
- universal joint;
- extension;
- ratchet handle.
How to change
Tools and materials required for replacement
- New handbrake cable.
- Open-end wrenches for 10 and 13.
- Socket wrench 13.
- Flat blade screwdriver (large size).
- 2 mounts.
Step-by-step instruction
- The car is placed on an inspection hole, and wheel chocks are placed under the rear and front wheels.
- The handbrake lever is lowered to its lowest position (until the stopper clicks).
- The muffler and resonator are removed from the car. After this you can get to the cable equalizer.
Handbrake equalizer VAZ 2110
Nut and locknut of the brake cable VAZ 2110
Dismantling the brake pads of the VAZ 2110 and disconnecting the second cable tip
Video review on adjusting the handbrake on VAZ 2110-2112 cars
To present this information in the most accessible way, I made a video on this topic. The video below shows the process of tensioning or loosening the handbrake cable in the fastest and easiest way.
After the cable is tightened, it is necessary to check the movement of the lever in the cabin.
And you shouldn’t make the brake work at the first click. This will not lead to anything good, but on the contrary, it will only cause harm, because in this case the risk of accelerated wear of the brake pads and drums increases.
And one more very important point that you should always remember. If you have already tightened the handbrake cable several times, and then decided to replace the rear pads, then it is necessary to loosen the cable to its original values. Otherwise, you simply won’t be able to put the drum on the pads later.
Source
Important points
- It is best to use two people to disconnect the tip from the brake pads. One person should carefully press the brake rocker with a large screwdriver (or a thin pry bar), the second at this moment will be able to freely loosen the lock nut, after which the cable can be pulled out of the holder without risking injury to your hands.
- As soon as the cable is removed, its attachment points should be thoroughly cleaned of rust and dirt. The best way to do this is with a wire brush. Those places in the brake shield where the cable passes must be wiped with solvent.
- If too much rust has accumulated in the through passages of the cable, you should use concentrated acetic acid, as it corrodes rust well. You only need to work with it wearing gloves to avoid chemical burns.
- Before installing the brake drum, be sure to check the condition of the pads. If the spacers on the pads are very worn (and most likely this will be the case), they need to be replaced with new ones. A set of such strips can be purchased at any auto store.
Fines for crossing the stop line and speeding will no longer bother you!
Video: how to change the handbrake cable mechanism on a ten
Diagnostics and testing of the handbrake on a VAZ-2110
According to the regulations, adjustment of the hand brake is carried out once every 30 thousand km.
However, there are situations when adjustments cannot save the situation. In cases where the handbrake cable is stretched to the limit or when the rear pads and brake drum are worn out, adjustment will not give any results.
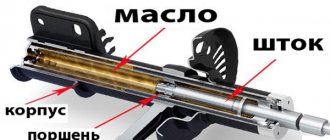
The design of the parking brake system of the VAZ-2110 car.
Terms and Conditions
The factory says that under normal operating conditions, the handbrake lever should make 2-4 clicks before the rear wheels are completely locked.
It’s easy to check - find a slope of about 20-25% , tighten the handbrake all the way ( there should be no more than 7-8 clicks ), put the car in neutral. If a car with a normal load holds well on a slope, the system is in good working order, and you can continue to operate. Otherwise, adjustment is necessary.
The exception is those cases when the handbrake cable is torn, soured in the casings or stretched . Then, first, we buy a new cable, and after replacing it and diagnosing the condition of the brake drums and rear pads, we will make adjustments.
Replacement
There is one important condition - you will need an assistant. His task will be to pull the cable tightly, which will allow the equalizer to be installed correctly.
The sequence of work to replace the cable is as follows:
- Lower the handbrake lever as far as possible;
- Remove the brake disc from the wheel where the element is being replaced;
- Remove the muffler from the suspension cushions and the resonator from the rear suspension;
- Lower the exhaust system down;
- Remove the adjusting nut and locknut;
- Remove the equalizer;
- Now remove the cable ends from the equalizer;
- Remove the tip of the equalizer shell from the bracket, which is located on the car body;
- Bend back the brackets that secure the cable;
- Remove the rear brake pad and remove the cable end from the lever;
- Slightly loosen the nut that secures the cable holder to the rear axle;
- Remove the cable from the holder, then from the bracket, and then pull it out through the brake spike;
- Place a new cable in its new location and perform the assembly procedure, following the reverse order of the indicated processes;
- Make sure that the cables in the bracket are positioned crosswise;
- After completing the installation of the new element, adjust the handbrake.
As you can see, the task does have certain nuances, but it is not difficult at all if you have some experience and rely on the VAZ 2110 operating manual. As a rule, everything is spelled out there.
Adjusting the hand brake
Adjustment is also necessary in cases where the handbrake operates before the lever makes a second click.
This means that when fully loaded, the rear brakes will slow down the wheels , the drums will overheat, fuel consumption will increase, and the pads will wear out intensively. To adjust, we will need to get two 13mm wrenches, pliers and, just in case, find a penetrating lubricant like WD-40 .
It will be needed to remove rusted, possibly adjusting or locking nuts. Further work is carried out in this order:
- We place the car on an overpass or inspection hole, since with the wheels hanging out we will not be able to accurately adjust the handbrake.
If there is no hole nearby, you can drive the car onto such a mini overpass.
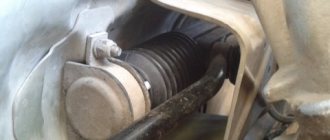
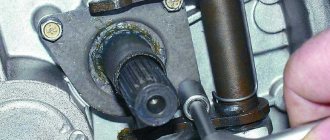
In the arch behind the muffler we find the adjustment unit and clean it of dirt.
1 – lock nut, 2 – adjusting nut, 3 – rod, 4 – equalizer.
If the nuts are hard to move, spray more lubricant.
We go into the salon, pull the lever and count the clicks.
If during adjustment we were unable to reduce the number of clicks to four, feel free to change the handbrake cable or check the condition of the brake pads and drums. Good luck to everyone and strong brakes!
Source
How to properly tighten the handbrake on a VAZ-2110
At the same time, problems with the handbrake can lead to serious trouble if an uncontrolled car crashes into some obstacle or, even worse, into another car.
Let's look at problems with the handbrake and how to fix them yourself without contacting specialists at a service station. Advice! If the cable tension on the handbrake is insufficient, in addition to the handbrake, the car must be left “at speed”, this will protect you in case of unforeseen circumstances.
When the linings on the rear brake pads wear out and the drive cables are pulled out, a problem often arises in adjusting the handbrake stroke (parking handbrake). The examples that will be described in the article will help to cope with this problem not only for the VAZ-2110, but also for other domestically produced cars.
If the problem cannot be resolved by adjusting and tightening the handbrake, you must immediately replace the faulty part with a new one; there is no need to take unnecessary risks. If the handbrake malfunctions, the car can move on its own, and this is an important factor that this mechanism must be checked regularly and, if necessary, the handbrake must be tightened. It will not be difficult for you to replace the handbrake at home, and you do not need to take the car to a service center.
Which cable to choose
When choosing any car part, you must first of all be guided by its compatibility with your specific brand. Obviously, the cable from Chevrolet will not fit the Zhiguli. But there are times when people purchase unsuitable cables.
In our case, it is difficult to confuse anything. The handbrake cable of the VAZ 2114 is exactly the same as that of similar models of the domestic manufacturer. It can be found at any auto parts store. Several manufacturers produce cables, and all are usually of the same quality. This is understandable, the detail is not complicated.
There shouldn't be any problems when choosing. The prices are quite reasonable and there is not much difference. The only thing worth doing is to read on the packaging about compatibility with your car, just in case.
After following all the instructions, you can replace the handbrake cable on VAZ cars yourself. This will have to be done quite often, due to the design features of the brake system and its fragility. Having such skills is always useful. Now you know how to change the parking brake cable on a VAZ 2114.
The handbrake plays an extremely important role in ensuring driving safety. This element of the braking system not only serves to prevent a parked car from rolling, but can also help avoid a traffic accident. That is why it is necessary to always monitor the serviceability of its entire system. Now let's try to figure out how to tighten the handbrake.
How to tighten the handbrake on a VAZ-2110
You should not ignore the condition of the handbrake and periodically check the cable tension; it is recommended to do this after every 30 thousand km. It is quite easy to identify problems with the handbrake; you need to put the car on an incline and put the handbrake on.
If the car rolls down, the parking brake does not work. This problem can be solved by replacing the handbrake, but in most cases simply adjusting or tightening the handbrake is sufficient.
If the adjustment does not help
There are not many cases when adjusting the parking brake did not have any effect. However, this is no reason to despair.
Device diagram
There are several situations in which it is necessary to replace the parking brake cable:
- The cable broke;
- The tips gave way;
- The cable threads have stretches, which over time can turn into a full-fledged rupture;
- The cable is difficult to move inside the sheath even after abundant lubrication.
Pull the handbrake from the passenger compartment
The easiest way to fix problems with the handbrake is to pull it out of the cabin.
To do this, you need to remove the protective cover that covers the handbrake, after which we will need a 10mm wrench, which should be used to tighten the tension bolt. This adjustment will allow you to slightly tighten the cable, which is convenient for slight loosening. If such manipulations do not give the desired result, it is necessary to resort to other methods of adjustment. Without an inspection hole or overpass, adjusting the cable tension is quite problematic; in extreme cases, a jack will help adjust our handbrake. When using a jack, you must pay close attention to safety precautions; a high percentage of injuries occur precisely because motorists do not comply with safety precautions. For repairs you need the appropriate tool:
- metal brush;
- WD (universal lubricant);
- extension;
- deep head;
- pliers;
- ratchet wrench (preferably with a cardan).
You can deal with this breakdown in a few seconds. Firstly:
- put the car in the pit;
- fully lower the handbrake;
Initially, you should clean all elements of the tension mechanism from dirt, and after that you need to treat the nuts using a “wedashka”. 2 cables and a tension rod are stretched on the adjusting mechanism, and two nuts are screwed on. From the above tools we assemble a single structure, with the help of which we will tighten the handbrake. First of all, loosen the lock nut and after loosening, tighten the second nut clockwise; if you need to loosen the cable, you should twist it in the opposite direction. We tighten the adjusting nut until the handbrake cable is tensioned to the desired result. We put the head on the nut and tighten it using a ratchet wrench, that is, we tighten the rod nut clockwise. If you don't have a ratchet wrench, you can use a regular open-end wrench. At the same time, do not forget to hold the rod with pliers. There is no need to tighten the head too much; a few turns will be enough. Then you need to check how many clicks the adjustable mechanism has been tightened. Ideally there should be 2-4 clicks. But in practice, 2 to 8 clicks are considered the norm. If more than 8 clicks occur, the wheels are not blocked enough. After all the work is done, do not forget to tighten the locking nut.
Aspects indicating the need to adjust the handbrake
There are several ways that will help any car owner, without exception, to help with the question of whether it is advisable to adjust the hand brake
It is worth noting that there is no need to check the handbrake every day; it is important to pay attention to this detail every 30 thousand km.
To find out whether the handbrake needs to be adjusted, you need to park your car on a slight slope, then leave the car on the handbrake and put the gear in neutral. If the vehicle slowly but surely begins to move down an incline, then the vehicle's parking brake may not be working properly.
Of course, this problem can be solved by replacing the VAZ-2110 handbrake rod, however, as practice shows, it is quite enough to make a very simple adjustment of this part.
- The travel of a properly adjusted handbrake lever should not exceed 8 clicks. The optimal lever stroke is 6-7 clicks (this number varies depending on the car model; details for a specific VAZ model can be found in the operating instructions supplied with the car).
- After installing the new cable, the rear wheels of the car should be jacked up and try to spin them by hand. Rotation must be free.
- Now the brakes should be checked while driving. You need to drive 30-40 meters, then slow down using the parking brake. After braking, you need to get out of the car and touch the rear brake drum. It should not be hot, its temperature should not exceed the ambient temperature. If the drum gets so hot that it burns your hand, this means that the brake cable is too tight and should be loosened.
- To loosen the cable, you should put the car back on the inspection hole, unscrew the lock nut on the outer tip with a 13mm wrench, and then loosen the main fastening nut. After this, the locknut is tightened again.
- If the brake cable is too slack, it needs to be tightened. All steps are listed above, with one exception: the main nut on the tip should be tightened, not unscrewed.
- To independently check the reliability of the parking brake, you should find a slope with a ratio of 1:5 (that is, 1 meter high and 5 meters long), drive the car onto it, turn off the engine, put the car on the parking brake and squeeze the clutch. After these actions, the machine should remain in place and not roll downhill. If the car does roll, you should tighten the brake cable a little more.
As can be seen from our article, there is nothing difficult in replacing a brake cable and even a novice car enthusiast can do this task
The main thing you should pay attention to in this case is compliance with safety regulations. When changing a cable, it is very easy to get injured or get a chemical burn, so it is better not to carry out this operation alone, but to work together with an experienced auto mechanic
Causes of malfunction
Handbrake lever VAZ 2110 in a leather case
Let's consider the principle of operation of the parking brake (handbrake) on a VAZ 2110 car.
It's pretty simple. One of its main elements is a special cable. When the driver pulls the parking brake handle, this cable is tensioned, which evenly distributes its effect on the brake pads of each wheel of the car. During operation, the rear brake pad linings wear out, the cable stretches, and as a result, there is a need to adjust or repair the handbrake. Also, very often drivers, especially beginners, drive with the handbrake raised, which leads to premature wear of the handbrake cable. If the driver does not carry out preventive maintenance or repair of this mechanism in a timely manner, the car may independently start moving from a standstill or will slow down, even stopping, on an uphill slope.
External view of the parking brake cable on a VAZ 2110 car
You can adjust the handbrake not only in a car service center, but also with your own hands at home. But first you need to familiarize yourself with the manual parking brake diagram in order to know its main elements for setting up this system.
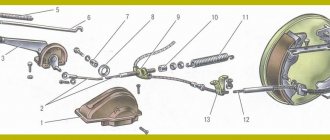
Handbrake diagram for VAZ 2110
In this diagram the following elements are indicated by numbers:
1 - button that fixes the handbrake lever; 2 — hand brake lever; 3 — protective cover; 4 — handbrake rod; 5 — cable equalizer; 6 — adjusting nut; 7 - lock nut; 8 - cable; 9 — protective sheath of the cable
Checking the rear brake system
Replacing parking brake cables on a VAZ 2110
- The car is installed on an overpass or in a garage in an inspection hole. Anti-roll bars are placed under the front wheels. The rear part is raised with jacks and reliable supports are installed. The lever goes all the way down.
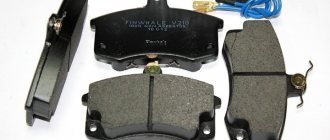
- The rear drums are removed and checked for wear. They will not allow a lot of wear and tear. The rear brake pads are checked; their thickness should be more than 2/3 of the new pads. The condition of the cable is inspected from below; it should not have any abrasions or broken strands.
Note. Broken strands impede the movement of the cable in the sheath; the condition of the tips is checked.
- Wear and tear of the parking brake system occurs during the operation of any vehicle.
First adjustment steps
To begin adjusting the handbrake, you need to make sure that one of three elements is present and accessible: a lift, an inspection hole or an overpass.
An overpass is a type of engineering structure that is intended to lay a road or communications above the ground.
Homemade overpass for adjusting the handbrake on a VAZ 2110
At home, most often only the inspection hole is accessible. If you cannot take advantage of any of the above conditions, then you can make do with a kind of support trestles, which are a rigid structure installed under the rear part of the body after it has been lifted with a jack. In addition, you need to prepare two wrenches size “13”, as well as pliers.
- lower the parking brake lever to its lowest position;
One of the adjustment stages is to lower the handbrake lever
- using one key set to “13” you need to loosen the lock nut, while holding the adjusting nut with the second key;
Loosen the locknut and loosen the adjusting nut
That's not all, as there are a few steps left to complete the complete handbrake setup.
What is needed to adjust the handbrake
To adjust the parking brake, you will need one of the following tools:
In the absence of all these conditions, which any ordinary driver is unlikely to be able to provide, you can get by with support “goats”, which are installed under the rear of the body after it has been raised with a jack. It is also worth considering the presence of two “13” keys and pliers in the set.
Where to start adjusting
VAZ 2110 handbrake does not work
The parking brake adjustment process is as follows:
- the car is placed on an overpass (or a ditch, or generally raised with a jack);
- the position of the brake lever is checked - it should be the lowest;
- Using the first key, the lock nut is loosened, while at the same time holding the adjusting nut with the second key.
- The adjusting nut is tightened until the handbrake cable is tensioned.
Note. When tightening the adjusting nut, the rod must be held with pliers.
VAZ 2110 tighten the handbrake
- Now you should make sure that the full stroke of the lever is from 2 to 4 clicks;
- After the stroke has been checked, the equalizer locknut should be tightened while holding the adjusting nut with a wrench.
- The handbrake lever goes down, after which the rear wheels are turned by hand. Their rotation should occur evenly and without jamming.
Note. If the handbrake drive cable cannot be tensioned during the adjustment process, this part should be replaced.
VAZ 2110 handbrake adjustment
After the system has been adjusted, it is necessary to check the quality of its operation again. To do this, after all the work performed by the driver, you should find a section of the road with a slope of at least 23%, then stop the car on it and put it on the handbrake. If the brakes reliably hold the car on the rise, then everything was done correctly.
What to do if the adjustment did not help
VAZ 2110 handbrake does not hold
In some cases, adjustment is indeed not enough. This happens in cases where the handbrake cable breaks - a rather rare phenomenon, but still happens, especially on older cars. It happens that the cable breaks on newer models that are subjected to too intense use, which the brake system of an average car is not designed for.
VAZ 2110 manual brake adjustment
The cable should also be replaced in the following situations:
- when its tips are loose;
- the cable threads began to stretch (this could soon lead to a break);
- the cable moves quite hard in its sheath even after it has been lubricated.
Like adjusting the handbrake, an operation such as replacing the parking brake cable does not necessarily require a visit to a car service center. And, although it will most likely take much more time to complete, such repairs do not require special professional skills, equipment or any specialized tools.
Note. Still, some conditions must be met when replacing the cable. For this work, the driver will need an assistant who will strongly pull the cable in order to correctly install the equalizer.
Final Setup Steps
- continue rotating the adjusting nut until we are sure that the brake lever has a full stroke of approximately 3 clicks (this operation is convenient to perform with two people - one person rotates the nut, and the second checks the handbrake);
- after checking the working stroke, you need to tighten the locknut while holding the adjusting nut with a wrench;
- now you need to check whether the handbrake cable is not too tight: the parking brake lever goes down, the rear wheels are jacked up and turned by hand - they should rotate evenly, without delays;
- if the lever travel is still large, then we continue to tighten the adjusting nut (or unscrew it if the cable is too tight) and regularly check the handbrake travel until it reaches 3 clicks and the brake pads do not interfere with the rotation of the wheels.
Pulling up the handbrake
It is likely that you just need to tighten the parking brake on the VAZ 2110 to fix the problem.
- Drive to the inspection hole, from where it is most convenient to make adjustments. Another option is a lift. You'll find something here. This way you can easily get to the necessary nodes.
- Make sure the brake lever is in its lowest position.
- Take two keys. You will loosen the lock nut first and tighten the adjusting nut second.
- Tighten the adjustment nut until the cable is properly tensioned.
- It is strongly recommended to hold the rod when tightening the adjustment nut with pliers.
- Now make sure that the lever makes full travel in 2-4 clicks, no more.
- If after checking everything turned out to be good and the working stroke is correct, tighten the equalizer locknut while holding the adjustment nut with a second wrench.
- Release the handbrake lever down and turn the rear wheels by hand. Rotation should occur evenly without any jamming.
- But if the adjustment did not allow the cable to be tensioned, then the element must be replaced.