If you are the proud owner of a Gazelle car and have noticed that the free play (number of clicks) of the parking brake lever has increased enormously, this information will be useful. There are malfunctions in the car that do not affect the speed, but have no less important functions.
In general, in Soviet-Russian trucks, a handbrake with a mechanical drive is something abstract and is never remembered until the time comes to use it and the question arises of how to separate the brake pads on a Gazelle.
What is a parking brake for?
Experienced drivers will not argue, a handbrake is necessary. Yes, it should not be used in the off-season, when the thermometer can be equally likely to be above or below zero. But, for example, if the service brake system fails, all hope, first of all, falls on the parking brake and only then on engine braking. If both systems fail in particularly emergency situations, you should not neglect such “means” of braking as a snowdrift or bushes.
As the rear brake pads wear, the effectiveness of the handbrake decreases. This is exactly it, since the service brakes do not lose their ability. On the contrary, the pedal becomes more informative, and the braking itself is smoother. The solution is simple - find out how to properly space the brake pads on a Gazelle, and then tighten the handbrake cable.
This operation is not complicated, and any driver can perform it. If you are not confident in your actions, then you need to turn to specialists.
YUKKA "TIIR"
This is a domestic manufacturer, but despite this, many people use these brake pads. "Gazelle Business" and other models from GAZ, even the newest ones, are equipped with them.
Thanks to the use of special composite material, high-tech products received a gold medal for quality. These products have one advantage. With their stable properties in any conditions, they are characterized by an increased service life. There is no asbestos in both the rear and front pads. And excellent friction properties make the braking process very effective. The pads are in good demand among Gazelle owners.
The company produces brake pads (Gazelle) in several series. So, there is an economy series, a comfort series, and also an elite series. Even in the budget series, these consumables have excellent properties and characteristics.
Owners of Next models speak particularly positively about the products of this company - they are no worse than the original products, the cost of which is very high.
How to separate the brake pads on a Gazelle
The sequence of actions is as follows:
- Place the car on a flat, horizontal platform (ideally on a viewing hole or a lift).
- Place wheel chocks under the front wheels.
- Place the gear lever in the “neutral” position, the handbrake is lowered, and hang out the adjustable wheel.
- Remove the two rubber plugs from the inside of it. Bottom - for visual monitoring of the gap between the pads and the drum, as well as their condition. The top one hides the locked eccentric.
- Using a 17mm socket wrench or a sufficiently curved socket wrench, loosen the locknut. Then use a 9 mm socket wrench to rotate the eccentric, visually checking the gap between the pads and the drum. Achieve the “golden mean” when the gap is minimal, but the wheel rotates easily.
- Tighten the locknut, check again for easy rotation, and replace the plugs. The job is half done.
The final stage
Repeat all the above steps with the other wheel. Do not neglect the plugs: if they are not installed, then, thanks to dirt, sand and water, the next repair will not be as simple as this one.
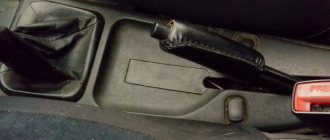
All that remains is to tighten the handbrake drive. The optimal travel of the parking brake lever is 8-10, but no more than 15 clicks until it is firmly tightened. That's all, actually.
The handbrake on Gazelle cars is part of the overall braking system, and at the same time it is an independently functioning mechanism. The parking wheel locking system on this car is reliable, durable and easy to maintain. The simplicity of the design allows, if necessary, to carry out repairs without the help of a specialist. Even if you have never performed work of this kind before, adjusting the handbrake on the Gazelle will not seem difficult to you - you just need to be careful and strictly follow the instructions given below in this article.
How to adjust the handbrake on a Gazelle - in our new article
How can you determine when it’s time to tighten the handbrake on a Gazelle? To do this, simply set its lever to the working position and, if it turns out that even after 20 clicks of the ratchet mechanism, the rear wheels are not blocked with the proper force, the handbrake cable should be tightened. You will learn how to do this further.
Allied Nippon
This is a Japanese company, which is considered throughout the world one of the leaders in the production of brake systems. The company supplies consumables to the assembly lines of many automotive giants. This brand offers several different models of products for light-duty trucks from GAZ.
Model ADB0795 are front brake pads for Gazelle.
They are ideal for 3302 and modifications based on it. Tests were carried out on these products. During the tests there was a running-in test, speed tests, and stability tests.
If you don’t go into numbers and details, the result is an effective consumable that fully meets all the requirements of the GAZ company. During the test, one minor drawback was identified - a squeaking noise when braking. But he doesn't appear often. Overall efficiency and quality make this squeak unnoticeable.
The final stage
Repeat all the above steps with the other wheel. Do not neglect the plugs: if they are not installed, then, thanks to dirt, sand and water, the next repair will not be as simple as this one.
All that remains is to tighten the handbrake drive. The optimal travel of the parking brake lever is 8-10, but no more than 15 clicks until it is firmly tightened. That's all, actually.
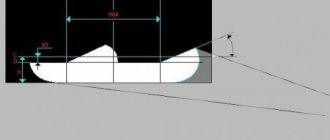
The parking brake should hold the vehicle on a 25% grade when the parking brake lever is moved 15 to 20 teeth (clicks) of the ratchet.
1. To check the correct adjustment of the parking brake, find an overpass or loading ramp with a height of H = 1.25 m and an entrance length of L = 5 m near the parking area of your car. This ratio corresponds to a slope of 25%
2. If there is no such ramp, for a simplified check of the parking brake, place the car on a level surface.
Set the gear shift lever to neutral and fully raise the parking brake lever.
Get out of the car and try to move it.
If you succeed, you need to urgently adjust the parking brake drive
Adjustment
- All manipulations are performed in the position when the handbrake is “off”
(the lever is fixed in the lowest position). To access the brake mechanism, remove the plastic plugs located on the brake shield. It is enough to pry them off with a screwdriver; - Then the eccentric nut is loosened
(no more than 2 turns). Further actions consist of moving the brake pads apart - to a position at which the drum is braked, after which the bolt is turned in the opposite direction, as a result of which the brake pads move in the opposite direction. The movement is carried out until the drum begins to rotate; - The process is monitored through inspection windows located in the lower part of the brake shield;
- At the end of the operation, the eccentric nut is tightened with reasonable force. It is important to prevent the eccentric from turning;
- The brake mechanism is adjusted in a similar way on the other side of the car, after which the plastic plugs are installed in place.
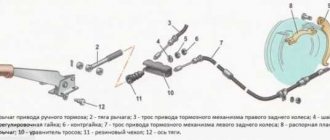
installing the leveler in a position “perpendicular” to the axis of the car. To do this, it is necessary to loosen the fastening nuts; they move along the thread until the desired position of the equalizer is reached. The position is fixed using locknuts.
The handbrake is set to the “one click” position. By rotating the rear end nut (sheath of the central cable), the cable moves to the forward position until the free wheel movement is slowed down. Having tightened – with moderate force – the fixing nuts, turn off the parking brake.
An indicator of operational efficiency will be the free rotation of the rear wheels.
In addition, the “activation” of the handbrake is characterized by a maximum movement of the lever of 15 clicks. In this case, we can safely state: the adjustment was made correctly, the desired result was achieved. Read more: Scanner for Hyundai Solaris The above gives some idea of what actions need to be taken for correct adjustment.
Adjusting the hand brake on the Gazelle
But there are times when professional repairs are not available, and you need to do the work yourself, so you need to know how to adjust the handbrake on a Gazelle. This operation is needed in the following cases:
1. The lever moves more than 15 teeth (this can be determined by characteristic clicks).
2. Breakage of elements of brake mechanism parts.
Adjusting the hand brake on a gazelle is carried out in several stages.
- The handbrake lever must be fixed in the maximum position at the bottom.
- To be able to repair the brake mechanism, you need to remove the plugs (this can be done with a screwdriver).
- Then you need to loosen the eccentric nut 2 clicks.
- After this, the brake pads are moved apart until the drum is braked. Then the bolt must be turned in the opposite direction so that the brake pads move against the rotation of the drum.
- You can monitor the entire process through the inspection windows located at the bottom of the brake shield.
- After this, you need to tighten the eccentric nut, the main thing is not to turn the eccentric. This is how the handbrake is adjusted from the other side of the car.
- At the end, the plastic plugs are returned to their place. Now the equalizer is installed at an angle of 90 relative to the axis of the machine, for which you need to loosen the fastening nuts. Then secure it with locknuts.
- After this, the handbrake on the Gazelle must be set to the “1 click” position. By turning the rear end nut, the cable is shifted until the wheel free wheeling is slowed down. Then the fixing nuts are tightened and the handbrake is turned off.
Adjusting the parking brake yourself
Before adjusting the handbrake on the Gazelle, lift the rear of the car and place it on supports. After this, remove the wheels to gain access to the brake mechanism. And you should also know that adjustment procedures are carried out with the lever set to the non-working position (lowered all the way).
Monitor the cable tension - this is important for your safety
To work, you will need a 17" wrench, two 22" wrenches, a "9" tubular wrench and a flat blade screwdriver. Having prepared the necessary set of tools, proceed to adjust the hand brake in accordance with the following list of actions:
- So, first you need to get to the brake mechanism - to do this, use a screwdriver and remove the upper and lower plastic plugs on the brake shield.
- Next, using a key set to “17”, loosen the eccentric nut two turns (no more) and, sliding the pads, unlock the brake drum. To do this, use a tubular wrench to rotate the eccentric bolt in the opposite direction. If the pads lightly touch the drum, this is acceptable. You can control the entire process through special inspection windows, which are located at the bottom of the brake mechanism flap.
- After this, the eccentric nut must be tightened to a torque of 2.4–3.5 kgf/m. If you do not have a torque wrench on hand, tighten by hand with a reasonable amount of force. In this case, rotation of the eccentric itself is unacceptable.
- At this point, the first stage of adjusting the handbrake on the Gazelle car is completed, so install the plugs in place and do the same on the second wheel.
Read more: Year of birth of Eric Davidovich
Now it is necessary to install the cable equalizer in a perpendicular position relative to the axis of the vehicle. This is achieved by loosening the cable fastening nuts. By moving the nuts along the threads, you will install the equalizer in the desired position, while eliminating the play between it and the cable tips. After this, the locknuts must be tightened.
With the completion of the described procedure, the process of adjusting the parking brake is not yet completed, since it is necessary to adjust the tension of the central cable. To begin, lift the handbrake lever one click and, by rotating the adjusting nut at the point where the rear end of the cable is attached to the equalizer (after releasing the lock nut), tighten the tension until the wheels begin to slow down slightly. After this, lower the handbrake lever all the way down and turn each rear wheel by hand. A properly adjusted handbrake should not interfere with rotation. In addition, when setting the vehicle to the parking brake, the lever travel should be 15 clicks of the ratchet mechanism.
From this guide you learned how to tighten the handbrake on a Gazelle without outside help. But sometimes, after a correctly performed adjustment, it is not possible to obtain the expected result due to critical wear or stretching of the cables. In this case, the handbrake cable will have to be replaced, which will be discussed below.
How to replace handbrake cables
If adjusting the Gazelle hand brake turned out to be insufficiently effective or did not lead to anything at all, therefore, you will have to change the brake pad drive cables. In addition to the critical stretch of the cable, it should be changed if damage is detected during an external inspection. And also an indicator for replacement is corrosion and jamming of the cable in the protective sheath.
In order to successfully complete the task, prepare two “22” wrenches, a “12” socket and pliers. We, in turn, will tell you how to change the handbrake cable on a Gazelle:
- Lift the rear of the car to remove the rear wheels and brake drums and shoes.
- Using a socket on “12”, unscrew the two bolts that secure the protective shell to the brake mechanism.
- After removing the socket cable from the brake shield, you need to move to the cable equalizer and use “22” keys to loosen the lock nut and the adjusting nut.
- Next, you should completely unscrew the outer nut, which will allow you to remove the cable from the bracket slot;
- After this, unsplit the equalizer axle using pliers, then remove the washer and remove the axle.
- Now you need to release the equalizer to remove the drive cable from it.
Read more: Hyundai Tucson 2018 Forum
The second cable is dismantled in the same way. As for installing new parts, you can also use these instructions for this, but in reverse order. After completing the replacement, be sure to adjust the parking brake according to the instructions given in the first part of the article.
The parking brake (handbrake) is part of the braking system designed to hold the vehicle stationary. As a rule, it is used when braking a car in a parking lot and holding it on slopes.
Today we will talk about what actions need to be taken to pull the handbrake on a Gazelle.
Prices and manufacturers
If we talk about models 2705 and 3302 (including “Business”), the cheapest set of pads is “Premium”. For 4 overlays they ask for about 700 rubles. But, as reviews note, this is not the best option for replacement (although the manufacturer is GAZ OJSC). The pads wear out quickly.
Many people recommend pads from NIPPON as a good alternative. Their price is 900 rubles. The set includes 4 pads.
GAZelle is perhaps the only car where original parts are cheaper than analogues.
Judging by the reviews, NIPPON can handle 40-45 thousand kilometers without any problems. As for the Nexts, there are Markon pads for them. The cost of four elements is 730 rubles.
How does the handbrake system work?
Applying the parking brake activates the rear brakes and ensures that the vehicle does not roll, even on a relatively steep incline. However, if the handbrake does not hold the vehicle, there is a problem that must be corrected to ensure the safety of the driver and others.
Parking brake systems vary greatly from one automaker to another and even between different makes and models of cars. In general, they are divided according to the type of brakes and the method of their use.
It is immediately necessary to understand that in the vast majority of cases in passenger cars, parking brakes use the rear wheels and are divided into two types:
- drum - consisting of two semicircular blocks that are located inside a cylindrical drum. If, on one side, they are rigidly fixed, then on the other there is a special piston mechanism that forces the pads to move when using the handbrake;
- disc brakes - consisting of a special brake disc mounted on the car axle and two pads. When you use the handbrake, the pads compress and prevent the car from moving.
The car's braking system can also be mechanical or hydraulic. If in the first option, braking is carried out using a system of cables and the force of a person who puts pressure on the handbrake, then a special piston is used in hydraulics.
Important! Depending on the type of braking system, the reasons why the handbrake does not hold may vary significantly.
The principle of operation of the caliper
The brake caliper on the Gazelle is a unit that clamps the brake system pads to the discs when a person presses the pedal and the car begins to brake. In the entire braking system, only this element moves. This part is installed only on disc brakes. But the drum system functions completely differently.
The caliper is an extremely important component. It is recommended to consider it together with the pads, since they bear the main load in the entire braking system. 90% of front brake failures depend on the calipers.
Mounted caliper on brake disc
The brake caliper is a simple design that is not complicated. It is used on almost all passenger cars. The design will be similar everywhere, but the changes themselves in different models will be minimal. The operation is based on hydraulic pressure.
After a person presses the brake pedal, a certain piston in the main cylinder of the brake system begins to press down on the brake fluid. Then it goes through certain hoses and channels to the brake caliper.
Technical components of calipers for Gazelle
It contains a piston that moves forward under pressure. On one side there is one block, which presses the disc in one direction. The second pad is simply fixed on the caliper and does not move. As a result, both pads clamp the disc: first they rub against the part, and then they completely stop its movement.
This disk has a relationship with the wheel of the vehicle, so that the speed of the car gradually decreases. With such contact, the pads, if they are made poorly, begin to creak because they cannot withstand the high temperature (heating occurs due to friction).
So, how to tighten the handbrake on a Gazelle?
1).Lower the parking brake lever to its lowest position. Next, use a screwdriver to pry up and remove the two plastic plugs of the brake shield (for clarity, the wheels have already been removed).
2).Using the “17” socket, loosen the brake eccentric nut by 1-2 turns.
3).Using a long “9” socket or a special tubular wrench, turn the eccentric bolt until you feel resistance to rotation, which is caused by the decompression of the pads.
4).The beginning of the movement of the blocks can also be determined through the inspection windows in the panel. Using the socket “17” we tighten the eccentric nut to a torque of 2.4 – 3.5 kg.m.
5).We eliminate the play between the tips of the cables and the depressions on the equalizer, for which: with two “24” wrenches, we loosen the tightening of the nuts securing the cable shell and, by moving the nuts along the threaded part of the shell, we achieve elimination of the play between the tip of the cable and the cavity on the equalizer.
Similarly, we eliminate the play at the other cable end. Tighten the locknuts of both cables. In this case, the leveler bar must be perpendicular to the longitudinal axis of the car.
6).Using a ruler or tape measure, measure the distance between the equalizer and the front wall of the bracket. It should be between 144–150 mm.
7).If necessary, adjust the position of the central cable in the same way as adjusting the rear cables. If after this there is play between the tips of the rear cables and the equalizer, repeat the adjustment described above.
When the drive is properly adjusted, the parking brake lever should not move more than 15 sector teeth (clicks).
A necessary manipulation for drivers of cars of the same name is adjusting the hand brake on the Gazelle,
– is a fairly simple, but extremely responsible job. Safety largely depends on how professionally the process is carried out (everyone knows that in an extreme situation the handbrake is the only means of emergency stopping).
Adjusting the handbrake on the Gazelle consists of several stages, which will be described below
. Anyone can do the job without resorting to the services of a car service. The main thing is accuracy, accuracy and scrupulous adherence to instructions.
AUTOFIZIK.RU / auto repair
We replace the rear wheel pads if they are damaged, oily, or if the linings are worn to a thickness of less than 1 mm. We replace the drum if it is damaged, cracked, or if the working surface is worn to a diameter of more than 283 mm. We replace all four rear wheel pads at the same time. Remove the rear wheels.
In case of a tight fit or “sticking” of the drum to the hub, you can compress it by screwing three M10 bolts into special holes.
ATTENTION The brake drums are machined together with the hubs, so we install the removed drums only in their original places. The factory instructions recommend grinding new drums together with the hub before installing them on the car. Do not press the brake pedal after removing the brake drum.
Using a hook or thin pliers, remove the end of the tension spring from the hole in the rear brake shoe.
It is more convenient to use a special device for this.
From the inside of the brake shield, with one hand we press on the cap of the rear brake pad rod, with the other hand on the cup, compressing the spring. Rotate the spring cup 90°. In this case, the slot on the cup will align with the tip of the axle. Remove the cups with the spring.
We remove the rod from the hole in the brake shield.
Turn the rear block and remove the lower tension spring.
We remove the parking brake lever from the cable end.
Similarly, remove the fastening of the front brake pad to the brake shield, and remove the front pad.
Remove the tension spring from the block and the spring from the spacer rod.
Using a 17mm wrench, unscrew the nut securing the rod to the block...
...and remove the parts of the parking brake adjustment mechanism.
Use pliers to unscrew the nut securing the parking brake lever.
Holding the fastening bolt with a 17mm wrench, use the same wrench to unscrew the nut...
When does adjustment become necessary?
Indications for adjustment are: lever travel of 20 teeth or more (determined by the corresponding number of clicks); repair or replacement of elements related to the brake mechanism.
The presence of any of these circumstances indicates the need for adjustment. The goal is to move the lever no more than 15 clicks
– this value is optimal for all modifications of the Gazelle.
Adjustment
- All manipulations are performed in the position when the handbrake is “off”
(the lever is fixed in the lowest position). To access the brake mechanism, remove the plastic plugs located on the brake shield. It is enough to pry them off with a screwdriver; - Then the eccentric nut is loosened
(no more than 2 turns). Further actions consist of moving the brake pads apart - to a position at which the drum is braked, after which the bolt is turned in the opposite direction, as a result of which the brake pads move in the opposite direction. The movement is carried out until the drum begins to rotate; - The process is monitored through inspection windows located in the lower part of the brake shield;
- At the end of the operation, the eccentric nut is tightened with reasonable force. It is important to prevent the eccentric from turning;
- The brake mechanism is adjusted in a similar way on the other side of the car, after which the plastic plugs are installed in place.
Next stage:
installing the leveler in a position “perpendicular” to the axis of the car. To do this, it is necessary to loosen the fastening nuts; they move along the thread until the desired position of the equalizer is reached. The position is fixed using locknuts.
Then:
The handbrake is set to the “one click” position. By rotating the rear end nut (sheath of the central cable), the cable moves to the forward position until the free wheel movement is slowed down. Having tightened – with moderate force – the fixing nuts, turn off the parking brake.
An indicator of operational efficiency will be the free rotation of the rear wheels.
In addition, the “activation” of the handbrake is characterized by a maximum movement of the lever of 15 clicks. In this case, we can safely state: the adjustment was made correctly, the desired result was achieved.
The above gives some idea of what actions need to be taken for proper adjustment.
Attention - gases!
THERE HAVE BEEN CHANGES IN THE PROGRAM...
In Nizhny they make, let's say, serious cars - if such an animal picks up speed, then the rest would be better off not pretending to be matadors. Just look at a detachment of minibuses - Hitchcock is resting... Therefore, providing these cars with excellent brakes is a task, if you like, of national importance and utmost importance.
Adherents of the brand, of course, do not object, but they also put forward their own demands - they say, give us not only efficiency, but also a resource! And since the pads alone do not wear out, it is necessary to evaluate the condition of the duet - the pad-disc friction pair...
Well, let's change the usual testing program to please the operators. A dozen brand new sets of front brake pads are waiting their turn at the NAMI stand.
THE BLOCK IS...
They say that in the thirties, some closed institute was given the task of creating a system for instantly stopping trains.
Adjusting the parking brake yourself
Before adjusting the handbrake on the Gazelle, lift the rear of the car and place it on supports. After this, remove the wheels to gain access to the brake mechanism. And you should also know that adjustment procedures are carried out with the lever set to the non-working position (lowered all the way).
Monitor the cable tension - this is important for your safety
To work, you will need a 17" wrench, two 22" wrenches, a "9" tubular wrench and a flat blade screwdriver. Having prepared the necessary set of tools, proceed to adjust the hand brake in accordance with the following list of actions:
- So, first you need to get to the brake mechanism - to do this, use a screwdriver and remove the upper and lower plastic plugs on the brake shield.
- Next, using a key set to “17”, loosen the eccentric nut two turns (no more) and, sliding the pads, unlock the brake drum. To do this, use a tubular wrench to rotate the eccentric bolt in the opposite direction. If the pads lightly touch the drum, this is acceptable. You can control the entire process through special inspection windows, which are located at the bottom of the brake mechanism flap.
- After this, the eccentric nut must be tightened to a torque of 2.4–3.5 kgf/m. If you do not have a torque wrench on hand, tighten by hand with a reasonable amount of force. In this case, rotation of the eccentric itself is unacceptable.
- At this point, the first stage of adjusting the handbrake on the Gazelle car is completed, so install the plugs in place and do the same on the second wheel.
Now it is necessary to install the cable equalizer in a perpendicular position relative to the axis of the vehicle. This is achieved by loosening the cable fastening nuts. By moving the nuts along the threads, you will install the equalizer in the desired position, while eliminating the play between it and the cable tips. After this, the locknuts must be tightened.
With the completion of the described procedure, the process of adjusting the parking brake is not yet completed, since it is necessary to adjust the tension of the central cable. To begin, lift the handbrake lever one click and, by rotating the adjusting nut at the point where the rear end of the cable is attached to the equalizer (after releasing the lock nut), tighten the tension until the wheels begin to slow down slightly. After this, lower the handbrake lever all the way down and turn each rear wheel by hand. A properly adjusted handbrake should not interfere with rotation. In addition, when setting the vehicle to the parking brake, the lever travel should be 15 clicks of the ratchet mechanism.
From this guide you learned how to tighten the handbrake on a Gazelle without outside help. But sometimes, after a correctly performed adjustment, it is not possible to obtain the expected result due to critical wear or stretching of the cables. In this case, the handbrake cable will have to be replaced, which will be discussed below.
Advice
To ensure good drum installation, coat the edge of the drum with graphite lubricant. And be sure to remember to adjust the expansion rod to the permissible min. length. If you do not do this work, you will not be able to install the drum on new brake pads.
Be sure to change the pads on one axle of the car.
Instructions on how to replace the rear brake pads in Gazelle Business, Cummins, Next with your own hands. We tear off the wheels and raise the car on a jack; in our case, this was done on a lift, behind the rear axle, which allows you to hang two wheels at once. From the factory, the drum mounting bolts are installed under a screwdriver, but they almost always stick and unscrewing them is quite problematic. Be sure to soak them in WD-40 for a few minutes. After this, use a sledgehammer to slightly tap the drum where these bolts are located. Then we take an impact screwdriver, apply pressure to unscrew it and hit it. If you don’t have such a screwdriver, you can try to unscrew it with a chisel or a flat “bat”. We separate the pads, tear off the eccentric nut (with a 17-point head), then take the 9-point head and counterclockwise, turn the eccentric. We remove the drum. Inspect the condition of the brake pads and cylinder, and carry out troubleshooting. We remove the spring, the soldiers from the two pads. The new pads do not have a handbrake bar, so we rearrange everything from the old ones.
Video of replacing rear brake pads in Gazelle Business, Cummins, Next:
Backup video of replacing rear brake pads in a Gazelle:
When replacing the rear brake pads, inspect the handbrake cable at the same time; if it is jammed, you should change it immediately. Inspect the brake wheel cylinder to ensure that it and its boots are intact and there are no brake fluid leaks.
Brake pads, as part of a car’s braking system, are consumable components, so monitoring their service life and wear is a mandatory measure to avoid unpleasant accidents on the road. The life and health of transported passengers, as well as the integrity of the cargo transported by vehicle, depend on the condition and quality of functioning of these elements.
You can change the rear brake pads of the Gazelle yourself or with the help of competent specialists. You can analyze the degree of their wear without outside help. Just look into the special hole in the brake shield. It is closed with a plug, which can be easily removed for visual diagnostics of components. If the thickness of the brake lining is close to 2-3 mm, the spare part must be replaced with a new one.
The procedure for dismantling and installing new components is as follows:
- The technician loosens the locking elements that hold the rear wheel in place. To do this, the vehicle is placed on a jack. The wheel is removed.
- Using a brush, dirt, dirt and accumulated deposits are removed, which can affect the integrity and performance of parts installed in this place. The brake drum is also carefully processed.
- The specialist dismantles the fastening elements of the brake drum and removes it entirely. The upper and lower tension springs are then removed. The pads become free from fixation and, after removing the spring from the rod, are easily removed.
At the end of the procedure, the master replaces the old components with new ones and installs them in their usual place. To ensure high-quality functioning of the parts, the edges of the brake drum are treated with graphite lubricant. When assembled with new elements, the brake system should work much better and more efficiently.
Specialists at the Alfa-Auto workshop recommend changing the pads in pairs to regulate their wear and be confident in the quality of braking and mechanical performance.
Replacing brake pads on any Gazelle vehicle model is done quickly. The specialists of the Alfa-Auto workshop provide a guarantee for all work performed. You can contact our center for repairs, replacement of components, diagnostic and scheduled work, for tuning of any Gazelle model.
If you are the proud owner of a Gazelle car and have noticed that the free play (number of clicks) of the parking brake lever has increased enormously, this information will be useful. There are malfunctions in the car that do not affect the speed, but have no less important functions.
In general, in Soviet-Russian trucks, a handbrake with a mechanical drive is something abstract and is never remembered until the time comes to use it and the question arises of how to separate the brake pads on a Gazelle.
How to replace handbrake cables
If adjusting the Gazelle hand brake turned out to be insufficiently effective or did not lead to anything at all, therefore, you will have to change the brake pad drive cables. In addition to the critical stretch of the cable, it should be changed if damage is detected during an external inspection. And also an indicator for replacement is corrosion and jamming of the cable in the protective sheath.
In order to successfully complete the task, prepare two “22” wrenches, a “12” socket and pliers. We, in turn, will tell you how to change the handbrake cable on a Gazelle:
- Lift the rear of the car to remove the rear wheels and brake drums and shoes.
- Using a socket on “12”, unscrew the two bolts that secure the protective shell to the brake mechanism.
- After removing the socket cable from the brake shield, you need to move to the cable equalizer and use “22” keys to loosen the lock nut and the adjusting nut.
- Next, you should completely unscrew the outer nut, which will allow you to remove the cable from the bracket slot;
- After this, unsplit the equalizer axle using pliers, then remove the washer and remove the axle.
- Now you need to release the equalizer to remove the drive cable from it.
The second cable is dismantled in the same way. As for installing new parts, you can also use these instructions for this, but in reverse order. After completing the replacement, be sure to adjust the parking brake according to the instructions given in the first part of the article.
Replacing the rear wheel brake cylinder
Remove the drum and brake pads (see above “Replacing the brake drum and rear wheel pads”). Drain the brake fluid from the rear wheel circuit (see section “7.2.1. Brake fluid and master cylinder”).
Using a 12" wrench, unscrew the tip of the brake pipe...
...and disconnect the tube from the brake cylinder.
Using a 12mm socket, unscrew the two bolts securing the cylinder to the brake shield.
Remove the brake cylinder. We install the cylinder, pads and brake drum in the reverse order, and then bleed the rear circuit (see section “7.2.1. Brake fluid and master cylinder”).