The rear wheel bearing is one of the weakest links in almost all domestic cars.
And the point here is not the low quality of components (although this aspect also plays an important role), but the terrible roads of the country.
Therefore, a good driver must promptly replace the faulty element. Otherwise, this may not only lead to more serious costs in the future, but also to an accident. Let's look at the main nuances of this work.
Symptoms of a problem
So, replacing the rear wheel bearing of a VAZ 2109 may be necessary:
- when noise appears (usually manifested in the form of a strong hum) or knocking in the rear of your car;
- the appearance of play in the bearing.
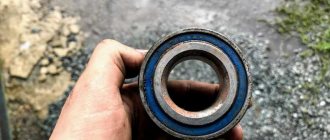
Rear wheel hub VAZ 2109
.
If you have one of the above symptoms, you need to lift the rear wheels one by one and make sure that there is a malfunction or not:
- Spin each of the suspended wheels thoroughly and listen to whether any extraneous noise appears. The presence of a clear hum indicates problems with the bearing;
- be sure to check for play (done with the wheel hanging). To do this, grab the top of the wheel and pull it away from you and towards you. If the bearing is intact, then the wheel should not play. Otherwise, you need to prepare yourself for serious work.
There are situations when there is no time for repairs. Try to lightly tighten the hub nut. Such a trick sometimes helps to remove the backlash, but not for long. In the future you will still have to make a replacement.
Diagnosis of wheel bearing failure
Signs of a problem appear, first of all, in the noise accompanying the movement. The sound of an accelerating subway train is what the whine that arises most resembles; it can come from one side or both; its appearance in the noise of the chassis clearly indicates the appearance of problems in the hub mechanism. At the very beginning, the problem makes itself felt at a speed of 50 km/h, during acceleration and when cornering, the noise will intensify.
Listen to what a bad wheel bearing sounds like in this video:
If you detect characteristic noises, you should try to eliminate the problem by simply tightening the hub nut. Then you need to check the unit, most likely there will be no more noise. But this is an option that will help you get to a workshop or other place for repairs without any problems. The braces are enough for 100 – 200 km of travel.
Signs that it’s time to change the wheel bearings on a VAZ 2109:
- When driving, especially when turning, there is a characteristic noise that turns into a howl, as well as knocking, crunching, and rattling. May only occur on one side. By the way, if you can already hear a grinding or crunching sound, the bearing is broken, and replacement is urgently needed, metal particles that have broken off from the mechanism crunch.
- Vibration is noticeable in the cabin itself. It is transmitted from damaged hubs to the steering wheel and body. Usually this is a sign that for some reason there is little lubricant left in the bearing, but it is clogged with dirt. Getting dirt and foreign objects inside the bearings causes chipping and destruction of the material of the balls and rings.
- Brake pedal vibrations.
- Any extraneous sounds from the suspension mechanisms, it is better to immediately check the condition of the hub assembly.
- The front bearings, by knocking and vibration, warn of strong play; a hum indicates poor condition, wear of the separators, rings or rollers.
Driving at a low (about 50 km/h) speed, like a “snake,” helps to find out which bearing is damaged. In this case, you need to carefully listen to the noises that arise when turning, they will indicate a problem unit. You also need to listen to which axle, front or rear, here a sharp turn will help identify the problem in the front hub.
To finally clarify the possible problems of suspicious nodes, you need to:
- lift the wheel with a jack;
- check the wheel itself for play without removing it, pull it towards you, away from you, in different planes, if the unit is in order, there will be no play (strong, small within acceptable limits);
- to be sure that the problem is in the bearing, it is necessary for someone to depress the brake when checking; if there is no play with the pedal pressed, the bearing must be replaced;
- by manually rotating the wheel, make sure that there is noise or absence of noise in the mechanism; the wheel should rotate smoothly, silently, without jamming or vibration;
- the damaged part heats up more, this can be verified by touch;
- with the wheel and brake disc removed, the play of the hub itself is checked; it must also be moved manually, towards the axle; strong play indicates the need for replacement;
It is important to pay attention to such a malfunction in a timely manner; driving with noise and vibration brings discomfort to passengers and the driver. In the absence of timely repairs, the destruction of the front bearing will lead to large play. The wheel starts to wobble and the car loses control.
The wheel starts to wobble and the car loses control.
The rear bearing will simply immobilize the car, jamming the wheel. In addition, as a result of such a breakdown, over time the entire rack will certainly suffer, then repairs will be more difficult and also much more expensive.
Why is inaction dangerous?
It is better not to ignore a malfunction of the rear wheel bearing for several reasons:
- firstly, in the presence of noise and hum, driving a car is not nearly as pleasant as it might seem at first glance. To get rid of unnecessary sounds, car enthusiasts are ready to endure any costs;
- secondly, ignoring a bearing failure may lead to the need to replace the entire strut (which, naturally, entails more serious costs);
- thirdly, malfunctions of the chassis system are dangerous due to the unpredictability of the car on the road and an increase in the likelihood of an accident. Therefore, it is highly undesirable to joke with this.
Important points
- The method proposed above for replacing a wheel bearing is considered the easiest, but it has its drawbacks. The main disadvantage is that when removing the knuckles, the alignment of the car's wheels will inevitably be disrupted. In order to avoid camber violations, before removing the steering knuckle, you should put a couple of marks (this can be done with a chisel, for example). The first mark shows what position the adjusting bolt was in the rack. The second mark shows what position the steering knuckle was in. Of course, these marks will not allow you to achieve an accurate initial camber of the wheels, but the deviation from the original camber when using them will be minimal.
- New wheel bearings almost never fit into place the first time, even with the use of a puller and a vice, so they will have to be “re-fitted” by hand, that is, driven into the fist. To do this, you will need to cut a steel pipe (and the diameter of the pipe must exactly match the diameter of the outer ring of the bearing). The attachment is installed on the ring, after which it should be carefully struck with a hammer. In this case, the fist must lie on a flat, hard surface, and the adapter on the bearing must be positioned accurately, without distortions.
- It can be difficult to unscrew the 30mm nut that holds the wheel bearing. That is why it is best to put a long metal tube on the socket wrench and use it as an additional lever.
- It is best to clean the wheel bearing housing from rust using a wire brush. If you don't have a brush, you can use a regular kitchen knife. It is better to lubricate the seat before pressing in a new bearing not with oil, but with grease.
- After installing the bearing, you should check whether it is seated correctly. The easiest way to check: after the wheel is installed, you should jack up the car a little higher and lightly rock the wheel with the new bearing (away and towards you). The wheel should not wobble. If play is felt, it means the bearing is installed poorly. Be sure to spin the wheel as hard as possible and listen to the sound it makes as it rotates. It should be a very quiet, monotonous hum. If you hear some kind of creaking, or worse, clicking, it means the bearing is installed incorrectly.
As can be seen from the article, replacing wheel bearings is a rather labor-intensive task, even taking into account the fact that the article provides the simplest method (an alternative replacement method allows you to do without removing the steering knuckles, but in this case the car owner will definitely need an inspection hole, which is far from available everyone has). In the method proposed above, a hole is not needed, and the main difficulty is not to disturb the camber of the car’s wheels. If the alignment still turns out to be damaged, there is only one way out: go to the nearest car service center and adjust the alignment again.
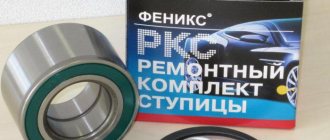
What brand should the bearing be?
In order for the replacement of rear wheel bearings on the VAZ 2109 to be as durable as possible, it is necessary to choose the right part.
So, the design features of the part are as follows: the bearings have a closed shape (double-sided seal). Type - angular contact, ball, double row.
You can also find a roller version on sale - 537906. Its features include a lower rotation speed and a higher load capacity.
Bearings are produced at four factories - at the Saratov Bearing Plant (SPZ), in Vologda (23 gas processing plants), Samara (SPZ-4), Kursk (20 gas processing plants). By the way, bearings are no longer produced in Kursk.
As for quality, the best are the first two options. As for Samara, bearings are produced there for those who like to save money (that is, you should not expect high quality).
The nominal parameters of the rear hub bearing are as follows: diameter (inner - 30 mm, outer - 60 mm), width - 37 mm, weight - 400 grams, number of balls - 28 pieces.
REPAIR RECOMMENDATIONS
When disassembling in the field, drivers often encounter problems.
- For example, VAZ 2108 rear wheel bearings from SKF, made in Sweden, are popular among motorists. However, sometimes they may resist removal. An original device made from a towing strap and a jack can help you with this procedure outside of the service center.
- In addition, during repairs, it is also important to pay attention to the wear of the drum brake pads and conduct a thorough diagnosis of the suspension. Sometimes it happens that beating or knocking occurs due to “tired” silent blocks.
- When tightening the wheel fastenings, the torque wrench should be set to 186-225 nm or 19-23 kgf.
Didn't find the information you are looking for? on our forum.
Required Tools
To complete the work, nothing unusual is required - most of the tools are already in the car enthusiast’s garage:
- pliers (with their help it will be necessary to dismantle the retaining rings);
- socket wrench. If you have the whole set, great, but for this work, number “30” is especially necessary;
- spanner wrench Again, you can use a set, but one “12” key is enough for the job. Without it, it will not be possible to remove the guide pins from the brake drum;
- special puller (necessary for pressing out bearings);
- Additional tools that may be useful are a hammer, a small wooden block, a pry bar and a chisel.
Removing the wheel
Once you get rid of the nut, you need to remove the wheel. To do this, first loosen the bolts used to secure it. Then you lift the side of the car on a jack and place it on a support. Only after this it is necessary to completely unscrew all the bolts and remove the wheel. Then, using a 12mm wrench, and on some car models - an 8mm or 10mm wrench, you need to unscrew the guide pins that secure the brake drum. It is advisable to gently tap them with a hammer before starting this action.
Please note that it is best to use spanners to remove these pins. The VAZ 2109 hub is replaced in the same way.
You can do all the work with your own hands very quickly.
Bearing replacement instructions
To quickly and accurately complete the job, follow these recommendations:
First, remove the protective cap and unlock the rear wheel hub (this can be done with a hammer and chisel).
Loosen the bolts on the hub and wheel. Please note that the tightening torque of the hub nut is very serious, so it would be useful to increase the “shoulder” of the wrench with an additional pipe.
Put the car in first gear and secure the car (this can be done by installing special “shoes” under the front wheels). Do not use the handbrake.
Finally unscrew all the bolts and remove the rear wheel.
Unscrew the guide pins.
And remove the brake drum.
If it cannot be removed, you can use a block (as a spacer) and a hammer. By tapping on it, or turning the drum, you can easily blow it up from its “home” place.
Now move on to the main part. Completely unscrew the hub nut and remove it from the axle.
If you have a puller, use it.
If not, then you can use a simpler method.
Or use a pry bar.
Put the wheel back in place, screw it to the hub with bolts (you don’t have to tighten it all the way). After this, sharply move it towards you (the hub should come off).
Please note that this work does not always go smoothly. In particular, the inner ring of the bearing may remain on the journal. If you are unlucky, you will have to remove it with a chisel and a pry bar.
Or you can use a puller.
The bearing in the hub will be fixed by a special retaining ring - remove it. To do this, you can use special pliers or a regular screwdriver.
Now use a puller to press the bearing out of the hub. If you don’t have a puller at hand, then you need to find a pipe with a suitable diameter, place it and beat until “victorious”.
Or so.
Clean the inside of the hub and lubricate it well.
Press in the new bearing. There are several options here - do the work using a puller, a vice, or a hammer and a wooden or metal spacer, as in our case.
We return the locking ring to its place using a screwdriver and pliers.
We install the hub on the axle. If you can’t get the part into place manually, you can carefully tap the bearing from the inside.
How to change the front wheel bearing on a VAZ 2109
Replacing the front wheel bearing of a VAZ 2109, especially with an assistant, and if you have the necessary tools (almost every car owner has them), takes just over an hour. This procedure is similar to that performed on a VAZ 2110-2115, for Kalina or Priora, due to the complete identity of the hub assembly.
Tools
In order to replace the front wheel bearing of a VAZ 2109 quickly and efficiently, all the necessary items must be at hand:
| pliers (round nose pliers); |
| a large flat screwdriver (it’s good if you have a set, but you can get by with a small one); |
| spanner wrenches, No. 10, 13, 17, 19; |
| hex key, No. 10; |
| hammer, chisel, pry bar; |
| wrench No. 30, extended, you can use a socket head of the same dimensions; |
| It’s good to have an original VAZ hub puller, this will greatly simplify the work, but you can use a vice; |
| a torque tool (wrench), without it it is difficult to pull the hub nut correctly, with the required force; |
| A universal puller will also come in handy. |
To carry out the work, you will need good lighting; the presence of an inspection hole or overpass will also speed up the work. The surface on which the machine is installed must be level. Stops are placed under the rear wheels, these can be ordinary wooden blocks - “shoes”, and the gear at the gearbox is set to 1st.
We carry out manual replacement of the front wheel bearing of VAZ 2109
Step by step, the following actions are taken:
- The front hub nut is loosened a little at the very beginning, before the car is jacked up.
- The front wheel must also be loosened.
- The wheel must be dismantled, the wheel bearing nut is twisted with a No. 30 wrench. This is not easy, the hub nuts usually “stick” to the threads. So, the key or head will need to be lengthened, say, with a piece of pipe, to increase the lever arm.
- The caliper is fixed with 2 bolts, they are screwed together with a key No. 17, disconnecting the caliper from the rotary cam.
- The pads are unbent with a screwdriver, the caliper must be removed as it is more convenient, it is better to put it on a stand, it is not advisable to hang it on a hose, it can be damaged.
- There is also a brake disc attached to the bolts, which also needs to be dismantled. It is convenient to unscrew the ball joint bolts with a spanner, then remove the knuckle.
- The camber of the wheels will definitely be disrupted in the process, so before removing the fist, use a chisel to mark the location of the adjusting bolt in the strut and the position of the fist itself. Then, when assembling the unit, it is possible to restore the original camber, although not exactly, but very close to ideal.
- The hub is manually knocked out of the element using a pipe cut of the appropriate diameter, then the retaining ring is removed using round pliers.
- The part itself is removed by pressing it out, which is conveniently done with a special puller.
- Now the place where the bearing was must be thoroughly cleaned of dirt and rust (for this there are special metal brushes or scrapers, you can even use a kitchen knife for this), apply a layer of lubricant - grease.
- The purchased new front wheel bearing, recommended for the VAZ 2109, needs to be pressed into the fist. By the way, the new part most likely will not fit into place perfectly right away. You will need to “plant” it in place manually, using the same piece of pipe of suitable diameter, driving the part into your fist. And distortions should not be allowed here, the fist is on a flat surface, the guide is exactly in diameter, strictly in place, the hammer blows are accurate, with measured force.
After everything, the assembly is assembled; the previous operations are performed in the reverse order, from returning the retaining ring to its place, to installing the wheel. Tighten the hub nut well with a torque tool, force 20 H*m.
After the VAZ 2109 front wheel bearing has been replaced, you will need to check the degree of success and quality of work. To this end, having installed the wheel, we lift the car higher, as during the initial diagnosis, checking for the presence of play (shake the wheel in all planes), smoothness and noiselessness of rotation. If, instead of a very quiet, even hum, you hear knocking, clicking, forceful rotation, or play that is greater than normal, the work needs to be redone.
This method is considered the simplest; with an alternative option, an inspection hole or overpass is required. If you use this method of replacing the front wheel bearing of a VAZ 2109 with your own hands, then the most difficult thing is not to disturb the wheel camber. Otherwise, you need to re-adjust.
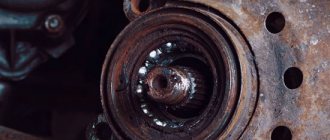
Design and purpose of the rear hub
Diagnosis and repair of the rear hub of the VAZ 2109 does not require any specific education; this operation is within the capabilities of many car enthusiasts. However, in order to carry out the necessary measures correctly, it is useful to familiarize yourself with the structure of this component of the car.
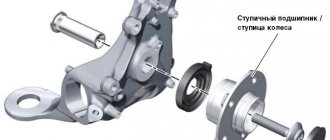
The rear hub is mounted on the beam using four bolts.
Location of the rear hub in a VAZ 2109 car
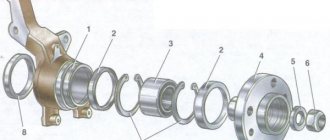
The hub itself includes several components. In the figure below you can see their list and relative positions.
Car rear hub device
From the presented infographics we can already conclude that the wheel bearing is the connecting link between the wheel hub and the vehicle axle. The wheel is attached to the hub flange using four bolts, and this entire structure rotates thanks to a rolling bearing.
The tasks assigned to the wheel bearing include:
- ensuring wheel rotation with minimal friction losses;
- quiet operation;
- comfortable and easy movement of the car;
- reliability and reliability;
- long service life.
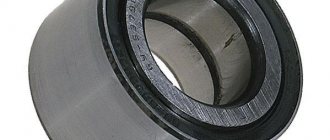
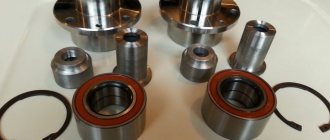
In turn, the bearing is a system of interconnected parts: a cage, a boot, rollers and a separator.
Wheel bearing arrangement
Wheel bearings operate under conditions close to extreme:
- temperature changes;
- aggressive environment (road deicing agents);
- exposure to moisture;
- impacts due to uneven roads;
- dynamic loads (acceleration, braking, sudden maneuvers).
Bearing Specifications
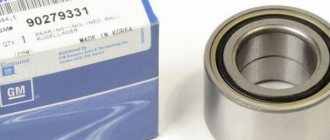
The product catalog number is 256706, it has the following characteristics:
- The diameter of the inner race is 30 mm.
- The diameter of the outer ring is 60 mm.
- Weight – 400 gr.
- Bearing width – 37 mm.
- Inside there are 28 balls with a diameter of 9.525 mm.
- Dynamic load capacity of at least 30.1 kN.
- Static load capacity 25.9 kN.
- The bearing operates normally at 6500 rpm.
There are only four manufacturers of these products in Russia:
- JSC SPZ (Saratov). Produces the highest quality and durable bearings. The cost is quite low.
- GPZ-23 (Vologda). It produces very good elements, which are slightly inferior to those from Saratov (denoted by the abbreviation VBF).
- Samara SPZ-4. The quality of the products does not differ, but the cost is very low.
- GPZ-20 in Kursk. The plant was engaged in the production of high-quality products; currently only copies of previous years of production can be found on the shelves.
Installing a new bearing
Before installing a new element, it is necessary to inspect the entire internal surface. There should be no nicks or damage on it. To make installation a little easier, you can place the new bearing in the freezer for several hours and warm up the hub. But please note that it should not be heated to very high temperatures.
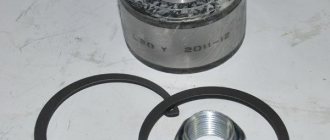
Otherwise, when installing a new bearing, its seals will melt, which will significantly reduce the life of the element. The bearing must be pressed in using a puller or using a clip from an old element. Be sure to secure the position of the bearing with the circlips, making sure they fit into their grooves.
Why does a bearing break?
On the VAZ-2109, the rear wheels do not turn, so the hubs are rigidly fixed to the suspension elements. The bearing is pressed very tightly into the hub, which rotates on the shaft. The appearance of play in this design is unacceptable. The rotation of the wheel should be as smooth as possible. There should be no crunches or jamming.
The average service life of high-quality wheel bearings is about 100,000 km. But the service life depends on what roads the car is driven on. If operation is carried out on unpaved roads, through mud and holes, then the wear of the element occurs much faster. Strong impacts on the suspension also damage the bearing. In addition, natural causes of wear and tear affect.
TABLE OF RECOMMENDED MANUFACTURERS
| No. | Manufacturer | Catalog number | Price 2022, rub. | Equipment | |||
| Retaining ring | Dirt cap | Lock-nut | Instructions | ||||
| 1 | VBF Russia | 2108-3104020 | 500 | – | – | – | – |
| 2 | SPZ Russia | 2108-3104020 | 520 | – | – | – | – |
| 3 | SKF Sweden | VKBA1307 | 1900 | 2 | – | + | + |
| 4 | FAG Germany | 545312A | 600 | – | – | – | – |
Preparing for repairs
First you need to secure the car on a level surface. Be sure to install chocks under the front wheels to prevent the car from rolling away. Next, follow these steps:
- Remove the protective cap.
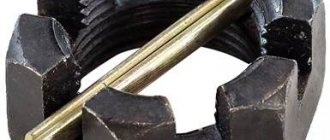
- Using a flathead screwdriver or chisel, align the locking collar that is on the nut.
- Using a wrench and a 30mm socket or a spanner, you need to remove the hub nut.
- Remove the wheel bolts.
- Raise the side to be repaired using a jack, place a reliable support under the car and remove the wheel.
At this point the preparation can be considered complete. Next you need to completely disassemble the entire assembly.