VAZ Oka with a 0.75 liter engine is a popular small passenger car of the nineties and 2000s, which won the hearts of many motorists due to its maneuverability, fairly high cross-country ability and efficiency. But fuel consumption could not always be the same; it largely depended on how the Oka 11113 carburetor was configured.
Currently, these small cars are still on the roads of our country, and spare parts for cars are in demand. Also for Okushka they sell carburetor units (CU) of various modifications, repair kits, jets, gaskets and other parts; they can be bought in specialized stores, and the adjustment and repair of the fuel system is carried out not only by specialists, but also by many car owners themselves.
Oka carburetor design
Cars under the Oka brand were produced from 1987 until 2008, at first the VAZ-1111 was modified (with a 0.65-liter two-cylinder engine). The updated VAZ-11113 model was launched into production in 1995, and it received a 749 cm³ engine. Initially, for 0.65-liter engines, the Dimitrovgrad Automobile Unit Plant developed the DAAZ carburetor series 1111, which combined elements of the Ozone and Solex type HRVs. Later, the DAAZ-11113 model began to be produced for the 0.75-liter internal combustion engine (ICE), which later underwent a slight modernization.
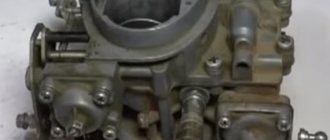
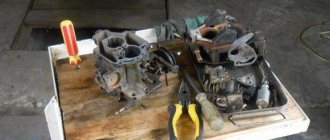
Carburetor 11113 is a device for creating an air-fuel mixture in a certain proportion, which sets the stable operation of a car engine in all modes. The body of this unit consists of 3 parts: the top cover, the middle (main) part where the float chamber is located, and the bottom part with throttles (flaps), the carburetor device itself is a 2-chamber one, with sequential opening of the throttles.
The carburetor assembly includes:
- the main dosing system (abbreviated as GDS), operating in all modes, which includes diffusers, fuel/air supply jets for both chambers;
- idle speed system (abbreviated as XX), which allows the engine to operate stably at minimum speed and consume fuel economically;
- economizer, which enriches the fuel mixture at high speeds and heavy loads;
- accelerator pump, its main function is to ensure uniform operation without failures with any, even the most sharp, pressing of the accelerator (gas) pedal;
- a starting device that allows you to smoothly start a cold engine at low air temperatures;
- float chamber, due to which a constant level of gasoline in the carburetor is maintained, required for stable operation of the internal combustion engine.
- a transition system that makes it possible to achieve a smooth increase in speed, without jerking, during the opening of the secondary chamber.
Each of the systems in this unit performs its own specific task, and configuration and adjustment are carried out using adjusting screws, selection of jets, setting the angles of the throttle and air damper.
How to set up a carburetor
Adjusting and tuning the gas-3307 carburetor
The carburetor is one of the most complex components of a modern car, allowing the use of a particular engine with maximum efficiency. It is the correctness of its adjustment that determines fuel consumption and the content of toxic substances in exhaust gases. Regardless of the specific model of carburetor and car, it is possible to correctly adjust the parameters of the air-gasoline mixture only using a gas analyzer and professional measuring equipment. It is advisable to adjust the carburetor for efficiency after any work on the engine.
However, you can adjust it to your driving style yourself.
Video tutorial on how to clean and adjust a VAZ carburetor
In this case, you should follow the basic rules:
- The carburetor can be adjusted only after the engine reaches operating temperature;
- You should check and clean all high-voltage wires, as well as battery terminals;
- It is necessary to make sure that the fuel supply system is working properly and that the ignition is set correctly. You can start adjusting only after making sure that all other systems are working properly. Often the cause of dips and poor response to the pedal is simple contamination of the mesh filter;
- During adjustment, it is advisable to turn on all powerful consumers of electricity: high beams, stove, heated windows, etc.;
- Before disassembling and cleaning the carburetor, it is advisable to purchase a repair kit for a specific model. It contains jets, sealing gaskets, diaphragms of the accelerator pump, starting device and other auxiliary elements;
- It is unacceptable to use rags, brushes or metal wire to clean internal surfaces. The best option is to use compressed air.
SOLEX is a popular manufacturer of carburetors for domestic cars
The main manufacturers of carburetors for domestic cars are Ozon, Weber, PeKAR (K151) and Solex (SOLEX). There are no fundamental differences in their adjustment. However, it must be taken into account that all modifications of the Solex 2108 carburetor have different calibration data, which is caused by their widespread use on VAZ, ZAZ and AZLK vehicles.
Do-it-yourself cleaning of the VAZ Oka carburetor
The most common problem with the failure of the normal operation of the Okushka engine is clogging of the carburetor unit, and both the jets and various channels can become clogged with debris and dirt. This raises all sorts of problems:
- idle speed disappears;
- The internal combustion engine does not develop speed;
- the motor is troublesome;
- fuel consumption increases;
- Black smoke comes out of the muffler exhaust pipe.
In some cases, repairs as such are not required; you can only get by by cleaning the carburetor. One of the most common problems with VAZ small cars is clogging of the GDS channels, when the engine does not pick up speed when the damper of the first carburetor chamber is open, although the idle speed is not lost. Here, quite often it is possible to blow out the heat exchanger with compressed air on site, without removing the fuel mixing device itself. We perform this operation with our own hands approximately this way:
- with the engine turned off, open the hood, first of all dismantle the air filter housing (AHF);
- We use compressed air (using a hand pump, blower or compressor) to blow through the HDS channels;
- after such cleaning, we start the engine, check how the engine picks up speed;
If the operation of the internal combustion engine has returned to normal after the operation, you can replace the air filter; if not, repeat the purging again.
Adjusting the gasoline level Oka 11113
If the fuel level in the float chamber (FC) is significantly less than required, the fuel mixture will be lean, the car may accelerate poorly, and there is a possibility of increased fuel consumption. With an increased level, gasoline consumption also increases; in both cases, it is necessary to adjust the position of the float to the desired level. If the carburetor floods, the cause of the problem is most likely not related to the adjustment, but to a loose fit of the locking needle to the seat, and in this case the locking mechanism in the PC will need to be replaced.
The adjustment is quite simple even for a driver with basic plumbing skills; this is done as follows:
- just as in the case of purging, first remove the CWF;
- then disconnect the choke cable:
- disconnect the fuel hoses (“return” and main);
- unscrew the five screws securing the top carburetor cover;
- remove the cover and gasket to the side;
- take a caliper or a specially cut piece of a ruler, measure the distance from the top edge of the body to the surface of the gasoline, it should be within 22-23 mm;
- if the readings obtained differ from the norm, we bend the float tongue in one direction or another, achieving the desired result;
- If it was possible to adjust normally, close the lid and replace the housing assembly with the air filter.
When performing all these operations, one nuance must be taken into account: when removing and installing the carburetor cover 11113, the shut-off needle falls out of it; removal must be done carefully so as not to lose the part, but installed by creating a vacuum (for example, using a rubber bulb, due to vacuum the needle holds and does not fall).
Which carburetor is better to put on Oka 11113
More about this in the Varyag Garage: Installing Solex
I decided to install a V8 carburetor. Not with some kind of self-interest, like a search for ways to save fuel and not with the goal of squeezing fantastic power of unprecedented power out of the half-eighth engine. I heard and read what they were putting on and I became interested.
What is needed for that? I took a DAAZ carburetor - 2108 - 107010 with a volume of 1500 cm3 because I was guided by the idea that the suction volume into the cylinder of my Oka (750 cm3) is equal to the suction volume of a V-8 with a 1.5 cc engine. In addition, I took a pan from 2108, since I didn’t want to drill and saw Okovskaya, and the classic one is somehow cumbersome; further hoses: for heating the carburetor, gas hose; clamps; self-locking nuts for fastening the pan (air filter housing); a gas filter and most importantly a sandwich of gaskets for 2108.
Overfills the carburetor
Often on the Oka a situation arises when the carburetor floods; with such a malfunction it is usually very difficult to start the car, and in other cases the engine does not start at all. There may be several reasons for the problem:
- does not hold the needle valve;
- the fuel pump creates too much fuel pressure (if a return line is not installed);
- the level in the PC is set incorrectly (more than normal);
- The float is not sealed.
Finding the cause of the defect usually begins with inspecting the parts of the float chamber, and if there is significant overflow and smells of gasoline, first of all you should pay attention to the locking mechanism.
Installation of Solex on Oka
It is often possible to achieve fuel economy and more stable engine operation by repairing the carburetor, replacing the repair kit, and making proper adjustments. But not all owners of small cars are satisfied with the dynamics of the engine and its throttle response, so some drivers perform tuning - install a Solex control unit from cars 2108-09. The price of this unit is relatively low, and many can afford this installation, but it will require some additional parts and minor modifications. Spare parts needed:
- thick spacer for the carburetor;
- 2 thin gaskets;
- clamps;
- fuel pipes (if necessary).
In any case, you will need to do something with the air filter housing: either upgrade an existing part, or purchase it from the VAZ-2108 (09) model. It's all about price, and if you want to save money, then it is better, of course, to modernize. Replacing a standard carburetor unit with a Solex is done as follows:
- remove the old HRSG (dismantle the air filter assembly, disconnect the fuel hoses, gas draft, choke cable, unscrew the four fastening nuts);
- We install thin gaskets on the collector platform, and a spacer between them;
- fasten the Solex with four nuts;
- we attach the gas rod, there should be no problems, adjustments are usually not required here;
- connect the EMG wire;
- we secure the fuel pipes with clamps; if there is no return line on the machine, we install a plug on the corresponding fitting;
- the choke cable will need to be “thrown over”, otherwise it will not be long enough;
- Having connected and installed everything except the “air”, we pump fuel into the float chamber with a gas pump, and try to start the engine.
Idle speed adjustment should be carried out only after the internal combustion engine has completely warmed up; idle speed is adjusted by tightening and unscrewing the quality and quantity screws. First, by using “quantity,” we raise the speed a little (to about 1000), then we tighten the quality screw until the engine runs quieter and small interruptions appear. We “add quality” a little, turning the screw a little, and using “quantity” we achieve speed within the standard range of 850-900 rpm.
Finally, we install the “air” in place and conduct tests on the road. If fuel consumption seems high, or the idle speed is not satisfactory, idle speed can always be adjusted on site, without removing the air filter housing.
As a result of the different lengths of the intake manifolds, some of the cylinders operate on a rich mixture, and some on a lean mixture. This prevents the engine from developing full power. A drop in maximum speed and slow acceleration of the car force owners to resort to modifications to the engine power system. The installation of two carburetors makes the supply of the air-fuel mixture more uniform, which leads to an increase in both torque and engine power of the iron horse.
Idle adjustment
Loss of idle speed, instability at low speeds, and frequent engine stops cause a lot of trouble for car owners; to eliminate such malfunctions, the carburetor has to be removed. But in some cases, you can do without disassembling/assembling the HRSG, limiting yourself to only purging.
Cleaning the XX channel can be done as follows:
- Having turned off the engine, removed the KVF and disconnected the supply wire, unscrew the XX solenoid valve;
- plugging the channel with your finger in the place where the electromagnetic valve (EMV) was turned out, start the internal combustion engine, apply gas, let the engine run for a while;
- we blow through the jet and the EMG itself, put the parts in place, connect the wiring;
- use the quantity screw to add a little speed and start the engine;
- if the cleaning was successful, the engine will already operate at idle, but at increased speed;
- Now, turning the quality screw, we adjust the fuel mixture, turn it until the engine begins to slow down somewhat and “fail”;
- slightly unscrewing the quality screw, having achieved stable functioning of the engine, use the quantity screw to set XX within the prescribed norm (850-900 rpm).
If purging does not help, then you need to remove the carburetor, disassemble it and thoroughly clean it. When fuel consumption is too high, you can experiment with XX, for example, buy an EMG jet of a smaller cross-section at a car store and install it instead of a standard part.
Tools and components required for installing two carburetors
To carry out installation work you will need:
- wrenches ranging in size from 8 to 14;
- screwdrivers with flat and Phillips blades;
- pliers;
- drill, but you can also use a screwdriver;
- angle grinder;
- vice;
- metal cutter;
- vacuum gauge bar.
The following components will be required:
- 2 carburetors of a suitable model. It is advisable to use new ones, since the old ones are unable to produce the same mixture. The more identical the composition is supplied to the cylinders, the greater the increase in power will appear in the engine. Old carburetors can only be used during the experimental phase;
- When installing two carburetors on a classic, two intake manifolds from Oka will be required;
- Gas drive parts. Since one carburetor was previously installed, the throttle drive will need to be upgraded;
- Fuel lines and other technical hoses;
- To ensure greater effect from installing two carburetors, you will need to install an additional air filter.
When installing carburetors, it may be necessary to secure the hoses, so it is advisable to purchase a set of clamps before starting work.
How to install the unit in place
You can assemble and reinstall the carburetor in the same way as you disassembled it, performing all the steps in reverse order.
- The carburetor is installed in its place, the mounting bolts are tightened.
- The pipes through which fuel is supplied are attached. The gas cable is connected to the throttle lever.
- The wiring is attached.
- A vacuum hose is connected to the ignition distributor, and the EPHH limit switches are combined.
- After installing the carburetor, it is adjusted.
Preparing to modernize the engine power system
In order to install two carburetors, it is recommended to initially drain the antifreeze through the fuel heater. After this, it is necessary to dismantle part of the fuel system. To remove the intake manifold, you need to unscrew the five bolts that secure it.
Connecting the carburetor to the manifold is not done on the car. This type of work is carried out in good lighting. Having connected the carburetors one by one to the intake manifolds of the Oka, you need to open both chambers and check the condition of the joint. It is strictly forbidden to allow the edges of the collector to protrude above the joint. The air-fuel mixture will swirl at the junction at high speed and the engine will starve.
To eliminate protruding edges, use a metal cutter inserted into a screwdriver or drill. The transition between parts should be as smooth as possible. For better results, you can use sandpaper or special sanding pastes.
Vehicle mounting
After adjustment and modification, the manifolds are fitted to the cylinder head. Slots for threads are made in the required places. You can control the connection of the manifold to the cylinder head either with or without removal. For reliable fixation, a central fastener is required. A strip of steel about 4 mm thick is suitable for these purposes.
Fixation is done with three nuts. One of them is located in the center, and two are located at the edges. It is recommended to prepare in advance two plates that secure the intake manifold at the bottom. Performing this operation will prevent coolant from entering the combustion chamber.
Upon completion of the installation of the manifold, it is necessary to connect the cooling system and vacuum brake booster. If the latter is missing, a plug should be installed. After this, the carburetors are installed.
Fuel tank
Fuel tank 38 is stamped and welded from two steel halves. To increase corrosion resistance, the tank is tinned with POS 35 on both sides and painted with black enamel. Fuel tank capacity is 30 liters, including fuel reserve.
The tank is installed under the body floor and secured with four nuts to the body welded bolts. On the side of the main muffler and exhaust pipes, the tank is covered with a screen that protects the fuel in the tank from heating. The filler neck 16 of the tank is located in a niche in the rear part of the right side of the body and is closed with a sealed plastic plug 14. The plug has a torque limiter (on some cars a lock may be installed in the plug). The filler neck is connected to the fuel tank pipe with a hose 18 made of petrol-resistant rubber.
To prevent fuel leakage during refueling, the upper part of the filling pipe is connected to the tank nozzle with a rubber hose 13, through which air is forced out of the tank during refueling.
Fuel level sensor 37 with a fuel receiving tube is attached to the top of the fuel tank through a sealing gasket with nuts. The fuel receiving tube has a strainer 36. When there is remaining fuel reserve in the tank, the float lever 35 closes the contacts of the fuel reserve indicator lamp. A fuel level indicator with a fuel reserve warning lamp is installed on the instrument cluster in the vehicle interior.
For ventilation and access to atmospheric air, the fuel tank has a ventilation hose 12, made of a polyvinyl chloride tube with a tip 34 at the end. The hose is connected to the tank nozzle, has a loop along the filler neck and is then laid on hooks along the rear edge of the tank. Fuel that gets into the lower part of the hose loop 12 when the car is moving on an uneven road forms a liquid seal that prevents the evaporation of gasoline from the tank.
Features of installing carburetors
It is better to install two new carburetors. Their parameters must be identical. The position of the mixture quality and quantity screws should be checked. If necessary, adjustments are made. It is important that the adjusting screws are turned out the same amount.
All hoses must be securely secured with clamps. To ensure reliable and durable operation, it is important to install an air filter. Since there is only one filter in the standard production, modification is required. How to make a filter depends on the ingenuity of the car enthusiast, but the main thing is to avoid allowing the engine to operate directly. An option for making a filter is to cut out a sheet steel housing to the size of the filter element.
The next stage is to obtain synchronous operation when the gas drive is applied. To control Solex carburetors, a cable drive is used. We install the stock plastic trim and the second carburetor is synchronized with the first. A test run of the engine will show how correctly the preliminary adjustment was carried out.
The final adjustment is carried out on a warm engine using vacuum gauges designed for multi-carburetor bikes. You can also use for these purposes:
- calibrated econometers;
- mixture quality sensors inserted into the spark plug hole.
Having installed two carburetors on a VAZ, during operation you should monitor the condition of the spark plugs of each pair of cylinders. A different color from the normal electrodes will indicate that the mixture feeding the engine is excessively rich or lean. Having decided which carburetor requires adjustment, it is necessary to achieve the optimal mixture composition. It is important that the engine operates stably at any speed.
Modification results
The main concern that car owners have when tuning is the appearance of excessive fuel consumption. The engine, working with two carburetors, consumes fuel within normal limits, since the increase in power occurs mainly due to a more optimal ratio of fuel to air in each cylinder.
The increase in gasoline consumption occurs only due to a more aggressive driving style, which is observed after an increase in torque and power. Car owners provide maximum fuel supply to the cylinders when starting at traffic lights, since dynamic characteristics, as a result of this modernization, increase by 10-15%.
The reliability of this system is at a high level. Although the presence of additional components increases the risk of breakdown, if installation and adjustment operations are performed correctly, carburetors will not require owner intervention for a long time.
Installing a second carburetor cannot be considered an easy tuning. The car owner should realistically assess his strength before starting modernization. If you take a risk, the result will not take long to arrive. The significant improvement in low-end thrust thanks to the high torque and increased top speed are well worth the effort of installing two carburetors.
The power units of the Oka car 1111 and 11113 were equipped with a carburetor power system. Now such a system is outdated and not used, but at the time of the start of production it was a priority; injectors were not used on domestic cars of those years of production.
The main element of such a power system is the carburetor. VAZ-11113 and its “junior” version received their own separate carburetor manufactured by DAAZ. This unit could not be simply borrowed from other models due to the fact that the Oka engines are 2-cylinder, and the performance indicators of the carburetor of the same VAZ-2108 simply did not meet the required requirements.
But the designers took the DAAZ-2108-1107010 from the Eight (aka Solex) as a base and based on it they created the DAAZ-1111-1107010, which was installed on the Oka.
It is noteworthy that when creating the Oka carburetor, not only Solex was used; some design solutions were also borrowed from Weber and Ozone carburetors.
The VAZ-11113 carburetor is similar in general construction principle to the Solex from the VAZ-2108, but there are some features, for example, in the Oka unit on the body there are two plugs, by removing which you can get to the fuel jets without disassembling the carburetor itself .
Construction and components
The Oka carburetor is a two-chamber carburetor with an idle speed solenoid valve (XX). This valve is the only electronic component.
The Oka carburetor includes 3 main parts:
- Lid;
- Main building;
- Throttle body.
These components are connected to each other with bolts.
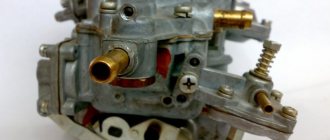
Lid
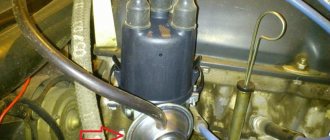
The cover contains fittings for connecting the fuel supply lines from the pump and draining the excess (return). To further clean the supplied gasoline, a small mesh filter is installed under the supply fitting.
An air damper is installed in one of the wells of the cover, the axis of which is connected by a cable to the handle for forced enrichment of the air-fuel mixture installed in the cabin (the so-called “manual choke”).
There are also studs on the cover to secure the filter housing.
Main building
The main working part of the carburetor.
It contains:
- GDS (main dosing system) with diffusers;
- float chamber;
- Acceleration pump;
- Economizer and inertial enricher;
- XX system with electronic valve;
This component is intended for dosing the amount of fuel depending on the operating mode of the engine and mixing gasoline into the air, ensuring stable operation of the power plant at idle.
Damper body
Two dampers are installed in the throttle body (1st and 2nd chambers). Structurally, it is made in such a way that the cable coming from the gas pedal is connected to the lever of the axis of only the damper of the primary chamber. The influence on the second damper is carried out through levers connecting both dampers.
Cleaning carburetor elements from carbon deposits and dirt
The carburetor must be cleaned both outside and inside. The best solution would be to perform this operation at a service station, since this operation requires special care. But if the car owner has experience in servicing spare parts, then this work can be done independently.
Cleaning the jets
A distinctive feature of such parts as the nozzle is that the holes made in them have strict tolerances and their violation can lead to a violation of the fuel supply parameters.
OKA carburetor jets must be cleaned every 50,000 kilometers. The thing is that, due to the design of the carburetor as a whole and the structure of the fuel nozzle itself, it is precisely this that is subject to soot adhesion.
Non-ferrous metals are usually used to produce this part. Since this material is quite soft, you should not use wire to clean the holes. It is best to use a wooden toothpick. It will be able to remove carbon deposits without damaging the jet body. To get a greater effect from cleaning the holes, it makes sense to blow them with compressed air.
Cleaning the throttle valve
Cleaning the throttle valve should only be done when there are reasons indicating the presence of carbon deposits. Its presence may indicate that the engine began to start intermittently, interruptions began to be observed in its operation and the idle speed fluctuated.
On DAAZ-1111 carburetors, it is advisable to perform the operation of cleaning the air damper after 80 - 100 thousand km. mileage In order to perform this operation with maximum effect, the damper must be removed. Carbon deposits should be removed only with a soft, lint-free cloth. By the way, there are special liquids for cleaning carburetors. To clean carbon deposits, such a liquid is applied to its parts and then, after some time, it must be wiped off with a soft, dry cloth.
IMPORTANT! WHEN PERFORMING WORK TO CLEAN THE CARBURETOR AND ITS PARTS FROM SOCO AND OTHER CONTAMINATIONS, IT IS ALLOWED TO USE A FLINT-FREE FABRIC.
Cleaning the float chamber
The float chamber must be cleaned every 80 thousand km. In order to remove carbon deposits, it is advisable to completely disassemble the carburetor, but there is no need to remove the floats.
Liquid is poured into the chamber to clean carburetors; by the way, it is permissible to use kerosene. After a certain time, usually two to three hours, the liquid will dissolve the soot layer. It must be drained and the chamber cavity must be cleaned, blown out and wiped dry.
By the way, sometimes the float chamber needs to be cleaned because low-quality fuel is poured into the gas tank.
Carburetor settings
How to adjust the carburetor on OKE? In fact, it is not so difficult, but for this you need to follow a few simple rules. On a VAZ-OKA car, you can adjust the carburetor in the following sequence.
- You can start adjusting the carburetor only after the engine has reached operating mode and other vehicle systems have been checked, incl. and operation of the main fuel and accelerator pump.
- When making adjustments, it makes sense to turn on all electrical equipment of the headlight, etc.
It should be noted that the carburetor can be adjusted without dismantling the device itself. The main thing is to remove the air filter, as it limits access to it.
Setting up the OKI carburetor includes the following operations:
- fuel consumption adjustment;
- setting idle speed;
- adjusting the dynamics of movement.
To perform these operations, several adjustment devices are installed on the carburetor.
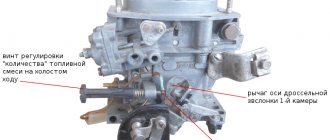
- A quality screw that raises engine speed in idle mode.
- Fuel quantity screw that regulates the enrichment of the fuel-air mixture.
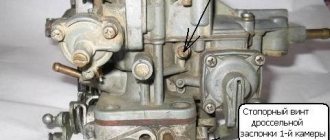
- Locking screws for the shutter of the first chamber system and the transition system of the second chamber.
- Idle jet clamp, which is responsible for their constancy.
Design features
Despite the fact that the Solex from the Eight was taken as the basis for its creation, the Oka carburetor has some design features:
- The float and shut-off needle are separated. The first element is installed in the float chamber, the second is located in the lid. Because of this, the technology for adjusting the fuel level differs from the usual Solex;
- There is only one float chamber, and it is located on the side of the main dosing system (and not on the sides, like the Solex);
- The float is fixed in the chamber in such a way that a constant normal supply of gasoline is ensured during acceleration and upward movements;
- The calibration (hole cross-section) of the jets is smaller than that of the DAAZ from 2108.
As for the differences between the carburetors of the Oka models 1111 and 11113, they only come down to different calibrations of the jets.
Model 1111 uses fuel jets with a calibration of 95 (on the 1st and 2nd chambers) and air jets with a calibration of 190 (1st chamber) and 95 (2nd).
Version 11113 has 95 fuel jets (on both chambers) and 170 (1st), 85 (2nd chamber).
Since the dimensional parameters of Solex jets are identical and only the sections differ, it is possible to upgrade the Oka carburetor to increase power by installing jets of larger sections (but at the same time, gasoline consumption will also increase).
Principle of operation
The VAZ-11113 carburetor works on the same principle as the Solex. The essence of the operation is very simple - the float chamber constantly contains gasoline, which, due to rarefaction through the gas pump, is mixed with the air flow, forming together with it an air-fuel mixture.
It all works like this - the driver uses the gas pedal to act on the throttles, thereby changing the flow rate of air sucked into the cylinders.
The air flow passing through the diffusers creates a vacuum in the nozzles, which causes the fuel in the float chamber to be sucked in. The gasoline sucked in by the flow passes through the fuel nozzle, which, thanks to the small cross-section of the hole, breaks the liquid into small droplets, which makes it easy to evaporate. And already in evaporated form, gasoline is mixed into the air through a sprayer.
The engine operates in different modes, to which the GDS does not always have time to adapt (it needs to dispense the amount of gasoline), which can cause dips and jerks.
To eliminate such problems, an economizer and an accelerator pump are included in the carburetor design. The first provides an increased amount of gasoline at high engine loads. This is done by supplying part of the fuel to the atomizer, bypassing the fuel nozzle.
The accelerator pump is responsible for supplying the required amount of gasoline when the throttles are opened sharply. He does this by injecting fuel through an additional nozzle. That is, when you sharply press the gas, gasoline is supplied into the air flow not only through the hydraulic system, but also through the accelerator atomizer.
Engine operation at idle is ensured by the idle speed system. It consists of channels through which fuel is supplied to the lower dampers. The air required for engine operation when the throttles are closed enters through holes made in the dampers. Therefore, even with the accelerator fully released, the combustion chambers are supplied with the air-fuel mixture necessary for the engine to operate at the lowest possible speed.
Possible malfunctions during fuel supply
In “Ozone” carburetors installed on VAZ 2105-07 and Weber cars, found on older classic models, the accelerator pump is responsible for emergency fuel enrichment. It operates as follows: when you press the gas pedal, the sector fixed to the axis of the primary chamber presses on the lever going to the chamber with the membrane. The chamber is constantly filled with fuel, and when the lever sharply presses on the membrane, it pushes the fuel into the channel leading to the spray nozzle.
The nozzle nozzle is located near the diffuser of the primary chamber and has a calibrated hole with a diameter of 0.4 mm, directed downward. When the fuel pushed out by the membrane passes through this hole, a powerful jet is formed, bypassing the small diffuser and entering through the open damper directly into the manifold. The sharper you press the pedal, the longer the jet of gasoline lasts, providing dynamic acceleration of the car.
When you smoothly press the accelerator pedal, the lever also squeezes the membrane, but most of the fuel manages to leave the chamber through a special bypass channel, and a little fuel gets into the spout, and the stream comes out short. To prevent gasoline from constantly escaping through this channel, it is equipped with a valve in the form of a ball that closes a calibrated hole. Problems with the accelerator pump are as follows:
- membrane wear;
- clogging of the calibrated hole in the spout;
- backlash at the sector-lever-diaphragm interface;
- souring and jamming of the ball valve;
- curvature of the housing due to overheating, causing the pump chamber to become leaky.
To find out which of the malfunctions is occurring, it is necessary to dismantle the air filter and turn the axis of the primary chamber to check the presence and power of the jet. If it is not there or the fuel flows poorly, getting on the walls of the diffuser, you need to start repairs.
Maintenance, adjustment
Thanks to its simple design and minimal amount of electronics, the Oka carburetor is a fairly reliable unit. But to keep it in full working order, periodic maintenance is required.
Signs that the Oka carburetor needs repair are the following symptoms:
- Difficulty starting the engine;
- Unstable operation at XX;
- The occurrence of dips, jerks under load, sudden opening of the throttles;
- Power drop;
Since problems with the ignition system have the same symptoms, it would be a good idea to check its performance together with the power system.
The main disadvantage of the carburetor is the presence of a large number of channels and components with small cross-section holes, which over time become clogged with debris and resinous deposits contained in the fuel are deposited in them.
Carburetor maintenance involves complete disassembly, washing and purging of channels, jets, and tubes. At the same time, it is not recommended to use metal objects (needles, awls) for cleaning, so as not to affect the cross-section of the holes, although the use of wooden objects (toothpicks) for cleaning is allowed.
For mild contamination, special products also help. products for cleaning carburetors, the use of which does not require dismantling and disassembling the unit - washing is carried out with the carburetor installed and the engine running.
Possible breakdowns of the unit include:
- Failure of the solenoid valve;
- Accelerator pump diaphragm rupture;
- Wear of the mounting holes of the throttle axles;
- Warping of the throttle body plane due to uneven tightening;
There are not so many settings for the DAAZ “Oka” - the level in the float chamber and the idle speed are regulated.
The first operation is performed like this:
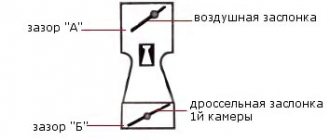
- Remove the cover;
- We measure the height of the protrusion of the top of the locking needle above the plane of the lid, holding the lid strictly horizontally (so that the needle “looks” down). The normal protrusion height is 10 mm. If the indicator does not correspond, you need to add a gasket under the needle seat;
- Put the cover in place;
- Manually pumping the pump pumps fuel into the carburetor (you need to fill it completely);
- Remove the cover;
- We measure the distance from the surface of the fuel to the upper plane of the body. With normal adjustment, this figure should correspond to 23-24 mm. If the distance is greater or less, we adjust it by bending the tongue on the float (to reduce the quantity, bend it up, and to increase it, bend it down).
The XX speed adjustment is carried out using a quality screw. Work should be performed with a warm engine and with electrical appliances turned on (to create a load). The essence of the adjustment comes down to the fact that you need to rotate the screw to achieve engine speed at 800-1000 rpm.