Selecting heated seats
In order to choose heated seats, you need to decide what kind of heating you need. There are several types of seat heating for Lada Priora: Cover, Standard heating, Emelya heating
Heated seats from the cigarette lighter (cape)
This type of heating has a wide area of application and is quite easy to install. To install heated seats from the cigarette lighter, you do not need any auto electrician skills. To install such heating, you just need to insert the heating plug into the cigarette lighter and select the heating position. It should be noted that the reliability of such heating leaves much to be desired. Filaments are used as a heating element, but since the cape is poorly attached to the seat and is often subject to creases, which leads to the breakage of the filament and, consequently, failure of the entire heating.
Heated seats standard
The standard heating for Lada Priora is a very reliable device that can be bought at any auto parts store at a price of 1000 rubles. Standard heating has only one heating position and does not regulate the heating temperature, i.e. The seat will heat up until you turn it off. This is its only drawback. The advantage of this heating is that there is no need to use additional intermediate relays to unload the contacts. Since the relay itself is already built into the button. The standard heating has heating elements for the seat and lower back.
Heated seats Emelya
Emelya's heated seats have proven themselves quite well on the market. The cost of such a heating kit is not cheap, starting from 2000 rubles. This heating is installed in the same way as standard heating. However, a significant difference from standard heating is the ability to regulate seat heating. But it is also worth noting that installing the seat heating button in the standard place will be difficult; you will have to cut out and trim the standard place. This type of heating has heating elements for the seat and lower back.
Possible malfunctions with heated seats
The heating device must have a fuse. On the VAZ-2114, two such elements are responsible for the measured heating operation. One fuse is located in the mounting block (F16), the other is located under the dashboard.
If you see that the control lamps do not light up when the heating is turned on, the problem most likely lies in the fuses.
Difficulties with relays:
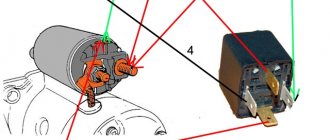
- The system is turned on by an electric relay, which is located under the dashboard.
- After the unit is triggered, check the voltage at terminal 87 with a multimeter.
- If operation does not occur, then it is necessary to examine the relay winding at terminals 86 and 87 with an ohmmeter.
- If the problem lies in the relay, it needs to be changed.
Another problem could be a simple lack of nutrition. To check this, do the following:
- You need to check the power with the power off at the connectors under the seats.
- The dark wire is the ground of the car, the second is the power supply, which should have 12 volts.
- Use an ohmmeter to check the resistance of the heater windings. As practice shows, the problem in most cases lies precisely here. The windings burn or break.
Depending on the situation, the problem with heated seats can be solved without the help of others. But to do this you need to disassemble the chairs.
Summing up the result of the article, we note that we have not seen all the probable reasons why heated seats may not work. But using the information above, you will know which direction to go to identify the problem.
If you have experience in carrying out such a repair plan, then finding the problem will not be difficult for you. Otherwise, we recommend contacting a specialist.
There is a special offer on our website. You can get a free consultation with our corporate lawyer by simply submitting your question in the form below.
Installation of heated seats
We will look at installing seat heating using the example of installing standard heating. Since the installation of other heating systems will be similar to the installation of standard seat heating.
In order to install heated seats yourself, you need to remove the seats from the car and remove the upholstery from them. The heating installation will be divided into several stages.
- Removing the seats
- installation of thermoelements in them
- putting the seats back
Removing the seats
Tools needed to remove seats:
- Ratchet
- Head at "13"
- Head on "8"
- Head at "10"
- Screwdriver “+”, “-”
- Insulating tape
Seat removal process
- Move the seat forward as much as possible and pull out springs 1 and 2
- Using a ratchet with a head set to “13”, unscrew the seat mounting brackets
- Using a ratchet with a head set to “8”, unscrew the seat skis in 5 places
- Disconnect the seat belt sensor plug
- We take out the seat
- Next we move on to disassembling the seat itself and installing thermoelements
Installation of thermoelements
- We bend the plastic clips of the seat upholstery and lift the upholstery up.
- We slip the thermoelement under the upholstery and sew it to the foam rubber.
- We stretch the upholstery over the seat frame and secure it with plastic clips.
- Fold the backrest, pulling out the hooks securing the backrest.
These latches must be released
- Remove the backrest adjustment knob. You need to pull the plastic gear towards you and it will come off.
- Using a “10” socket, unscrew the bolt securing the gear to the seat
- We bend the pins holding the backrest upholstery and remove it from them.
carefully bend the pins and remove the fabric
- We slip the thermoelement under the upholstery and sew it to the back.
- We stretch the upholstery over the back of the seat and secure it with clamps.
- Connect the seat heating plug to the lumbar heating plug
- We extend the same procedure with the second seat.
Button installation and connection
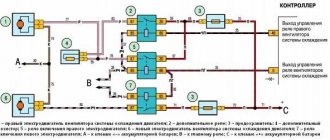
Connection diagram
A simple diagram for installing standard seat heating in a Lada Priora
Connection
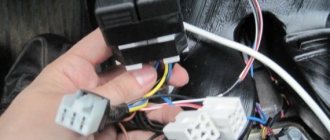
- We drill holes on both sides near the air duct for the rear passengers' feet to bring out the plugs for each thermocouple.
- Remove the cover for the seat heating button.
- We insert the wires into the holes under the seat heating button and separate the thermocouple wires in different directions and insert the holes.
- We screw the ground wire under the nut securing the central dashboard near the gearshift lever.
- We stretch the positive wire to the fuse block under the central dashboard.
- We connect the positive wire to fuse F11, this is the wiper fuse, power appears on it only after the ignition is turned on.
- We insert the wiring plug into the heating button and install the button in its normal place.
Seat installation
- We connect the free plug on the seat with the heating wiring.
- We check that the connection is correct, that is, the right button should be responsible for the right seat. If it’s the other way around, remove the button and swap the wires.
- Installation of seats is carried out in the reverse order of removal.
Principle of operation
This arrangement of switches will be the most successful from the point of view of ergonomics and comfort. As a result, after painful searches and reflections, I noticed that this board should fit perfectly into the tunnel setup.
When the button is pressed, power is supplied to its winding. Installing heating elements in the rear seats takes about the same time. The power wire was led directly from the battery through the standard hole on the left in the engine compartment into the passenger compartment. The driver's license will have to be removed to put everything back in place. It is enough to install the heating sheet and the relay in their original places. The connection diagram will remain the same, that is, installation will not cause any additional difficulties. I plopped down on the icy seat for a couple of seconds, started the car, pressed the heating button, and within a couple of minutes the seat was already warm.
And here it is, the highest pleasure - to sit in a warm chair when there is frost all around. Cheap DIY steering wheel heating.
See also: Sample estimate for electrical installation work
Installation of heated seats "cape"
The heated seat “cowl” fits over the cover or seat of your vehicle. Fixed on the seat with elastic bands. The heating plug is inserted into the cigarette lighter and narrower, after which the desired operating mode is selected on the heating button. Such heating is dangerous because some models do not have protection and leaving it in the cigarette lighter can lead to dire consequences.
The installation of heated seats on your vehicle is complete. Standard heating only works when the car's ignition is turned on.
We hope our article was useful to you.
Possible malfunctions with heated seats
The heating device must have a fuse. On the VAZ-2114, two such elements are responsible for the stable operation of the heating. One fuse is located in the mounting block (F16), the other is located under the dashboard.
If you notice that the control lamps do not light up when the heating is turned on, the problem most likely lies in the fuses.
Relay problems:
- The system is turned on in an electromagnetic relay, which is located under the dashboard.
- After the unit is triggered, check the voltage at terminal 87 with a multimeter.
- If operation does not occur, then you need to examine the relay winding at terminals 86 and 87 with an ohmmeter.
- If the problem lies in the relay, it needs to be replaced.
Another problem may be the usual lack of nutrition. To check this, do the following:
- It is necessary to check the power with the power off at the connectors under the seats.
- The black wire is the ground of the car, the second is the power supply, which should have 12 volts.
- Use an ohmmeter to check the resistance of the heater windings. As practice shows, the problem most often lies here. The windings burn or break.
Depending on the situation, the problem with heated seats can be solved independently. However, this requires disassembling the chairs.
To summarize the article, we note that we have not considered all the possible reasons why heated seats may not work. But using the information above, you will know which direction to go to identify the problem.
If you have experience in carrying out such a repair plan, then finding the problem will not be difficult for you. Otherwise, we recommend contacting a specialist.
There is a special offer on our website. You can get a free consultation with our corporate lawyer by simply submitting your question in the form below.
With the arrival of cold weather, drivers of cars, especially those stored outside garages, are wondering why the heated seats on VAZ 2114 and 2115 do not work. Some time ago, drivers of even prestigious cars did not dream of such an option. The first to install heating systems were manufacturers from northern countries.
At first they appeared on prestigious brands of cars, and today they can be found on budget car models. Those owners who have tried this option speak very positively about it.
We'll look at why heated seats on VAZ 2114 and 2115 don't work in this article. It will to some extent help owners of other brands of cars, since the principles of operation and connection are largely similar. I would like to warn you that finding and eliminating problems with this function is a very troublesome and time-consuming task, and you will also need experience in repairing electrical equipment and the availability of measuring instruments.
What is needed for this?
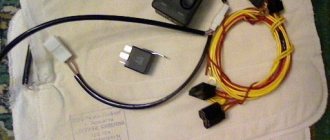
The first thing you need to figure out is what elements, materials and tools will be useful to you during the heating installation process.
| Element | Explanation |
| Heating elements | They are required for backs and seats. Experts recommend choosing the standard ones provided for the VAZ 2110. They are sold in sets for two seats. Their cost ranges from 1000 to 1400 rubles. The kit also includes wiring and buttons to turn the heating on and off. |
| Buttons | They are not always included. They are used to turn the seat heating system on and off. |
| Wiring | It serves to connect the heating to the vehicle’s on-board network |
| Foam rubber | If the seats are already quite worn, it would not hurt to replace the foam rubber, which is short-lived |
Choose only high-quality materials, purchase kits from trusted retail outlets. Heating is carried out by electricity, which is always dangerous to human life and health.
On/off buttons
Finding a broken heating element
To search for a broken winding wire in a heated cape, you need any pointer tester, multimeter or any electrical circuit integrity dialer. If the multimeter has an audio dialing mode, then it is better to use it. You won’t have to be distracted to take readings from the device. If you are little familiar with how to test electrical circuits, then you can read the site’s article “How to measure resistance, test a circuit with an ohmmeter.”
Since the winding conductor broke due to kinks as a result of mechanical action, you should start looking for a break in the part of the cape that spreads over the seat. To search, you need to connect one end of the device probe to the beginning of the winding laid on the seat; according to the diagram, this is the connection point of the two windings. In the photo above, this is the right side of the cape.
The heating winding wire has a diameter of 0.3 mm and is not covered with an insulating layer. Therefore, a method is available to search for a break using a sewing needle. You need to take a sharp thin needle, attach the second end of the probe to it and pierce the insulation of the heating winding with the sharp end to find the break point.
For a faster search, you first need to divide the length of the heating winding wire into approximately two equal parts and make a puncture in this place - a continuity test. If the chain rings, divide the far part of the winding into two equal parts, and make the next puncture in this place. Mark the puncture sites with a marker to make it easier to find. If the chain does not ring, it means that the break point is between the last two punctures. Divide this area into two parts again and make another puncture.
The method of checking the halves allows you to find the break point by making the minimum possible number of punctures. I found a break through five insulation punctures with an accuracy of 3 cm. Insulation punctures in this case are harmless, since due to the elasticity of the plastic, the holes will be closed and there will be no holes.
How to disassemble a cape for repairs
You need to start disassembling the cape by removing the clamp of the current-carrying wire. In order to remove it, you need to unscrew two screws.
Removing the wire clamp did not provide access to the connection of the wires with the heating elements and it was necessary to cut the fabric and foam rubber from the back of the heating cape. It is good to make the cut with scissors or a sharp knife. In this case, you need to be careful and careful so as not to damage the wires and the cut is smooth. Then, after repairing the cape, it will need to be sewn up with thread.
An autopsy showed that the heating winding was connected to the current supply wire by twisting followed by soldering. For insulation, insulating tubes are put on the solder joints.
A thermal fuse is included in the gap between the black wire and the lower end of the heating element for fire safety. This fact caused a pleasant surprise.
I removed the insulating tubes from the junctions of the ends of the heating windings with the current supply wire and checked the reliability of the connections. I found no defects. The rations were brilliant and high quality. I rang the windings again with the tester. The resistance of one of the heating windings, the bottom one in the electrical diagram, instead of 3 Ohms, was infinity. I had to start looking for the break point.
First, in order for the current-carrying wire not to interfere with work and not to break the ends of the heating windings with its weight, it was necessary to disconnect it from the windings by heating the joints with a soldering iron. In order to get to the heating conductors, I had to literally turn the car seat cover inside out. The following picture opened before my eyes.
On a sheet of foam rubber about two millimeters thick, the heating wires are neatly laid in a snake on glue in an insulating tube. The conductors are covered on top with a translucent sheet of thin, fragile elastic material with a sticky layer. There was full access to the wires to find the break point. All that remains is to find this place.