The car engine is one of the main parts that takes up most of the space under the hood. The vehicle’s ability to fulfill its main task – to drive, transport people and cargo – completely depends on its operation.
The condition of the engine is directly related to operating conditions, care and mileage. Every motorist knows that over time, parts inside the internal combustion engine wear out and require replacement. In this case, you need to do a major overhaul of the worn-out engine in the garage with your own hands.
Engine care, driver actions to extend the “life” of the engine
To extend the life of the engine, it is necessary to create the most gentle operating conditions for it, try to maintain optimal engine speeds and use only technical fluids recommended by the manufacturer, in particular, high-quality oil and fuel.
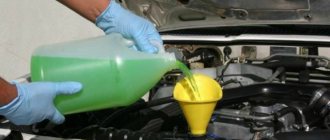
Timely oil change: the most important procedure
In addition, regularly carry out various preventive measures and do not forget to take good care of your car.
Where to begin?
Of course, with information. We get a manual that tells you in detail and with diagrams how to repair your particular brand of car. We find a catalog on the Internet that contains spare parts for this car in order to immediately determine prices and, possibly, place an order in the online store.
Preparing tools:
- keys - ratchet, torque;
- mandrels for clutching pistons, caps;
- desiccant for valves;
- micrometer;
- heads;
- device for adjusting valves;
- two-legged or three-legged puller;
- stethoscope;
- tweezers;
- support post;
- hydraulic chain hoist;
- puller set.
Major overhaul, which indicates the need for a major overhaul of the engine
The cylinder parts can tell you that your vehicle's engine needs a major overhaul. This is noticeable by the car’s greater need for oil - consumption is more than one liter per thousand kilometers.
What does the color of the exhaust gases mean?
A clear sign of engine trouble is the presence of characteristic bluish smoke from the exhaust pipe. However, when these symptoms appear, you should not rush to conclusions.
Oil leak
For example, high oil consumption may indicate that the valve stem seals have lost their elasticity.
Check out our article on replacing valve stem seals. 3drive has created complete and most understandable instructions about this procedure.
We believe that even inexperienced motorists can roughly understand what this can lead to:
- increased oil consumption (it simply burns along with the fuel mixture);
- inefficiency of the engine (oil + fuel + air does not provide the efficiency expected from the engine);
- destruction of the cylinder-piston group (and it’s good, if the matter is resolved by rupture of the rings, the pistons can often burn out and then the costs will be tens of times higher than preventive ones).
Due to the high temperature (and the engine heats up to very high temperatures during operation), the rubber from which the oil seals are made hardens, the part loses its elasticity, becomes rigid and no longer fits tightly around the valve stems. Because of this, oil gets inside.
The crank mechanism should be highlighted - a characteristic knock is possible, indicating complex damage to the bearings, crankshaft liners and other sliding components. You can diagnose a knock using a stethoscope, and a pressure gauge can help determine the pressure in the cylinders. Serious signs that a major engine overhaul will be needed in the near future include the following symptoms: increased fuel consumption, loss of power, increased engine noise.
If you find most of the signs listed above in your car, then most likely you cannot avoid capital damage. However, to be more certain whether a major overhaul of the engine is required or not, it is better to contact a special service station, where they will check the degree of wear of all engine elements. For this check, special devices are used at stations - bore gauges, dial indicators, micrometers, measuring clamps. Using these devices, you can accurately determine the need for engine repair.
What is a major overhaul and why is it needed?
Overhauling a VAZ engine is quite a labor-intensive job that requires knowledge of the structure and operating principle of the unit.
This process will take a lot of time. You will have to remove the engine from the car and completely disassemble it. All removed spare parts are checked for suitability for further use and, if necessary, replaced with new ones. Particular attention is paid to the crankshaft: it is restored and brought into perfect condition. The existing systems are also checked: cooling, lubrication, fuel supply, and the crank mechanism is repaired.
During repair work, internal combustion engine parts and components are brought to perfect condition. After assembling the unit, its condition and performance should be identical to a new engine just released from the assembly line. Capital is needed if the engine has fully or partially exhausted its service life, and corresponding signs have appeared indicating this. It is impossible not to pay attention to them. With further use of the car, the engine may completely fail and cannot be restored. There is only one option left - purchasing a new part. Naturally, purchasing spare parts is more expensive than repairing them.
The service life of the engine before overhaul can be extended if you follow simple rules when operating the machine.
- Monitor the oil level and change it regularly.
- Monitor the coolant level to prevent the machine from overheating.
- Fill with high-quality fuel recommended by the manufacturer.
- Operate the machine wisely and avoid overloading.
- Limit the vehicle's idling time to a minimum.
- Avoid extreme driving that requires high speeds. Do not allow the tachometer needle to enter the red zone.
Trust the professionals, or do the repairs yourself
Many drivers think that doing major engine repairs on their own is much cheaper than contacting specialists at a service station. However, this is not always a correct statement. For example, in some situations, it is necessary to grind and polish the cylinder mirrors or replace the piston rings. It is very difficult to carry out such operations at home. In addition, it is necessary to have special devices, which, as a rule, are quite expensive. Therefore, in this case, it is advisable to seek the help of professionals.
It is better to entrust engine work to professionals
In addition, at service stations, during major repairs, they carry out diagnostics of the starter, generator and distributor of your vehicle. If they are faulty, they will be replaced.
Car maintenance after major repairs
After overhauling the engine with your own hands, the car must be operated carefully. During the break-in, the basic rules must be followed; the ride must be calm. During this period, frequent oil changes are required: every 500 km. When the mileage reaches 2000 km, the oil is changed unscheduled for the last time. Next, it needs to be changed like in any car after 10-15 thousand.
After overhauling the engine yourself, with proper operation, the car will delight the owner for many years. The main thing is to change consumables on time and use high-quality, proven products.
You can see how the overhaul of a VAZ engine takes place in the video.
Spare parts for engine overhaul
To overhaul the engine you will need the following spare parts:
- Water pump.
- Oil pump.
- Fuel pump.
- Guide bushings and valves.
- Sets of gaskets and seals.
- Asterisks.
- Piston rings.
- Bushing inserts.
- Chain.
- Belts.
And this is not a complete list of all the parts you will need.
It is advisable to first disassemble the motor and pay attention to the elements that actually require replacement. And only after that start purchasing the necessary spare parts. If you decide to contact a car service, then after diagnostics the specialists will tell you what elements need to be purchased for subsequent replacement.
Problem areas in the engine
During the operation of this vehicle, owners discover malfunctions and weak points of the engine. These include the following:
- Water pump. This element is also called a liquid pump. It breaks quite often. If the vehicle owner did not look at the temperature sensor readings in time, then a breakdown of the liquid pump can lead to serious consequences. This installation quickly overheats, and then it simply jams. To restore the functionality of the part, you will have to sharpen the cylinders and then change the piston group.
- Radiator. It is imperative to check the radiator periodically. Quite often, a leak forms in places where there are adhesions. They must be eliminated as quickly as possible.
- Roller in the gas distribution mechanism. This is another weak point where breakdowns can occur. If you hear a hum in the area under the timing belt cover while the engine is running, then you must take all necessary measures. If the hum begins to interfere only when the trip is long, then the functionality of the roller can be restored by using more lubricant. However, this will not save you for a long time, so major repairs will be required. The roller will have to be replaced. If you continue to ignore unpleasant sounds, then in the future this will lead to the fact that the load on the timing belt increases significantly. As a result, he either breaks through or flies out of his place. As a result, the valves bend, so a complete overhaul of the entire unit is necessary.
Quite often, Priora drivers complain that oil is leaking under the cover of the valve mechanism. To fix this problem, you just need to replace the gaskets.
As a rule, repair work consists of boring the cylinders or simply replacing the pistons. Often, owners are forced to resort to repairs because the unit has overheated. This happens due to the following reasons: the cooling system is not working well or is completely broken, the gaskets are not installed tightly, the thermostat is not functioning properly, etc. In simple cases, you can simply change the gasket. But if overheating is caused by more complex and serious problems, then you will not be able to correct the situation on your own, so you will need the help of specialists.
Engine disassembly, DIY repair and diagnostic manual, step-by-step instructions
There are no standard instructions on how to overhaul an engine. It all depends on the specific make and model of your vehicle and the wear and tear of various engine components.
In any case, for major repairs it is necessary to completely disassemble the engine. This process is long and labor-intensive, which cannot always be done at home.
Removing the power unit
For those who are not afraid of difficulties, we have prepared a short guide to engine overhaul:
- First, we remove the engine from the vehicle. To make your car's engine a little lighter, you need to dismantle some units - we start with the carburetor, then remove the cylinder head cover, dismantle the generator, disconnect the gearbox, dismantle the manifold, and then remove the flywheel and clutch. Now you can unscrew the cushions and remove the engine.
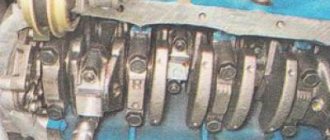
- To gain access to the crankshaft and pistons, you need to remove the crankcase cover. Then we unscrew the connecting rods. We take out the pistons and remove the pins from them. Now you need to remove the crankshaft and its bearings.
- Pay special attention to wear on the crankshaft liner and journal. If necessary, bore them. In addition, do not forget to purchase piston rings, pins and new liners.
Stages of engine repair
Rebuilding the engine involves performing the following actions:
- Removing the motor.
- Complete disassembly and removal of accumulated dirt by washing and cleaning.
- Identification of defective spare parts of the block that need to be replaced: inspection of the engine block for cracks, measurement of possible gaps formed, assessment of the condition of the crankshaft, identification of worn parts.
- Overhaul of the cylinder head.
- Restoration of the cylinder block.
- Assembly of the unit and installation on the car.
Disassembly and dismantling of the engine
The process of removing the unit from the car may vary depending on the car model. Dismantling a carburetor engine is much simpler than an injection engine. There are fewer electronics that have to be removed first. Also, the disassembly process will be different for brands with front and rear wheel drive.
The preparatory stage preceding dismantling will be the removal of interfering mechanisms and unscrewing the retaining bolts. The removal of a heavy unit from the car body occurs using a special lift or winch. If there is no such device, then to reduce weight, all possible parts and spare parts of the engine are removed, and it is pulled out manually. This will require the help of several people.
Disassembly follows. The work should be done sequentially, carefully inspecting the parts for wear and placing them in order.
It is worth knowing that a VAZ engine can be disassembled in about 3 hours; disassembling a foreign-made engine takes more time: about 10 hours.
Washing engine parts
Washing is an important step that many people skip.
It is not right. Each detail has a specific meaning. If the spare parts are not washed and deposits are not removed, then the degree of wear can be incorrectly determined, which can cause rapid failure of the entire motor. You should also wash the block and cylinder head with special care to examine for possible cracks.
Diagnosis of damage and defects
Defects are identified visually and using measuring instruments. All spare parts are checked for wear, scratches, cracks and chips. Particular attention should be paid to the following details.
- The cylinder block and head are checked for integrity, special attention is paid to cracks and chips.
- The crankshaft is inspected and measured to check whether wear has appeared, and is also checked for alignment and bends.
- Parts of the connecting rod and crank mechanism: the general condition and the presence of play are determined.
- Gas distribution mechanism.
Cylinder head repair
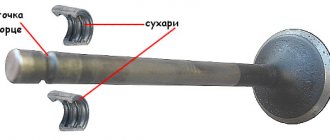
Repairing this spare part is not too complicated, but many car owners turn to the service for help. If you decide to do the repairs yourself, then you will need to replace or repair the following parts.
- Camshafts.
- valves.
- Guide bushings.
- Valve stem seals.
If cracks are found on the block head, it will need to be replaced or polished. It is possible that there will be a specialist who can weld the damage with argon.
Cylinder block repair
After cleaning and washing the block, it is necessary to restore it, bringing it to a quality close to the factory one. It is necessary to polish the head seat to a mirror shine, eliminating any existing holes and chips. For this, a surface grinder or milling machine is used. Depending on the degree of damage, the cut thickness can vary from 0.05 mm to 1 mm. If there are too deep cavities, grinding may consist of several stages.
Crankshaft repair and restoration
A car's crankshaft can be repaired and bored a certain number of times, depending on the model. For example, the crankshaft on a VAZ needs to be repaired 4 times and is bored to fit different sizes of liners with their subsequent enlargement. Having dismantled the spare part, the first thing you need to check is whether it can be restored. If yes, then you can buy larger earbuds and get started.
The second thing you need to pay attention to is the crankshaft journals. If, upon inspection, wavy grooves and risks are found on them, then you need to get rid of them. This is done by grinding on a special machine. Remember the main thing! Replacing liners without grinding is unacceptable. Repairing a car engine with your own hands will be in vain, the result will be zero.
Assembly and installation of internal combustion engines
Having prepared the head, cylinder block and crankshaft, we proceed to assembling the engine. For engine capitalization, you may need to purchase the following spare parts from a car store:
- Valves, guide bushings and seats for them;
- Connecting rod and main bearings;
- Connecting rod pins and bushings for them;
- Piston rings;
- Repair kit for pump;
- Oil filter;
- Gasket set.
Engine assembly occurs in the following order:
- Installation of liners and crankshaft shrinkage.
- Installation of pistons and connecting rods.
- Fixing the crankshaft with yokes.
- Installing the gasket.
- Installation of the motor cover.
- Mounting the pump and oil pump.
- Installing the crankshaft pulley.
- Installing the head.
- Fastening the pan and crankcase.
When installing the liners and piston group, lubricate the parts and cylinder walls with a special lubricant. Its further performance and service life depend on the high-quality assembly of the internal combustion engine. It is advisable that it be carried out by a person who knows the principles of operation and the design of the motor.
We install the unit in its original place using a lifting device. After successful installation, it is fastened, then the removed equipment and electrics are installed in reverse order. Before starting the engine, it is additionally recommended to center the clutch and test the engine.
Running in the engine
Having capitalized the engine, you definitely need to break it in properly.
Otherwise, the motor will quickly fail without using up even half its service life. During the break-in period, parts are ground in, and excessive load will harm them. According to existing standards, a car needs to be run in for about 2-3 thousand km. In this case, the speed should not exceed 60 km/h.
Engine assembly, step-by-step instructions
Assembling the motor involves the following steps:
- You should start from the moment where you finished disassembling the engine. Before installing the crankshaft back, it is necessary to replace the old bearings and thoroughly treat the new ones with oil. Don't confuse them.
- Then you need to heat the connecting rods in oil and carefully insert new pins into the pistons. Next, we put on new rings - put on the oil scraper ring first, then the second compression ring, then the first compression ring. You should put the rings on as carefully as possible so as not to damage them. Be especially careful when putting on the second compression ring because it is made of cast iron.
- Now we install the finished pistons into the cylinder block. For this you need a mandrel. If you don't have one, you can make your own mandrel. To do this, take a tin strip to wrap it around the piston head and clamp the mandrel with pliers. After this, we adjust the optimal position of the connecting rod and slowly mount the piston in place.
- We return the crankcase cover to its place and install the engine in the vehicle. We tighten the cushions, install the flywheel and clutch, and mount the gearbox. We return the manifold, cylinder block cover, generator and carburetor to the car.
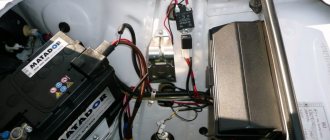
- We turn the crankshaft several times and, if the battery is fully charged, start the engine.
Assembly and installation of internal combustion engines
Sequence of engine assembly after major overhaul:
- Install the half-shaft bearings and seat the crankshaft.
- Install connecting rods and piston group parts.
- Correctly install and tighten the yokes (arc-shaped crankshaft mounting).
- Install the gaskets correctly, check that the gasket does not cover the channel holes.
- Installation of covers covering the motor.
- Install the oil pump and water pump.
- Install the engine crankshaft pulley. We have already learned how to remove the crankshaft pulley.
- Install the cylinder head.
- Install the pan, crankcase.
- Collect small knots.
If you decide to make a capital with your own hands for the first time, after all the work before assembly, it is better to carry out the assembly with an experienced specialist in this matter. The lifespan of the entire car depends on the quality of the assembly.
Running in the engine, advice from professionals
After repairs, you should not subject the vehicle to high loads. First you need to warm up the engine well. Then start the engine and let it idle for about ten minutes. After this, the engine must be turned off and cooled. These manipulations should be done several times. The engine should now idle for about ten hours. Only after the above operations can you begin operating the vehicle.
For the first fifty kilometers of driving, you should not accelerate the vehicle more than forty kilometers per hour. Then it can be accelerated to 60 km/h. Then, every hundred kilometers of driving, it is necessary to increase the speed of the car by 10 km/hour. Notice the increase in compression level. If it is missing, send the vehicle for re-diagnosis. Try not to accelerate or brake suddenly.
How to remove the engine
To remove the engine from the engine compartment, you will need the following:
- Disconnect all plugs from the sensor connectors installed on the vehicle. You don't have to label them, since each connector has its own shape.
- Remove the radiator pipes, unscrew the fuel hose, and then loosen the engine mounts.
- Loosen the bolts securing the gearbox to the engine. If the engine is installed longitudinally, then it is advisable to loosen the gearbox mount in order to move the unit back.
- Unscrew the bolts securing the exhaust manifold to the exhaust pipe.
- When nothing is blocking the engine, use a chain with a tap or other device to remove it from the engine compartment.
Taking this opportunity, you need to wash everything under the hood, as well as process the connectors and wires.
Break-in features
There are several ways to break in an internal combustion engine after a major overhaul:
- Cold version on the stand.
- In our country, cold running without a stand is common. It consists of moving a car with the engine not running in tow for 2 hours, at a speed of about 3 km/h. Refrigerant and engine oil are pre-filled.
- Hot running. The internal combustion engine is started, after 3 minutes of operation it is turned off. The process is repeated several times, waiting for the unit to cool down after each start. At the same time, leaks and other important parameters are checked.
What spare parts are purchased?
It is impossible to say for sure what parts will be needed during an engine overhaul. It all depends on the inspection of worn-out engine parts, so the price of the overhaul is not exactly known before it begins. Naturally, new “consumables” will be needed: crankshaft oil seals, distributor oil seal, oil filter, air filter. Also, most likely, oil seals, pan gaskets, cylinder head and valve cover will need to be replaced. You can purchase an oil pump, liners and seals, bearings, hydraulic compensators, oil scraper and compression rings in advance. You can also change the timing belt at the same time. Otherwise, the need to purchase new spare parts depends on the faults found and wear of parts. Ultimately, you may need many parts, including a new piston group and engine mounts. Therefore, the price of a major car repair, taking into account the cost of work, may even exceed the purchase of a used or new engine as a whole.
What mileage should be before overhaul?
The resource for internal combustion engines in middle-class cars up to the “capital” range is approximately 200 thousand km. There are vehicles that manufacturers position as “million-dollar” vehicles, capable of covering up to 1 million km. However, modern engines practically do not have such parameters, especially in domestically manufactured cars.
The VAZ plant for model 2114 set an average mileage of 150 thousand km, which is comparable to the performance of most Russian cars. This parameter can be extended if all current problems are resolved in a timely manner. Popular foreign cars have a range of 200-300 thousand km before engine overhaul.
For what reasons does the engine wear out quickly?
If we exclude unforeseen breakdowns (engine overheating, jamming due to oil leakage, etc.), then we can identify a certain set of factors and causes that contribute to accelerated wear.
- As mentioned above, engine oil and its quality, lubrication level and compliance with the type of internal combustion engine, as well as the condition of the filters play a paramount role. The oil must be correctly selected and its replacement must be carried out strictly taking into account the operating characteristics of the vehicle.
You cannot try to replace the recommended semi-synthetic or synthetic with cheap mineral oil, save on an oil filter, etc.
If the engine is under load, then oil change intervals should be shortened. The oil level should be checked regularly and lubricant topped up if necessary, avoiding mixing different types of lubricants. Ignoring these rules significantly increases the wear of the internal combustion engine and brings the time of major repairs closer. By the way, the air filter also needs to be changed regularly, since its contamination leads to abrasive particles entering the cylinders. These particles can cause scoring and damage.
The operating conditions of the car engine also affect the timing of the overhaul, since engine wear can be quite accelerated in cases where the engine:
- often operates at maximum speed;
- a car with a running internal combustion engine sits idle for hours in traffic jams (idling mode);
- the driver is used to driving at low speeds in high gears (driving tight);
- Cold engine starts occur constantly>;
For example, many experts claim that one cold start at -25 degrees is equal to wear over a run of about 150 km. Also, when driving on the highway, the engine wears out much less than when driving around the city with frequent accelerations and stops. It turns out that habitual city use negatively affects the condition of the engine and its service life before overhaul is reduced.
When your engine is seriously ill
I once had to personally observe how an engine literally died. No, the car was moving, but it was doing it with great difficulty. At the same time, my friend claimed that everything was fine, this was the usual behavior of his car. But I somehow doubted that the engine on a relatively new Audi should work exactly like that.
My suspicions were confirmed a few days later, when a friend took the car to a service station, and the result of the check was an unpleasant verdict - major repairs or a landfill. By the way, my advice to you. Living in Samara, Moscow, St. Petersburg or any other city and being the owner of a car, make useful acquaintances with car service workers. This will allow you to receive services at a high level, and for the service station you will be a regular and therefore profitable client. It is better to spend more money on trusted specialists than to try to save money by doing repairs in dubious garages.
So that you, my dear friends, do not bring the car to its limit, I have prepared a list of the main symptoms indicating the approaching end of the life of your power unit.
If you notice the signs below, know that you urgently need to send your car to a good car service center and have the engine repaired:
- Soot appears on the spark plugs every now and then, although you regularly clean it or change the spark plugs;
- oil is consumed with activity close to fuel consumption;
- Blue or bluish smoke comes out of the exhaust pipe;
- The engine's appetite increases significantly; you have to stop by the gas station more often;
- low compression in cylinders;
- the car loses power at least 15%
- a lot of crankcase gases are formed;
- knocking noises are heard when the power unit is operating;
- the lubrication system experiences a shortage of pressure;
- the engine constantly overheats, the temperature sensors go off scale;
- the engine is unstable in different modes, etc.
Just keep in mind that the end of the engine’s life and the need for major repairs is indicated by a set of symptoms presented. If symptoms appear separately, this may indicate a malfunction of individual components or even ordinary consumables. So if you have blue smoke coming from your rear tires, don't panic.
Stages of overhaul
If you watch various videos about major repairs, and also study the instructions, then all the work can be divided into several stages.
- Disassembly and cleaning. Without disassembling and cleaning the engine, it is impossible to objectively say where there are problems, which components are out of order, what needs to be changed, and where repairs can be done. A full check of literally every element forms the final cost of capital. In addition to purchasing spare parts, you also have to pay for the services of the masters themselves. It is not uncommon for the amounts to be comparable.
- Making decisions. Here the master, together with you (if your presence is necessary), decides what to do with this or that node. It's not always rational to change everything. Sometimes simple repairs can return the unit to its previous good condition.
- Working with the cylinder block. One of the main stages. When capitalizing, it is bored, honed or sleeved. At the same time, a complete replacement or restoration of the crankshaft may be required.
- Reassembly, testing and starting at idle speed. You should not begin reassembly until you are sure that the work was done correctly. After all, then you will have to disassemble and redo everything again. The assembly must be approached very responsibly. When the engine is assembled, basic adjustments, adjustments and further running-in are carried out.
Post-capital run-in
Many people forget about such a concept as running-in, which must be carried out after completing a major engine overhaul.
If you follow all the rules and carry out the repairs professionally, then after restoration the engine can receive a resource no less than its original safety margin provided by the manufacturer.
In fact, the break-in is carried out according to the same rules that must be followed after purchasing a new car from the showroom:
- Before driving, you need to warm up the engine briefly;
- gradual acceleration is replaced by smooth braking;
- You can drive at low speeds;
- Driving in high gear is prohibited;
- It is strictly not recommended to brake with the engine;
- You cannot drive for a long time at the same speed and speed;
- trailers, towing and transportation of heavy loads is contraindicated.
We recommend: Cardan transmission and everything you need to know about it.
And you should do this for the next 1 thousand kilometers. This is the minimum value. Although experts say that optimal performance after running-in is achieved after approximately 5-10 thousand kilometers. Increase the load on the engine gradually so that you do not have to contact the car service again. Already by 30 thousand kilometers the car can be operated in the manner familiar to you, hitch trailers, accelerate to high speeds, etc. But is it worth doing this?!
Don't forget to change lubricants. The first replacement is made approximately 1000 kilometers from the start of the run-in, and then after 5 thousand. Another mandatory replacement is carried out after approximately 6-8 thousand km. All subsequent activities are carried out at the usual intervals, as before the major overhaul.
What's involved in the process?
After disassembling the engine, the components are washed and cleaned. This will allow the specialist to find out the degree of wear of the parts, their maintainability or the need for replacement. Determining the clearances of mating elements and checking the cylinders for scuffs and scratches is carried out after removing the cylinder head.
During the troubleshooting process, the pistons are also inspected for chips, carbon deposits, connecting rods, and the engine crankshaft. Visually check the gas distribution unit, bearings, fingers, valves. Take measurements of the main parts, comparing them with factory parameters. After troubleshooting, the level of wear is assessed, sorting spare parts for repair, replacement, or abandonment.