Hello, dear friends! At one time, angel eyes on BMW cars made a splash on the market. It was optics of amazing beauty, especially in the dark. But even now fashion has not disappeared, and many people want to make angel eyes with their own hands.
In practice, there is nothing particularly complicated here. You will have to tinker, but the result will certainly please you. You can start from different instructions and manufacturing options. Some people use sites with videos that can be watched in parallel with taking notes in a notebook. Also on the Drive2 resource, motorists share their own experience of making peepholes, like those on a BMW.
I suggest you consider 3 interesting options. 2 of them are homemade and one more can be purchased online. The kit usually includes an ignition unit or a stabilizer, depending on the light source used.
Basic information about fines for driving with a trailer without documents
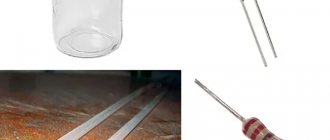
- 5 mm white LEDs;
- a resistor of approximately 330 Ohms and 0.25 W;
- wires for connection;
- plastic rod;
- or a plexiglass rod (diameter from 8 to 10 mm);
- jar or lid (1-3 liters);
- drill with adjustable speed;
- soldering iron;
- silicone glue;
- construction type hairdryer.
Take a rod of suitable length to make a ring out of it. You will need to make holes on the end sides for installing LEDs.
To avoid damaging the rod, it is recommended to wrap it in polyethylene or fabric and then fix it in the machine. This will ensure immobility and the ability to carefully make indentations without scratches.
Typically the holes are made with a diameter of about 6 millimeters. The depth depends on the design of the tube itself. But it is better not to exceed the value of 10 millimeters. To make the body take the shape of an optical device, you can take a jar or a lid from it. By bending around the jar, you will get a perfectly even ring. It is important that the diameter matches the internal diameter of the headlight itself on your car. Using a hair dryer, the body heats up and bends around the jar or its lid. There is no need to completely connect the ends of the tube to each other.
At the next stage, diodes are installed. Here you need to solder a wire of a suitable length to the terminals, which is enough to connect to the power wires outside the car headlight housing. A resistor is soldered onto one wire. As a result, you need to assemble an electrical circuit of LEDs with a serial connection and the resistor itself.
Now insert the diodes into the holes of your tube and secure with glue. The number of LEDs is determined individually.
In this case, you should not count on a bright glow and the ability to replace DRLs. The option is rather decorative.
Installation of angel eyes
After making or purchasing a set of glowing eyes, they need to be installed in the headlights. The installation process itself does not depend on the make of the car and on what kind of eyes are available: homemade LED or purchased CCFL tubes. The main thing is to be able to carefully disassemble and reassemble the headlights. To carry out the work you will need:
- construction hair dryer;
- transparent two-component glue;
- a set of screwdrivers and other tools.
The first step is to dismantle the headlights. There are no general rules in this matter, since each machine has design features and requires an individual approach. After dismantling, you should carefully inspect the headlight for the presence of latches at the junction of the two parts. Then it is placed on the table and for several minutes the seam area around the entire perimeter is heated with a hairdryer to warm up the sealant there. Only after this they start unpacking. It is better to do this work together, when one person holds the body and heats the seam with a hairdryer, and the second person gradually divides it into two parts.
You need to wear gloves when working with a disassembled headlight to avoid leaving fingerprints on the reflector.
Having separated the inner mask with the reflector from the glass, you can begin installing the first luminous eye. To do this, apply it to the mask and determine the location of the wires. Apply glue to the degreased surface of the ring, press it against the reflector and leave until completely dry. Glue the second ring in the same way. The headlight is assembled in the reverse order, heating the seam with a hairdryer and pressing the glass tightly against the body.
Please note that these instructions are general and only suitable for some types of headlights. Therefore, in each specific case, it is necessary to take into account the design features of the car.
The Spikes sign: whether it was canceled or not, why it is needed, what they can be fined for
- to Priora;
- Toyota Chaser 100;
- BMWs deprived of such a privilege;
- VAZ 2106;
- VAZ 2109;
- 2110;
- VAZ 2115;
- VAZ 2114;
- Renault Logan;
- Hyundai Solaris;
- Daewoo Lanos, etc.
Objectively, angel eyes look more advantageous on foreign cars. Although no one will forbid you to install such solutions on any machine.
To implement the task, you will need to prepare a slightly different set of materials and tools.
The following is required:
- double-density white LED strip, but without silicone coating;
- wires for connection;
- transparent silicone;
- glue;
- varnish (silver color);
- screwdriver;
- pliers;
- Have a good mood;
- extreme concentration and accuracy.
LED strips bend perfectly, which will allow you to easily make a ring of the required diameter. Just keep in mind that one headlight requires about 30-40 centimeters of tape.
Then the pads at one end are stripped to allow additional wires to be soldered there. They allow you to connect to a +12V power supply.
Next, a piece of tape is pointed onto a flat surface with the diodes facing upward. Gradually the tape is filled with transparent silicone. Do this slowly and carefully, armed with a mounting gun. This will allow you to coat the diodes with a uniform and even layer of silicone. It is important to wait for the resulting structure to dry completely, otherwise you will ruin everything with your own hands. Silicone will protect the product and act as a light diffuser.
To avoid wasting light illuminating the reflector, coat the back side of the tape with silver varnish. You can borrow it from your wife, sister or mother. Or buy it at your nearest store. The varnish will act as a reflector.
Connecting Angel Eyes
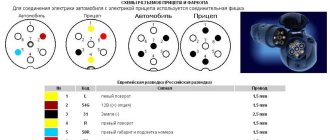
Angel eyes are an additional lighting device for a vehicle (vehicle) and inherently fall within the requirements for daytime running lights (DRLs). In accordance with clause 6.19.7 of GOST R 41.48-2004, running lights must turn on when the engine starts and turn off when it stops. In addition, turning on the headlights should lead to the DRLs turning off, so connecting the angel eyes must be done in accordance with a specific DRL connection diagram. It follows that the connection of angel eyes according to all the rules can be realized through a five-pin relay or through the DRL control unit.
To implement the first option, you will need female terminals (4 pcs.) and a 5-pin relay, the connection diagram of which is shown in the figure.
As can be seen from the diagram, the negative wire from the angel eyes is connected to the car body, and the positive terminal is soldered and connected to contact No. 30 of the relay. Then, under the hood, they find a wire connecting the side lights to the switch and run another wire with a terminal parallel to it, putting it on contact No. 85. Another long wire will run from the “Ignition + 12V” terminal block to contact No. 87a. The last one to connect contact No. 86 to the car body. During the connection process, all terminals, including unused terminal No. 87, are insulated using heat shrink tubing.
If an ignition unit (current stabilizer with LED rings) is supplied complete with CCFL rings, then it should be connected between the 30th pin of the relay and the eyes. In general, any LED DRLs must be operated together with a current or voltage stabilizer (for LED strips) to avoid the influence of voltage surges in the 12 V on-board network.
The second option involves connecting angel eyes through a DRL control unit (DRL controller), which can be purchased at any auto store. In this case, assembly is carried out in accordance with the diagram given in the instructions for the product. The use of industrially produced DRL control units is the best option for connecting angel eyes, as it is easy to assemble, provides overload protection and guarantees long-term, safe operation.
Third method
In theory, it is the simplest, since you are simply buying a ready-made device, which has a diffuser, an ignition unit and other necessary components. It’s just important to choose a quality product, since the Internet offers many options that are not of the best quality.
Eyes based on CCFL rings have proven themselves to be excellent. They have high reliability indicators and are in many ways superior to their LED counterparts.
If we talk about Aliexpress, then I would not advise you to buy ready-made angel eyes based on LEDs. Low-quality products are used here, which can quickly overheat when the head optics are turned on. As a result, in less than a year they will have to be removed due to the significantly reduced brightness level.
Reprocessing an old headlight
First you need to remove the headlight and separate the glass. However, this is not so easy to do, since it “sits” securely on the sealant. Therefore, we take a construction hairdryer and heat the product to melt the factory glue (you should not heat the central part of the glass surface so that it does not burst, only the side seams). Some heat the headlights in the oven for 10-15 minutes at a temperature of 60-80 degrees.
But sometimes the sealant does not soften. Then you can try to pick up the glass with a screwdriver and carefully separate it from the reflector along the seam. However, often such manipulations still lead to damage to the surface, so for those who do not want to suffer, it is easier to immediately buy new glass for the headlight (can be found for 50-100 rubles) and work with it.
Healthy! Old glass can be placed in a bag and carefully broken (the fragments will remain in the polyethylene). After this, all that remains is to clean off the old glue and remove any remaining glass along the seams of the headlight.
SECTION 3. Other Important Information/Miscellaneous
Now that we've covered all the different types of automotive front optics technologies, it's time to talk about some pressing issues that arise. So, for example, let your friends find out with you whether it is possible to use xenon incandescent lamps in halogen headlights and vice versa?
As a rule, to use xenon lamps, the front optics must be equipped with a specific lens that projects light onto the road. Also, xenon optics must be equipped with a headlight range control.
Mostly these days, automatic headlight leveling is used, which itself changes the angle of the lens in order to protect oncoming drivers from the bright daylight of xenon headlights. Their angle changes depending on the number of passengers inside the car. In particular, all such xenon headlights must be equipped with an optics washer, since a xenon light source is not entirely effective (or almost ineffective) with dirty headlights.
As for halogen lamps, unlike xenon lamps, they can be installed directly into lensed optics. What about LEDs then? We answer. Since LED lamps usually have a directional light source, it is unsafe to install them in a headlight with conventional reflectors, since in this case the efficiency of illuminating the road with them will be low. Therefore, most automakers equip the LED optics of their cars with lenses that project light from the LEDs directly onto the road. More about this below:
Results
With this method we get real angel eyes that glow with a continuous LED ring. If you attach the LEDs to the tube with electrical tape, then inside the ring there will be a gap without light, which will negatively affect the aesthetic appearance.
As you can see, the process is long and painstaking, but there are no particular difficulties here. You need basic knowledge of electrical engineering and tools, which should be available to every motorist working on his vehicle.
SMD technology
SMD (Surface-mount LED). In this version, the LEDs are installed in a circle on a round board. They provide very high light output. There are many styles of these rings, depending on the number and size of LEDs. SMD LEDs are mounted in a circle and create a glow in individual points. Many people like this particular look, while others want the luminous rings to be more uniform and continuous. This is done using a diffusion housing that is placed on top of the LED ring. However, this creates additional heat build-up, which reduces the lifespan of the LEDs.
“Angel eyes” SMD without diffuser and with diffuser.
SMD LED angel eyes can be with resistors or adjustable. The most common method for making SMD LED angel eyes is to mount resistors directly on the ring to control the power that goes to the LEDs. This method is quite reliable, but under certain conditions the resistors on the ring itself may become subject to excessive heat. Additionally, voltage surges can occur in a car circuit, also adding voltage to the resistors. Over time, with constant voltage, resistors may fail or operate intermittently.
To completely eliminate the problem, LED rings have been developed that do not use resistors on the rings. There are only LEDs there. To provide constant current, a regulator unit is used, which is less susceptible to voltage and temperature changes. It is attached along the line between the power supply and the LED ring. This technology allows you to install more LEDs on each ring of angel eyes, which gives a more uniform glow. It is more convenient to mount such rings, since the reverse side does not contain resistors and fits well to any surface.
How to remove a taillight on a Priora and glue vinyl
Car enthusiasts often have a desire to highlight the uniqueness of the vehicle on the road in every possible way. To achieve the goal, the owners are upgrading the taillights on the Priora. They change the color of the vinyl film glued on top and install additional LEDs. Additional modifications to the design of the light signaling system must comply with safety standards.
It will be easier to work by removing the rear light. What is not difficult:
- You need to disconnect the wiring connector going to the light on the trunk side;
- unscrew the three plastic wing nuts;
- remove the lantern;
- pull out the wires along with the rubber seal through the mounting hole.
That's it, the lantern is removed, you can put the lantern in the reverse order. Before dismantling or installing the lamp, it is recommended to disconnect the wire from the terminal. Pasting vinyl is a procedure somewhat similar to the process of tinting car windows. You need to remove dirt, wash the glass of the lantern, remove greasy stains and stains using window cleaners. Cut a piece of vinyl of the required size (with a small margin), moisten the surface of the lantern with a soap solution (without fanaticism). Glue the prepared piece of vinyl, removing the protective layer, remove air bubbles, and remove excess moisture. The remaining vinyl around the edges of the tail light can be cut off with a sharp utility knife.
A few general notes
What one of the possible options for such tuning looks like is shown in the photo
How necessary such a change in appearance is is a purely individual matter. It is quite harmless, it even has a positive effect on safety, the car becomes more noticeable, and is also very popular. And although you can make angel eyes with your own hands quite simply, how will they harmonize with the overall appearance of the car? Won't it turn out that they will only cause smiles from outsiders?
According to established practice, angel eyes are usually made with your own hands using:
- LED rings or strip;
- light guide
A couple of important points
A car is a vehicle whose technical condition must meet certain standards and norms.
This means that any change in design requires prior technical expertise. If you follow the letter of the law, then the car owner must contact a specialized organization with an application “to make changes to the vehicle’s light signaling device.” The expert will conduct an examination and give an opinion on the vehicle’s compliance with the requirements of the Technical Regulations. A simple procedure at first glance has one significant drawback: the minimum cost of services is 5 thousand rubles. Not wanting to pay such a sum, many drivers continue to tune their car themselves, thereby violating Art. 12.5 Code of Administrative Offences. According to the article, every driver who independently installs angel eyes risks receiving a warning or a fine of 500 rubles. An exception is the installation of lamps emitting red light in front of the car, for which a penalty is imposed in the form of deprivation of rights for a period of 4 to 6 months.
Types of front car optics.
There are many misconceptions among motorists when it comes to car headlights. Considering the fact that headlights are one of the most important features in a car, many of us (you) drivers think that rumors and misinformation about the front optics of cars do not exist and, in principle, cannot exist. After all, it would seem that there is nothing special here; all car front optics have a fairly simple design that is understandable to all of us. But do not rush to make assumptions and conclusions, since there are many different types of headlight designs in the auto industry, which often causes confusion among motorists. In our article today, we want to clarify and at the same time explain to all confused drivers that front car headlights in our time come in different types and designs that you, dear drivers, may not have encountered in your life.
And so friends, let's get started, we divided our article into three parts:
— Housing and design of headlights.
— The lamps themselves.
— Other relevant information (Miscellaneous).
How to connect a voltage stabilizer (optional)
In the electrical on-board network of the car, the voltage “walks” from 12 to 16 volts. And LEDs do not tolerate such changes well. We soldered a resistor to each LED to regulate the voltage. But for more reliable protection you need a special stabilizer. It’s easier to buy a ready-made version and arrange it into a connection between the “angel eyes” and the on-board network of the car.
Factory version of the voltage stabilizer
If you are an “advanced” electrician, you can solder a simple stabilizer yourself. The L7812CV chip is used as a basis. See the photo below for the connection procedure.
The connection diagram is quite simple
According to this scheme, you need to connect the negative contact of the LED to the ground of the car, and the positive contact to the output of the stabilizer.
Video: connecting a voltage stabilizer for LEDs
The procedure for making and installing “angel eyes” is not easy. Before starting work, evaluate your abilities and capabilities to avoid possible additional costs. Consider whether your actions are legal and what consequences they may lead to. Neatness and cleanliness are required for successful completion of optics tuning. But everyone will notice your efforts.
Adjusting the parking brake on Kalina: the need for the procedure and step-by-step instructions
How to choose the best navigator. Instructions for flashing Prology iMap-400M
Decoration Features
Today, the simplest and most effective way to modify the exterior of a car is the so-called. "angel eyes" This tuning consists of luminous rings installed on the headlights. These rings are installed on the front optics of the car. For the first time, such a unique solution appeared on BMW products. After some time, luminous rings for headlights began to be sold as a separate vehicle upgrade. Note! Today, “Angel Eyes” can be either purchased in a store or made with your own hands. At the same time, their production is quite simple and many car enthusiasts prefer the second option for their car.
"Angelic" car tuning
It is worth noting that purchased angel eyes for a car are made from special neon tubes. They are bent and installed on the headlights. The installation also uses an ignition unit. After installing this optical system on the headlights, the light turns out more pleasant and bright. Separately, it is worth noting that some drivers use such tuning as daytime running lights or dimensions. Today, such car decoration is very popular and is very common. This is due to the fact that they can be installed on the headlights of a wide variety of car models (both domestic and foreign). For different car models, this type of tuning may differ in basic parameters:
- dimensions;
- glow color;
- ring diameter.
If everything is done right, you will get an exclusive car.
How legal is it to use such tuning?
The question of whether angel eyes are allowed requires separate consideration. The fact is that there are no regulations that directly regulate the use of such headlight upgrades. At the same time, there are clear and unambiguously interpreted settings, according to which the front lighting devices must emit exclusively white color. Thus, the use of colored or multi-colored angel eyes is unacceptable.
At the same time, many standard lighting devices, especially on older cars, emit light close to the yellow spectrum. Therefore, RGB LEDs equipped with a controller can be given a yellowish tint without particularly worrying about the consequences. But for running lights that are red, blue, green or any other color, you can get a fine, and the inspector has the right to confiscate such devices that do not comply with traffic regulations.
Note that the only exception is orange, which is acceptable for side lights and direction indicators.
As for the shape and size of angel eyes, there should be no complaints against you here. Is it possible to undergo maintenance with such an improvement? This question is no longer relevant: the institute of technical inspections in Russia has sunk into oblivion. But when receiving a roadmap for insurance, the above nuance should be taken into account. If you are planning a trip abroad, you should carefully study the traffic rules of the country you intend to visit. But, based on our experience, we assert that such retrofitting of lighting devices is not considered a serious violation anywhere, so the occurrence of serious problems is unlikely.
But owners of show cars can use colored LEDs quite legally, even in exotic colors and with lighting effects.