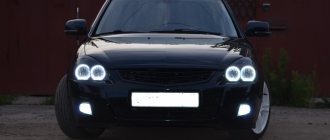
Angel eyes (luminous rings) - as one of the car tuning options, were first demonstrated by the German concern BMW in 2001. The know-how immediately gained worldwide popularity, which has not declined to this day, and owners of other car brands began to seriously think about how to assemble angel eyes with their own hands. Fortunately, with the development of bright white LEDs, they have a real opportunity to tune headlights even at home. Of course, it is unlikely that it will be possible to surpass the result of German engineers from BMW, but every car enthusiast can make something similar.
How to install angel eyes?
There are several different ways to install angel eyes. Angel eye installation may vary depending on headlight configuration. Each headlight may have one or two luminous rings inside it.
Required tools and materials:
- Pliers for stripping wires and crimping contact terminals. This tool allows you to cut wires, strip insulation, and crimp connectors.
- Soldering iron. Required for connecting wires.
- Multimeter. Required for electronic work. Helps check voltage, resistance, wire integrity.
- Insulating tape.
- Screwdrivers and keys. Required for removing and disassembling the headlight.
- Corrugation for wiring. Protects wires from damage and kinks.
- Drill and drill bits. Depending on the vehicle, you may need to make holes to route the wiring to connect the angel eyes.
Ring connection
First of all, it is necessary to take into account the rules for using lighting. The “angel eyes” themselves can be classified as daytime running lights. In this case, it must be connected in such a way as not to violate the requirements of GOST R 41.48.-2004. This means that the rings and lights themselves should be on when the engine starts and off when it stops.
Therefore, you should adhere to a certain connection diagram. There are two ways to solve this problem:
- You can use a 5-pin relay and a female terminal (4 are required). In this case, connect the negative wire to the car body and solder the terminal on the positive side, then connect it to terminal #30. After this, you need to find the cord under the hood connecting the “lights” and the switch. We connect contact No. 85 to the “+” side lights, and No. 86 to the body (i.e., the relay will be powered simultaneously with the “headlights”). It will also be necessary to lay another wire that goes from “Ignition + 12V” to contact No. 87a. When the ignition is turned on and the side lights are on, + 12V voltage will enter the “eyes” through the closed contacts of relays No. 87a and No. 30 and they will begin to burn. When the parking light switch is turned to the "off" position, the relay is de-energized and contacts No. 87a and No. 30 open. In this case, the “angel eyes” will be darkened along with the “lights”, as required by GOST. If you buy prefabricated rings, they usually come with a regulator.Current. It should be connected between pin 30 of the relay and the "headlights". If there is no current stabilizer, it is better to buy one, as this will avoid situations in which a voltage surge occurs in the on-board system and the devices fail.
- Connect angel eyes via a low-emission LED driver. It can be purchased at any specialty store. After this, assembly will be carried out according to a specific scheme, which is presented in detail in the instructions for the device.
If we talk about which connection method is better, then, of course, it is much more convenient to use a high beam driver. This will help protect against possible overloads. In this case, homemade “eyes” will last much longer.
Disassembling headlights
- First you will need to remove both headlights from the car. Remember how everything was attached and connected and collect all the fastening parts in some kind of container so that nothing gets lost.
- It is necessary to remove everything removable from them, since the headlights will need to be heated in the oven.
- In order to disassemble the headlights, they need to be heated and the sealant that connects the two halves softened. Preheat the oven to 130-150 degrees and place the headlight inside. It should stay inside for about 7 minutes. You need to be careful not to overheat the headlight. When removing the headlight from the oven, use an oven mitt to avoid getting burned. Instead of an oven, you can also use a hair dryer.
- Next, you need to immediately carefully divide the headlight into two parts. For more information about disassembling a headlight, read the article “how to disassemble a headlight.”
Preparatory work
To create an unusual glow from the headlights, you will need to purchase a 7-8 mm plastic rod. It can be purchased at retail outlets that sell blinds or at an outdoor advertising store. Plexiglass should withstand high temperatures well, so it’s better not to skimp. If we talk about the length of the tube, then usually 1 meter is enough for 4 headlights.
Healthy! To accurately calculate the amount of plexiglass required, simply measure the headlight by diameter, add 2 cm to the result and multiply by the number of headlights.
Also for work you will need:
- an industrial hair dryer (if you don’t have one, then the necessary processing can be carried out in the oven);
- 2 LEDs 12V (per headlight);
- 220 Ohm resistor (for one headlight);
- screwdriver with 6 mm drill;
- bur machine with a thin diamond disc (can be replaced with a thin metal file);
- Super glue;
- glass jar or any other container, the outer diameter of which coincides with the inner diameter of the headlight;
- sealant.
Having purchased everything we need, we get to work.
Installing angel eyes with LEDs on headlights with lenses
Angel eyes are sold in different sizes, usually from 60mm to 120mm. The LED angel eyes set contains rings with LEDs, one controller with a connector, and a remote control for changing the color of the angel eyes, including blinking modes. Diffuser caps can be added to the rings for a more traditional, uniform appearance.
“Angel eyes” in headlights with lenses are installed on the housing.
It can be pre-painted black to make the rings more visible. It is recommended that the rings be attached at three points at equal intervals. To attach the luminous rings inside the headlight, glue, double-sided tape or special wire are used. Glue has its drawbacks. Vibrations from driving and heat can weaken the adhesive bond. Double-sided tape cannot always be used, since there is not always a suitable surface inside the headlight for secure fastening in this way. It is better to use thin wire for hanging pictures. You need to drill small holes on the lens housing and screw the rings with wire. If you do everything carefully, you get an almost invisible fastening unless you look closely. The advantage of this method of fastening is that it is very reliable and does not weaken from vibrations and heat.
If you choose an adhesive connection as a method of attaching the rings, then apply a thin layer of glue to the back of the ring and to the reflector, in the place where the ring will be installed. Let the glue dry for 10 minutes before pulling the wires through. Gently press the ring into place for 5 minutes. Try not to move the ring until the glue dries.
Can I use red lenses?
Technically, the backlight can be any color, but don't choose blue and red. Traffic police officers regard the use of such colors in optics as an imitation of “flashing lights”, and will definitely want to talk to you about this. In extreme cases, they may even take the car to the impound lot. They react calmly to white, yellow or orange “angel eyes” (in most cases). Multi-colored lights are often considered by traffic police officers as a challenge and immediately cause an appropriate reaction.
What are the penalties for violation?
For those who like to argue, here are excerpts from the traffic rules.
For those who are slow-witted, sanctions are provided in the form of fines:
- for citizens - 2.5 thousand rubles;
- for officials - from 15 to 20 thousand rubles;
- for legal entities - from 400 to 500 thousand rubles.
In addition, unauthorized devices and devices are confiscated. The violator also faces a ban on the operation of the vehicle with the removal of the seal.
Traffic police inspectors will probably issue a fine for such tuning.
Installation of “angel eyes” in headlights with a reflector (without lenses)
Installing angel eyes in reflector headlights is possible, but the light coming from the rings may reflect erratically off the headlight reflector. This way the glowing rings will blend into the background. These headlights have no obvious place to install the rings.
After opening the headlight, you need to determine what size rings you need to use and where to install them. You can cut an opening at the bottom of the reflector. This will allow the ring to be partially placed there and will hold it in place. It will be enough to recess the ring by 1–1.5 cm. The upper part of the ring will touch the reflector. To mark the bottom of the reflector for cutting, apply masking tape and make a slit along it using an engraver or other tool. Check that the ring fits easily, tightly, and is centered. You can drill two holes in the top of the reflector and thread a wire through them to hold the top of the ring.
To pull the power wires through, you need to drill a hole under the ring, remove the connector, push the wires through and put the connector back on.
Why are owners of cars with such tuning fined?
Owners of cars in which such tuning is legally included in the vehicle package should not be afraid of claims from law enforcement agencies. Everything here is legal, correct, fair. But when installing it yourself, you need to be guided by legal acts regulating the lighting of the front and rear of the car. In traffic rules, codes of offenses, government regulations and GOSTs regulating safety requirements for technical condition, angel eyes are not directly mentioned anywhere.
But there is a legal requirement according to which white lights can be used on the front of the car (dimensions and headlights), as well as orange lights for turning lights. Eyes of other colors are not allowed and will result in a fine.
Blue color is outlawed
Therefore, there is no need to install yellow, red, green, purple and other colors in the headlights
We can advise all drivers CAUTION: you need to install angel eyes CORRECTLY, although even this advice does not guarantee problems when passing a technical inspection
