Not all cars have windshields on the side windows. Their factory installation is not provided by the manufacturer for all car brands, so many owners attach the cutoffs to the body or window themselves. “Visors” perform a decorative and protective function.
You can install window deflectors on your car at a service center, but this is not a cheap service. It is possible to do the installation of the device yourself. To glue protective windshields, you will need special tape, clips or fasteners.
Why are deflectors installed on a car?
Translated from English, this word means cutter. This is the name given to accessories in the form of plastic visors that are placed on the hood or in the upper part of the side openings of cars. They also always need degreasing.
A car deflector is needed to cut off air flows that bring dust or dirt into the interior. Additional protection is also provided for the front side.
Installing such elements by gluing negatively affects the streamlining of the body and increases air resistance. Therefore, they are initially absent from factory configurations.
Each driver decides for himself whether he needs such an additional solution. It is important to contact only trusted manufacturers. If necessary, their representatives will tell you how to glue the windshield to the car door.
Types of deflectors
There are no universal windshields for cars; you need to try them on before purchasing, because they are produced taking into account the contours of a certain brand of car. Depending on the type and function of the cutter, they are located in different parts. Deflectors are so-called visors of different sizes. The driver and passengers often pay attention to the fact that the devices provide uniform ventilation of the cabin and reject the appearance of strong air currents.
There are windbreakers:
- side windows;
- hood;
- rear windows;
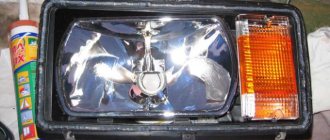
- headlights;
- windshield;
- radiator
There are also sunroof deflectors; drivers who drive cars with the top slightly open should consider purchasing them. They differ from each other in the place and method of installation, configuration, material, and cost.
How to glue side window deflectors to a car
Most of these products are available with adhesive strips. Thanks to this approach, the joining procedure takes a maximum of 10 minutes. The main thing is to be careful and glue everything evenly.
Otherwise it will turn out crooked and you will have to repeat the steps. And again you will have to decide how to glue the side window deflectors to the cars.
Instructions for installing deflectors on tape
A special type of material is used. They help create strong fastenings without leaving smudges or sticky marks. This is already becoming a noticeable advantage compared to conventional glue. In this case, everyone decides for themselves how to degrease the product. Glue everything carefully.
If after a preliminary check it turns out that everything is fine, proceed as follows:
- They prepare the surface on which protection is then installed, not just adhesive.
- 3-4 centimeters of the film covering the tape is removed from both sides of the windshield.
- The product is applied to the door edge.
- Check that the windshield is in the correct position.
- Firmly press the areas that are free from the protective tape.
- The tape is completely freed from the film by pulling the free ends.
- The cutter is applied tightly along the entire length, and then the edge is ironed with force.
The door arch with the glued parts can be heated with a hairdryer to make the connection more reliable.
Old deflectors can be removed using anti-glue, multi-purpose grease or a drill. The surface will need to be degreased in any case.
Installing deflectors on clips step by step
In the case of such gluing, the description of the actions will be slightly different:
- The arc and the door are tightly applied to each other. Do not forget about the marks in the places where the fastenings will be.
- The surface is degreased.
- Fasteners are installed deep under the rubber, opposite the holes.
- The protective arc and tape are connected to each other according to the diagram, which is partially already designed above.
- The rubber ring is inserted into the clamp from the inside. All that remains is to secure everything using the appropriate fasteners.
Installation with clips
On some machine models, a cutter is attached, which does not have an adhesive strip or any fasteners. The hood visor kit usually includes the fixing clips that are needed to attach the device. The appropriate bolts are threaded into the holes on the fly swatter, then they are screwed into the wells on the clips. Mounting devices are secured to the hood using clamping screws, but they can damage the paint on the car. To prevent this from happening, a protective strip is glued under them, the role of which is played by thick tape. Often a gap forms between the cutter and the hood, into which wind gets caught when driving. He can tear off the rubber. If the car is old, then it is covered with silicone sealant.
How to properly install deflectors in winter?
Sometimes it happens that replacing car deflectors is required in winter. At temperatures below +10 degrees, it is recommended to refuse such work. Otherwise, there is a high probability that everything will fall off without lasting even a few hours. You won't be able to install anything yourself.
If the operation is required urgently, the car must be driven into a dry garage. Heaters will help create suitable conditions and microclimate. Then you can begin work for installation.
If you have heating in the garage, you can refuse stoves and heaters. It is enough for the car to stay warm for several hours. You can take the vehicle to a service center or contact specialists. They will also tell you how to glue the material.
What kind of service is this?
Window deflectors are a plastic lining above the side windows, designed to protect against dirt and precipitation getting into the car interior or onto the glass surface. While the car is moving, this visor prevents the glass on the doors from becoming dirty from splashes from oncoming and passing vehicles. This improves visibility through the rear view mirrors. Also, deflectors will prevent precipitation from entering the car interior when the windows are partially open.
Advantages of installing deflectors
By installing window deflectors, the driver and passengers will be able to experience the following benefits:
- Exterior mirrors more clearly reflect the situation behind the car due to reduced dirt getting onto the side windows
- Protecting passengers and the driver from moisture when the car windows are partially open
- Prevents fogging of the windshield and rear windows due to natural ventilation of the car interior while driving
- If the deflectors are opaque, protection from bright sunlight is created, which improves visibility of the road situation
The advantages of the deflector also include ventilation of the interior from unpleasant odors and cigarette smoke.
Installation process
Our craftsmen install window deflectors and install radiator protection of various designs and for most car brands. By design, deflectors can be plug-in or adhesive. The installation technology of these two types of windshields has significant differences.
Adhesive deflectors, as the name suggests, are mounted to the vehicle by gluing. This process occurs using glue or double-sided tape. The second option is more common due to the absence of possible glue smudges and the immediate setting of surfaces. The process of installing window deflectors using tape includes the following steps:
- Degreasing surfaces using alcohol-containing solutions
- Applying tape to the surface of the deflector
- Positioning the windshield on the car door frame without removing the protective film
- If the deflector fits in size, the film is removed and the element is glued to the frame and pressed firmly
- Warming up the deflector with an industrial hair dryer to improve adhesion strength
Installation of plug-in window deflectors occurs by inserting the wind deflector into the groove of the door frame into which the side glass fits. The product is fixed due to its tight fit in the frame of the front doors, while the rear doors require additional sealing using double-sided tape.
Preparing for installation
Gluing is carried out only on the surface without any contamination. The car is washed and the fastening area is treated with a solvent.
After polishing with paraffin or wax, the body requires especially thorough cleaning. How to glue different types of products has already been discussed above.
What will you need?
A soft rag, a solvent and a hair dryer - this is the minimum set of equipment with which to complete all the work.
Almost all modern models have an adhesive strip; installation should not take much time. Otherwise, they buy tape or other similar materials to glue the deflectors to the windows.
How to remove glue residue and old deflectors?
The car door is opened. Then the fastening area is heated using a hair dryer. This is done until the edge of the device begins to move away. The main thing is not to overdo it, otherwise the varnish will begin to bubble and may peel off. Then, with a high probability, you will have to glue the entire body again.
The windshield is carefully pryed off with a utility knife. A fishing line is inserted under the part. Then the device is slowly pulled towards itself. You can warm up the structure again with a hairdryer if things don’t work out the first time. A cloth is moistened with solvent and the body is wiped.
The glue from the previous product must be completely removed from the surface. You can use a drill with a “taffy” attachment in the form of a rubber circle. Then they carefully wipe the door frame. Just don't apply too much force, otherwise scratches will appear. All that remains is to treat the area with anti-glue.
Horse silicone grease can also be spread over the surface. All you have to do is wait two dozen minutes and then wipe the body with a soft cloth. How to use tape correctly has already been written.
How to degrease the surface
Before starting installation, you need to make sure that the following are not on the body:
- Fats.
- Lubricants.
- Oils.
To get rid of such traces, ordinary water is no longer enough. You need to add ammonia or vodka to it. An acceptable option is the choice of white spirit. You should not rely on acetone or gasoline, as they cause damage to the surface. The deflectors on the car doors also deteriorate.
Recommendations for choosing deflectors
Types of deflectors
- Connection with screws is the strongest, but involves making holes in the body, and therefore is not very popular among car enthusiasts.
- Installation using brackets and clamps.
- Fitting with double-sided tape with special gaskets.
- Use of combined fasteners.
The most popular today are:
- Fastening window cutters under sealing rubber or on an adhesive base.
- Installation of the “fly swatter” on the hood using a combination of self-adhesive gaskets and self-tapping clamps.
The main thing is to choose high-quality components from reputable manufacturers. In this case, installation will not be difficult, and operation will be long and comfortable.
Deflectors for windows
Deflectors on the hood
Step-by-step process for attaching deflectors
There are several options to solve the problem on your own.
On the side windows
It is necessary to attach the element to the surface in advance and check the mounting location. You can then follow the following instructions:
- The door frame is degreased using a solvent. You can use napkins.
- Both sides of the deflector are cleared of 3-4 centimeters of the protective strip on each side. The ends of the device are lifted and then applied to the installation site.
- The adhesive strip is freed from film residues. The wind deflector is pressed completely against the door frame.
- The structure must be held in the appropriate position for at least several minutes. Windshields are glued to other car windows in approximately the same way.
Functional purpose of windshields
The deflector is a compact pad that is mounted on the hood and side windows of the car. This device performs the following functions:
- protects the body and windows from dirt, stones, insects and other small particles that, together with oncoming air, hit the car;
- prevent the penetration of raindrops when the window is open;
- prevent the occurrence of drafts in the cabin, thereby improving the ventilation of the interior space;
- provide additional sound insulation of the cabin.
Wind deflectors are mounted in areas that experience maximum air pressure while driving. Therefore, deflectors must be fixed on reliable fasteners. Windshields come in plug-in and overhead types. The first option is suitable for those who do not want to waste time installing a deflector. However, this type of windshield is not suitable for all cars and is not securely fastened. Overhead deflectors are attached with glue and last longer.
Installation errors and possible consequences
There are some simple rules that will help you avoid problems during installation and further operation:
- Wind deflectors are changed only in dry weather. Or the work is carried out inside a dry room with good ventilation.
- When you buy a set with cut-offs, you can try on several pairs. This will allow you to choose exactly those products that fit as accurately as possible. Then it is more likely that they will not block the view of the distant mirror
- Hiring an assistant will make the job easier. It will take much less time.
- The places of fastening and joining can be heated with a hair dryer if the air temperature is less than plus 18-20 degrees.
- After completing the fastening, it is not recommended to use the car for 24 hours.
The main thing is to carry out the work as carefully as possible so that you don’t have to repeat anything. Not a single option is complete without notes. Otherwise, there is a high probability of encountering unevenness. Replacement will be a rather complicated operation, especially if you don’t want to damage the paintwork.
There really are no universal windshields in nature.
A common mistake is that the body is not degreased before starting work. Because of this, the degree of fastening in principle remains insufficiently high. The car won't look nice.
The differences between different models of deflectors are cost and shape, price and manufacturer, and additional accessories.
But there are the main and largest groups of products, including those for windows.
- Plug-in. In this case, the installation is the simplest. But during operation, all the disadvantages become noticeable. Installation takes place between the glass and the rubber seal. In some car models, this approach only causes problems.
- Invoices. Here the fastening goes to the door frame, although installation takes a little longer. And the process itself is a little more complicated. But with the right approach, products last much longer. Correct option.
The main thing is to choose what suits a particular car. The more famous the manufacturing company, the better. Then there is a high probability that the initial kits will include consumables as add-ons.
They may be required during installation and further operation, no matter whether the door is covered or whether double-sided material is used.
How to safely remove old adhesive from baffles
When replacing cutters, first remove the old glue from the previous parts. There are a couple of effective ways to do this:
- Take a drill, attach a butterscotch bit to it and go around the door frame, carefully removing the old adhesive layer. Experienced professionals recommend using a nipple from a tubeless tire as an attachment. Treat the areas with anti-glue - anything left after the drill will be easily removed.
- If you don’t have a drill, apply Horse lubricant to the layer of old glue. Wait 15-20 minutes, then remove everything with a dry cloth.
Be careful not to rub too hard to avoid damaging the surface of the window.
KIA Rio Mashinka › Logbook › Installation of deflectors (wind deflectors)
On May 26, 2012, we decided to install the deflectors recently received at Exist. We ordered the original from Mobis, article number: P 8222 1G 000 (Side window deflectors), price: 2095.15 rubles. The installation had to be done in two steps.
The installation process is very easy and simple:— First, degrease the surface on which the deflectors will be glued
— Then take the deflector (I advise you to start with the front doors), try it on the door
— If everything is OK, tear off the protective layer of the 3M film (double-sided tape) and carefully and evenly apply the deflector to the door, starting from the edge closest to the windshield (it’s better not to immediately press on the attachment point so that it grabs stronger, because if something happens -it will go crooked, you could carefully disconnect it back)
— After everything fits well, we press down the deflector at the fastening points and from the bag at the bottom of the box with deflectors we take out the latches, which we put on top - once again connecting the door and the deflector
— After installing the front two deflectors, I advise you to try on the rear deflector and try to open the front door. You'll have to step back a little so that nothing gets in the way and repeat the same steps as before (don't forget to degrease the surface!)
This is where we got caught up in the fact that we didn’t do this and attached the rear deflector right away, which made it impossible to open the door from the front (when we tried to do it “in a big way” we knocked the door a little).
As a result, I had to tear off the rear deflector, the 3M tape stretched and I had to wait to install it until I bought myself a roll of tape. They glued it in place of the old one and installed it, this time wisely (We did this almost a month later - June 24)
In general, we did not understand the originality of the mobis; if such a setup happened, the gap between the deflectors is quite large. Moreover, the front deflectors do not fit tightly.
During the installation of the deflectors, we also tried on a new useful thing: a protective reflective folding bed (the size seemed to be measured, but it still turned out to be too big).
When traveling to the country - with the sun there for the whole day - very useful!
How to avoid problems
The adhesive composition of some models of deflectors does not provide reliable fixation. This can be fixed with double-sided tape, which must be attached to the inside of the fairing. Then, after removing the protective layer, you need to install the plastic plate on the door.
Before purchasing deflectors, it is recommended to try on several models, attaching each device to the car. You can avoid problems during and after installation if you carry out the described manipulations together. Thanks to this, the plastic plate will be fixed more securely.
After completion of the operation, it is recommended to heat the fixation sites with a hair dryer. Thanks to this, the mount will be stronger. In addition, after completing the procedure, contact of the fairings with water should be avoided for at least 24 hours.
Source of the article: https://hozzi.ru/klej/kak-kleit-deflektory-na-avto
Preparing the machine surface before installation
Most models of windshields are produced together with an adhesive base designed to fix this device. Otherwise, you need to purchase specialized tape, which is preheated with a hair dryer.
It is also recommended to prepare the latter if deflectors with an adhesive layer are used.
In addition to a hair dryer, you will need a dry rag and a technical solvent to fix the plastic pads. After preparing the specified components, you will need to perform the following steps:
- Wash the car body and windows, paying special attention to those areas where you need to stick plastic covers.
- Treat the body and windshields with a technical solvent, removing the fat layer.
- Carry out additional treatment of the body coated with wax polish or paraffin mastic.
If the car has old deflectors, then to dismantle the deteriorated linings you will need:
- Open and lock the side door.
- Using a heat gun, warm up the junction of the deflector and the car body. This procedure must be carried out with extreme caution. Overheating will cause the paintwork to peel off from the surface of the body.
- Pry up one of the ends of the old lining and insert the fishing line.
- Run the fishing line along the entire deflector, thus unfastening the trim from the body. During this procedure, you should also be careful to avoid contact with the surface of the body.
- After dismantling the old windshield, treat the surface with a solvent.