The Lada Priora car has different options for tuning headlights. This could be: replacing the substrate with a different color, due to which the Priora headlights will acquire a new tinted color. Installation of lenses. Painting or decorating with eyelashes. Tuning headlights on a Priora is not just decoration. Good optics will illuminate the road so that at night visibility conditions will be much better. People complain about the Lada Priora family that the standard one is “dim.” Owners take care of the optics so that the front headlights shine well, and the rear ones look beautiful, but are safe - after all, these are brake lights.
Tuning headlights on a Priora with your own hands is not a fairy tale. You can change the optics on your car yourself without contacting a service center. For example, installed LEDs in the angel eyes style will highlight the elements of the car, and this operation is no more difficult than assembling a construction set.
A good solution for the Priora is to install a brighter lamp and be sure to adjust it. Previously, it was “customary” to completely change the headlight unit, which changed the appearance of the car very much. Tuning the front and rear lights on a Priora is not so complicated, but it will create its own highlight for your favorite car.
You should know moderation in everything - if the desire is too strong, car owners neglect the technical inspection standards, and therefore the lighting fixtures either become dimmer or become so bright that they blind other road users, and this is, at the very least, impolite. Read the article to the end and find out all the details of this topic!
Coloring masks
The next type of tuning the appearance of optical devices is painting the Priora headlight masks. These changes are also not expensive and will not hurt the car enthusiast’s pocket. The mask is a specific insert that is placed inside the headlight structure. The factory version of the mask is chrome-plated. After painting the mask (traditionally black), the appearance of the car will change quite seriously. Therefore, this tuning of headlights on Priora is quite common.
However, there is a difficulty in its implementation, which lies in the need to completely disassemble the lighting device. Since the Priora's headlights are not dismountable, the glass is securely glued to the body using sealant. However, with the right approach, disassembly can be done. After this, the mask is removed from the headlight, cleaned (the chrome coating is removed), primed and painted. Then the lighting fixture is put back together and installed in its original place.
How to make angel eyes for a vase yourself?
Today, many people can only afford to buy a domestic car: a Kalina Priora or a VAZ. These brands are often found on the roads of our country. To make them more attractive and unusual, many car owners go for original auto tuning. The most popular and easiest do-it-yourself auto tuning today is “angel eyes” headlights.
Tuning "angel eyes"
We will tell you how to make angel eyes on a viburnum or a vase with your own hands in this article.
Benefits of tuning
Today, the “pumped up” VAZ (models 2101, 2105, 2106, 2107, 2109, 2110, 2112, 2114, 2115, 21099) or Viburnum Priora are found in all regions of our country. Car tuning can be very diverse, often installing new body kits. But this won’t surprise anyone anymore. But the installation of “angel eyes” on a domestically produced vehicle is still a curiosity and can amaze even the most ardent opponents of the domestic automobile industry. The advantages of installing “angel eyes” on a Priora or VAZ are the following points:
- the ability to assemble a lighting system with your own hands;
- availability of system materials;
- high-quality headlight illumination;
- long service life of the prefabricated system;
- beautiful appearance of the car;
- high-quality and original auto tuning of a domestic car.
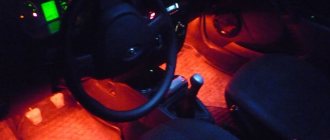
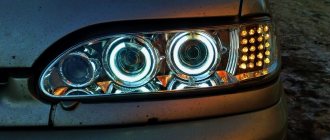
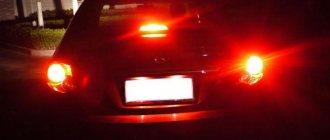
Car with "eyes" in the dark
Illumination “angel eyes” will be an excellent addition to any VAZ model (from 2101 to 2115 and 21099) or Priora.
Tuning features
Auto-tuning “angel eyes” consists of luminous rings that are located on reflectors. Such rings give the car originality and unusualness. It is worth noting that this type of tuning is the most attractive in terms of finishing of domestic vehicles.
Glowing rings are formed from LED strip, making this tuning:
- durable;
- resistant to mechanical damage;
- provides high-quality lighting;
- Quite easy to assemble.
Due to the fact that the basis of the luminous rings is an LED strip, anyone can do such tuning with their own hands. To do this, you just need to strictly follow the instructions given below.
Getting ready for work
In order to decorate your vase (models from 2101 to 2115 and 21099), you will need to prepare a certain set of materials and tools.
Painting headlights
Tuning the front and rear lights on a Priora is not limited to increasing the aperture ratio. They can be tinted. But this does not mean that you need to paint the glass - the light will simply become cloudy. The tinting effect is obtained due to a change in the color of the substrate. This is done using high temperature paint.
This is done in the following order:
- The entire block is removed and the backing is removed;
- Wipe off the chrome from the substrate (zero polish will help). Cover the substrate with two or three layers of primer and wait about an hour;
- Apply 4-5 layers of paint over the primer, wait for each layer to dry;
- Assemble the block lights, close all the cracks to prevent fogging;
- After painting, all that remains is to adjust them. The main thing is that the light is not too dim and does not cause inconvenience when driving.
Adjustment after any modification of the optics is performed as follows:
- Place the car at a distance of 5 m from a flat wall (for example, opposite the garage);
- Set the adjusting screws under the hood to “0”. Put a person of similar height behind the wheel;
- The headlights are adjusted one by one; while one is being adjusted, the second one is closed;
- The clear edge of the light should be 10 mm below the top edge of the headlight.
Adjustment is not a useless requirement of technical inspection standards. This must be done for comfortable driving at night - you won’t need to peer and look for obstacles on the road, they will be illuminated if adjusted correctly.
How to make your own angel eyes
You can buy a light device ready-made or purchase parts separately and assemble it yourself. True, you can only make LED angel eyes with your own hands. Assembling neon and cluster eyes requires sophisticated equipment and professional skills.
It is important to understand that the installation of both ready-made sets of peepholes and home-made devices requires subsequent examination and changes to the PTS. If you are not sure that you can select parts and assemble equipment so that it meets GOST requirements, then it is better to entrust this matter to professionals
Step-by-step instructions for making rings
The main part of homemade angel eyes is a clear plastic rod that can withstand high temperatures. You can buy it in curtains, curtains and blinds stores. You will need 2 of these twigs (the price for a set of 10 pieces is 400–500 rubles, depending on the diameter of the tubes). You will also need 4 diodes with a power of 3–5 W, assembled with resistors (they are sold in sets of 10–15 pieces and cost around 150 rubles).
READ How to connect a wifi router via adsl router
The procedure for making angel eyes:
Before installing blanks in the headlights, you need to check their functionality. Connect to a 12 volt DC source - the rings should light up evenly. Be sure to shake the eyes slightly - if they go out or start blinking, it means the wires are poorly secured somewhere.
Video: an alternative option for making angel eyes from LED strip
Installing and connecting the eyes on the car
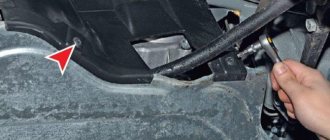
First you need to remove the glass of each headlight. If they are placed on rubber sealant, then it can be easily softened with an industrial hair dryer. You will have to get rid of the heat-resistant sealant by cutting it into pieces. After the glass is removed, you need to attach rings along the contour of the reflector. This can be done using double-sided tape or hot glue.
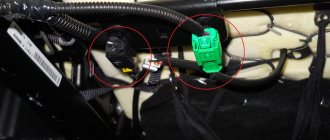
Once the angel eyes are attached, they must be connected to the car's on-board network. We pass the wires into the engine compartment through the technological slots. Now, under the hood, we look for a two-pin connector for the sidelights (the left one is located in the area of the windshield washer reservoir, and the right one is located in the area of the battery). We disconnect these two blocks and take the yellow wire. The following options are possible:
For the “gentle” method (with automatic shutdown of the angel eyes when the low or high beam headlights are turned on), we need two PC 702 relays. The connection is made according to the diagram:
Angel eyes look modern and attractive. But you need to think a hundred times before installing them on your car. It’s one thing when this “feature” is part of the standard kit of the car you are buying - in this case you do not risk anything
When it comes to tuning, it is important to ensure that the eyes meet the GOST requirements for the color and brightness of the emitted light. Violation of the prescribed rules will result in deprivation of rights for a period of 6 to 12 months.
Source
Installing angel eyes with LEDs on headlights with lenses
Angel eyes are sold in different sizes, usually from 60mm to 120mm. The LED angel eyes set contains rings with LEDs, one controller with a connector, and a remote control for changing the color of the angel eyes, including blinking modes. Diffuser caps can be added to the rings for a more traditional, uniform appearance.
“Angel eyes” in headlights with lenses are installed on the housing. It can be pre-painted black to make the rings more visible. It is recommended that the rings be attached at three points at equal intervals. To attach the luminous rings inside the headlight, glue, double-sided tape or special wire are used. Glue has its drawbacks. Vibrations from driving and heat can weaken the adhesive bond. Double-sided tape cannot always be used, since there is not always a suitable surface inside the headlight for secure fastening in this way. It is better to use thin wire for hanging pictures. You need to drill small holes on the lens housing and screw the rings with wire. If you do everything carefully, you get an almost invisible fastening unless you look closely. The advantage of this method of fastening is that it is very reliable and does not weaken from vibrations and heat.
If you choose an adhesive connection as a method of attaching the rings, then apply a thin layer of glue to the back of the ring and to the reflector, in the place where the ring will be installed. Let the glue dry for 10 minutes before pulling the wires through. Gently press the ring into place for 5 minutes. Try not to move the ring until the glue dries.
Lada Kalina Hatchback 1.4 16V › Logbook › “Angel Eyes” production
Hi all! I'm tired of burning halogen in vain during daylight hours, and I just wanted this “Angelic” beauty)). I decided to make a DRL in the form of Angel Eyes. In this post, the production of AG, connection HERE The printed circuit board file for Bosch headlights was kindly shared by user Maks13ru, for which thanks to him. But in his boards, the crystals of one LED are connected in parallel, and since I will use 3-chip 5050 LEDs, such a connection will not be entirely correct. You need to connect the crystals in each LED in series. For the manufacture of boards I used the LUT method. I printed the board files on photo paper:
I combined the layers in the light under a lamp, and after combining, I fastened them with a stapler so that nothing would move. Next, I put textolite into the resulting “envelope”:
And I “iron”, heat the iron over the paper so that the design transfers from the paper to the textolite:
Then I cut out the blanks with a jigsaw and brought them to the desired size:
Next is etching. Etched in ammonium persulfate.
After etching, clean the toner with a solvent. Copper remains under the toner. Next we tin the boards; for this I used Rose alloy.
In the absence of an engraver, I drilled holes in the boards to connect the tracks on both sides with a screwdriver. I tried to drill with a 0.5 mm drill. holes right through the tracks, but the drill broke under the weight of the screwdriver... I decided to drill holes with a 1 mm drill, but next to the tracks, because... The diameter of the drill is too large and the track can be torn off. But I still had to hit the negative track with a drill. Eh, an engraver... Well, okay, I’ll solder it...
The boards are ready, you can solder the LEDs and resistors. Everything was also ordered on ebay: LEDs Resistors Stabilizers Because. the voltage will be reduced by the stabilizer to 9 volts, then the resistors are only suitable for 20 ohms. In total, for both headlights you will need 186 LEDs and the same number of resistors. Now you can start soldering.
Installing lensed headlights
Installing lenses will change the illumination - after the modification, there will be no standard optics left inside the unit. First of all, a reflector will appear that will redirect the light rays forward into the space in front of the car. Instead of standard light bulbs, optics with lenses are installed, which creates a spectacular glow.
This option is considered the most expensive, and the effect will be noticeable. Separately, you can change the color of the substrates if you can’t spend money on optics.
DIY angel eyes for number nine
Due to the strong light emission, the use of this element of optics allows you to make the car more visible in poor visibility and thereby reduce accidents on the road. In addition, angel eyes can be used as daytime running lights, thus reducing the load on the vehicle's on-board network and extending the life of low beam lamps.
When making angel eyes with your own hands, you use a standard LED strip mounted on a prepared base, or individual LEDs placed in a plastic tube bent to the required diameter.
The demand for automotive optics using LEDs is due to their following features:
- long service life;
- resistance to vibration and external mechanical influences;
- the ability to emit the required luminous flux at low electrical power;
- The operating voltage of the LEDs corresponds to the vehicle's on-board voltage, which simplifies their connection.
Important! When using an LED strip, it can only be cut in special places marked on its surface. When using an LED strip, all the work consists of making a round base that matches the size of the car headlight. For this, any available material can be used (plastic, electrical cardboard, etc.)
etc.), from which the base is cut. After this, the tape used is glued, and its leads are connected to the electrical circuit of the vehicle
For this, any available material can be used (plastic, electrical cardboard, etc.), from which the base is cut. After this, the tape used is glued, and its leads are connected to the electrical circuit of the vehicle
When using an LED strip, all the work consists of making a round base that matches the size of the car headlight. For this, any available material can be used (plastic, electrical cardboard, etc.), from which the base is cut. After this, the tape used is glued, and its leads are connected to the electrical circuit of the vehicle.
If you use separate LEDs to perform the work you will need:
- tubes or sticks made of transparent plastic, long enough to form a circle of the required radius. For VAZ-2109 this is 400–450 mm;
- copper stranded wires with a cross section of 0.5 mm2 (PV, PGVA or NV);
- colorless sealant.
To complete the work you will need a hair dryer, a glue gun and pliers.
The work is carried out in the following sequence:
- When using plastic sticks, the latter are heated using a hair dryer, and then bent to a given diameter. To form the required diameter, any round-shaped objects (jar, pan, lampshade) can be used, the dimensions of which correspond to the required values.
- After the curved sticks have hardened, and when using tubes, after cutting them, the cut areas are cleaned. Then, notches are made on the surface of the workpieces in the form of cuts with a depth of up to the middle of the diameter. Notches are made in increments of 2.0–3.0 mm.
- 2 LEDs are placed in the prepared ring, placed opposite each other along the diameter of the product. Next, they are connected using cables.
- The connection points of the tube and the installation of the LEDs are sealed using a transparent sealant.
Important! When heating the tube, do not allow it to overheat, as this leads to a loss of physical properties (strength, formation of bubbles, etc.), which will make it impossible to use the workpiece in the future
The finished product is placed in a car headlight. One way to place the product:
- the protective glass of the standard light source is dismantled;
- the manufactured angel eyes are placed in the interior of the headlight and glued there to the outer contour of the reflector;
- Protective glass is installed, the headlight is installed on the car.
Important! When dismantling the protective glass, it can easily be damaged, so when performing work it is necessary to have a spare one to replace the damaged one.