Hi all. Today at VAZ Repair another photo report on the installation of PTF. This time we will install fog lights on the Lada Priora at home. The work is not difficult, but it requires certain knowledge and adherence to a sequence of actions.
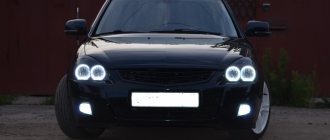
I will not delve into the details of what fog lights (FTL) are and what use they are, anyone interested can read about it on the Internet, fortunately there are many detailed, understandable explanations. I will only say that not all trim levels had fog lights installed, so we will fix this problem ourselves. Therefore, without further preamble, I propose to proceed directly to the process...
So, to install PTF on Priora you must have:
- Set of fog lights;
- Wires, corrugation, pads, adapters, relays and buttons;
- Heat shrink, electrical tape;
- Pliers, a set of keys and screwdrivers.
How to connect fog lights on Lada Priora?
When there is not much left in stock, you just have to disassemble everything and install the PTF, then put everything back together and enjoy the work done. Kidding :-).
- Let's start with the fact that we need to de-energize everything, to do this we remove the “-” terminal of the battery.
- Next, you need to remove the bumper; to do this, unscrew the screws that secure it one by one. The screws that need to be unscrewed are marked in the photo. After all the fasteners are unscrewed, carefully unclip the bumper from the latches and dismantle it completely.
- Next, take a screwdriver and remove the foglight plugs, which are attached with self-tapping screws.
- We prepare our fog lights and proceed to an important stage called “installation of fog lights.” We carefully place the PTFs in their regular places and secure them with the self-tapping screws that secured the plugs. Then we start laying the wiring. The wiring is routed from the inside of the bumper; it is advisable to use corrugated wire.
- The wires need to be pulled into the cabin in the GTZ area; to do this, we take out a special plug, under which the holes we need are hidden. For convenience, it is recommended to remove the frill along with the wipers, as well as the expansion tank with bracket.
- In the cabin, in order to extend and connect the fog lights, you should pull off the trim (sound insulation) and pull the wire into the cabin.
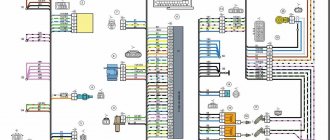
- When the wires are brought into the interior, you can start connecting. The diagram according to which it should be connected is usually included with the PTF kit, but just in case I decided to post the diagram.
- Connecting the fog lights to the button requires the removal of the central panel. When installing the PTF relay in the unit, it is important not to mix up the wires and follow the PTF connection diagram.
Installing fog lights on a Lada Priora is quite an extraordinary task and can be done by any car enthusiast. The only problem is the connection; as a rule, difficulties arise with it. However, if you follow the instructions and carefully study the connection diagram, then everything should work out. If difficulties arise during the connection, I recommend contacting an experienced electrician, he will easily help you for a minimal fee. Before final assembly, do not forget to check everything and make sure that the PTFs are working as they should.
That’s all for me, thank you for your attention and see you again at VAZ Repair! Bye!
Photo from here
Basic Setup Aspects
After the fog lights are installed, their luminous flux will need to be properly adjusted so that the operation of the optics is most effective. Adjustment of fog lights should be carried out in conditions that are closest to real ones. Therefore, make sure that there is a spare tire in the trunk, the tank itself is fully filled, and the tire pressure should be the same. In addition, for greater realism, a load weighing about two hundred kilograms can be placed in the car interior.
When all these conditions are met, you can begin adjustment. First of all, the vehicle must be placed on the most level surface, this will allow you to get the most accurate result. If this condition is not met, the adjustment will be incorrect. The setting is done in front of a wall or garage door, this is a prerequisite.
To begin the adjustment, measure the distance from the ground to the middle of the lantern. After this, you should draw a straight line on the wall or garage door that corresponds to the distance measured earlier. Having done this, you will need to draw another stripe - it should be 5 centimeters lower, while the first line can be erased. The anti-fog optics should be adjusted so that the upper limit of illumination is located on the horizontal strip that you draw on the network.
Types of PTF
As you know, Priora underwent several stages of restyling, where one of the main changes was the bumpers. With the change in bumpers, the design of the PTFs themselves also changed.
In the old bumper, the fog lights had a round appearance, but in the new one they already received a frame in the shape of a triangle, but still with the same round headlight.
At first glance, you might think that they are exactly the same, but this is a wrong assumption; they have different mounting brackets. Therefore, it is important to know which bumper the PTF will be installed on.
There are two manufacturers of fog lights for Priora - BOSH and Kirzhach. It is difficult to notice any particular difference in the luminous flux of these manufacturers, but there are differences in the mounting for installation in them. It will be difficult to replace “BOSH” with “Kirzhach”; for this you will have to change the PTF spacer in the SE bumper.
There are two options for installing a pre-restyle Priora and a post-restyle Priora into the bumper (SE bumper, Priora 2).
Articles and price of PTF for PRIORA 1 (pre-restayl until 2012):
PTF Priora 1
PTF "Kirzhach": 21700-3743010-52. The price starts from 700 and reaches 1000 rubles. For one headlight, sellers ask from 500 rubles.
PTF "BOSCH": 21700-3743010-54. The price starts from 1500 and reaches 2000 rubles. For one headlight you will have to pay from 1000 rubles.
Articles and price of PTF for PRIORA 2 (restyled after September 2012):
PTF Priora 2 (with frame)
PTF "Kirzhach": 21700-3743010-53. The price starts from 800 and reaches 1100 rubles. For one headlight, sellers ask from 600 rubles.
PTF "BOSCH": 21700-3743010-50. The price starts from 1000 and reaches 1500 rubles. For one headlight you will have to pay from 700 rubles.
It should also be noted that not all stores come with a mounting kit of wires and relays for the PTF. It is necessary to check with the sellers whether they have an installation kit. Otherwise, you need to purchase it in addition. Its cost is from 600 rubles.
Analogs
If for some reason the models from and “Kirzhach” do not suit you, then you should not be upset. Currently, the market is simply filled with a huge number of Chinese-made analogues.
Manufacturers from China have a large selection of high-quality PTFs that are not inferior to more expensive models.
One of the most popular Chinese PTF models are headlights that completely cover the cutout for the fog lamp, that is, they have the shape of a triangle.
Chinese PTF
If you are categorically not a supporter of Chinese production, there are a number of domestic manufacturers creating analogues of fog lights for the Lada Priora.
- Automotive lighting;
- Ray;
- DAAZ;
- Orion-7;
How to install PTF correctly, and why do you need to replace standard lamps?
Fog lights on Priora, as well as on any other car, are installed quite low, at a level of 0.3-0.7 meters from the road level. In this case, a narrow beam of light enters an area free of wet condensation and actually improves visibility.
But located on the roof of the trunk (additional lighting is often installed on jeeps), they are absolutely useless in a curtain of rain, in fog or during a dust storm. Therefore, fog lights used to be placed under the bumper (for old-style metal structures), but today they are placed directly into it (for modern integrated parts).
Fog lamps must comply not only with traffic regulations, but also comply with UNECE standards. The latter suggest that the fog beam on the Priora and any other car must have a special wide-angle light distribution, with a clearly defined upper limit and dispersion of up to 70 degrees horizontally. Only compliance with these parameters gives the required anti-fog effect.
The most common today are fog lights with halogen lamps with a power of 55 watts. They create a luminous flux of 1.1 thousand lumens, which is enough to illuminate a space of 25-30 meters in front of the car.
Replacing conventional incandescent lamps with them is almost always required, because... old-style lamps provide the necessary illumination at a distance of about 8-10 meters, which is clearly not enough for modern driving conditions.
Installation
There is practically no difference in the installation of PTF Priora 1 and 2. The only differences will be noticeable in making holes in the bumper for the headlights. In the SE bumper you need to cut a triangle along the contour and in a regular bumper you don’t need to cut anything.
There will be no other differences in installation.
Required tool:
- 10mm wrench;
- Screwdriver “+”;
- Insulating tape;
- Knife or jigsaw;
- Pliers;
Installation process
- Remove the negative terminal of the battery;
- We remove the car bumper; to do this, unscrew many screws from the bottom and top of the bumper, then disengage it from the fender and remove it.
- Next, use a knife to cut out a hole in the bumper for the PTF. Be careful and take your time so as not to damage the paintwork on it.
- We attach the PTF to the bumper using self-tapping screws.
- Let's start running the wiring into the cabin. We lay the wires from the PTF next to the main braid of wires on the left side of the car (in the direction of travel) behind the washer reservoir.
- Next, you need to run the wires into the car interior. The most convenient place to run the wires is in the area of the brake master cylinder. There is a hole there plugged with a rubber band, you need to insert the wires into this hole. For convenience, it is recommended to remove or move the expansion tank.
- We fasten the wires tightly so that they do not rub or come into contact with the metal. It is better to place them in a protective plastic corrugation.
- In the cabin, remove the cover of the fuse box (attached with three clips), turn them counterclockwise 90° and pull the cover towards you.
- Then we bend the sound insulation and tighten the wires under the center console.
- Remove the center console (central insert), fasten it with screws.
- Next, we proceed to connecting the wiring; for a correct and safe connection, we use the diagram from the kit or the diagram below.
- We install a button instead of a plug on the center console.
- After connecting, we check the functionality of the PTF. The main difficulties arise precisely when connecting the wiring. To avoid problems, carefully double-check the connected wires and strictly follow the connection diagram.
- Assembly must be done in reverse order.
How to replace a burnt out lamp
Let's start with replacing the lamps in the foglight of the Lada Priora. This is a simple matter, and there is absolutely no need to go to a service station for such a trifle - everything can be done on your own. First of all, what lamps are installed in the PTF of this car? The manufacturer installs H11 type halogen lamps with a power of 55 W on both regular Priora and Priora Restyling (production since 2013).
Light bulbs in PTF Lada Priora of any modifications
In addition to, in fact, new lamps, we will need:
- Torx key T-30;
- socket wrench (head) 10;
- cotton gloves;
- inspection pit or overpass.
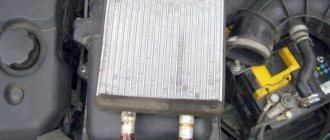
Removing the power unit mudguard
We drive the car into a pit or overpass. To get to the PTF of the Priora, you need to remove the engine mudguard or, as it is also called, the engine protection. To do this, use a T-30 wrench to unscrew the four screws that secure the mudguards to the engine mudguard. The photo shows two, the remaining two are on the other side of the mudguard.
Now we arm ourselves with a 10mm wrench and unscrew first the two rear mounting bolts (the second on the opposite side), and then the five front mounting bolts.
The mudguard can now be removed to gain access to the fog lights.
Replacing lamps
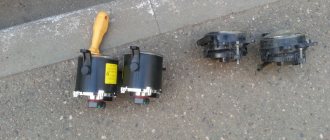
We look under the bumper and get to the back of the PTF. In front of us is a lamp base with a power supply inserted into it. Press the latch and pull out the block.
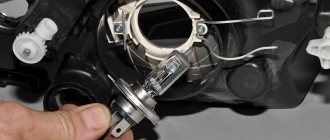
Turn the light bulb counterclockwise until it stops and remove it from the flashlight housing.
We put on cotton gloves, remove the new lamp from the box and install it in place of the burnt one, not forgetting to lock it by turning it clockwise until it stops. We connect the power supply (the latch should snap into place). Similarly, we change the light bulb on the second PTF and install the engine mudguard in place.
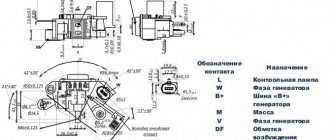
Description of the scheme
The relay must be connected according to this diagram. The relay has only 4 contacts, which are assigned numbers: 85, 86, 87 and 30.
- We connect contact number 86 to the negative of the battery;
- We connect contact number 30 to the “plus” of the battery;
- Contact number 87 is connected to the power wire (plus) of the PTF;
- We connect contact number 85 to the PTF ON/OFF button with a blue wire through a fuse;
We hope our article was useful to you.
Fog lights are simply necessary on a car, because they help you drive in the fog with confidence that oncoming cars will see you, in the dark, and in general they help improve the standard light. Fog lights on the popular Lada Priora are installed only in the “Luxury” configuration. PTFs are sold for Priora, and you can install them yourself, instead of plugs, when they are not included in the package, but they have a different article number for the model before restyling and after restyling.
Fog lights for the domestic Lada Priora are not expensive, starting from 800 Russian. rub. Connecting the fogs occurs quickly and without significant effort. We will talk about this in our material. When car owners decide to install PTF, they are faced with the question of choosing between LED and lens headlights.
Adjustment
You managed to install the PTFs, but in order for them to perform their task, they must be configured. Place the Lada Priora on a flat surface. There should be a wall opposite the front bumper; motorists usually use a garage for this. Check the tire pressure - it should be the same.
Now you need to measure the distance from the ground to the middle of the headlight. On the wall, draw an even strip corresponding to the distance from the coating to the middle of the PTF. Draw another strip 5 cm below, the top one can be erased. The fog lights need to be adjusted so that the upper limit of the light is located on the horizontal line that we drew on the surface. As you can see, the headlight adjustment scheme is quite simple.
Lamps in foglights
The effectiveness of PTF in foggy conditions is determined by several factors. Their low placement, different range, and direction of the light flux make it possible to illuminate only the road surface itself, without affecting the surrounding area, like high-beam headlights. This allows you to see the road even in heavy fog, which completely scatters the light of the headlights, creating a snow-white wall in front of the car.
Standard fog lights on Priora: cost, article number
The automotive company AvtoVAZ connects fog lights to its Lada Priora, if provided for in the package, manufactured by Avtosvet (Kirzhach) and Bosch. They have a difference. The installation depth of Bosch fogs is as much as 40 percent greater than that of similar products produced by the company from Kirzhach. In the “Lux” package, fog lights from Bosch are required, and from “Avtosvet” they are installed as standard. There are 2 options for the kit - for the pre-restyling Priora and for the post-restyling model. What is the difference? The installation point and the shape of the headlights themselves. Among other things, headlights can be purchased separately or as a set.
For Lada Priora:
- The Bosch headlight set has the article number 21700-3743010-54. The cost of the kit varies in the range of 1.6-1.9 thousand Russian. rub. The cost of one headlight will be about 900 rubles.
- A set of fog lights “Avtosvet” costs 700-800 Russian. rub. Article 21700-3743010-52. One headlight will cost the buyer approximately 500 rubles.
For Lada Priora 2:
- A set of Bosch fog lights costs 1-1.2 thousand Russian. rub. Article: 21700-3743010-50. One headlight will cost buyers approximately 600 rubles.
- The set of headlights "Avtosvet" has the article number: 21700-3743010-53. The cost of the kit varies in the range of 800-900 Russian. rub. The cost of one headlight will be about 500 rubles.
Plus, you will need to buy a special set of wires or a so-called installation kit, without which installation of the PTF is impossible. This kit includes a relay and a button. The cost of the set is about 600 Russian. rub.
Standard PTF Priora 1 and 2: article number, price
AvtoVAZ installs fog lights on Lada Priora from Bosch and Avtosvet (Kirzhach). The difference is that Bosch is 40% larger in installation depth than fog lights from Kirzhach. Lighting equipment from BOSCH was installed in luxury versions, and from Kirzhach - in standard ones. Two options for the kit are being considered. The first set is a PTF for Priora 1 (pre-restyling), the second is for Priora 2 (restyling). The difference is the shape of the headlights and installation points. PTFs are sold complete or separately.
For Priora 1:
- PTF set of Kirzhach “Avtosvet” 21700-3743010-52. Price – about 700-800 rubles. One headlight costs about 500 rubles.
- PTF kit Bosch 21700-3743010-54. Price – about 1600-1900 rubles. One headlight costs about 900 rubles.
For Priora 2:
- PTF set Kirzhach “Avtosvet” 21700-3743010-53. Price – about 800-900 rubles. One headlight costs about 500 rubles.
- PTF kit Bosch 21700-3743010-50. Price – about 1000-1200 rubles. One headlight costs about 600 rubles.
Other models of fog lights for LADA Priora
Not only fog lights for Lada Priora from Bosch and Avtosvet can now be purchased in specialized stores. If for some reason these options do not suit you, there are models from other manufacturers, in particular: diode Orion-7, Ryazan Automotive Lighting, also produced by Ryazan and DAAZ.
Chinese-made fog lights should not be discounted either, especially since they produce both diode and lensed fog lights. You can also purchase special frames for the restyled Priora, which are installed instead of the plug and leave a hole for the old-style foglights installed on the 1st version of the Priora.
Step by step guide
1. Unscrew 3 screws on both sides in the wheel arch.
2. Unscrew the top plastic covers on both sides near the headlights and remove. They are secured with four screws each.
3. Unscrew 2 more screws securing the bumper in the area of the hood lock.
4. If you have built-in fog lights, then disconnect the power connectors from them.
5. Next, in the engine protection area, unscrew five nuts by ten.
6. At the corners of the bumper, unscrew three screws on each side.
7. Pull the bumper off the latches starting from the arch.
After all the latches have opened, remove the bumper.
When replacing a bumper, you need to replace the radiator grille, lower plastic grille and fog lights (if equipped) with a new one from the old one.
The radiator grille is secured with eleven metal latches. The latches are removed using a screwdriver.
The lower plastic grille is secured to twelve metal latches, the same as those on the grille mount.
The fog lights are secured with Phillips screws.
Video lesson
Differences in installing PTF on Priors before and after restyling
In the first version of Priora, the installation of PTF differs solely in the position of the headlights, because in this version the headlights are round in shape and located closer to the center. In the restyled version, such headlights have a trapezoidal shape and are located almost at the edges of the bumper.
Connecting fog lights on the popular Lada Priora 2 is sometimes complicated by the fact that instead of a modern trapezoidal headlight, an old round headlight is installed, and if you bought a special adapter frame in advance, you will have to secure it with screws to the bumper, and the headlight directly to the frame. In general, installing fog lights is not at all difficult, and it will take no more than 2 hours. The most important thing in this matter is to strictly follow the instructions and connect the electrical wiring correctly.
What kind of light bulbs are in Prior's fog lights?
In the list we have given the most common models of the selected car brand. (Abbreviation PTF - fog lights)
| Brand | Lamp type | Base |
| 1113 Oka | Near | H4 |
| Further | H4 | |
| PTF | — | |
| 1117 Kalina | Near | H7 |
| Further | H1 | |
| PTF | H11 | |
| 1118 Kalina | Near | H7 |
| Further | H1 | |
| PTF | H11 | |
| 1119 Kalina | Near | H7 |
| Further | H1 | |
| PTF | H11 | |
| 2105 Zhiguli | Near | H4 |
| Further | H4 | |
| PTF | — | |
| 2106 Zhiguli | Near | H4 |
| Further | H4 | |
| PTF | — | |
| 2107 Zhiguli | Near | H4 |
| Further | H4 | |
| PTF | — | |
| 2108 Samara | Near | H4 |
| Further | H4 | |
| PTF | — | |
| 2109 Samara | Near | H4 |
| Further | H4 | |
| PTF | — | |
| 21099 Samara | Near | H4 |
| Further | H4 | |
| PTF | — | |
| 2110 | Near | H1 |
| Further | H1 | |
| PTF | H1/H3 | |
| 2111 | Near | H1 |
| Further | H1 | |
| PTF | H1/H3 | |
| 2112 | Near | H1 |
| Further | H1 | |
| PTF | H1/H3 | |
| 2113 Samara-2 | Near | H4 |
| Further | H4 | |
| PTF | H1/H3 | |
| 2114 Samara-2 | Near | H4 |
| Further | H4 | |
| PTF | H1/H3 | |
| 2115 Samara-2 | Near | H4 |
| Further | H4 | |
| PTF | H3 | |
| 21213 Niva | Near | H4 |
| Further | H4 | |
| PTF | — | |
| 21214 Niva | Near | H4 |
| Further | H4 | |
| PTF | — | |
| 2123 Chevrolet Niva in one low/high beam | Near | H4 |
| Further | H4 | |
| PTF | H3 | |
| 2123 Chevrolet Niva split low/high beam | Near | H7 |
| Further | H1 | |
| PTF | H3 | |
| 2131 Niva | Near | H4 |
| Further | H4 | |
| PTF | — | |
| 2170 Priora | Near | H7 |
| Further | H1 | |
| PTF | H11/H3 | |
| Granta | Near | H4 |
| Further | H4 | |
| PTF | H11 |
ATTENTION. This information is for informational purposes only.
There may be differences between the installed lamps in your car and in the table. To more accurately determine the lamp base, we recommend that you check in more detail in the manual for your car, or look at the lamp markings by directly pulling it out of the headlight. Some types of headlights have a marking (or sticker) on the housing of the headlight itself.
How to install and connect fog lights on a Priora
The climatic conditions of our country, unfortunately, are not the most suitable, and therefore most motorists have already become accustomed to such a phenomenon as morning or evening fog. A more optimal solution for Priora owners would be to install fog lights. Standard headlights are not always suitable due to the light curtain they create for both the car owner and other road users.
We install the button in the cabin, power the circuit
Follow these steps on your LADA Priora to connect the fog light button in the cabin:
- The negative terminal is removed from the battery.
- The steering column is disassembled, which is secured with 3 special plastic latches; they should be rotated 90 degrees.
- We find the safety block. Unscrew the screw holding it in place.
- We disassemble the center console; for this purpose you need to unscrew the 4th screw. In place of the plug, we install a button on/off the fog lights and connect the blue wire directly to the mounting block, or via a relay.
- Using clamps, connect the remaining wires to the rear window heating button.
Priora fuse box diagram
| Fuse no. | Current strength, A | "Standard" and "Norm" | “Norma” with air conditioning and “luxury” |
| F1 | 25 | Engine cooling radiator fan | Reserve |
| F2 | 25 | Heated rear window | Mounting block, rear window heating relay (contacts). Electrical package controller, contact “10” of XP2 block. Rear window heating element. |
| F3 | 10 | Right headlight, high beam | Right headlight, high beam lamp. Instrument cluster, headlight high beam indicator. |
| F4 | 10 | Left headlight, high beam | |
| F5 | 10 | Sound signal | Mounting block, horn relay. Sound signal. |
| F6 | 7.5 | Left headlight, low beam | |
| F7 | 7.5 | Right headlight, low beam | |
| F8 | 10 | Alarm signal | Mounting block, alarm relay. Alarm sound. |
| F9 | 25 | Priora heater fuse | Reserve |
| F10 | 7.5/10* | Interior lighting, instrument panels, brake light | Instrument cluster, pin “20”. Brake light switch. Brake light bulbs. Interior lighting unit. Interior lighting. The door sill light on the right front door. Additional brake signal. |
| F11 | 10/20* | Wiper | Mounting block, high speed windshield wiper relay. Switch for cleaners and washers, contact “53a”. Wiper and washer switch, contact “53ah”. Heated rear window switch. Mounting block, rear window heating relay (winding). Windshield wiper motor. Rear window wiper motor (2171,2172). Windshield washer motor. Rear window washer motor (2171,2172). Airbag control unit, pin “25”. |
| F12 | 20/10* | Terminal 15 devices | Instrument cluster, pin “21”. Electrical package controller, contact “9” of block X2. Electromechanical power steering control unit, contact “1” of block X2. Reversing light switch. Reversing lamps. Parking system control unit, contacts “11” and “14”. |
| F13 | 15 | Cigarette lighter fuse Priora | |
| F14 | 5 | Left headlight, parking light, license plate light, trunk light | Side light lamps (left side) Instrument cluster, main light indicator License plate lights Trunk light Electrical package controller, pin “12” of block X2 |
| F15 | 5 | Right headlight, parking light | Side light lamps (right side) Glove compartment lamp |
| F16 | 10 | Terminal 15 ABS | Hydraulic unit, contact "18" |
| F17 | 10 | Left fog lamp | |
| F18 | 10 | Right fog lamp | |
| F19 | 15 | Seat heating | Seat heating switch, contact "1" Front seat heaters |
| F20 | 5/10* | Immobilizer control unit | Recirculation switch (switch on) Mounting block, relay for low beam headlights and parking lights (automatic lighting control system) Heater electric fan relay Automatic lighting control switch Windshield wiper and external lighting control unit, contacts “3”, “11” Automatic climate control system controller installation, pin “1” Automatic window cleaning system sensor (rain sensor), pin “1” |
| F21 | 7.5/5* | Rear fog lights | Light switch, contact "30" Diagnostic block, contact "16" Clock Automatic climate control system controller, contact "14" |
| F22 | -/20* | Reserve | Windshield wiper motor (automatic) Mounting block, windshield wiper relay and windshield wiper high speed relay, (contacts) |
| F23 | -/7.5* | Reserve | Windshield wipers and external lighting control unit, pin “20” |
| F24-F30 | Reserve | ||
| F31 | 30 | Electrical package control unit | Electrical package controller, terminal “2” of block X1 Electrical package controller, terminal “3” of block X1 Driver’s door module, pin “6” Threshold light of the left front door |
| F32 | Reserve | ||
* - for the “Norma” configuration with air conditioning and “luxury”
| Relay | "Norm" | "Norma" with air conditioning | "Lux" |
| K1 | relay for turning on the electric radiator fan of the engine cooling system | Reserve | Relay for turning on the low beam and side lights of the headlights (automatic lighting control system) |
| K2 | rear window heating relay | ||
| K3 | starter activation relay Priora | ||
| K4 | additional relay (ignition relay) | ||
| K5 | space for backup relay | ||
| K6 | windshield washer and wiper relay | ||
| K7 | headlight high beam relay | ||
| K8 | horn relay | ||
| K9 | alarm relay | ||
| K10 | Reserve | Fog light relay | |
| K11 | Reserve | Front seat heating relay | |
| K12 | Reserve | ||
Installation of fog lights on Priora
Installing a PTF does not require special knowledge and skills from you, the main thing is to acquire the necessary list of tools and strictly follow the instructions below.
To install you will need:
- Keys for "10" - "13".
- Flat/Phillips screwdrivers.
- Heat shrink.
- To insulate the wiring - corrugation.
- Regular pliers.
- Insulating tape.
Step-by-step installation instructions for LADA Priora PTF:
- We open the engine compartment and make sure that the negative terminal of the battery is removed without fail. We dismantle the wipers and frill; for this purpose we use the key set to “13”.
- Using the 2nd key, remove the bracket and expansion tank. This is necessary for the convenience of work, and removing/installing these units is not at all difficult.
- The front bumper is attached with 10 screws. We unscrew them all.
- Use a Phillips screwdriver to unscrew the fasteners of the plastic plug. We put the headlights in their standard places and fasten them securely with self-tapping screws so that they don’t come loose when shaking from driving.
- At this stage we begin to do the wiring. For this purpose, we hide the wires in corrugation in order to prevent chafing and fasten the wires so that the contacts do not come off.
- We take the longest one from the set of wires; it is always blue. We divide the wire into 2 ends and connect one end to the left headlight, and the other to the right one, respectively. Next, we extend the wire into the engine compartment, or rather into the area of the main brake cylinder.
- Using a flat-head screwdriver, we pull off the interior trim of the LADA Priora and insert a wire into the interior.
- Already in the cabin we connect the wire to the safety block.
- At the end of the work done, we install everything in its place and carry out the adjustment of the fogs, which was mentioned above.
How to do work on foreign cars
Now let’s figure out how to change the fog light on a Ford Focus 2. We will need:
- screwdriver;
- gloves.
Begin.
- First of all, unscrew the screw on top of the low beam head unit - this main illuminator needs to be removed.
- Below, to the right of the head unit, press the latch, pull the housing towards you and remove it.
- We remove the interfering wiring to the side.
- Carefully turn the lighting element towards the wing.
- Unscrew the plug and replace the lamp.
- We reassemble in reverse order.
Replacing Priora high beam lamps
It all starts again with removing the battery - you can’t do without it now. The high beam lamp is located a little deeper and is not easy to get to. The sequence of actions when replacing a high beam lamp is as follows:
- We disconnect the rubber cover (it is larger than the one designed to protect the low beam lamp);
- Disconnect the block with wires;
- Unclench the spring clamp and disengage it from the reflector hooks. We release the light bulb.
- We remove the lamp socket from the headlight unit.
In fact, everything is simple: they opened the lid and took out one lamp. However, such minor operations will put a lot of strain on your wrist and palm - don’t forget to warm up, otherwise the new part may treacherously slip out of your hand when you don’t expect it.
Adjusting the luminous flux from PTF
Then the car (Priora se or another modification) is placed on a flat area opposite a steep smooth wall at a distance of five meters, and the fogs are turned on. Next, the distance from the center of the headlights to the ground is measured, and a line is drawn on the wall five centimeters lower than this distance. After this, you need to adjust the light spot so that its upper boundary is at the level of the drawn line.
I have long been interested in the question of how to install non-standard fog lights on a VAZ 2170 yourself. After diagnosing faults, this stage is an integral part of vehicle maintenance to bring it into working condition. At the same time, any motorist can independently replace non-standard fog lights in a VAZ 2170 with his own hands, this is where my video instructions will help you. This topic covers the following points: 1. how to remove non-standard PTFs in a VAZ 2170 yourself, 2. do-it-yourself replacement of non-standard fog lights in a VAZ 2170, and 3. independent installation of non-standard fog lights on a Lada Priora Put the sedan back into place with your own hands. So, before you change non-standard fog lights in a VAZ 2170 yourself, I recommend that you familiarize yourself with this video. If, however, you have questions about how to install non-standard fog lights on a VAZ 2170 yourself, then study it yourself removing non-standard PTF in Lada Priora Sedan with your own hands, and try to reproduce the same steps in reverse order. Good luck with the replacement!
Sources
- https://myautoklass.ru/my-auto/zamena-lampy-protivotumannoj-fary-v-kitajskix-avtomobilyax/
- https://1ladapriora.ru/remont/kak-ustanovit-protivotumanki.html
- https://avtostuk.com/videos/mazda/ustanovka-ne-shtatnih-ptf-na-lada-priora-sedan-vaz-2170.html