| Additional lighting in the car interior is not only convenient, but also a beautiful interior design. In this article, we will look at how best to install the footlights for front and rear passengers , as well as how to properly connect this lighting to the Lada Granta. |
What is needed for installation?
In order to make a footlight in a car, you will need a minimum amount of materials and tools.
The materials you need to purchase are LED or neon strip. Which one to take is up to you. Neon lighting, of course, looks much more beautiful, the light is more pleasant. However, it is more expensive and requires connection through the ignition unit, and for this you will have to interfere with the car's electrical system. That is why it is still better to use LEDs for illumination. They are easier to install, inexpensive and easy to install. Calculate the length yourself. It all depends on where you will install the tape, and what exactly you will illuminate: only the front seats or decide to illuminate the legs of the rear passenger seats. It is also important to decide on the color of the tape itself. After all, lighting should be in harmony with the interior design.
You will also need a wire (up to 5 meters), heat shrink tubing and glue. If you want to tinker, you can additionally purchase a controller for adjusting the brightness of the lighting, a control panel and a switch.
You will also need some tools, namely pliers, a 220 V soldering iron, a knife and screwdrivers.
Step-by-step instructions for creating underbody lighting
Neon lights
Do-it-yourself underbody illumination must be achieved through the correct placement of lighting equipment. Neon underbody lighting installed on a car requires a reasonable approach; the car owner needs to place the lamps outside the line of sight. Neon lighting looks much more attractive if the main effect is conveyed by illuminating the asphalt under the car. Direct light from a neon lamp negatively affects the exterior of the car.
Neon illumination of the bottom will require the creator to have knowledge in the field of electrical installation. Sequencing:
- the purchased neon lighting kit should be thoroughly studied;
- work must be carried out with the battery turned off;
- select the installation location of the kit (it is advisable to exclude places where there is a huge number of wires, fuel supply and elements related to the brake system);
- make sure the site where installation work will be carried out is safe;
- check the integrity and functionality of neon pipes;
- you need to decide in advance on the places for attaching the brackets, which are most often provided in the finished kit;
- in those places where the staples will be located, there must be a thorough surface treatment with silicone sealant (this will prevent the negative appearance of rust);
- the screws must be firmly driven into the holes created, while the wires from the tubes should be located in the rear of the car;
- A converter should be located next to the battery, which is subsequently connected to the common lighting circuit.
The cutting of pipes specified in the instructions must be carried out using a heat gun, which helps create a seal on the heat-shrinkable tube. The power wire must be directed towards the positive side of the power unit. The resulting step is to connect the switch to the fuse under the motor.
LED lights
The easiest way to do it yourself is to use LED underbody lighting. To create a lighting system with your own hands, you need to stock up on:
- LED strips (color depends on the taste of the owner);
- plexiglass;
- small diameter plastic tubes;
- thin two-core copper wire;
- resistor.
Illumination of the bottom must begin with the creation of a special housing. In this matter it will not be possible to do without a plastic pipe. First you need to cut the pipe lengthwise into two equal halves, which will result in half-cylinders. Covering the inside of the housing with foil helps improve the light quality of the entire system. A drill should be used to make many holes.
After the housing is ready, you need to start working on the LEDs
It is extremely important for the motorist to carefully file and polish the ends of the product, which will contribute to the soft and organic dispersion of light. Pre-prepared resistor and LEDs should be placed in one of the halves of the sawn pipe
Before you begin mounting, you need to make sure that all LEDs are functioning. Half of the pipe filled with diodes and a resistor must be additionally equipped with plexiglass so that as a result the owner of the vehicle gets a half-transparent half-cylinder. The plexiglass is secured using galvanized sheet metal; small cracks and holes must be hermetically sealed with a layer of silicone. The power source for the entire structure is a common circuit with a fuse and a shutdown switch located on the panel.
Installation of LED strip
Before installing footwell lights in a car with your own hands, you should decide where you will attach the tape itself.
To illuminate the footwell area, it can be installed below the seats, along the perimeter of the lower part of the front seats, under the instrument panel and under the glove compartment. It all depends on your imagination. Remember, when choosing a place for installation, you should take into account that the installed lighting should be directed towards the floor.
After choosing a location, measure and cut a piece of tape of the required size. Do not forget that it may not be cut in all places. Cut only in areas where solder contacts are located. Therefore, having measured what length you need, it is better to take a little less than vice versa, so that later there is no sagging during fastening.
After cutting, solder a wire to the edges of the tape and try to connect it to a power source. If it works, isolate the solder joints. To do this, put a heat-shrinkable tube over the joint, heat it with a soldering iron or even with a lighter. After insulation, attach the tape to the selected location using an adhesive layer, glue, or even regular silicone ties.
An effective way to adjust the backlight
The problem with the first modifications of the Lada Vesta is insufficient lighting of the dashboard. In sunny weather, the driver cannot see the readings of sensors and instruments. Excessive distraction on the “visor” provoked accidents, crashes, and collisions with oncoming traffic.
In order to eliminate the defect, engineers developed and made publicly available on-board computer firmware with an increased brightness coefficient. However, the program code did not always work correctly, and malfunctions occurred from time to time.
Self-taught people worked together with the official VAZ developers and came up with a much better method - installing a 2-channel PWM controller.
The cost of a set of equipment is from 650 rubles in online catalogues, perhaps it will be cheaper in the car market. There is no catalog article, look for the production name: “KIT, PWM power regulator set, 12-50V 30A, 20kHz.”
Connection
Depending on how and when the backlight will light up and work, choose the method of connecting it.
To interior lighting
Most often, the footwell lighting in the car is connected to the interior lighting. It will only work when the doors are open or the lights are on.
In order to connect the backlight to the interior lighting, you need to remove the lampshade (most often it is on clips, although you may need a screwdriver to remove it). Next you need to connect the wires. Connect the plus to the white and the minus to the red. You hide the reasons under the casing. The easiest way is to stretch them along the side rack. After this, connect the wiring of the LED strips at the feet of the driver and passenger and connect everything to power. Then you check the lighting operation again, and only after that insulate all contacts and install the lampshade back. If you wish, you can additionally install a controller, then the light will fade out smoothly rather than go out abruptly.
From the cigarette lighter
If the lighting is connected from the cigarette lighter, the footwell lighting will light up exclusively from the side of the open door. This is very convenient, because often lighting is only needed when getting a passenger into a car. The plus of the diode must be connected to the cigarette lighter, and the minus to the door limit switch. The wiring on the door can be routed through the same passage through which all wiring to the door goes. However, in most cases, to do this, you will have to dismantle the panel.
From dimensions
When connected to external lighting, the light in the cabin will always be on when the dimensions are on, that is, during trips in the dark. In order to be able to turn it off, you should immediately provide for this possibility and add a switch to the backlight.
In order to connect, you power the positive wire from any light bulb on the instrument panel, and throw the negative wire onto the body of the car.
Result
Let us remind you that in order to make the car interior more comfortable, you should approach the issue comprehensively. Please note that the standard panel backlight has been improved.
Keywords: half fret grant | interior lighting for Lada Granta | floor Lada Kalina | floor Lada Priora | interior lighting for Lada Kalina | interior lighting for Lada Priora | Lada Granta seats | Lada Kalina seats | Lada Priora seats | torpedo Lada Granta | torpedo Lada Kalina | Lada Priora torpedo
0 0 0 0 0 0
Share on social networks:
Neon lighting on cars, its types, advantages and disadvantages
The modern type of tuning, called neon lighting, gets its name from the cold glow neon fluorescent lamps originally used for this purpose. It is an additionally installed system consisting of lighting elements with auxiliary devices that are responsible for its correct functioning. Today, the light source for such car design can be not only neon. There are the following types of lighting design for the exterior and interior of a car:
neon lamps, which are ordinary fluorescent lamps in which the working gas is inert neon;
Neon is usually used to illuminate the underside of a car.
- gas-filled flexible tubes filled with neon, the surface of which is coated with phosphor;
- LEDs in the form of individual plates or LED strips in silicone insulation.
Depending on the installation method, light tuning can be spot-based, in which the emphasis is placed on highlighting individual elements of the car, or continuous, performed along the entire contour. The following car elements can be subject to aesthetic upgrade:
- bottom, when lighting devices are placed under the car;
- interior, most often illuminated by the floor or dashboard;
- luggage compartment;
- individual elements of the car, for example, wheels or a radiator grille.
Granta
The interior of this car needs drastic improvement immediately after purchase. At the same time, both large internal elements and small details deserve attention.
As in the cases described, it is important here to carry out all activities in a certain sequence:
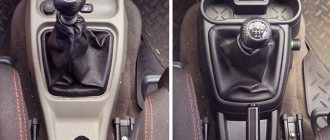
- It is advisable to start interior changes with replacing the standard steering wheel.
It is better to purchase this element in the required configuration at a specialized store. This solution will be the simplest, since covering the steering wheel yourself is quite difficult and time-consuming. The new element is relatively easy to install. In addition, the finished cover is very easy to tighten with threads. It is also easy to remove if necessary. - The interior decoration of the Lada Granta model is not reliable or durable.
This applies primarily to the armrest, which fades and cracks when exposed to sunlight. In addition, objects inside it rattle while moving. Standard branded armrests require special fastenings, which are fixed with screws. Russian technologies leave much to be desired, so it is better to purchase such an imported interior element. - Due to the dim light, the lampshades cause many complaints from Granta owners. Here the problem can be solved radically by replacing the light source.
Thus, the highest quality improvement of the interior is possible only with a radical update of the upholstery. This is quite a labor-intensive task. For a simpler option, you can simply buy covers. Their selection on the market is simply huge.
Interior lighting - lamp replacement, removal and installation
Replacing the lamp
1. We prepare the car for work (see “Preparing the car for maintenance and repair”). 2. Using a slotted screwdriver with a thin blade, release the two fixing protrusions and remove the diffuser.
3. To replace the interior lighting lamp, press the spring contacts and remove it. We install a new lamp in the lampshade.
4. To replace the individual lighting lamp, press it and turn it counterclockwise. Install the lamp in reverse order. 5. Place the two protrusions on the lower part of the diffuser into the grooves of the interior lamp housing and press the upper part of the diffuser until the latches snap into place.
Removal
1. Remove the diffuser for the interior lamp. 2. We remove the lower part of the ceiling lining from engagement with the body.
3. Remove the lining. 4. Using a Phillips screwdriver, unscrew the two self-tapping screws securing the lampshade to the interior ceiling.
5. Remove the lampshade from the hole in the ceiling trim.
6. Squeezing the spring clamps on both sides, disconnect the wiring harness blocks.
Installation
Install the lampshade in the reverse order.
The dashboard of the Lada Kalina car is made of softer plastic than the dashboards of other models of the Volga Automobile Concern. Despite this, the build quality of the torpedo of this vehicle leaves much to be desired. This is primarily due to the fact that the process of assembling the dashboard of a Lada Kalina car is not automated.
Removing the instrument panel on a Lada Kalina, which is not equipped with a front passenger airbag, is a relatively simple procedure, and it can be done even without special skills.
Removing the car dashboard
To dismantle the torpedo you will need the following tools:
In addition, you will need a bit of patience and accuracy when performing the work.
First you need to bend the rubber seals of the front doors from the A-pillars. After this, you need to remove the plastic covers of the front pillars. Each of them is held on by 3 clips. Use a slotted screwdriver as leverage. Next, you need to unscrew the screws securing the upper front (in the direction of travel) panel trim
There are 2 of them: one on the right, the other on the left, both are located near the racks. After this, you need to remove the upper front trim by carefully pulling it towards you. It is secured not only with self-tapping screws, but also with clips at the front
When removing the panel, try not to lose them. Then you need to unscrew all the screws and remove the trim on the side air ducts.
- First you need to remove the ashtray. To do this, just pull it all the way back (in the direction of travel of the car) and unscrew the 4 screws that secure it to the console.
- Then you need to pry with a screwdriver and pull out the plugs located to the right and left of the alarm button.
- After this, you need to unscrew the 2 screws located under the plugs and securing the center console from below.
- Now you should carefully pull the console towards you and disconnect all the wiring from it, having previously marked with a marker what is attached where. If you don't have a marker, you can take a picture with your phone of which wires go where.
- After dismantling the center console, you need to unscrew 2 bolts and 5 screws and remove the steering column cover.
- Then you need to unscrew 2 screws and remove the outer trim of the instrument cluster.
- Next, you need to unscrew all the instrument panel mounting nuts from above using a 10 mm wrench.
- After this, you need to tear off the lock washers on which the heater air duct is seated, unscrew the remaining screws securing the dashboard, and remove it by pulling it towards you.
Lada Priora Sedan › Logbook › Footlights (part 3 point 1 - rear passengers)
I was glad to see the installation of footwell lighting for the driver and passenger. I didn’t even plan to make footwell lights for the rear passengers. And then yesterday I had to travel a lot, with a large number of stops. And every time I opened the doors (or the passengers when they opened the doors) I enjoyed the pleasant light)) But when it went to night, I realized that the lighting of the legs is a drop-dead thing.
It became pleasant to get into the car at night (it lifted my spirits), visibility in the cabin improved significantly. And then I realized - once you highlight it, then highlight everything.
In general, I climbed into the car and began to look for places to install the tape, guided by the principles: 1) If it’s ugly, but it’s not visible, then it’s beautiful. 2) LEDs should not be visible (that is, they should not shine in the eyes).
There were not so many places for installation: 1) Under the seat - it didn’t fit right away, since there was nowhere to attach it. That is, immediately under the seat there was black fabric upholstery. It was somehow awkward to glue to it, and besides, the tape would be located too high and it would be constantly caught with feet or bags. 2) The floor threshold, what is near the door and what is between the doors - no, no, and again no. I didn’t want to make holes in it for LEDs or glue it on top. And even more, I didn’t want the LEDs to be visible, i.e. the place (point) where the light comes from. After all, this is foot lighting, not interior lighting. 3) The front seat rails (side panels) are convenient to install, but that’s not it. The light would be to the side, and not under the passengers' feet. 4) Air duct outlets for blowing passengers' feet - that's it, if you play a little shamanically.
In general, I decided to attach the tape to the air ducts. But after gluing the tape to the corner (to shine in the direction of people, and not in the seat)
Advantages of air ducts: 1) Using the corner, the light came exactly as it should (from front to back), especially since the tape would have been 3-4 centimeters from the floor, so the light would have broken through over the rugs of the rear passengers. 2) They were located in the depths, according to it was impossible to reach them with your feet. 3) The light would be highly scattered, and not point-like. those. as it should.4) In principle, it’s not far to pull the wires.
Cons: 1) Harder to install, i.e. you have to crawl under the seat. And for this you need good weather outside.2) You need a corner.3) If the tape is self-adhesive, then the corner would need to be glued with something. A solution was quickly found - double-sided tape on a foam base (this is how deflectors are often attached). The width of the tape is about 1 cm so it’s normal.
And so let's go! To make the corner, a piece of plinth was used (it was just lying around after the renovation). You could use anything as long as it was a corner and easy to cut
I only have brown, but it doesn’t matter because the corner won’t be visible anyway
The main thing is that the angle should be 90 degrees, otherwise the light would come very high or low. The duct was 16 centimeters wide, and that’s what I started to push away from. To begin with, I cut a piece of the required length using a metal saw. Then, using scissors, I cut one side so that its width was the same as that of adhesive tape, and the second side so that it was as wide as an LED strip. Then I treated it with a little sandpaper and natfil so that there were no sharp edges. Here's what happened:
Well, then I glue tape and tape on the outer sides of the corner. From the outside so that in the end the tape would be a little closer to the passengers. (it turns out to be 1.5 cm). The parts of the tape where the heat shrink was located were glued to the same tape. The tape should be glued so that after installation the wires come out to the connection side. So you immediately need to think about how to connect the left and right sides.
I thought I would install it right away, but it started to rain and the wiring work had to be postponed until another day.
Source
Features of interior lighting fixtures
In the minimum configuration, Kalina's interior lighting is represented by one lamp located on the ceiling in the front of the car. It gives a soft yellow light, but according to car enthusiasts, it is not enough.
More equipped versions have two built-in lamps: one in front, the second above the rear seat. Lighting in luxury versions has been improved: some halogen lamps have been replaced with LED lamps.
The front courtesy light in the Kalina's cabin, located above the rearview mirror, has a control unit. It consists of a right lamp for individual lighting, activated by a key, a left lamp, activated by a key, a lamp and a three-position switch that determines the interior lighting mode. When the switch is set to the far left position, the lamp lights up continuously until it is turned off. In the middle position of the three-way switch, the lamp is de-energized, and when switched to the extreme right position, the light automatically turns on when any of the car doors is opened and turns off when all doors are closed with the ignition on.
↑ Questions unclear to whom
On this occasion, a friend had two questions for experts from the program “What? Where? When?":
- Which AvtoVAZ specialist came up with such a system for turning on the lighting in the Lada Grant's interior?
- Which motorist was smart and was able to guess that it was necessary to turn on the lights using the wiper switch?
Whatever you say, our people are very talented and love different jokes. The country must know its heroes. It has certainly been said that Russia cannot be understood with the mind.
And I also feel a little sorry for the owners of foreign cars, since everything in their cars is simple and clear, there is absolutely no imagination.
Installation in a lock
With the second option, the part will be placed not in the threshold, but at the top of the door. The wires are redirected to the lock. In this case, the function of the switch is taken over by the lock contacts. There are practically no difficulties in installation. Refining the circuit involves installing additional wiring and plugs for connections. During installation, it is necessary to protect the wires from abrasion using a corrugated hose or insulating tape. To implement this method, it is necessary to disassemble the lock and remove the locking bracket. The work is carried out in the following sequence:
- Remove the lock.
- Pull out the protective bracket.
- Open the connector plugs.
- Insert terminals.
- Connect the wires on the driver's door side.
It should be remembered that installing and connecting switches on the Lada does not guarantee their stable operation. To eliminate possible problems, you need to know their causes and solutions.
Vesta
When operating Vesta, many drivers encounter such an unpleasant phenomenon as a noisy and dusty interior. Therefore, it is necessary to improve the interior for the driver and passengers inside this model by replacing door seals, improving sound insulation, and installing additional lighting.
Work must be carried out in the following sequence:
- First, you should install additional rubber seals in places where the greatest discomfort is felt. Here these are the ribs of the rear doors. Their surface must be thoroughly cleaned and degreased. To solve the problem, it is recommended to purchase an RKI-19 brand seal from a car store. This modification will significantly improve the tightness and reduce noise when driving. Discomfort when driving this car is caused by squeaks from the steering wheel and gear shift lever. To get rid of it, you can paste over these places with a special material, treat them with silicone or penetrating lubricant.
- The level of sound insulation can be increased by using sheets of foam placed under the sheathing. It is recommended to treat the outside of the bottom and wheel arches with bitumen mastic.
- It is advisable to improve the lighting of the rear seats by placing lamps on the edges above the rear doors or in the center. This must be done before installing the upholstery fasteners.
Illuminated rear discs (drums)
You will need: corners, mounting tape, rivets, LED strip (85 cm for one wheel), zip ties (plastic clamps), protective casing for wires, twisted pair.
First, along the contour of the brake drum, we weld the camping corners, pre-cut to size. There are only 24 notches on the drum, you need to secure 6 corners (one corner for 4 divisions). There is balancing on the drum so that the corners do not touch, they should be bent in place.
We attach the mounting tape to the corners using rivets. Twisted pair is used as wiring, which is connected in the same way in the LED strip. We install an 85cm LED on the resulting structure. tape using clamps. For additional protection, we place the cable in a protective casing. We lay the wiring using clamps and lead it into the cabin through the hole. To ensure long-lasting illumination of car rims, it is recommended not to use connectors to connect the wires, but to use soldering or twisting.
As a result, if you don't look closely, the disc backlight is not noticeable. Despite the ease of operation, installing and connecting such external lighting will require a day of work.
By the way, do you know how to tune the interior lighting (Priors, Kalinas, Grants, Kalina 2)?
Photo source:
Logbook rustemka-02
Where do we start?
And we’ll start with the consumables themselves, which can be obtained in any city where there are electrical and construction goods stores.
So point by point:
- A multimeter is needed to measure the voltage of the entire circuit during installation.
- The switch has two, three, four and as many positions as necessary in order to change the backlight frequency and its color if desired.
- Conventional foam used on the packaging of refrigerators, televisions and other large equipment.
- Good heat-resistant glue and a lot of thin wooden slats.
- A certain number of LEDs (quantity and color at the discretion of the owner), but not more than the power supply for the vehicle’s on-board network.
- Thin and working soldering iron.
- A decent amount of time (it’s better to choose a free day).
- Kerosene or at least turpentine, as well as a piece of rags.
- There are several capacitors of at least 16 V (the number directly depends on the number of LEDs).
- A roll of electrical tape and two rolls of wire of different colors.
- Well, and wire cutters with a knife to strip the cable.
Where and how you get it all is entirely your task, but there are many ways and the ingredients are simple.
Finalization of the scheme
Work on modifying the door end elements can be delegated to service station specialists. In this case, the owner will be charged an installation fee. You can do everything yourself, then installing limit switches will require plumbing tools and a device for checking the electrical circuit:
- Tester.
- Soldering iron.
- Phillips screwdriver.
- The wire.
- Solder POS-40.
- Corrugated hose.
- Insulating tape.
- Limit switch.
The owner must decide on a further plan of action based on the features of the layout of his Lada Granta car. It can activate the button in the threshold or the door lock contacts.
Both options involve parallel connection of unused elements to the working terminals of the door on the driver's side. The switches for opening the doorway of a Lada car are powered using a two-wire circuit. To simplify the choice, we will consider both options.