As you know, low beams must be turned on when driving a vehicle, not only in the evening and at night, but also during the day. In a situation where the running lights do not work, the traffic police officer has the right to issue a fine to the driver. Of course, this is a small amount, but it creates a headache. In this regard, most motorists have encountered a number of inconveniences due to the fact that many simply forget to turn on the low beams when getting into the car, or do not turn off the lights when leaving the car, which is why they find the battery completely discharged in the morning.
In order to get rid of such problems, many decide to modify the process of turning on and off the headlights. Thanks to the simplest circuits, the headlights can turn on simultaneously with the ignition or when the engine starts. In this case, during the daytime the low beam headlights will light up, but not the headlights, and at night everything will work as usual. Let's consider both options.
Automatic switching on of headlights via relay.
The second way to implement automatic headlight switching is to connect the electromagnet of the headlight switch relay or an additional relay to the generator excitation circuit, or rather the charging signal lamp circuit. This method is suitable for almost all modern cars.
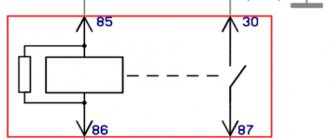
To implement it, you need to add a five-pin relay of type 90.3747. Connect the wire from the ignition switch to pins 85 and 30. Connect pin 86 to the generator terminal to which the wire from the charge control lamp is connected. Connect pin 88 to the headlight relay or directly to the fuses protecting the headlight circuit.
In this case, when the ignition is turned on, the power from the ignition switch, the relay electromagnet coil, goes to negative through the generator winding, and the relay is activated and opens contacts 30 and 88. After the engine starts and the generator starts operating, a plus appears at the output of the generator warning lamp. The relay turns off and closes contacts 30 and 88, turning on the headlights.
To prevent a harmful circuit in this case, it is advisable to use a diode connected in series with the relay coil directed towards the generator. In this case, the headlights will light only when there is a charging current, subject to the integrity of the circuit, which can be monitored by the battery charge lamp.
How to connect daytime running lights?
Many motorists have wondered how to connect the DRLs so that they turn on when the engine is started. Garage craftsmen have found 10 ways to turn daytime lights on and off, as an example:
- From the handbrake;
- Battery;
- Instead of fog lights, etc.
And each of the methods requires money, as well as good knowledge of wiring diagrams.
Let's watch a video on how to install and connect daytime running lights via the control unit:
One of the main schemes is to connect the DRL via a 4-5 contact relay; some craftsmen connect the wires to the pressure sensor. Since when the engine starts, the pressure sensor on the dashboard automatically lights up, which means that when the DRLs are connected to it, the lights themselves light up.
We connect the DRL via a 5-pin relay
To work we will need:
- The relay itself, for example, from an alarm system;
- Several wires with a cross section of 4 mm;
- 3 male-female terminals;
- Daytime Running Lights;
- Heat shrink.
The first way to connect DRLs is as follows:
- Take the DRL and attach it where it is most convenient for you. We solder the negative wire to the body and secure it well. The positive wire is supplied with a “mother”, insulated with heat shrink and left for a while.
- In the car wiring you need to find the wire that goes to the low beam of any headlight. We connect to it, output it, solder the “mother” in the same way and forget about it for now. The same must be done with the positive ignition wire.
- Let's move on to the relay. It has 5 contacts, we will use all but 87. You can remove it or leave it, decide for yourself. Number 86 will need to be connected to the negative on the body, 85 will be connected to the headlight, 87a will be connected to the positive from the ignition. Contact number 30 is connected to the free DRL terminal. Assess the reliability of the insulation of the terminals on the relay so that there are no short circuits and the contact is good.
Another video, installing DRLs using a five-contact relay on a VAZ 2111, be sure to watch:
That's all, check your installation to see if it works. Turn on the engine and see how the daytime lights function. Then turn on the low beam, the lights should turn off. After turning off the lights, the DRLs should light up again, and after stopping the engine, they should go out. In order for the decay to occur smoothly, it is worth placing a good capacitor in the circuit in parallel.
Connecting DRL without relay
If you don't have a relay on hand, you can do without it. DRLs are very simple in electrical terms. At the output we have only two wires, red and black. By all rules, red is a “plus”, and black is a “minus”. Open the hood and look for a “+” on any of the car systems that starts when you turn the ignition key. As an example, these could be the wires going to the fuel sensor or any others. Connect the red DRL wire to the positive terminal of your chosen vehicle system. And connect the negative wire to another contact of the same charge.
The result of such a connection scheme will be that when the ignition is turned on, the DRLs light up, and when they are turned off, they go out. Be careful, after installing the lights, check the functionality of all electrical appliances. And do not drive on the road if there are any malfunctions in the car.
On the Internet you can find many other solutions on how to connect the DRLs so that they turn on when the engine starts. This article described only two of the most popular and less expensive methods. Other connection schemes require deeper intervention in the car’s electronics and the purchase of various materials and accessories. And, as you know, not everyone can understand intricate schemes.
New articles
- What is car clearance and how does it affect the car's performance?
- Fur car seat covers are a useful addition to your interior
Previous articles
- How to make wheel chains for a car with your own hands?
- What is engine chipping? Pros and cons of chip tuning
Automatic switching on of headlights after engine start
To organize such a work scheme, you can go in two directions: connect to the oil pressure sensor or to the handbrake.
Method 1: Connecting to the oil pressure sensor
To make this connection you will need:
- relay;
- transistor (2 pieces);
- wires;
- microcircuit K561TP1.
All parts are placed in a small relay housing, after which the device must be connected to an oil pressure sensor. When the pressure in the engine lubrication system normalizes, that is, when the engine is turned on, the sensor will open, and the power from it will go to the capacitor. Ultimately, the voltage to the relay will be supplied through the transistors included in the headlight power supply. When the engine is turned off, power from the sensor is supplied to the desired lamp located on the dashboard. At this time, the capacitor that is included in the headlight control unit begins to discharge and the power supply to the relay stops.
We recommend: Changing the automatic transmission oil: recommendations from experts
This is interesting: Is it worth installing additional pads on the seat belt?
In this case, you can also control the headlights manually if you use a parallel connection. In order to set the time to turn off and turn on the headlights, just select the resistance on the board. The higher this parameter is, the longer it will take the headlights to turn on and off.
True, not everyone likes this method, since this scheme is much more complicated (you need to pull wires and make 3-4 connections).
Method 2: Connecting to the handbrake
This method is much simpler, since in this case it is enough to just slightly modify the headlight connection diagram for ignition, which we talked about at the very beginning. To do this, just add another relay and a short wire (about 25 cm) to the standard contact of the handbrake button.
Thanks to this method, the headlights will turn off as soon as you pull the handbrake, and light up when you release it.
Benefits of installing the system
First, we will look at the main advantages that using automatic light switching options gives us:
| Convenience | Now you will not forget to turn on the lights, and you will not be fined by the traffic police. As practice shows, the majority of such offenses are committed precisely because drivers forget to turn on the lights when starting to drive. In addition, you will not have to be distracted, you will know that the system works automatically at a certain point in time |
| Battery preservation | As practice shows, very often after finishing driving, drivers forget to turn off the lights, as a result of which the battery runs out; if such cases are repeated periodically, the battery will fail very quickly. The presence of such a system allows you to eliminate such troubles, because the shutdown will also be carried out automatically |
| Ease of work | You can easily implement any of the options described below with your own hands; the installation instructions are simple and clear, so you can do it without outside help, especially since the delivery set includes all the elements necessary for installation. The main thing is to be careful and use only high-quality connection methods; twisting and electrical tape are unacceptable |
| Low costs | The price of the required elements is low, so you will not incur large expenses. The most important thing is to choose a high-quality option that will ensure good system operation |
Important! The big advantage is that you can customize the operating features of the system to suit yourself, this allows you to use devices of this kind on almost any car model.
The automatic low beam headlight switch in some models requires moving the regulator to a special mode, sometimes it is marked with the letter “A”
Pro Tips
Of course, drivers who have at least basic training in electrical engineering and experience in doing this kind of work with their own hands can do the job efficiently with their own hands.
Professionals also advise that before starting work, you should really assess your capabilities. In some cases, in order to avoid problems, it is better to fork out some money and entrust the work to a professional auto electrician.
If the work will be done independently, then it is recommended to arrange all tie-in points inside the cabin. At the very least, they will be protected from the negative effects of precipitation.
It is more rational to make the connection points themselves by twisting the wires - this method is in no way inferior to soldering, and in conditions of increased vibration it turns out to be more resistant to loads.
The installation should not be carried out in such a way that, with the maximum permissible trajectory of movement of the wiring branches, their tension does not arise; all bending points of the wiring located near the metal fragments of the body must be protected using a polyvinyl chloride tube.
It is not advisable to follow the recommendations of amateurs who claim that to obtain the desired result, you can install a jumper in a certain place on the car's mounting block, without installing an additional relay. Failure to comply with basic electrical engineering rules is a real cause of serious problems, for example, headlights may turn on bypassing the fuse.
Carrying out installation work with your own hands will require maximum care and accuracy from the car owner. During operation, the possibility of moisture and mechanical deforming loads on system fragments should be excluded. It is not recommended to use gas-discharge lamps in automobile electrical systems.
If you are afraid to use homemade versions of Eurolight connection devices, you can install devices made in the factory, for example AvtoSvet AS, PHARAON, Skybrake M5, Meguna T 7.2, etc.
What spare parts are needed to assemble an automatic switching circuit?
To set up a system for automatically turning on lighting fixtures, you will need to find:
- standard five-pin relays
- wires
- diodes
We recommend: Motul oil
To implement a more rational scheme with the option of connecting to a handbrake or oil pressure sensor, you will need to purchase:
- transistors, 2 pcs.
- wires
- relay
- microcircuit marked K561TP1
Automatic switching on of headlights upon ignition
In order to organize such operation of the lighting elements, it is necessary to connect them to the ignition power source, and as many know, some devices can be connected at any position of the ignition switch, while others begin to function only when the ignition is already on. Based on this, the most convenient place to connect the headlights is the heater switch button (the rightmost switch block).
For this scheme you will need:
- any standard five-pin relay;
- diode;
- wires.
Next, we need:
- Remove the size switch (switch block on the leftmost side).
- Disconnect the positive wire from the key block responsible for the low beam operation (usually this is a green double wire) and connect it to the relay.
- You need to insert an additional wire into the positive wire that goes to the heater switch and also connect it to the relay.
- Connect the wire that powers the headlights to the relay.
- Throw the wiring to minus (to the body).
The connections can be soldered, but for full-fledged work, an ordinary insulated twist will suffice. As a result, automatic low beam headlights will work as soon as you turn on the ignition.
However, this method is considered not the most economical, since the headlights start working immediately, which is not very important in winter, when the engine needs to be warmed up or when repairing a car.
To avoid such inconveniences, you can complicate the circuit a little so that the low beam turns off while parked, regardless of whether the ignition is working or not.
Tips and tricks
As you can see, self-made solutions can have more advantages than standard ones. The functionality is also expanding, and the cost is often more attractive. In other words, it is quite possible to assemble an inexpensive circuit for automatically turning on low beam headlights.
It is important to understand that to assemble a circuit with your own hands, you need certain experience and skills. If you are not confident in your abilities, it is better to seek help from a professional auto electrician.
If the work is carried out independently, it is optimal to place the insertion points in the interior space, and not under the hood. This approach will avoid oxidation of contacts, reduce the risks of moisture and short circuits, etc.
If we talk about what is better, soldering or twisting wires, correctly done twisting in some cases will be better than soldering in relation to a car. The fact is that the vehicle is subject to various vibrations, and soldering is less resistant to vibration loads.
As for relays, wires, fuses, etc., the relay must be securely fastened, the wiring must be laid so that the wires do not lie in tension. In places where wires are bent and at points where the wire touches metal parts of the body, additional insulating heat shrinkage must be present. Otherwise, the wire may fray and begin to short out.
It is also strongly not recommended to use regular jumpers instead of relays, connect bypassing fuses, etc. Ignoring these recommendations can not only cause equipment malfunctions, but also short circuits or fires.
- DIY engine start button
How does the engine start button work? Available options and solutions for installing the starter button yourself. How to install the engine start button yourself. Read more
- The radio turns off when starting the engine: reasons...
Why does the car's head unit (radio) turn off when the engine starts? The main reasons for turning off the car radio, possible malfunctions. Read more
- Engine demining: why is it?
What is the purpose of demining the power unit and why? The main advantages of this solution are installing additional mass yourself. Read more
- Do-it-yourself soundproofing of the engine compartment
How to properly make noise insulation of the engine and engine shield of a car yourself. Materials for processing, elimination of noise and vibration. Tips, recommendations. Read more
- On-board computer for carburetor engines: what...
On-board computer for a carburetor engine. The main functions and capabilities of the device, features of controlling the BC for carburetor cars, pros, cons. Read more
- Remote Engine Start Module
Remote engine start unit: basic functions. Safety of using the internal combustion engine autostart module, interaction with car alarms and immo. Read more
A way to turn on for the forgetful.
The simplest scheme, automatically turning on the headlights, protects against driver forgetfulness and prevents the headlights from turning on when the ignition is off. On most cars this is done during design at the manufacturer, and where it is not implemented it can be easily done. To do this, simply supply power to the power button or headlight relay through the ignition switch terminals, which are closed when the ignition is turned on, but open when the starter is turned on.
This method has a very important advantage: simplicity. There is an opinion that turning on the headlights will cause additional load, but this is not the case. If the connection is made correctly, then when the starter is turned on, the headlights will turn off. Conclusion: a simple, reliable method that does not require costs.
Automatic switching on of headlights upon ignition
In order to organize such operation of the lighting elements, it is necessary to connect them to the ignition power source, and as many know, some devices can be connected at any position of the ignition switch, while others begin to function only when the ignition is already on. Based on this, the most convenient place to connect the headlights is the heater switch button (the rightmost switch block).
For this scheme you will need:
- any standard five-pin relay;
- diode;
- wires.
This is interesting: Photo spies saw the successor to the Toyota Supra
We recommend: How to determine what engine oil consumption is considered normal?
Next, we need:
- Remove the size switch (switch block on the leftmost side).
- Disconnect the positive wire from the key block responsible for the low beam operation (usually this is a green double wire) and connect it to the relay.
- You need to insert an additional wire into the positive wire that goes to the heater switch and also connect it to the relay.
- Connect the wire that powers the headlights to the relay.
- Throw the wiring to minus (to the body).
The connections can be soldered, but for full-fledged work, an ordinary insulated twist will suffice. As a result, automatic low beam headlights will work as soon as you turn on the ignition.
However, this method is considered not the most economical, since the headlights start working immediately, which is not very important in winter, when the engine needs to be warmed up or when repairing a car.
To avoid such inconveniences, you can complicate the circuit a little so that the low beam turns off while parked, regardless of whether the ignition is working or not.
How to make your car headlights turn on by themselves
Car headlights perform a very important function. They not only illuminate the road in the dark and in bad weather conditions, but also allow other road users to detect the vehicle in poor visibility. Therefore, turning them on and off is an essential part of driving a car. Drivers often need to automate this process.
Automatic low beam switching can be a very useful feature for the driver
Turning on the headlights using the light sensor
Many foreign-made cars are equipped with special devices that turn the lights on and off without human intervention. Most often, such gadgets are combined with a solar light sensor in a car. If the controller realizes that it is dark outside, it turns on the headlights, and when it arrives at a lighter section of the road, it turns them off.
This is a very useful function for residents of some countries... But not for Russians. Traffic rules in Russia force drivers to turn on low beams (or daytime running lights) when driving at any time of the day and in any visibility.
Which device is relevant for our country?
Driving without lights puts motorists in trouble in the form of fines. However, many people find it difficult to train themselves to turn on their headlights every time before they start driving. And the lack of habit of turning off the headlights upon arrival at the destination has already given many motorists a “gift” in the form of a dead battery.
It would be nice if the headlights turned on themselves when the engine was started and turned off after it was turned off, wouldn’t it? The fact is that any car can be equipped with such an option.
There are two options for devices for automatically turning on low beam headlights:
- artisanal;
- branded.
Artisanal
The homemade device is assembled by the car enthusiast himself. To do this, it is necessary to make changes to the car electronics system. However, the process of reconfiguring the car itself is not so simple. To create automatic switching on of low beam headlights, as well as to automatically switch on high beam headlights, you need to have a good understanding of the structure of the car.
Here is one of the options for equipping the machine with the mentioned option.
You can also solder the system using a more transparent scheme:
Some craftsmen sell hand-assembled devices that help headlights turn on and off independently. However, no one can be responsible for the quality of such devices, not even the sellers themselves. Therefore, think several times before purchasing such a product.