Caster angle is one of the most important parameters when tuning a car. The behavior of the car on the road depends on it. For ordinary car enthusiasts, it is not so important to set the exact angle; the presence of an electric power steering or power steering is enough for them.
For sports car racers the situation is different, you will have to rack your brains over this issue. There are many theories about how the caster adjustment angle affects how the car behaves. Sometimes it is very difficult to choose the optimal adjustment angle for the desired stability of your car.
What is caster angle
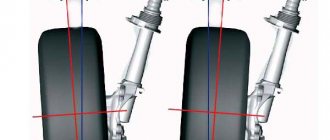
The caster angle, or simply caster, is the deviation of the wheel's turning axis from the vertical. The need for its existence is due to the desire to obtain a self-centering steering system. This parameter affects the car's steering ability in various conditions:
- during acceleration;
- braking;
- coasting.
For greater clarity, you can consider the caster angle on a bicycle. As you know, the axis of rotation of the steering wheel is not vertical, but has an inclination. Having gained some speed, the cyclist can let go of the handlebars, and the bike will still go straight. This effect is achieved due to the fact that the contact patch of the front wheel with the surface is located behind the intersection of the steering axis with the ground.
The higher the caster angle, the better the wheels are centered, but this also reduces the vehicle's steering ability, increases the turning radius, and reduces traction on uneven or slippery roads. As it decreases (the less the wheel's turning axis deviates from the vertical), the grip of the front wheels with the surface improves, but a phenomenon called oversteer occurs.
When tuning a racing car's suspension, engineers base it on the road conditions the race will be in. If the track is uneven, slow, with a lot of hairpins, the angle is reduced, but if you have to drive on a high-speed track with an even surface, the angle is increased.
Measuring individual wheel alignment
To measure the toe-in of each wheel, it is necessary to create a corridor consisting of two parallel lines. To create them, you can use strong threads, fishing elastic bands, and laser beams. The lines must run strictly horizontally; they must be aligned to the height of the wheel centers. A basic corridor can be created in three ways:
- The first is to attach the threads directly to the wheels. This is the simplest, but least accurate method. The wheels may have different offsets relative to the arches, which disrupts the parallelism of the lines.
- The second is fixing the threads on stationary supporting structures. The method is more accurate in comparison with the previous one, but it is inconvenient because during the process of adjustments and rolling the car, the chassis may shift relative to the constructed lines.
- The third is to create a corridor around the car body using rack and pinion fastenings. The slats are fixed in the front and rear of the car, strictly in the centers of the wheels.
There are many examples of such constructions on the English-language Internet. For example, type “BG rasing string lines kit” in the search.
In garage conditions, it is appropriate to use the most budget-friendly and simplest method. To measure alignment and camber, you will need two aluminum slats, which can be purchased at any hardware store. One of them needs to be placed on the floor near the rear or front axle of the car. Next, you need to make marks on the rack at a short distance from the wheels - about 5 cm. Then the distance between the marks is determined, the resulting value will be the width of the measuring corridor. By dividing this parameter in half, you can calculate the location of the midline. Next, you need to attach a second strip to the marked tube and transfer the resulting marks to it.
Two additional marks are applied to the car’s bumper exactly in the center. They are set using a tape measure and marked with a piece of electrical tape or masking tape.
Aluminum tubes are fixed using ordinary office clothespins. They are attached to bumpers, mudguards or other body elements, depending on the design features of the car.
Next, you need to tighten rubber cords on the slats in the previously marked places, which can be purchased at any fishing store. Instead, you can use non-elastic threads, which can be secured to the tubes with rubber bands for money. This will avoid breaking the threads, ensure the necessary tension and minimize the error in determining the wheel toe angles.
At the next stage, the measuring corridor is centered along the marks that were previously marked on the bumpers. Next, you need to set the steering wheel to the zero position; for greater accuracy, you can use a building level.
After the above steps, you can already detect the lateral displacement of the wheels. To do this, measure the distances from the centers of the hubs to the threads of the base corridor and determine the difference between them. This is relevant for drivers in whose cars the wheels extend out of the arches at different distances.
Now you can start measuring the individual alignment of each wheel. Measurements are carried out by determining the distances from the lines of the base corridor to the symmetrical points of the rim of the discs in front and behind the center of the wheel. The results obtained must be recorded in a notebook or, in the absence of one, written down with chalk on the asphalt in the garage.
Then you need to roll the car forward or backward half a revolution of the wheel without changing the position of the lines of the measuring corridor
It is important that the steering wheel remains in the same position. Next, you need to take repeated measurements of individual wheel alignment several times.
If there are no significant differences between two measurements, they can be accepted as true. If the difference is significant, you should roll the car a few tens of centimeters more and find “crooked” wheels. This way we calculate the wheel curves. To compensate for wheel runout during calculations, we find the most frequently repeated values of individual toe-in alignments.
Effect of Caster Angle on Handling
The size of the tire contact patch with the road depends on the wheel camber. The purpose of camber adjustment is to achieve maximum contact area. Wheel camber affects mainly the wheels located on the outside of the turn, which bear the main load. The caster angle provides a change in the camber of the wheels during a turn. The wheels lean into the turn and are in better contact with the road, counteracting the buoyant centrifugal force.
The smaller the deviation of the wheel's turning axis from the vertical, the more pronounced the car's steering is; the maximum possible steering is achieved at zero caster angle. This is explained by the fact that when the steering wheel is turned, the wheel turns to a larger angle. At the same time, the suspension works as efficiently as possible, because all the levers move up and down in a vertical plane. The shock absorbers also operate at maximum efficiency, better absorbing road imperfections.
With a small caster, there is a possibility of the car's front axle drifting when accelerating out of a corner. This happens because the center of gravity shifts back during acceleration, the front axle is unloaded, and the wheels grip the road worse. Also, a low caster angle impairs wheel self-centering because the force forcing the wheels to remain straight is reduced.
Large caster threatens to demolish the front axle when coasting or braking at the entrance to a turn, since the wheels deviate less to the side. At the exit of the turn, on the contrary, the understeer improves, because The wheels lean more towards the inside of the turn, increasing the contact patch with the road.
Installation and repair of VAZ cars (2110 and Lada Priora)
To ensure good stability and controllability of the car, the front wheels are installed at certain angles relative to the body and suspension elements. Three parameters are adjusted: toe-in, wheel camber angle, and the longitudinal inclination of the steering axis.
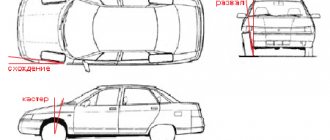
The casting angle of the steering axis (Fig. 1) is the angle between the vertical and the line passing through the centers of rotation of the ball joint and the bearing of the telescopic strut support, in a plane parallel to the longitudinal axis of the vehicle. It helps stabilize the steered wheels in the direction of straight motion. This angle is adjusted by changing the number of shims on the extension ends. To decrease the angle, washers are added, and to increase it, they are removed. When installing/removing one washer, the angle changes by approximately 19′. Symptoms of deviation of the angle from the norm: the car pulls to the side when driving, different forces on the steering wheel in left and right turns, one-sided tread wear.
Wheel camber angle (Fig. 2) is the angle between the plane of rotation of the wheel and the vertical. It promotes the correct position of the rolling wheel during suspension operation. The angle is adjusted by turning the top bolt securing the telescopic strut to the steering knuckle. If this angle deviates greatly from the norm, the vehicle may deviate from straight-line motion and cause one-sided wear of the tread.
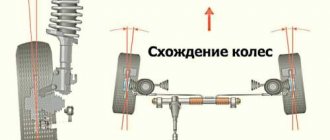
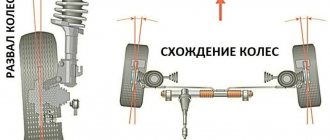
Wheel toe (Fig. 3) is the angle between the plane of rotation of the wheel and the longitudinal axis of the car. Sometimes this angle is calculated by the difference in the distances between the edges of the rims, measured from the rear and front of the wheels at the level of their centers. Wheel toe ensures the correct position of the steered wheels at various vehicle speeds and turning angles.
Toe is adjusted by rotating the adjusting rods with the tie rod ends loosened. Before adjustment, the steering rack is set to the middle position (steering wheel spokes are horizontal). Signs of toe deviation from the norm: severe saw-tooth wear of the tires in the transverse direction (even with small deviations), squealing tires when cornering, increased fuel consumption due to high rolling resistance of the front wheels (the vehicle's run-out is much less than expected).
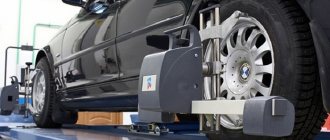
It is recommended to check and adjust the angles of the front wheels at a service station. The car is placed on a horizontal platform and loaded in accordance with the manufacturer's recommendations (see below). (Checking and adjusting the angles on an unloaded vehicle is acceptable, but gives less accurate results. Before doing this, make sure that the tire pressure is correct, the tread wear on the left and right wheels is approximately the same, there is no play in the bearings and steering, and the wheel rims are not deformed (radial runout - no more than 0.7 mm, axial runout - no more than 1 mm).
Checking the wheel alignment angles is mandatory if suspension parts that affect these angles have been replaced or repaired. Due to the fact that the installation angles of the front wheels are interconnected, first of all the caster angle of the turning axis is checked and adjusted, then the camber and, lastly, the toe-in.
For a run-in vehicle in running order and with a payload of 320 kg (4 people) in the cabin and 40 kg of cargo in the trunk, the wheel alignment angles should be within the following limits: camber angle……………………………………………………………… …………..0°±30′ toe……………………………………………………..0°00'±10′ (0±1 mm) pitch angle rotation axis…………1°30'±30′
Angles of vehicle wheels in running order: camber angle……………………………………………………………..0°30'±30′ toe…………………………… ………………………..0°15'±10′ (1.5±1 mm) pitch angle of the turning axis…………0°20'±30′
Self-adjustment
Many car owners, trying to improve the driving performance of their cars, independently change the caster angle. As practice shows, this step is often justified, especially when it comes to domestic cars. It is not uncommon for a new VAZ car to have corners on the left and right that are very different from each other. Even if the discrepancy is within acceptable limits, controllability suffers greatly from this.
On rear-wheel drive Zhiguli cars, for example, VAZ-2105 or 2107, the angle is 3 degrees 30 minutes, plus or minus 30 minutes. On front-wheel drive models, for example, Priora, VAZ-2109, VAZ-2110, this angle is smaller, only 1 degree 30 minutes, plus or minus 30 minutes. If the caster of one front wheel of a VAZ-2105 is 3 degrees exactly, and the other is 4 degrees exactly, which is the norm by factory standards, the car will inevitably pull to the side.
Adjusting the caster angle is done by removing or adding washers on the suspension braces. The maximum number of washers allowed is two in the front and four in the rear, with the addition or removal of one shim changing the caster angle by 19 minutes. When adding washers, it is necessary to turn them over with their chamfers facing the thrust end of the stretcher.
Of course, this procedure cannot be carried out in a garage. Adjusting the caster angle is carried out only in conjunction with adjusting the camber and toe of the wheels, otherwise the suspension settings will be disrupted and the car may behave completely unpredictably.
To increase it, tuning enthusiasts remove the standard strut supports and install SS-20 supports instead. on front-wheel drive VAZ cars, including Priora, such a replacement, coupled with installing the maximum number of washers, allows you to increase the angle to 3 degrees. At the same time, the controllability of the car changes noticeably, the overall effect is positive.
Often, to improve handling, it is enough to simply replace the strut supports with the same ones. Despite the fact that the caster angle will not change significantly, the result will be, as they say, obvious. It's all about physical wear and tear. A signal that the supports need to be replaced is a low, thumping sound that occurs when driving on an uneven road at low speed. You can confirm the diagnosis by rocking the car and seeing if the struts dampen vibrations equally on the left and right sides. If not, you need to change the supports.
When choosing new strut supports, you should not choose the cheapest ones. It's better to buy either standard ones or SS-20. The latter are much more expensive, but they will also last much longer, and due to the fact that replacing supports is a complex and time-consuming task, the overpayment may be completely justified.
What else is worth reading
Chassis vaz 2109
Cruise control function
Bleeding the power steering
Strong knocking noise in the front suspension
Installation angles
All installation geometric angles are measured in degrees, with the exception of the toe angle, which is most often measured in millimeters in European countries.
Vehicle suspension parameters are measured from several angles:
- toe-in;
- camber (Gamber);
- caster;
- longitudinal angle;
- transverse angle;
- kingpin angle.
The main setting angles are the first three, that is, toe, camber and caster angles. Changing any of these angles significantly affects the geometric parameters of the wheels. In order to understand what a wheel alignment is, it is worth examining each corner separately in detail.
Toe-in
Toe-in is translated from English as wheel toe-in and generally has a positive meaning; traditionally, Subaru models have zero toe-in, and negative settings are used exclusively on sports racing cars.
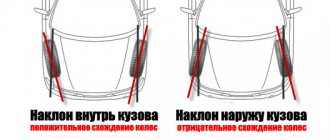
Positive toe is considered when the front part of the tire is directed inward towards the longitudinal central axis of the car, and negative when it deviates outward. The deviation of this angle affects:
- for increased tire wear;
- handling when turning;
- vehicle rolling distance.
On rear-wheel drive vehicles, positive toe-in is considered to be within 1 to 2 millimeters, and on front-wheel drive vehicles, from 0 to 1.5 mm. The adjustment units are located on the steering rods.
Camber (Gamber)
The camber angle can be either positive or negative depending on the design features of the vehicle suspension. On rear-wheel drive vehicles, positive yaw deflections are usually used in the range from 0 to +1 degrees. Front-wheel drive vehicles generally have negative camber from 0 to -1 degrees. Significant deviations affect handling and contribute to wheel tread wear.
The main reasons for violation of the Gamber angle are:
When these malfunctions occur, the wheel begins to deviate towards negative camber, while the toe-in of the wheels changes, quite often the initial position of the steering wheel changes, the car is felt to pull away, and wear marks appear on the tread on one of the sides.
It is worth noting that not all cars, especially cars with MacPherson strut suspension, have adjustment units for this angle. On earlier models, eccentric bolts were installed on the lower arms or shock absorbers for adjustment. So, for example, on the VAZ 2108 model, the upper bolt securing the shock absorber strut to the axle is eccentric, which allows adjustment work. Gradually, the engineers abandoned this idea. Therefore, if the camber deviates from the factory parameters, the reason should be sought in the elements of the chassis or body geometry.
Caster
A very important and responsible angle, violation of the parameters of which leads to the car moving away from straight-line motion; in fact, the front axle of the car’s wheels shifts in relation to the rear axle. Caster stabilizes the vehicle's handling at high speeds and ensures that the steered wheels return to their original position when turning. The angle is always positive, and the higher it is, the more stable the car is at high speed. On ordinary cars the range is from two to five, and on sports cars the tilt reaches nine degrees or more.
Reasons for changing caster tilt may include:
- the lever is deformed due to hitting an obstacle;
- silent blocks destroyed;
- spring is broken;
- the shock absorber strut is deformed (MacPherson system);
- deformation of the front subframe or body.
Almost all SUVs have units that allow you to adjust the angles of the wheels, which are located at the point where the levers are attached. Two adjustment methods are used:
- eccentric bolts;
- adjusting plates or washers.
On the VAZ 2121 the unit is located on the upper arm; washers are used, by installing or removing which adjustment work is carried out. Imported SUVs have special eccentric bolts located on the lower or upper suspension arms.
Frequent front suspension malfunctions
Maintenance and repair of the front suspension in Priora involves identifying the exact cause of the breakdown:
- If there is extraneous noise or a distinct thud is heard, the struts may need to be replaced. Check the tightness of the bolts securing the stabilizer hoses, tighten if necessary. If the cushions are worn out, replace them with new ones. If the supports at the top of the suspension strut are loosened to the body, tighten them. Assess the condition of the rubber component of the strut mount, ball joint, spring device, and compression motion buffer. If they are damaged or defective, replace them. Alternatively, check the wheels for imbalance.
- Liquid may leak from the strut, for one reason - the rod seal has worn out and collapsed. This will be indicated by the appearance of burrs on the rod, damage to the chrome surface, and mechanical defects in the sealing ring located on the strut body. Replace the old telescopic stand with a new one.
- If the suspension in the Priora breaks, you will have to replace the spring device and telescopic strut.
- It has become difficult to drive the car, it constantly skids to the side - it’s time to check the air pressure in the tires and normalize it. If the wheel alignment angles leave much to be desired, perform a wheel alignment. It may be necessary to replace the rubber lining in the suspension mounts or springs.
Read more: Crane under the hood of the VAZ 2107
How to make a wheel alignment yourself on a VAZ 2109
You can adjust the wheel alignment angles of your car with your own hands using available tools and simple devices. In this material we will talk about how to do wheel alignment yourself at home, and what difficulties are most often encountered when adjusting wheel alignment angles.
Incorrect alignment adjustment can cause, for example, rapid wear of tires, or the fact that when driving in a straight line, the car will pull to the left or to the right.
At the end of this article you will find a video that explains and shows in detail everything you need to know about wheel alignment.
First, let's look at the theory: wheel alignment - what is it? What are the wheel alignment angles and how does the car’s behavior on the road depend on them?
Wheel alignment - what is it?
Camber is the angle between the vertical and the plane of the wheel. It ensures reliable contact of the tire with the road (see picture above).
Toe is the angle between the direction of travel and the plane of rotation of the wheel. The stability of the car in corners and tire wear depend on it.
On rear-wheel drive cars, the wheels should be slightly turned towards each other - this is called positive toe. When moving, they move apart and become parallel. For front-wheel drive vehicles, on the contrary, the toe-in should be negative (see the diagram below). Caster is the longitudinal inclination angle of the king pin. This parameter very rarely needs adjustment, only on a newly assembled front suspension from new parts, so we will not consider its adjustment.
Repairing the suspension or steering (replacing the same shock absorbers or steering joint) leads to a significant change in the wheel alignment angles. Daily use of the car also makes adjustments to these parameters over time, so the need to adjust the wheel alignment periodically arises.
It is best to adjust wheel alignment twice a year, during seasonal tire changes. During this time, you will fall into a hole more than once or run over a curb, causing the chassis to become loose and the angles to change. Timely alignment adjustment will cost much less than a set of new tires.
In 1955, American engineer Lee Hunter developed the first wheel alignment stand. Sensors mounted on the wheels sent focused beams of light and accurately measured angles. That's why the stand was called optical. But already in 1969 it was connected to a computer, and in 1995, 3D technology was first used to measure and adjust angles.
True, Soviet car enthusiasts managed without any stands or computers - using wrenches, calipers, thread and a plumb line, they adjusted the camber and toe angles with their own hands.
Instructions for adjusting wheel alignment yourself
Before you begin adjusting the camber and toe angles, it is imperative to check the vehicle's chassis. If repairs are needed, then doing a wheel alignment is pointless. The steering and suspension must be in perfect order.
Pay attention to three points on which the wheel alignment angles on a car greatly depend:
Serviceability of the chassis (read more about car suspension diagnostics). Tire pressure. Loading the machine. Be sure to check the tire pressure before adjusting the wheel alignment and make sure that you haven’t accidentally forgotten a couple of bags of potatoes or cement in the trunk
Option 4
Option with sporting ambitions: everything is “minus”, with the exception of the caster. A car with such settings turns more confidently and faster, as does the “rearrangement” maneuver. Hence the best result.
So, there are a lot of simple and very effective ways to change the character of a car without resorting to expensive replacements of components and parts. The main thing is not to neglect the adjustments - they often turn out to be very important. Which option should you prefer? For most, the second will be acceptable. It is the most logical for everyday driving, both with partial and full load. You just need to take into account that by increasing the longitudinal tilt of the rack, you not only improve the behavior of the car, but also increase the stabilizing (return) force on the steering wheel. The last, “fastest” tuning option is more suitable for the near-sporting public who likes to improvise with the car. When giving preference to these adjustments, it must be taken into account that with increasing load, the values of the toe and camber angles will increase and may go beyond the permissible limits.
