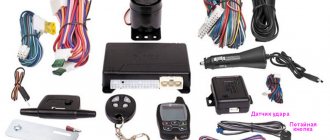
Functions of fender liners, installation recommendations
To prevent the occurrence of corrosion processes and to increase the service life of wheel arches, fender liners are installed today. Their second technical name is lockers. Of course, it is very expensive to repair a niche today, so it is better to install the fender liners yourself if they were not installed at the factory. In addition, lockers improve the appearance of the car. Different materials are used to make fender liners:
- polyethylene;
- fiberglass;
- polyvinyl chloride;
- copolymers.
The following types of materials have excellent properties:
- high strength;
- elasticity;
- environmental Safety.
It must be said that they are distinguished by low thermal conductivity. Therefore, snow adhesion and ice formation are not observed on the surface of the lockers. Auto parts stores provide every car owner with a wide range of wheel arch liners. Corresponding elements are produced for almost every car model.
The best quality installation of lockers can be done at a service station. But you can install fender liners on a VAZ yourself if you have certain skills and some specific knowledge. The service life of the VAZ wing depends on the tightness of the fender liners. A tight connection is much easier to make with special equipment. Before installing the wheel arch liner, you must:
- wash;
- dry;
- coat with an anti-corrosion compound.
To carry out such technological operations, a special stand is used. The installation of the fender liners itself does not cause any particular difficulties. They are secured with self-tapping screws, which must be screwed into the “pistons” included in the kit. The wheel arches have special technological holes that coincide with the mounting holes for the fender liners.
Therefore, there is no need to do additional drilling. As a result, the paint coating that was applied to the surface of the wheel arch is not damaged. To install the front fender liner, you need to perform several operations:
- a fender liner is inserted into the wheel arch;
- the mudguard is fixed;
- tighten three screws securing the locker to the front bumper;
- all pistons are installed in the technological holes;
- A self-tapping screw is screwed into each piston;
- the upper fastening of the fender liner is performed;
- Removing the fender liner is carried out in the same sequence, but in reverse.
To install the rear fender liners, follow these steps:
- the rear fender liner is inserted into the wheel arch of the VAZ wing;
- the mudguard is screwed on;
- the top screws are tightened;
- the lower screw screws the fender liner to the rear bumper;
- Remove the rear fender liner in the reverse order.
Return to contents
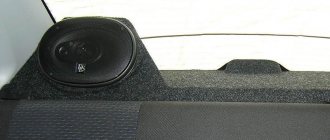
We insulate the wheel arches to reduce noise in the cabin
There are literally dozens of options for soundproofing wheel arches. Many use traditional methods with the installation of insulation of various shapes and options, others prefer more modern solutions. In any case, you should remember about the effectiveness and durability of the chosen sound insulation method. You can choose to spray special chemical compounds on the fender liner, which will be done for you in a specialized center. You can also use the ideas of liquid sound insulation in the form of various resinous compounds applied to the metal in a thick layer. However, the most popular solution is this method of soundproofing car arches:
- in a car store or on the market, a search is made for the optimal materials for sound insulation specifically for your car or universal ones;
- the material in this case is a foil and fairly thin seal that should cover all metal surfaces above the wheel;
- the material is mounted on mastic, as well as on special glue or other fasteners, which also reduces the possibility of corrosion;
- sound insulation can be single-layer or multi-layer; often the effectiveness of all work performed depends on the number of layers of material;
- the sound insulator is mounted with the foil side to the wheel, this helps to reflect sound and reduces unpleasant noise effects in the car interior;
- A plastic fender is mounted on top of the insulation layer - this is a prerequisite for maintaining the durability of the insulation layer and the efficiency of its operation.
The process of installing sound insulation on fender liners is quite simple, so you can complete all the tasks yourself. Many sellers offer ready-made plastic fender liners with a layer of sound insulation and insulation applied. This is a completely adequate solution, but its effectiveness is somewhat lower than when carrying out high-quality insulation using special materials. You can use a variety of solutions to get the desired result. The main task is to ensure reliable protection of the body from the spread of corrosion. This is one of the first tasks when performing any work related to the installation of additional materials or devices. Therefore, it is recommended that work be carried out by specialists.
Features of replacing the rear wing
Sometimes the rear fender needs to be replaced. This is usually due to the fact that the condition of the item is so poor that it is completely impossible to repair. For example, serious deformation has occurred due to strong mechanical impact, there are cracks and small tears.
Maybe corrosion has created huge holes in the fender. Replacing a rear wing is a fairly complex process, but you can do it yourself if you follow a certain sequence of actions.
- First, the trunk is completely emptied.
- The bumper is removed.
- The headlights are removed.
- The fuel tank is removed.
- The trunk mat is removed.
- The rear wing is removed.
To carry out dismantling, you must use a thin chisel. The wing is slightly pushed forward. The work must be done carefully so as not to cause damage to the body. Where the wing connects to the transverse frame, technological points are drilled. Only then can the rear wing be removed.
After removing the wing, you need to cut off the remaining strips of metal. A grinder is used for this. Wire cutters and a sharp chisel will also come to the rescue. The edges themselves are straightened and polished. The dirt that has accumulated under the wing must be removed and everything thoroughly wiped. The cleaned surface must be degreased.
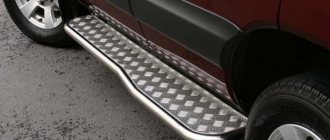
Installation of steel parts
Before installing a new steel wing, it is necessary to coat it with an anti-corrosion compound and an anti-gravel substance. To successfully mount a new wing, a fastening consisting of several welding points is performed.
When welding work is carried out, it is necessary to maintain a very tight fit of the wing to the working surface. After establishing a tight fit, major welding is performed. The new wing of the VAZ 2110 is painted in the color of the car. Remember that before the main painting the surface is primed in several layers.
In addition, all nearby parts must be covered before painting to prevent accidental paint. After welding the new wing, the fender liner is installed under it in the manner described above.
Wheel arch liners, also called lockers, are a plastic casing on the inside of a car's wheel arch. At the manufacturing plant, cars are rarely equipped with fender liners, completely shifting the responsibility for this to the future owner. Our domestic manufacturer usually does this. It happens that fender liners are installed, but only on the front arches. And their size is negligible, so they do not protect even one third of the arch.
Shipping and payment
Payment Methods
| 1.06018.1 | |
| Material | Steel |
| Brand | Auto armor |
| A country | Russia |
| Protection for ? | Engine and gearbox |
| Thickness? | 1.8 mm |
| Drive unit | All |
| Fasteners? | Not included, uses standard mounting hardware |
| Number of sheets? | 1 |
| Gearbox type | All |
| Engine ? | 1.6 |
| Changing the oil and filter without removing the protection? | Yes for (1.6) |
| Guarantee | 24 months |
| Note | deep stamp |
| Applicability: | Lada (VAZ) Priora sedan 2007-2018 Lada (VAZ) Priora hatchback 5 doors. 2007-2018 Lada (VAZ) Priora hatchback 3 doors. 2007-2018 Lada (VAZ) Priora station wagon 2007-2018 |
| Weight: | 7.5 kg |
| Cash to courier | You can pay for the order upon receipt to the courier upon delivery or at the pick-up point in your city |
| Cashless transfer | The order can be paid from the organization's current account for legal entities or from a personal account |
| Bank cards | Payment by bank cards is possible on the website or upon receipt |
For more information about payment, see the “Payment” section.
What are they needed for
Why are fenders needed?
If the owner is responsible or wants to drive the car for a long time without thinking about rust in the arches and on the edges of the wings, then he will definitely install the wheel arch liners himself or at a car service center. In general, they are installed to protect against stones flying from under the wheels. The fact is that stones fly out at great speed and when they hit the wheel arch they spoil the paintwork, which in this place is very weak due to mechanical influences and reagents that are so generously sprayed on our roads. Additionally, an owner who loves his car will definitely cover the arches with anticorrosive. This, among other things, will make sound insulation better, because most extraneous sounds enter the car from the wheel arches.
Correct installation of lockers
Many cars have factory mounting locations for fender liners. Special plastic “bugs” are used as fastening elements. The use of self-tapping screws is permissible when attaching lockers to plastic elements (decorative threshold trim, bumpers). If processed correctly, self-tapping screws can be used as fasteners at the bottom of the internal cavity of the mudguard.
Never use self-tapping screws to attach the fender liner to the edge of the wing. Moisture is trapped between the plastic casing and the wing. In the place where the metal is exposed, rusting will inevitably begin, which, moving upward, will destroy the paintwork.
When you can't do without self-tapping screws
If another installation method is not possible or if holes have already been drilled in the wing before you, the metal must be protected. If there are no traces of rye in the area where the paintwork is damaged, prime the area with epoxy primer and paint it with acrylic paint from a spray can. Rusted areas must first be cleaned and treated with a rust converter. After drying, treat the inner cavity of the wing and the edge adjacent to the fender liner with anti-corrosion mastic (for example, Movilya). Also soak the self-tapping screw in mastic before screwing it in.
Useful solutions
Often, protecting wheel arches with fender liners can only do harm. Vibrations from a poorly secured product damage the paintwork in the plane of contact with the wing. There are two ways to deal with this:
- The edge of the locker is trimmed, and a special seal is put on it. The soft rubber coating fits tightly to the wing and does not scratch the paint;
- use of body sealant. It is applied where the plastic adheres to the body. Promotes waterproofing, which is important for both paintwork and laminated sound insulation. The sealant not only performs a waterproofing function, but also acts as an additional fastener. After drying, it remains elastic and therefore does not crack.
High-quality preparation of a car for operation involves the use of fender liners - special plastic devices to protect the body space around the wheels. Today, various manufacturers offer car fender liners that are ideal for your model, specially designed to take into account all the shapes and features of the wheel arches. It should be noted that this particular protection option is the most important and necessary to preserve the body from corrosion. The paint under the wheels is quickly scratched off due to constant attack by small stones, sand and water, so rust in these places forms within a matter of weeks of using the car. It is necessary to install fender liners immediately after purchasing the car and protect the body from further destruction. If rust has already begun to spread, it is better to treat these areas.
What you need
Must be washed with water under pressure
So, you have decided to do this simple task and are thinking about how to take on this task, that is, how to install the fender liners? But everything is simple. In order to do this job we will need 4 fender liners, anti-corrosion agent, brush, degreaser, rag, self-tapping screws and a screwdriver. First you need to wash the arches with water under pressure. It would be better to do this at a car wash. Then you go to the garage or other place where no one will bother you for the next couple of hours.
Anticorrosive
First of all, we remove all the wheels one by one, and put the car on trestles or bricks. Now pour degreaser onto a rag and thoroughly wash the wheel arch so that the anti-corrosive agent adheres to the surface of the arch as best as possible. It’s better to do it this way: wash one arch with a degreaser and move on to the other. After the last arch is washed, the first one will already dry.
Now we apply anticorrosive. It is better to use a brush for this rather than a spray bottle.
If you paint with a brush, then do not skimp on the anticorrosive agent. The thicker the layer, the longer it will last and the longer the guarantee that the arches of your car will not be eaten away by corrosion. If you have time and resources, it would be better to paint in two layers.
The application scheme is the same. We painted one arch and moved on to another. By the time you paint the last one, the first one will already be dry.
Applying the composition
Now we move on to installing the fender liners. To do this, it is better to use the services of an assistant. It is necessary that one person presses the fender liner to the arch so that it does not move or slide to the side, and the other at this time, using a screwdriver, screws them to the arch with self-tapping screws. Screw in the screws carefully; don’t just make a sieve out of the arches of your car. And choose shorter self-tapping screws. Centimeter ones with a large cap will be enough.
There are special plastic clips on sale that secure the fender liner to the arch without screws or extra slots. But, unfortunately, they do not fit all cars, so you can ask about them in the store, but if you are the owner of a domestic car, don’t have high hopes.
Special fasteners
Do not leave gaps between the fender liner and the arch. Subsequently, dirt and moisture will get clogged there, which means that rust will form even faster than without wheel arch liners and anti-corrosion.
If such gaps remain, then there is a simple way to seal them. Take a simple syringe and fill it with anticorrosive, bitumen or anti-gravel and pour it into the cracks. After this, the car needs to sit for at least a day. This is necessary for complete drying of the poured substance.
So, it’s not so difficult to properly coat the wheel arches with anticorrosive and close them with lockers. All you need is a little free time and a lot of desire. After installing the lockers, you can be sure that the arches of your car will remain intact for the next three to five years.
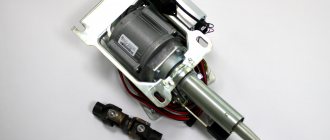
Priora engine characteristics
This is poor engine protection.
The engine for the Lada Priora was created on the basis of the unit for the VAZ 2112. Externally, it is very similar to the engine in the Lada Kalina, but internally it is significantly different. The engine volume is larger and is 1.6 liters due to the fact that the piston stroke is increased, but the cylinder diameter remains the same.
The cylinder block is cast from high-strength cast iron, making it hard and reliable. The engine cooling jacket is made in such a way that all cylinders are protected from deformation, because it is located along the height of the entire cylinder block and is open at the top. In addition, this has a positive effect on cooling the engine pistons, which protects it from overheating.
At the bottom of the engine there are crankshaft bearing supports, they are bolted to the base. The crankshaft itself is made of cast iron and is protected from movement along the axis by half rings inserted into the middle support. 8 counterweights, which are designed to reduce vibration, are also located on the crankshaft.
In front, at the end of the crankshaft, there is a pump that pumps out oil, a camshaft drive belt pulley and a generator drive pulley. At the opposite end of the crankshaft is a cast iron flywheel with a steel toothed rim. The Lada Priora engine pistons themselves are cast from aluminum alloy. The mass of the piston set as a whole is approximately 785 g, which is 32% less than in the engine of a Lada Kalina car.
Experimental version of the barrier
The camshafts, which are located at the top of the cylinder block, are cast from the same durable cast iron and bolted in place. The block head itself is made of aluminum alloy. The oil sump is bolted to it. All working surfaces of the parts are bleached, that is, they have undergone heat treatment, which significantly increases their wear resistance. Each cylinder has 4 valves - two inlet and, accordingly, two exhaust. The block head has valve guides. They are equipped with locking rings. These rings keep the valves from falling out.
The power supply system of the described engine consists of several parts. These include: an electric fuel pump located in the gas tank, a filter for thorough fuel cleaning, a throttle assembly, a fuel pressure regulator, hoses and injectors. Thanks to a special collection system, harmful fuel vapors do not enter the atmosphere. An engine ignition system consisting of coils is installed on the cylinder head cover. They are individual and controlled by the car's ECU.