Wheel alignment adjustment is a job that must be done after repairing the suspension with replacing tie rod ends, ball joints, and silent blocks. Before you learn how to make a wheel alignment with your own hands on a VAZ 2107, you should get acquainted with the essence of the terms and why their correct adjustment is so important.
Do-it-yourself wheel alignment on a VAZ 2107
Owners of domestically produced cars are accustomed to the fact that most repair and maintenance work on such cars can be performed independently.
This is often very useful, especially if the car is driven in an area where there are no service stations nearby. One of the important tasks in servicing a VAZ-2107 is the correct setting of the car’s suspension, or “wheel alignment”. Most often, car owners go to a service station, where a specialist sets the correct angles of the car's steering wheels on a computer or optical stand. But if it is not possible to contact a specialist, the wheel alignment procedure on a VAZ-2107 car can be done in your garage on your own.
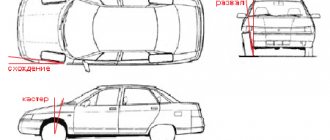
First, let's define what camber is and what toe is.
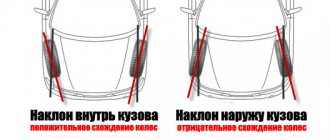
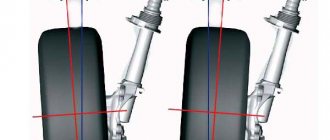
Camber is the position of car wheels relative to the vertical. The angle at which the top of the wheel protrudes beyond the wheel arch is considered positive. If the camber is adjusted incorrectly, the car will lose its directional stability, “yaw” will appear, and the tires will wear unevenly.
Do-it-yourself wheel alignment on a VAZ 2107
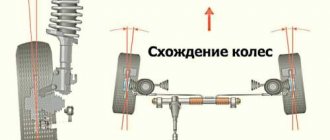
Toe-in is the location of the wheels relative to the horizontal, that is, the road surface. On a rear-wheel drive car, such as the VAZ-2107, the toe-in degree will be positive.
Negative camber VAZ Classic + upper ball offset — Lada 2101, 9.9 l., 1974 on DRIVE2
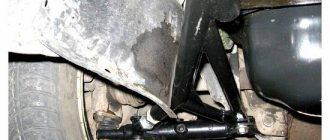
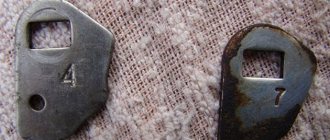
A guide for dummies. How to stir up negative camber in a couple of hours. And so what we need, I mean the material, I’m generally silent about the tools. 1 lengthen the camber bolts, I personally used them from the cylinder head 2109-099, it’s easy to change, it’s advisable to boil it. 2 To adjust the spacer, the spacer is the same spacer on which the lower arm is attached, you can almost buy it in a magnet, it is not rare.
3 And so we have two spacers in front of us, we just need to cut off the excess (where the thread is) and install
There are no comments here, and everything is clear. As a last resort, print this drawing on A4, attach it next to the lever, it will be approximately the same size and everything will become clear!
result of the work done
The limiters on the steering wheel and levers were also washed down, the eversion was slightly increased
Page 2
A guide for dummies. How to stir up negative camber in a couple of hours. And so what we need, I mean the material, I’m generally silent about the tools. 1 lengthen the camber bolts, I personally used them from the cylinder head 2109-099, it’s easy to change, it’s advisable to boil it. 2 To adjust the spacer, the spacer is the same spacer on which the lower arm is attached, you can almost buy it in a magnet, it is not rare.
3 And so we have two spacers in front of us, we just need to cut off the excess (where the thread is) and install
There are no comments here, and everything is clear. As a last resort, print this drawing on A4, attach it next to the lever, it will be approximately the same size and everything will become clear!
result of the work done
The limiters on the steering wheel and levers were also washed down, the eversion was slightly increased
Wheel alignment adjustment
Design and adjustment of the OZONE VAZ 2107 carburetor
If the wheel alignment is incorrect, then adjustment will be required. To do this, follow these steps:
- Loosen the tension on the tie rod end coupling clamps.
- Using Cobra-type pliers, you need to rotate the coupling. Before starting the adjustment, be sure to clean all threaded connections from dirt and dust and treat them with penetrating lubricant.
- Rotate the clutch until the gap between the thread and the front wheel tire is normalized.
- After completing the work, be sure to tighten the threaded connections.
- The adjustment on the second wheel is carried out in the same way.
- The total toe-in of the wheels should be no more than 2 mm.
How is it regulated?
The camber and longitudinal inclination of the king pin on a Zhiguli are changed by installing special adjusting washers under the lower arm of the front suspension. To achieve the required wheel alignment angles, a combination of the required number of washers and their thickness is selected. It is completely different for each car.
The wheel master loosens the lower lever, and then adds or removes the required number of adjusting washers, after which he tightens the lever and looks at the bench readings. The operation can be repeated several times until the desired values are achieved.
After adjusting the camber and caster, the technician moves on to adjusting the toe-in of the front wheels. Toe-in on classics is adjusted by steering rods. By loosening the two clamps on the coupling and rotating it, the desired value is achieved. At the end of the work, the clamps are tightened again.
Preparing for wheel alignment adjustment
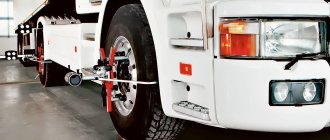
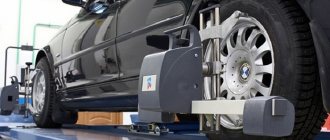
Optical stand for wheel alignment adjustment
It is recommended to adjust the wheel alignment angles when the vehicle is loaded. The load must be such as to correspond to a car with 4 people in the cabin, with 50 kg of cargo in the trunk and with a full tank.
It is also necessary to check the tire pressure, which must be correct.
Self-adjustment allows you to save on service station fees. Adjusting the angles does not require too high precision, so even at specialized stations it is performed in accordance with the old technique, which does not require specialized equipment. The adjustment accuracy that can be achieved at home is quite sufficient for trouble-free operation of the car. The adjustment process is not an irreversible action and, if you have doubts about the correctness of the adjustment, you can always contact a specialized service station equipped with the latest technology.
How is wheel alignment adjusted?
For repairs you will need:
- ruler;
- chalk;
- standard set of tools;
- cord with a plumb line;
- flat area with a pit or lift.
First you need to find out how accurately the convergence was performed earlier. Those. Is the steering rack in a “zero” position during straight-line motion? How to do it? We follow further instructions: place the car on a flat surface. Then turn the steering wheel as far as possible in one direction, making a mark on the top of the steering wheel (in the middle of the circle) and turn the steering wheel all the way in the other direction. In this case, it is necessary to count the number of whole revolutions and parts of a whole circle (shares). When you have calculated, divide the resulting amount by 2 and turn the steering wheel to this position. If this result coincides with the usual position of the steering wheel, then the “zero” position of the rack is set. If not, you will have to do it yourself.
When adjustment is necessary
Adjusting steering rods VAZ 2107
Adjustment may be necessary if:
- the car pulls to the side on a flat road;
- deviations of wheel angles on the VAZ 2107 became visible;
- premature or uneven tire wear occurs;
- the increase in fuel consumption was higher;
- the suspension was damaged.
If the alignment does not correspond to the norm, then the car will constantly be “pulled” to one side. To determine this, just remove your hands from the steering wheel. If the adjustment is performed poorly, the car tires will wear out very quickly, and some suspension parts may also fail.
To perform a VAZ 2107 wheel alignment without the help of specialists with your own hands, you must have:
- thread with hooks at both ends;
- ordinary thread;
- bars 6 mm and 22 mm thick;
- Cobra type pliers;
- set of wrenches;
- calipers.
Basic Concepts
If we consider the concept of wheel alignment, it means how the wheel of a car will be installed vertically. If the upper edge of the wheel is pointed outward, this fact means that the camber is positive. If the edge of the wheel goes inward, then the camber is negative, and it is designated accordingly: “-”.
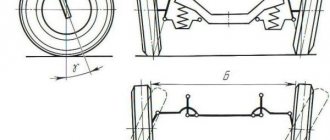
The diagram shows toe-in (a) and camber (b)
If the camber is adjusted incorrectly, and to be precise, when the camber of only the front wheel is adjusted, the car can drift to the side while moving; this is determined quite simply - the driver takes his hands off the steering wheel, and the car “steers away”.
As for toe-in, it shows how the wheels can converge with each other relative to the road. If we consider cars with rear-wheel drive, then their wheels are placed at a positive angle, but on front-wheel drive the angle is determined by a negative indicator. This adjustment is necessary so that at the time of movement and during further driving the wheels can be aligned and continue to remain in the same position. Of course, incorrect toe adjustment quickly wears out tires and other elements of the car, so the motorist must pay close attention to his car and promptly adjust the wheel alignment himself or with the help of specialists.
Tire wear due to correct and incorrect adjustment
Video: consequences of incorrect wheel alignment
Check and adjustment
First of all, you need to make sure that the steering wheel is level. After that, the front and rear bumpers of the VAZ 2107 must be pressed with a force of up to 50 kg. Then from the top point of the wheel you need to pull the thread vertically down. Using a caliper, find out the distance from below and above. If the difference is, for example, 3 mm, then this means that the angle is approximately 30°. In case of any deviations, a wheel alignment must be performed immediately.
If the car's wheel alignment is normal, then the angle is 0°5'+20' without load and 4°30'+20' with load. To check the alignment, you need to take a thread with hooks and attach it to the end of the rear wheel on one side, and to the front wheel on the other.
In order to adjust the VAZ 2107 camber as accurately as possible, you need to take into account the difference between the wheel tracks, which is 44 mm. You need to place a 22mm block under the thread on the rear wheel. After this, you need to turn the steering wheel until the wheel touches the thread on both sides.
Now you need to place two bars with a total thickness of 28 mm under the thread. If the front slope does not touch at 2 points, then it is necessary to adjust the toe of the front wheels. To do this, you will need 2 wrenches, which are used to loosen the clamps on the tie rod couplings.
Afterwards, you can take pliers and move the clutch with your own hands until the thread touches the wheel at 2 points. The wheel alignment requires accuracy, so it is better to check all measurements several times.
You can adjust the wheel alignment if you perform a simple procedure with each wheel until the desired result is obtained. In order for the alignment to meet the norm, sometimes you have to spend a lot of time, so you need to be patient.
It is quite possible to do a VAZ 2107 wheel alignment yourself. This requires help, tools and patience. To achieve a better result, you can watch a video on how to adjust the wheel alignment.
It is not difficult to do a wheel alignment on a VAZ-2107 with your own hands, but you will have to adhere to a number of requirements and recommendations. Otherwise, the rubber will not last long. Camber is a term that defines the angle at which a car's wheel is mounted relative to the vertical. In cases where the top edge of the wheel protrudes outward, this is positive camber. If she looks inward, then negative. When adjusting on computerized stands, the angles are indicated with the prefixes “+” and “-”.
Let's sum it up
You need to set the correct front suspension geometry on a level surface using the following tools:
- Template for determining the castor angle.
- Plumb line and string with hooks.
- Caliper or ruler.
- Bar 28 mm thick.
- Set of keys.
Having adjusted the caster by rearranging the washers, you can begin adjusting the angles of the front wheels in the following sequence: adjusting the camber by adding/removing washers and adjusting the toe by rotating the steering linkages.
Wheel alignment adjustment is a job that must be done after repairing the suspension with replacing tie rod ends, ball joints, and silent blocks. Before you learn how to make a wheel alignment with your own hands on a VAZ 2107, you should get acquainted with the essence of the terms and why their correct adjustment is so important.
Controlling the camber angle on the front wheels
It should be noted that it is quite problematic to set the camber angles yourself, since there are many difficulties. But you can check how much the angle deviates from the normal position without much difficulty. To do this, you need to follow the following algorithm:
- Place the car on a level surface and secure its position by placing chocks under the rear wheels.
- Sit in the car and turn the steering wheel until it is level. The wheels must be parallel to the car body.
- Press the shock absorbers 2-3 times until the car's suspension is in its normal position. The force should be approximately 40-50 kg. The operation is carried out on all four shock absorbers.
- Take the thread and fix it on the top of the car's fender so that it passes clearly through the center of the wheel. To achieve a vertical position, tie a weight to the lower end. Measure from the top and bottom edges of the wheel to the thread. The difference in values is the wheel camber.
For example, the difference is 2 mm. This means the camber angle is 20 minutes (not degrees). Normally, the angle should be 4 degrees and 30 minutes. An upward deviation of no more than 20 minutes is permissible. But this is the case when the car is loaded with a mass of 320 kg. If there is no load, the angle should not deviate by more than 20 minutes. from 0 degrees and 5 minutes.
The process of setting angles
To work at home you will need the following tools and equipment:
- Set of spanner wrenches;
- Calipers;
- A strong thread or fishing line with hooks at the end - if there are none, then you will need to figure out how to tie it to the wheel;
- Two bars - the first is 6 mm thick, and the second is 22 mm.
You may also need a special or regular ruler - there is such an adjustment method too.
Before you begin setting the wheel angles, you need to check the tire pressure, make sure that there is no radial and axial runout of the tires, play in the hub bearings, play on the upper ball joints and free play in the steering wheel.
If we find any of the above, we fix the problem. Next we proceed in the following order.
We drive the car onto a flat area, set the steering wheel position to straight-line driving mode - for this you need to drive forward and backward a couple of times to understand that the car is not moving anywhere, and press the suspension, putting 50 kgf pressure on the front and rear bumpers several times in a row.
Checking the angle using a thread and caliper
Checking the wheel alignment angles. To do this, attach a plumb line next to the wheel so that it runs exactly in its center, as shown in the photo above. Stop it rolling and measure the distance from the top and bottom edges of the rim to the thread. The resulting difference will be an indicator of camber.
Advice! If you don't have a caliper, use a regular ruler.
VAZ 2107 is a rear-wheel drive car. For such, the maximum difference can be 4 mm, for front-wheel drive - 1 mm.
It is worth considering that the upper distance cannot be less than the lower one - it’s better if it’s the other way around. Ideally, the camber should be zero for cars with any drive.
If adjustment is required, loosen all the nuts on the steering knuckle, move the part in the desired direction and tighten everything as it was.
To make sure everything is done correctly, repeat the measurements, and also take it with the wheels turned to the right and left.
Let's move on to adjusting the toe.
Beam 22 mm
We carry out the same preparatory measures as when adjusting the camber.
Next, we stretch the thread between the front and rear wheels so that it passes through their center. If the thread clings to the fender liners, then they need to be temporarily removed.
The track of the rear wheels on the VAZ 2107 is slightly narrower than that of the front wheels, so you need to make a lining from a block or two folded matchboxes.
Then we turn the steering wheel so that the thread touches the front wheel tire on both sides. If everything works out, then you will not need any adjustment.
Now move the block to the back of the rear wheel and add another 6 mm insert to it - you can put a third box of matches. The thread should still touch the tire at two points. It turned out great, no, it needs adjustment.
You can adjust the alignment using wrenches 13. To do this, loosen the outer tie rod coupling.
Cobra pliers
Next, using Cobra-type pliers, you need to grab the clutch and turn it, thereby adjusting the length of the pull. We achieve such a position so that the thread touches the tire as required.
Finally, tighten the clamps and repeat all manipulations with the second wheel. We strive for a joint convergence of 2 mm.
When to adjust camber and toe
Before adjusting the installation angles, be sure to make sure that you have the following set of tools:
- Calipers.
- Open end and box type wrenches.
- Ticks.
- Strong thread.
- Metal hooks or pushpins.
- Wooden blocks - 2.2 cm and 6 mm thick.
This is the minimum set that will be required. It wouldn't hurt to have WD-40, since the nuts and bolts are close to the road surface and dust and dirt constantly accumulate on them. Rust may occur, so you need to thoroughly clean the threaded connections before starting repair work on the car. All dirt accumulations must also be removed from the inside of the wheels.
Cost of work
| List of works | Prices |
| Checking wheel alignment angles | 800rub |
| Toe adjustment only | 1200rub |
| Full adjustment (toe, camber and caster) | 2000rub |
| Adjusting washers are included in the cost of work | washers are always in stock |
Skeptics who believe that 2000 rubles for a wheel alignment on a classic would like to note that it takes 2-3 times more time to adjust this car than a foreign-made car of the same class, as well as the fact that today Not many services in Moscow take on this car, and if they do, they really do it with the same quality as us.
What is needed to adjust wheel alignment
To independently adjust the wheel alignment of a VAZ 2107, you will need the following tools and products:
- set of basic wrenches;
- calipers;
- cobra type pliers;
- strong thread (fishing line);
- weight;
- adjusting washers for the lower arm;
- a pair of metal hooks tied to a thread or fishing line;
- wooden blocks 2 and 6 mm thick.
After changing which parts of the front suspension you need to do camber
-
toe-in
and when not needed. ontak group.
Note: it is possible to ideally adjust the camber of a VAZ 2107 only in a workshop that has special expensive equipment. When asked how to set your VAZ 2106 on the timing cover, there are three marks there. If you take the matter seriously, you can do without “branded” services and independently set the wheel alignment angles with sufficient accuracy.
Before adjustment, it is necessary to check the condition of the suspension elements. If they are worn out and there is play in them, adjusting the wheel alignment is useless. The best way to do this is to remove the oil filter. oil for VAZ 2107. First you need to replace the parts with serviceable ones.
Preparatory stage and scheme for adjusting front wheel alignment angles on Lada 2107
Balanced wheels, tires with optimal air pressure and a level surface are not a complete list of necessary conditions when adjusting the wheel alignment yourself will go without errors. No less important are seemingly insignificant factors:
- No excessive play in the front suspension components.
- Normal steering free play.
- Tightening level of chassis connections.
- The depreciation system is in good condition.
In order for the chassis settings to be correct, it is advisable to load the car: put 60-70 kg on each seat, and 40-50 kg in the trunk. Actually, adjustments can be made with an empty car, but it is hardly possible to call it accurate. The geometry established in the manufacturer's documentation is carried out according to the scheme: castor - camber - toe.
The steering wheel is set in the direction of the rectilinear motion vector, after which you should rock the car body on the side of each wheel to select the suspension play. Before you start installing the wheel alignment values on a VAZ 2107 car with your own hands, you need to check the fuel level in the fuel tank and, if necessary, top it up to full. Also, do not forget to remove the decorative caps on the disks.
Required tools and equipment
To independently work on setting wheel alignment angles, you should prepare:
- A set of wrenches and sliding pliers.
- Vernier calipers or measuring tape.
- Twine 3 meters long with hooks at the ends.
- Plumb line and wooden blocks 22 and 6 mm thick.
Adjusting the caster angle
Adjusting the castor always precedes setting the angles of the front wheels. The work is carried out using special templates, and it is important to consider the following points:
- The error in castor angular indicators between the left and right sides of the car should not exceed 30′.
- U-shaped washers are mounted with the groove down.
The adjustment procedure is carried out by rearranging the washers on the bolts that fix the lower arm relative to its axis (at the ends). You can increase the angle by installing a washer on the bolt located closer to the passenger compartment.
Preparing for wheel alignment adjustment
It is recommended to adjust the wheel alignment angles when the vehicle is loaded. The load must be such as to correspond to a car with 4 people in the cabin, with 50 kg of cargo in the trunk and with a full tank.
It is also necessary to check the tire pressure, which must be correct.
Self-adjustment allows you to save on service station fees. Adjusting the angles does not require too high precision, so even at specialized stations it is performed in accordance with the old technique, which does not require specialized equipment. The adjustment accuracy that can be achieved at home is quite sufficient for trouble-free operation of the car. The adjustment process is not an irreversible action and, if you have doubts about the correctness of the adjustment, you can always contact a specialized service station equipped with the latest technology.
How to set the “zero” position?
It is necessary to remove the steering wheel; to do this, unscrew the nut. Afterwards, fix it in the “zero” position we calculated (the steering wheel spokes should be positioned symmetrically). Now we will be guided by this position. In order to test yourself, you need to alternately rotate the steering wheel left/right - it should turn the same number of revolutions in both directions, so turn the wheel to the sides as far as possible, protecting them.
Next, you need to loosen the tie rod end lock nuts. One rod should be unscrewed a little, and the second should be tightened by the same number of revolutions (this is very important!). This procedure can be done once and no longer change the position of the steering wheel. And in the future - just adjust the convergence.
Checking and adjusting wheel alignment on a VAZ 2107
Camber angles are measured in the following order:
- Sit in the car and position the steering wheel so that the front wheels are straight (parallel to the axis of symmetry of the car).
- Get out of the car and “pump” the rear and front suspension several times, pressing on the rear (front) bumper with a force of 50 kg.
- Hang the thread with a weight, securing it at the top point of the wheel, and use a caliper to measure the distance from the thread to the top and bottom points of the rim.
Note: a difference of 3 mm indicates a camber angle of 0.5 degrees.
The camber angle should be 4.5 degrees when the car is fully loaded and 0.1-0.3 degrees when the car is empty.
The camber angle is adjusted by changing the distance between the axis of the lower arm and the cross member. To do this, you need to unscrew the axle mounting nuts and add (remove) adjusting washers. Standard “factory” washers change the camber angle by 8 degrees.
To check alignment, you must perform the following steps:
- Align the wheels and load the machine.
- Stretch a thread with hooks, hooking it to the front edge of the front wheel
and the rear edge of the rear wheel rim. How to install side windows on a VAZ 2106 from 07. How to adjust the camber and toe on a VAZ. The procedure for adjusting the valves of a VAZ 2106. The thread should be well tensioned and not sag.
Important: the track of the rear wheels is narrower than the front ones by 44 mm. Therefore, to properly install the toe, it is necessary to place a 22 mm thick block between the thread and the rear wheel
- Turn the steering wheel slightly, positioning the wheels so that the thread touches both sides of the tire.
- Pull the thread along the other edge of the machine, using, in addition to the 22 mm bar, a 6 mm bar.
- Check that the wheels have not changed position and the thread still touches the front wheel
on the opposite side at two points. - Loosen the clamps holding the tie rod coupling.
- Rotate the clutch using cobra pliers so that the thread touches both sides of the front wheel tire on the other side of the machine.
- Tighten the coupling clamp. If necessary, perform the same operation with the second wheel.
When adjusting the wheel alignment of the VAZ 2107, it is necessary to take into account that adding a 6 mm block between the rear wheel and the thread corresponds to an increase in the wheel alignment by 1 mm. The total toe-in of the wheels should be 2-4 millimeters on an unloaded car and 3-5 when fully loaded.
Theoretical part
First, let’s get a little grounded in theory in order to accurately understand all the actions that will be described. Let's look at the definitions:
Wheel angle
Or in other words – wheel alignment. These are design parameters that determine the current position of the wheels when the car is moving in a straight line and when cornering. Ideally, a car on a flat surface should always move in a given steering position.
If this parameter deviates, directional instability appears; the driver constantly has to pull the steering wheel to the side in order to maintain the desired direction.
Interesting! Due to driving with such wheel alignment settings, tires begin to wear out faster, suspension parts suffer, and fuel consumption increases significantly, since a moving car constantly experiences some kind of resistance.
Angle of longitudinal inclination of the axis of rotation
It is also called caster - a given angle between the axis of rotation of the wheels and the vertical level, when viewed from the side. This angle is set using adjustment washers, which are placed on the bolts securing the lower arm axle. This ensures stabilization of the wheel position when the car moves in a straight line.
Camber angle
The deviation of the plane of rotation of the wheel from the vertical line, which passes exactly through the center of the contact area of the tire with the road surface. This angle is also set by adjusting washers on both bolts of the lower arm axle.
The number of washers should always be the same, as should their thickness. This allows you to achieve the correct position of the wheels when the suspension is operating.
Wheel alignment
This is the difference in distance between the points in front and behind the inner parts of the wheel rims.
Adjustment and checking of wheel angles should be carried out in workshops where everything necessary for this is available. You can also correct a lot of things manually, not counting the caster angle of the steering axis.
Interesting! The most accurate data when setting the wheel angle can be obtained when working with a loaded car of 320 kg - this is the approximate weight of four people in the cabin, 50 kg of cargo in the luggage compartment. In this case, the fuel tank must be filled to full.
Ideally, the value of all the listed angles after undergoing maintenance should correspond to the following values (the value for an unloaded vehicle is indicated in brackets):
- Pitch angle – 4°±30′ (3°±30′);
- Wheel camber - 4°30'+20' (0°5'+20');
- Toe - 2 - 4 (3 - 5) mm.
It is these values that we will focus on when working.
How to adjust wheel alignment on a VAZ 2107 car with your own hands: key points
Adjusting the wheel position parameters is difficult to do on your own, so it is better to use the services of a good assistant. But even if you couldn’t find one, then don’t despair - by slowly acting on the points listed, you will be able to implement the setup operations in full.
Setting the Camber Angle
To adjust the camber or toe of the front wheels on a Lada with your own hands, it is enough to perform several simple operations. To measure actual values, take a plumb line and a caliper. Further actions are carried out according to the following scheme:
- Place a plumb line at the top of the tire sidewall.
- Using a caliper, measure the distance from the disk rim to the string at the lower and upper points.
- Determine the difference between the results obtained. For example, if the difference between the numbers at the lower and upper points is 3 mm, then this indicates that the camber angle is 30°.
The technology for changing the camber angle consists of installing or removing washers on two bolts, which are screwed radially into the axis of the lower arm. By adding or removing a 0.5mm thick washer, the adjustable angle will change to 7-9′
It is important to know that the castor angle remains unchanged
Setting the toe angle
The parameter represents the deviation factor of the wheel rotation vector from the gradient of rectilinear motion. In numbers, this gap is expressed as 2-4 mm with a fully loaded car and 3-5 mm with an empty one. These indicators are determined using twine with two hooks:
- Secure the steering column in a straight direction.
- Install and tighten the string, securing the hooks to the edges of the inner rim of the front and rear discs at the level of their axes.
- Place a 28mm thick piece of wood between the string and the side of the rear wheel that is closest to the front axle. In this case, there should be a gap of 2 mm at both points of the front tire at the level of the string.
If the condition is not met, you need to adjust the camber and toe angles on a VAZ 2107 car yourself by adjusting the steering linkage couplings:
- Loosen the fixing units on the traction coupling using 13mm wrenches.
- Unscrew or tighten the coupling to the required amount.
- Tighten the end ties.
Adjusting the caster angle of the steering axis
The angle is adjusted by changing the number of adjusting washers on the bolts securing the lower arm axle.
Thus, moving one washer 0.5 mm thick from the front package to the rear one increases the caster angle by 36–40′, while the “camber” of the wheel decreases by 7–9′, and vice versa.
Adjusting U-shaped washers with a thickness of 0.5 and 0.8 mm are available for sale.
These washers must be installed with the slot facing down.
You can measure the longitudinal inclination of the rotation axis using a homemade template with a plumb line.
The template has a sector marked in which, if adjusted correctly, the plumb line should be located.
We tighten the nuts on the ball joint pins so that their edges become perpendicular to the longitudinal plane of the car, and apply a template to them
You can measure the longitudinal inclination of the rotation axis using a homemade template with a plumb line.
The template has a sector marked in which, if adjusted correctly, the plumb line should be located.
What can result from poor-quality wheel alignment adjustment?
Here are several defects that may appear after incorrect wheel alignment adjustment and ways to eliminate them.
Rapid wear of tires due to incorrect wheel alignment settings
1. The position of the steering wheel when the car is moving in a straight line is deviated from the average position.
There may be several reasons for the appearance of such a defect:
- increased steering play, which was not taken into account when adjusting the toe;
- the rear axle is slightly rotated relative to the longitudinal axis of the car. This defect can be missed if the work was carried out on an optical bench, as well as in the case when the mode for measuring the angle of bridge installation is disabled on the computer bench;
- difference in pressure in the tires of the right and left wheels, which was not eliminated before adjustment;
- the presence of other hidden defects in the suspension system that were missed during inspection and testing of the vehicle’s chassis before adjustment;
- There are known cases when the average position of the steering wheel changes if the wheels on the front suspension are swapped with each other.
2. The car spontaneously deviates away from the direction of travel.
There may also be several reasons:
- the difference in the quality of manufacturing of front wheel tires, expressed in the heterogeneity of the power characteristics of their metal frame. This happens quite often. To check, you need to change the front wheels - the slip should change its direction. To eliminate it, you should change the wheels between each other, selecting a pair in which the spontaneous slip will stop;
- defects in the rear axle, the diagnosis of which was missed. The position of the rear axle should be inspected and checked;
- the presence of hidden defects in suspension systems that were not identified during their diagnostics, carried out incompletely or of poor quality;
- poorly performed adjustment or uncalibrated test bench.
3. One-sided drift of the car appeared only after the adjustment was made; before this there was no deviation, but there was characteristic uneven wear of the rubber.
The reason may be the difference in the quality of tires, which is mentioned above, leading to the car spontaneously deviating from straight-line movement. However, before this, the deviation was compensated by incorrect toe-in, the elimination of which led to the appearance of deviation. In this case, you should change the tires.
Diagnostics and regulation
To identify discrepancies in the VAZ's wheel alignment, you will need to have a special ruler on hand, and it is better to drive the car into a pit. We check the location of the steering wheel - it must strictly correspond to the straight-line movement of the car. It also doesn’t hurt to check the tire pressure and equalize it. After these simple steps, you can begin to diagnose and change the VAZ wheel alignment yourself.
To determine this indicator, it is necessary to compare the distance between the rims of the front and rear wheels. We put a mark on the inside of each wheel; regular chalk is good for this. Then we take a ruler and create tension in it. You also need to organize a tensioning mechanism with a chain that will touch the ground. In this position, it is necessary to place the ruler so that both ends rest against the marks on the wheels. Lightly shake the ruler and align the zero value with the pointer. Remember that the scale must be fixed.
After these manipulations, you need to set the car in motion and drive forward a little. The ruler should move after the wheels so that the suspension and body are not affected. Time to take measurements and draw conclusions about the necessary alignment. The arrow will point to a value by which the alignment condition can be judged.
You can influence the toe-in performance by rotating the connecting couplings, which are located on the side steering rods. At the end of the work, be sure to tighten the locknuts.
Alignment problems are a little more difficult to diagnose and fix. To diagnose existing discrepancies, the car must be raised so that the wheels are in the air. On the side of each wheel we determine the places of equal runout. To do this, you will need to organize a hand rest and stock up on chalk. We fix the hand and put marks on those areas that protrude in diameter. After this, we turn the wheel so that the mark is located vertically.
We prepare a rectangular stand or a suspension with a load. We note the difference that results between the suspension (stand) and the top point of the rim. It is this value that will reflect the collapse. Regulation must be carried out if the difference exceeds half a centimeter. Spacers or shims are suitable for these purposes, they strengthen the gap between the lever axle and the cross member. Spacers allow for more precise adjustment, since when using one washer, the camber changes immediately by 8 degrees.
The distance between the front pair of wheels and the rear one should be the same. If the rear wheels are closer than the front wheels, then the tie rods should be shortened. Otherwise, they need to be lengthened.
The VAZ wheel alignment must be adjusted after any repair work related to the chassis. As a preventative measure, such adjustments should be made once every six months.
VAZ 2107 do-it-yourself camber adjustment
Dear visitors of the Avtobahn website! We will be very grateful for your comments on the video clip “VAZ 2107 do-it-yourself wheel alignment”; registration is not required for this. We also ask you to let us know if you have any problems playing the video.
50 minutes is not 2 mm
and you read the specification about each car on the stand, which was sent by the manufacturer
buddy this is so long
Soul channel subscription Good luck to you
Dear super master kolegaKoneshno LIKE… no k sojelenyu u mersedesov po moyemu opatu Rul perestovlyat ne poluchayetsaSpasibo za videoZa kirilicu sorry.
Hello Nikolay, thank you very much, your video really helped me save nerves and money. Very simple and accessible. I made myself such a ruler, and I’m going to use it only this way. It’s a long way to get to the service station and it’s not always free there, but waiting…..it’s worse than catching up. Thanks again
There is no need to fill people's heads with all sorts of nonsense. Firstly, if the steering wheel has never been removed after the factory installation, there is no point in touching it. And the horizontal position of its spokes is determined by adjusting the toe. Second. In almost all domestic cars, the front track is wider than the rear, and this must be taken into account when adjusting. Third. No huge rulers are needed when adjusting toe; one thread and a small ruler are enough. You just need to know the adjustment algorithm. The thread performs the same function as a beam of light on stationary stands for adjusting camber and toe. It’s a pity that I can’t post the video, because I’m seriously ill and practically bedridden.
The person correctly says: ADJUSTMENT MUST BE STARTED WITH THE CORRECT INSTALLATION OF THE STEERING STEERING.
Why in the repair book, in particular, am I talking about the ZAZ 968 Fuchaji repair book, they write that you need to tighten the rear wheels with a force of 10 kgf? How will this affect the regulation? Will there be one difference with a screed, and another without a screed?
tighten one rod or two?
Is it really possible to accurately detect a difference of 2mm...?
Simple and clear. If only there were more people like this on earth. I wish you health and a good life.
They said a lot of interesting things, but from your words - we align one side with the rack at zeros, and the wheel on the other side is toe-in +2 mm?
Hello Nikolay, I'm going to make the same ruler. You can give the dimensions of the ruler, otherwise I don’t really want to make things at random. If, of course, it’s not difficult for you and you have time. Can be sent by email. address
Thanks to the author, thanks to the videographer Everything is clear
Dear, you are misleading people, to find out the difference you need to roll the car and measure between the same points, but from the rear of the axle without rolling, it’s all crap
what kind of -50 minutes are we talking about negative toe-in on front-wheel drive maximum 0.6 minutes golf ideally camber -30 toe-in +8 min
What you say is not entirely correct: on any car, both front-wheel drive and rear-wheel drive, the toe-in of the wheels should be positive or zero, but in no case negative. The purpose of the toe-in is to compensate for the angle of the wheel when moving, that is, when the car moves forward, play is selected in silent blocks and the wheel turns back. Therefore, positive toe compensates for this inversion and it does not matter what drive the car is equipped with. Read the specifications in the repair manuals for any front-wheel drive vehicle. And so, everything is to the point - I’ve been setting angles with a similar device for more than 10 years.
Multiple ways to set corners
In general, it is not recommended to change the factory settings on a car, but you need to set the wheels to a certain position, and there are several options.
- In the first case, if the castor is negative, then the car becomes too sensitive. And in this case, the car will seem to float and not hold its position when turning.
- In the second case, the castor is positive, but the camber angle is at zero, and the steering wheel will be too heavy. But the car becomes more obedient on the road.
- In the third case, they make it sporty, that is, they set it to both minus and plus, and the steering wheel will remain the same, but the handling will improve.
How and what to measure
Caster angle cannot be measured. Decreasing it leads to the inability to take a turn at speed, and increasing it leads to a “heavier” steering wheel. Usually 2-3 degrees is considered a “sporty” option. This is what we need to build on.
To measure toe and camber angles, it is enough to place a thread and a weight. Zero camber corresponds to the fact that the values of A and B are equal (Fig. 52).
Measuring with a thread
“Zero toe” is also easy to check: measure distance B (Fig. 51), knowing that the track of the front and rear wheels differs by 30 mm. The rear wheel is “recessed” inward compared to the front.
To accurately measure the toe angle, you will need equipment: a sliding ruler or a chain with a dynamometer. Only one thing is used.
Measuring the toe angle
The “measuring device” itself is brought in front and behind, then the obtained values are compared. For zero degrees, the two digits should not be different.
The car must be placed on a surface whose inclination angle is zero! In practice, to take measurements, plates are placed under the wheels. The steering wheel must be turned to the “0 degrees” position - this is also important.