Symptoms of a problem
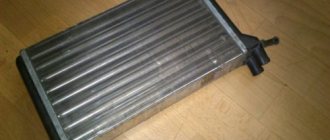
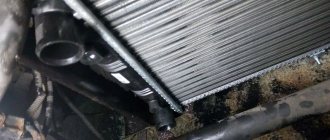
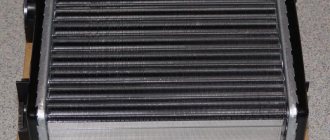
The Lada 2170 model received a liquid heater, which is connected to the engine cooling system. The radiator is a heat exchange device; due to this component, the air entering the Priora’s cabin is heated. Coolant constantly circulates through the radiator; this part of the heater is subject to wear.
It is worth checking the radiator in the following cases:
- The stove stopped heating properly.
- The coolant level drops.
Once you disassemble part of the heater system, you will see a rusty and most likely leaking radiator. There may also be leaks in hoses, pipes and the junctions of these elements. You should check the heat exchanger of the stove only after you have made sure that there are no defects in the operation of the gearmotor and damper.
How to remove a generator on a Priora: step-by-step instructions
You need to remove it as follows:
- first you need to disconnect the battery from the negative terminal;
- Next you need to remove the generator drive belt;
- then disconnect the block with the wire from the “D+” generator.
- then remove the rubber boot by unscrewing the fastening nut;
- Now you need to disconnect the wires from the contact pin;
- Next, you need to remove the nut of the bolt from the lower fastening of the device;
- then the nut and sleeve are removed;
- then you need to pull out the bolt of the lower fastening of the device;
- then remove the tension bar by completely unscrewing the bolt;
- after this you can safely remove the generator (it is important to check its condition).
Installation of the device is carried out in reverse order. There are times when it is necessary to remove the pulley from the generator. To do this, you need to remove the generator drive belt, loosen the radiator mounting bolts, then unscrew the adjusting bolt, and then remove all the mounting nuts. It is advisable to perform this procedure with two people so that one holds the generator and the other removes the mounting bolt. Only then can you begin to remove the pulley.
It is also advisable to do this work with a partner, since the pulley is quite difficult to remove.
Causes of heater failure
There can be a huge number of reasons, but there are several main ones. These include leaks and clogged heater radiators. Let's take a closer look at each.
The radiator is clogged on the outside
When the radiator honeycomb becomes clogged with various debris, its throughput is significantly reduced and it cannot give off heat in the amount necessary for effective heating of the interior.
This happens due to prolonged use of the cabin filter or even neglect of its use.
The radiator is clogged inside
With such a problem, which arises as a result of using low-quality antifreeze or using it for a long time without replacing it, the inside of the radiator becomes clogged. It is for this reason that the coolant does not circulate effectively or does not circulate through the heater radiator at all, which leads to insufficient heating of the heater, thereby complicating the heating of the interior.
Radiator leak
Radiator leaks occur due to many different reasons.
These include:
- Aging;
- Poor quality coolant;
- Corrosion, etc.;
This problem is fraught with the fact that when the radiator leaks profusely, a large amount of coolant is lost, which can lead to engine overheating and, as a result, expensive repairs of the internal combustion engine.
All of the above described causes of radiator malfunction can be eliminated by replacing or flushing it.
Why change pistons?
The car owner has three reasons to start such a global operation:
- Faulty pistons.
- Reasonable replacement.
- Engine tuning.
Let us briefly analyze these reasons.
Piston failure
Usually this is simple wear of rubbing parts or mechanical damage. For example, if the timing belt breaks. Often in this case, the pistons are destroyed, falling into debris in the Prioreza engine. This naturally leads to replacement.
Prudent replacement
Often, a zealous Priora owner, aware of this unpleasant feature of the VAZ 2170 engine and its modifications, replaces the pistons in advance.
Engine tuning
This is primarily an option for young people, although not everyone is 100% willing to own a sports car. And “Prioresha” is at hand. And here the tuning begins. There are many different techniques for increasing engine power, and one of the mandatory ones is installing pistons of different configurations.
Radiator replacement
To work, you will need a standard set of tools, which includes socket wrenches 10 and 13, side cutters, a Phillips screwdriver, and a wrench 8. In both cases, you will have to disconnect the heating system hoses; the remaining coolant will pour out of them, so immediately place containers under the pipes heater Then the liquid can be returned to the system.
With air conditioning
- First of all, we need to remove the rubber seal of the windshield to gain access to the parts; Remove the windshield trim to gain access to the heater system parts
- Let's move on to soundproofing the engine shield. We need to dismantle its middle part, having previously removed the hoses from the mounts. The sound insulation is secured at the bottom with 3 screws, 2 nuts and a washer, and at the top with 3 self-tapping screws. It is recommended to use a tool extension as some fasteners may be difficult to reach; Removing the fastenings
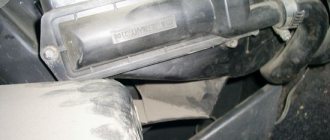
- After dismantling the protection, you will see a foam seal that covers the heater radiator; Remove the trim and move on to soundproofing the engine
- To remove the cover, we need to unscrew 3 screws - 1 you will find in the middle, and 2 others - along the edges; Unscrew the fasteners and gain access to the radiator
- We reached the pipes. To remove them, we need to loosen the clamps and lift the pipes up. Be careful not to tilt the hoses down;
- Pull the heater core towards you until it comes out of the fastenings.
As you can see, dismantling the radiator in a Priora with air conditioning does not require draining the antifreeze. Coolant will only come out of the expansion tank and the heat exchanger itself. Removing the radiator in a VAZ 2170 with Panasonic air conditioning follows the same scheme, only a few fasteners may differ. Now you can replace your worn-out heater with a new one!
Without air conditioning
- Work begins by disconnecting the negative terminal of the battery. We remove the windshield trim along with the windshield wiper arms, as these elements will interfere with operation;
- The next step is to remove the coolant supply pipes to the engine injectors;
- The windshield trim is held in place by seven screws. Unscrew it to completely remove the element;
- Now we move on to the hood seal, in its center you will find a tightening screw - unscrew it;
- The engine noise insulation closes the passage to the heater system - pry up the plugs with a flat screwdriver and unscrew the plugs;
- We unscrew the screws and dismantle the sound insulation. Remove both covers; We remove both parts and go to the interior to dismantle the radiator
- Let's move on to the radiator pipes. We loosen the clamps and dismantle them, having prepared a container for antifreeze in advance. Plug the pipes so as not to drain all the antifreeze;
- You need to remove all the wiring that goes to the stove;
- Next, remove the wire holder and take it to the side, now we go to the Priora’s interior;
- Armed with a 13mm wrench, unscrew the bracket fastenings along with the brake pedal. We move the details to the side;
- We unscrew 3 screws and gain access to the radiator;
- Replacement is carried out in reverse order.
Clean the heat exchanger and inspect it for damage. If cracks are found on the plastic elements, then you will no longer be able to repair the part - only replacing the stove radiator on a Priora, which is done in the reverse order, will help here.
How to remove a generator on a Lada without air conditioning
If you do not have additional equipment installed, replacing the Priora 16 valve generator will be a little easier, since there will be more space under the hood.
- Remove the negative terminal from the battery.
- Remove the protection from the engine.
- Unscrew the nut on the belt tensioner (not completely, a maximum of four turns). Now you can turn it around by turning the screw a little. When it is loose enough, you can remove it.
- Remove the protective cap to later remove the terminal from the wiring harness. Now you can remove the wiring block.
- Remove the nut to remove the top mounting bolt, then do the same with the bottom mounting bolt.
- Remove the belt and then the entire generator.
Since in advanced configurations with air conditioning the belt on the generator is longer, then if it is necessary to replace it, you need to remember some subtleties. Especially if you feel that the quality of grip on the rollers has become much worse, then you will have to re-tension or change them. The first thing that indicates a problem is a whistle, a clear decrease in the battery charge level, even if it should be fully charged. New batteries can be ordered here: https://www.rimir.by/products/car/akkumulyatory-95/. In this case, first of all, you should look at the belt to see if it is elastic, if there are any third-party cracks on it.
Replacing the Priora 16 valve alternator belt should be done after 60 thousand kilometers, or once every two years.
How to replace a stove radiator yourself without an air conditioner
What will be needed for replacement? First of all, the following tools:
- Screwdrivers, figured and flat.
- Wrenches for 8 and 10. (preferably heads with a wrench.)
- Thin pliers for removing clamps.
And, of course, some materials and devices:
- Container for coolant from the system.
- New radiator.
- Foam rubber adhesive strips for the radiator of the Priora stove.
- 2 liters of coolant. (same brand as in the system.)
- Rags.
Having prepared such an arsenal, you can begin this interesting operation of replacing the heat exchanger.
Process description
Place the car level. This is necessary to completely drain the coolant from the radiator of the Priora stove. Place a container for liquid under the bottom of the car. It must be installed in the area of the radiator drain hole of the cooling system. On the right side (along the direction of the car, or on the left, if you stand near the hood). Next you need:
- Unscrew the screw cap and allow the liquid to drain. When the pressure weakens, open the cap of the expansion tank. Wait for the drain to drain and tighten the plug. Disconnect the negative battery terminal. You can begin dismantling the protection. It's called frill.
- First, the windshield wipers are removed. Using a 13mm wrench, unscrew the fastening nuts and remove the brush holders. After this, remove the rubber seal.
- Unscrew the fastening screws. There are 6 of them on top and 7 along the bottom edge. Now remove both halves of the plastic frill. After unscrewing the fasteners, remove the fabric protection of the glass niche in which the stove is installed.
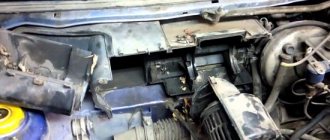
Now comes the most crucial moment. Most craftsmen, when replacing this part, immediately disconnect the pipes going to the radiator of the Priora stove. However, there is a risk of dousing the heater parts with coolant. There is a more interesting and safer option.
Removing the stove
Now that the frill and protection have been removed, access to the heater is completely open. First of all, you need to disconnect the electrical connectors:
- Micromotor gearbox for damper drive. 2 connectors.
- Electric fan. 1 connector.
- Resistor. 1 connector.
Now unscrew the fastening of the heater body to the car body.
One 10mm nut secures the eye on the stove body to the right wing. 8 secures the top to the stud at the top. And two nuts at the bottom. Once the fasteners are removed, the fun begins. Using a flat screwdriver, remove the 3 screws securing the radiator to the body. You need to act carefully so as not to break off the side, thin pressure relief pipe. After that, remove the screws holding the 2 parts of the heater housing. Move the left part with the fan motor a little to the left, disconnecting them, and pull it out.
After this, you can begin to remove the second half with the radiator. Hold the pipes with your hand and begin to remove the body to the left. When it comes off, set it aside. After releasing the clamps from the pipes, remove them from the radiator.
Installation (replacement) of a new radiator
There are two options here. You can simply replace it by putting the part in place of the old one, before installing the housing. But it is better to install the radiator in the removed half before attaching the pipes.
Having decorated the heat exchanger of the stove with foam, install it in the niche of the housing and secure it with screws. Place the half in place and secure all 3 pipes in place. Tighten the clamps.
Carefully reassemble the heater in reverse order. Add coolant to normal level. Start the engine and wait for the cooling fan to operate. Press the accelerator pedal and hold the speed at about 2,000 rpm for a couple of minutes. This is necessary to eliminate a possible air lock. Turn on the heater and check its operation in all modes. All! Well, the necessary work has been done.
Video on the topic of replacing the heater radiator on a Priora without air conditioning.
How to change the brushes of a Priora generator without removing
Often, replacing generator brushes on a Lada Priora is done with your own hands. First of all, this is due to savings. Many car services charge a significant fee for this procedure. With the average cost of replacing this part on other VAZ models being 400-500 rubles, for Lada Priora they will charge 2500-3000 rubles for such a service. This is explained by the fact that the generator needs to be removed, and sometimes other parts in the engine compartment will have to be unscrewed. So it turns out that replacing generator brushes on a Priora at a service station costs as much as half a new generator , which is not very cost-effective.
The process of replacing brushes without removing the generator
So, if you decide to replace the brushes with the regulator yourself, then the algorithm of actions is as follows:
- Disconnect the battery.
- Remove the power wire from the generator.
- Disconnect the control lamp input.
- Remove the plastic cover of the generator by unlatching the three latches.
- Unscrew the two fastenings of the voltage regulator with brushes.
- We change the node.
- Putting everything back together.
- Optionally, you can check the battery charging voltage and compare it with the values shown by the on-board system.
The basic algorithm described above is ideal when you need to replace the brushes of a Priora generator without air conditioning . Because in such cars there is enough space between the engine and the radiator, where the generator is installed. In this case, it will be convenient for you to stick your hand in and get to the generator while performing all the operations. Below you will find tips on replacing brushes in a car with air conditioning if this algorithm fails.
By the way, when dismantling the regulator, you can finally be convinced of the need to replace it. Firstly, this is indicated by uneven wear or sticking of the brushes. And secondly, if their length is less than or close to 5 millimeters, then they definitely need to be changed.
Often during the replacement process, the question arises “how to remove the cover of the Priora generator,” because in limited space it is not always convenient to open all three latches, doing this so that they do not snap back. For many car owners, these mounts end up breaking. Therefore, be careful not to use too much force to remove the cover.
Replacing the brushes of a Priora generator with air conditioning without removal (also in the Lux configuration and engines with 16 valves)
Video on replacing Priora generator brushes
The replacement process is no different for vehicles with air conditioning. But on such cars there is little free space left in the engine compartment - as a result, some car owners are unable to stick their hand between the engine and the radiator. This problem is also relevant for owners of 16-valve engines. In this case, try disconnecting the air filter housing, moving it to the side or removing it, and thus provide yourself with room to maneuver.
Replacing the engine cooling radiator on a Lada Priora
Normal operation of a car heater provides the driver and passengers with a comfortable ride in the cold season. But sometimes the car’s heating fails, for example, the heater radiator may leak, and the freezing driver takes longer to react to sudden changes in road conditions.
Using the Lada Priora as an example, we will consider a way to independently solve this problem. Such repairs can be done in the garage yourself, although at first it may scare away less experienced car enthusiasts.
Difficulty of choice
If it has become noticeably cold inside the car, it is worth checking the car's heating system. Most likely, the problem will be detected in the heater radiator and you will soon have to buy a new one.
The Internet is full of advertisements for the sale of heater radiators for Lada Priora, but how to choose a quality product and not “run into” a fake?
The first thing that should indicate the originality of a part is its price. High-quality spare parts cannot be cheap; manufacturers of original radiators will not allow this.
Second. The original radiator of the car heating system has small cells, i.e. the distance between the vertical slats is minimal, only factory equipment can provide this. Factory equipment “works” only with high-quality metal; the honeycombs should not be too soft.
Manufacturers of counterfeit products save on small things; they do not install “liquid swirlers” in counterfeit radiators, plastic parts that increase the heat transfer of the coolant in the radiator of the heating system. To check their presence, you should shake the part; a specific sound will indicate their presence or absence. If they are made of soft material, this method is useless.
Once the radiator has been selected, it is time to change it. Replacing an old one or installing a new radiator in a Priora requires certain actions.
Replacing a heater radiator in a Priora without air conditioning
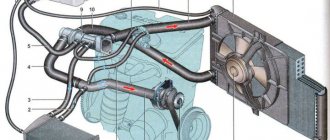
The layout of the Priora heating system is traditional for domestic cars, its main components are:
- radiator (heat exchanger) of the heater, in which the liquid is heated;
- fan - it disperses air heated from the radiator throughout the cabin;
- regulators - with their help, the intensity of the fan operation is changed and the flow of warm air is regulated by zones.
Before the main work, turn off the power to the car, i.e., remove the negative terminal from the battery.
After turning off the power to the car, you can begin to remove the windshield trim. If you are too lazy to dismantle the wiper arms before doing this, certain difficulties will arise in the future. Next, disconnect the tubes (plastic) for supplying washer fluid to the injectors. Now the decorative trim of the windshield can be easily removed, just unscrew the 7 screws that hold it in place. Although this may still be prevented by the hood seal.
Then the next step is to remove the hood seal. At the front, the two sides of the seal are connected together and secured with a screw; it must be unscrewed. Using a flat tool (screwdriver or knife), remove the plugs and unscrew the screws. We remove the seal that may interfere with the removal of the decorative trim, after which it should come off easily.
Everything worked out - we move on and remove the sound insulation of the engine compartment. We unscrew the screws securing it, remove the covers one by one (the order does not matter). Before releasing the clamps that hold the pipes, place a container to drain the coolant; this will save you some money.
The wiring can be removed using keys 8 and 10. Unscrew the 4 nuts and put the harness aside. Using a 13 key, remove the bracket from the brake pedal and move it to the side - the road to the radiator is open. Use a Phillips screwdriver to unscrew the 3 screws and remove the radiator.
Install the heat exchanger, following the completed cycle, but starting from the end. It’s up to you to decide which Lada Priora heater radiator to install, repaired or new.
Alternative option
There is an alternative option to remove the heater radiator; some prefer it. The vacuum booster (brake) is removed, along with the brake pedal. This will allow you to get to the heater (its left side) and to the heater radiator on the Priora.
Replacing the cooling radiator Priora with air conditioning
After a certain period of time after the release of the Lada Priora, the manufacturer began to equip them with climate control units (air conditioners) Panasonic and HALLA. The new heater has become structurally different from the old one, and getting to it has become much easier. To replace the radiator, you no longer need to remove the frill (windshield trim), VUK, wiper holders or heater.
Non-stick pistons for Priora: features, types and replacement rules
The problem of timing belt breakage and valve damage is familiar to many owners of the new Priora with a lightweight connecting rod and piston mechanism.
The problem can be avoided by timely diagnosing the condition of the belt and replacing it if necessary. But even responsible owners of domestic transport note that problematic situations, even with a thorough study of internal systems, do not completely disappear.
Therefore, the right solution would be plugless pistons for the Priora, the installation of which can be done in the salon or by the motorist himself.
High-quality plug-in pistons for Priora: product features and advice from owners
The main advantage of the spare parts is the presence of deep recesses for the valves, which in the event of a timing belt break do not allow engine elements to fail. Thus, possible breakdown and the need for repairs are completely prevented.
High-quality Priora plug-inless pistons help not only to avoid problems with the car, but also to spend a large amount of money on subsequent restoration. The valve problem will be solved forever.
Among the most popular products, motorists note Kostroma pistons for Priora, which are plugless and have an affordable price. With them you can secure your car quickly and inexpensively. Therefore, most Lada owners with an 8-valve engine liked the purchase for its practicality. The installed elements do not affect changes in the operation of the unit in any way.
Less popular are plugless pistons on the Priora STK, which are more expensive. True, the current owners have no complaints about wear resistance or any other qualities of the products. This manufacturer is also recommended by many auto repair shops. Therefore, when choosing, it is important to take into account the opinions of both specialists and experienced drivers.
Priora stove diagram
Before changing the stove on a Priora, buy new heater elements using the catalog numbers:
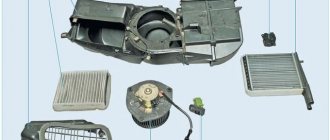
Priora heater 2111-8101012: 1 — heater inlet/outlet hoses 2170-8101200/208; 2 — additional resistor 2123-8118022; 3 — electric fan 2111-8118020; 4 — heater 2111-8101012; 5 — nut 1/07259/11; 6 - screw 1/51873/01
Priora heater parts: 1 - screw 1/76691/01; 2 — heater radiator 2110-8101060; 3 — left heater casing 2111-8101025; 4 — heater control damper 2110-8101538; 5 — right heater casing 2111-8101024; 6 — air duct housing 2111-8119124 intermediate; 7 — screw 1/76692/01; 8 — lower air intake housing 2111-8119026; 9 — bracket 2108-8101110; 10 — bracket 2111-8119102 right; 11 — screw 2114-5325388; 12 — air filter 2111-8122020; 13 — upper air intake housing 2111-8119025; 14 — filter cover 2111-8119116; 15 — screw 1/76702/01; 16 — screw 1/76691/01; 17 — additional resistor 2123-8118022; 18 — screw 2123-6302332; 19 — screw 2114-5325388; 20 — air supply pipe 2123-8118096; 21 — electric fan 2111-8118020 of the heater; 22 — bracket 2108-8101110; 23 — gear motor 2110-8127200 for the heater damper; 24 - screw 1/76691/01
By the way, do you know that the Lada Priora is also equipped with air conditioners (HALLA and Panasonic), so the process of replacing the Priora heater may be slightly different. For example, in order to replace the heater radiator on a Priora with HALLA air conditioning, it is not at all necessary to dismantle the heater assembly.
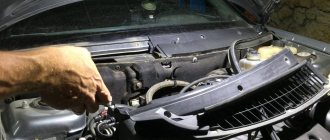
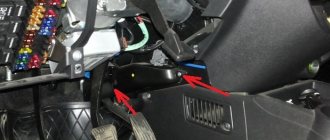
Removing a generator with air conditioning
Let's start with the fact that if the air conditioner is Panasonic, then you do not need to remove the compressor along with the generator, but if it is Halla, then you cannot do without removing the compressor. The procedure for removing the generator in this case consists of the following steps:
- First, the engine protection (8 or 16 valves) is removed.
- Next, remove the compressor drive belt (if necessary).
- After this, the generator contacts are disconnected.
- Next, the engine compartment mount is unscrewed, after which the bolt is pulled out.
- Then, if the compressor is removed, then it must be moved down and then to the right.
- Then the bolt with the metal sleeve is pulled out.
- Only then can you remove the generator down the engine compartment.
It should be noted that during this procedure, a problem with the engine bolt often arises. It happens that it is installed with the head down, which is why it is not possible to remove it completely. The fact is that it rests against the engine mount, which prevents removal of the generator. In this case, you need to jack up the engine and carefully remove the cushion. If this cannot be done, then it is advisable to replace the bolt with a new one. It must be positioned with the head facing outwards, then there will be no problems with removing the generator.
To summarize, we note that removing the generator is a long and serious procedure. In order to do everything correctly, you need to have skills and knowledge. If you doubt your abilities, it is better to contact the craftsmen who will quickly and efficiently remove the generator cover with or without steering wheel, replace these parts, and also completely put in order any car, whether it is a luxury class or not. If you have certain knowledge, you can safely carry out this work, following the instructions. Moreover, this page is accompanied by a video that will help you remove the generator on your Priora yourself.
Source
How to replace a Lada Priora radiator heater without air conditioning
First of all, let's look at the main elements of the VAZ-2170 heating system. They are, in particular:
- heater radiator (heat exchanger) – this is where the coolant is heated;
- fan - with its help warm air is supplied to the car interior;
- regulators – heating intensity and heat distribution zones.
The scheme is, in principle, traditional, and there are no particularly complex technical delights here. If you notice that warm air is not flowing into the cabin while the heater is on, you should inspect the entire system. If a radiator leak is detected, the latter will have to be removed either in order to be soldered, or to be replaced with a new one. Let's look at how this procedure can be done with your own hands on a Priora without air conditioning.
The first thing that is recommended to do before starting the main work is to remove the negative terminal from the battery.
Do not neglect this advice, because it is, firstly, about your safety, and secondly, it is additional insurance against a number of different unpleasant surprises with wiring and electrical equipment.
After the car is de-energized, you can remove the windshield trim.
It will also be necessary to dismantle the wiper arms, since they will create additional inconvenience during operation. Together with them, we also disconnect the plastic tubes through which liquid from the windshield washer reservoir is supplied to the nozzles. Now you can proceed to removing the decorative trim of the windshield. This is not difficult to do - it is attached using 7 self-tapping screws, respectively, they should be unscrewed. First you will need to remove the hood seal. Please note that in the middle of the pad there is a screw with which the halves are pulled together. After this, use a screwdriver or knife to carefully pry up the plugs covering the screws and unscrew them. That's it - the cover can be removed.
If everything went well, then you can move on. At this stage, you should remove the sound insulation from the engine compartment. To do this, unscrew the screws with which it is actually attached, and then remove the lining, left and right (the order does not matter). After this, you can move on to the pipes leading directly to the radiator. In order to remove them, you will first need to loosen the retaining clamps. Place a container to drain the coolant first.
Now you can remove all the wires that lead to the heater from the connectors. Having disconnected them, take two keys - 10 and 8 - and unscrew the 4 nuts. The wiring harness should be moved to the side so that it does not interfere, after first removing the holder. After this, we move into the car interior and take a socket wrench size 13. With its help, remove the bracket from the brake pedal, and
move it to the side. That's all - you have free access to the heater radiator. In order to remove it, you need to unscrew 3 screws using a Phillips screwdriver, after which the unit can be easily removed. All work on installing the radiator is carried out in reverse order.
As you can see, there is really nothing particularly difficult here. In order to remove the heater radiator on a Priora without air conditioning yourself, you will need some time (it all depends on your skills) and a minimum set of tools. On the other hand, you save money because you do all the work yourself, rather than turning to specialists at a car service center. Even if you have never encountered this before, figuring out how to remove the Priora radiator will not be difficult. The eyes, as you know, are afraid, while the hands do. It’s probably worth listening to folk wisdom.
How to convert a Priora engine to plugless pistons. Video
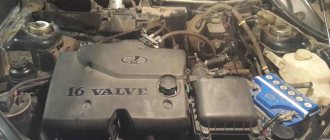
Today we will look at a Priora equipped with a peak design engine 21126 (photo 1), which means that if the timing belt breaks, the pistons collide with valves and other elements, and this, in turn, leads to undesirable consequences.
Of course, many drivers are not satisfied with this, and besides, the factory timing life of 200 thousand is practically not achieved in reality. In confirmation of this, there are known cases when a belt break occurs during mileage starting from 30 thousand km.
, without any apparent reason for this.
Thus, when the timing belt breaks, the owner gets a new opportunity to invest his financial resources in expensive repairs, which include: replacing valves, removing the head and much more. Therefore, Prior owners, whose vehicles are equipped with 16th and 26th engines, are ready to undergo some engine processing in order to obtain plug-inless power devices.
Options for converting Priora engine pistons
This can be done in three ways:
- the first involves replacing the standard ShPG (connecting rod and piston group) of the Priora with a ShPG from the 124th engine (to put it simply, this is a 12 engine with a volume of 1.6 with a tenth connecting rod and a 124 piston). At the same time, it must be taken into account that the power device, at the same time, consumes more fuel, and the bottom, due to the increasing mass, begins to produce more vibration than that of the Priora. In general, it must be said that this method has more disadvantages than advantages. The main advantage is that the motor is plug-free;
- the second option is less budgetary, since it involves replacing the pistons with forgings with large counterbores. A set of such pistons will cost about 6,000 rubles;
- the third option is to replace the piston Priora with an Avtramat (Kharkov). The cost of the kit is approximately 2000 rubles. This, one might say, is a copy of Priora pistons. They are installed on the original connecting rod, have their own piston rings and valve connections. These devices also have a displacer, with which manufacturers have tried to compensate for the decrease in compression levels.
Getting to know ShPG Priora
Let us now take a closer look at the standard Priora SPG. In our case, it was removed from a car that had traveled a little more than 50 thousand km.
The liner is somewhat worn at the edges, which is, however, normal for a Priora, because, as you know, the connecting rod is not centered on the crankshaft, but on the piston, which moves freely in the cylinder.
Also in the photo below you can see scuffs on the “skirts”, which also arise from the wear of this car part.
Let us now move on specifically to the replacement process. To do this, we will use the third option proposed. We will replace the standard ShPG Priora with Kharkov Avtramat pistons.
To begin with, we note that they have a wider “skirt” than the factory ones, which raises the assumption of an increase in service life and a more tightly fixed piston in the pot, since the factory T-shaped piston, after some time during which it wears out, begins to hang out in the cylinder .
To get acquainted, let’s take a closer look at the videos themselves.
Above is a tension roller, semi-automatic, made in China. Below is a stunning video. If you take into account the mileage of the car, you can see that the condition of the rollers is, to put it mildly, average, since there is a slight leak, and the lubricant has already begun to dry out a little.
Let's take a closer look at the tension roller of the generator belt, which, at the same time, on the Priora serves as a drive belt for the power steering. It is clear that its condition is poor (in practice, this can be understood by the dried grease, as well as the roller itself, which rustles). If necessary, it can be filled with lubricant and it can still serve for some time.
How to replace Priora pistons
Let's move on directly to the process of replacing pistons. In the photo we see that one of the Kharkov pistons has already been installed.
Pistons from the Ukrainian company are not sold randomly, as owners would sometimes like, so in this particular case we will take devices from group C. On the second and third cylinders, upon closer inspection, you can see vertical scuffs.
In approximately the same places, there are also raised spots on the piston “skirt”, which may be a consequence of racing on a cold engine.
In the photo you can see the factory piston cooling nozzles, which are placed at an angle and hit the rear of the piston. As you can see, the condition of the crankshaft connecting rod journals is quite good for its mileage. We also note that the piston rings remained factory and only one piston and cylinder head gasket (cylinder head) were replaced.
If you are wondering whether the exhaust manifold gasket requires replacement, then the answer is no. It is metal and its service life is long. It is also necessary to note the higher cleanliness of the factory milling of the block and head (compared to the first factory copies), suitable for the metal gasket.
As for this particular head, with a mileage of a little over 50 thousand km, then, as can be seen in the photo, it is in good condition. When the Priora pistons are replaced with Avtramat analogues with deepened counterbores, the plane will need to be cleaned and put in its place.
It should be noted that Avtramat pistons come without pins and without special retaining rings, so only factory components will be installed. As you can see from the photo, there is no wear on the fingers, so there is no need to install new fingers.
How the connecting rod and piston are placed relative to the crankshaft and block
There is a special bump placed on the connecting rod, which should look at the timing pulley. That is, the connecting rod and piston are placed in the block in such a way that the timing drive is located on the left, where the hand is located in the photo.
But this is not the only way you can navigate the connecting rod. You should also pay attention to the lock of the earbuds. This lock should be in front and facing you.
With this device you can check yourself, because it often happens that the markings on VAZ connecting rods are mixed up.
To do this, you need to focus on the locks of the liners, which must be located in front.
- As for the piston itself, if you take the “Automatic”, they have a special sign in the form of a piston.
At the top of the piston, the direction is shown by an arrow, but you can also navigate by the notches: the inlet notches are larger in size. Thus, using all these tips, you will put the piston on correctly, according to the marks on the connecting rod.
- If you look at the factory pistons, there are no markings on them.
- You can only navigate by the arrow drawn on the piston.
She points to the timing drive. You can also additionally navigate by the intake counterbores, which in factory pistons are larger in size than the exhaust ones, as in the Avtramatov ones.
After the block is ready, you will receive a plug-in Priora. Even if the timing belt breaks, the valves will not be damaged. The owner can, if necessary, simply change the belt or roller and continue on his way. In this case, there will be no need to carry out expensive cylinder head repairs.
The presented replacement option has several advantages:
- relative efficiency;
- the possibility of preserving the original Priora long connecting rod, which will provide high engine power as well as high torque.
- Low fuel consumption will be maintained.
This is what an assembled engine looks like with Avtramat pistons with enlarged valve counterbores, filled with oil and antifreeze. Please note that the engine must undergo the so-called initial run-in at idle speed (approximately 1 hour). After this, the car can be used as usual.
Replacing the radiator of a heating unit in a Priora that is not equipped with air conditioning
Replacing the heater radiator on a Priora without air conditioning may make sense if warm air has stopped flowing into the cabin, while the heater itself is working. If, in addition to the above problem, there is also a water leak from under the Priora stove, the motorist will have to remove the poorly functioning unit in order to solder the latter. Sometimes repairs are impractical and you have to replace the old device with a new one.
So, first of all, you need to start by removing the negative terminal from the battery. The fact is that the issue here is not only about the safety of the master himself, but also about additional insurance, which allows him to avoid several unpleasant surprises that, if handled carelessly, can arise not only with wiring, but also with electrical equipment.
If you are replacing the heater radiator on a Priora without air conditioning, after de-energizing the system, you can begin to dismantle the windshield trim. At the same time, the wiper levers, which can cause future discomfort during operation, should also be removed. After this, you should rid the unit of all plastic tubes through which the liquid located in the windshield washer reservoir goes directly to the nozzles. Only after all the above steps have been completed will it be possible to remove the decorative trim located along the edges of the windshield. In fact, it’s easy to carry out such a manipulation - just get rid of seven self-tapping screws.
Replacing the heater radiator on a Priora can only be done after removing the hood seal. Before dismantling, it should be noted that in the middle of the lining there is a screw that tightens both halves of the structure. Using a screwdriver or any knife, you can gently lift the plugs (this element serves as the “cover” of the screw) and unscrew them.
After this, you can begin to remove the sound insulation, which is located in the power unit compartment. To do everything correctly, you will have to unscrew the screws and remove the pads (there is no clear rule about which of them to remove first: left or right). Then you should get rid of the pipes that go directly to the radiator. A person who wants to understand how to get to the heater radiator on a Priora must loosen the clamps holding the structure itself.
After this, you can remove all the wires going directly to the stove from the connectors. You can remove them using two keys, in particular, one “10” and the other “8”. After unscrewing all four nuts, move the wiring harness to the side, which is held by the holder. The “13” key will help to dismantle the bracket located on the brake pedal. Only after this can you begin to remove the heater radiator on a Priora that does not have air conditioning. A regular Phillips screwdriver will help you dismantle the device, allowing you to remove 3 screws. All the rest of the work consists of installing a new unit and reassembling the system in the reverse order of the described actions.
In fact, there is another way to replace the system element of interest. To open free access to this element, dismantling not the stove body, but the vacuum brake booster will help. It is worth noting that this procedure will only be successful if the brake pedal is removed along with it. Such actions help to get closer directly to the left side of the stove and the desired device.
How to tension a belt and check its tension
For Priora, in addition to the original ones, similar belts from foreign brands such as Contitech, Dayco, Gates, and Flennor are recommended.
- Loosen the roller nut; you will have to hold the cage with a wrench. By then rotating this key, the clip can be turned.
- Tighten the nut against the roller. Check the quality of tension only on the long section between the pulleys. If, when pressing on the belt in this place, it bends no more than 10 millimeters, the tension is appropriate.
- If your Lada has a hydraulic booster, you should tighten it a little more. If you don't pull it tight enough, it will whistle obviously, a defect that can be easily detected by ear. Then pull it a little tighter. If you hear not a whistle, but a hum, the belt, on the contrary, needs to be lowered.
On a Priora, in a regular service, changing just the belt can cost from 300 rubles (not counting consumables). If the generator is with rollers or mounted, then the price will increase significantly to one and a half thousand rubles. Do not forget the receipt for the services provided; the warranty for the work performed must be at least six months; if the belt deteriorates due to poor installation or tension, you must demand a replacement at the expense of the service.
The replacement generator itself starts at 5 thousand rubles. The cost of removal and installation work alone will average 1000 rubles for simple models.
Installation of a new radiator in a Lada Priora with air conditioning
Replacing the heater radiator in a Priora car with air conditioning is a fairly simple process. The latter unit appeared only in newer cars, in particular, Priors began to be equipped with a HALLA or Panasonic climate control system. Thanks to the new component, you can replace any part of a non-working stove only by dismantling the frill, getting rid of the windshield wipers, the stove itself or the vacuum brake booster.
If a motorist wants to understand how to remove the heater radiator on a Priora with air conditioning, he must start by removing the sound insulation located in the engine panel. After this, you should dismantle the power unit air filter hose and remove the seal, which is located near the radiator hoses. Then you should drain the coolant and lift the radiator up towards the mechanic.
Life hack: removing the generator on a Lada Priora car
Without electricity, nothing will work.
So on a car, the voltage in the on-board network is maintained by a generator. You need to understand how many amperes you need in the on-board network. It all depends on the amount of attachments, air conditioning, heating, etc. Depending on the configuration, a generator is also selected. Read the article to the end and we will cover this topic. Removing and replacing the generator on a Lada Priora car depends on the attachments; if the car does not have air conditioning, then the unit can be removed in 6 steps. If the air conditioner costs 9 steps, we will talk about them in the article. This part on Priora comes in 3 types. Their prices are also different.
Difficulty of choice
If it has become noticeably cold inside the car, it is worth checking the car's heating system. Most likely, the problem will be detected in the heater radiator and you will soon have to buy a new one.
The Internet is full of advertisements for the sale of heater radiators for Lada Priora, but how to choose a quality product and not “run into” a fake?
The first thing that should indicate the originality of a part is its price. High-quality spare parts cannot be cheap; manufacturers of original radiators will not allow this.
Second. The original radiator of the car heating system has small cells, i.e. the distance between the vertical slats is minimal, only factory equipment can provide this. Factory equipment “works” only with high-quality metal; the honeycombs should not be too soft.
Manufacturers of counterfeit products save on small things; they do not install “liquid swirlers” in counterfeit radiators, plastic parts that increase the heat transfer of the coolant in the radiator of the heating system. To check their presence, you should shake the part; a specific sound will indicate their presence or absence. If they are made of soft material, this method is useless.
Preparation and necessary tools
It is more convenient to remove the generator on a Lada Priora on an overpass or inspection hole. Before you begin dismantling, prepare the following tools:
- locksmith's crank;
- extension;
- cardan from the tool kit;
- heads for 10, 12, 13, 17;
- spanners for 10, 12, 13, 17.
- WD-40 product.
This is interesting: On the way to a “perpetual” engine When you drive onto a pit or overpass, do not forget to install chocks under the wheels so that the car does not roll spontaneously. Then disconnect the negative terminal from the battery. Apply WD-40 to the mounting areas of the generator and air conditioning compressor. Wait 10-15 minutes for the product to take effect.
Generator replacement
Taking into account that the Lada Priora is equipped with a large number of electrical appliances, it is necessary to install a powerful generator that can cope with all tasks. Characteristics of a suitable device:
- marking 5102.3771;
- power 80 Ampere or 115 Ampere. For lovers of good music, the power should be 170 Amps.
First, you need to remove the old generator. This should be done in three steps, shown in the photographs:
- Remove the terminal from the battery and the belt placed on the generator and crankshaft pulley (there is no need to lift the engine mount).
- Disconnect the three wires going to the generator. The first is in the form of a connector, the other two are in the form of terminals under a protective cap, which must be bent and the fastening nut unscrewed to disconnect the wires.
- Use a wrench (a socket wrench size “13” will do) to unscrew the nut of the bolt for the lower mounting of the generator, and then carefully remove the bolt. If necessary, use a hammer to knock out the bolt. Then completely unscrew the nut securing the generator to the upper bracket. After removing the adjusting bolt, you need to remove the generator from the car.
Secondly, install a new suitable generator. It is mounted in the same order in which the old mechanism was removed. It is necessary to take into account that installing a generator with a power of 115 Amps from Priora Lux on the Lada Priora requires connecting a new D+ wire connector, which has different parameters. It can be bought at any car dealership. Finally, you should connect the remaining wires to the generator.
As you can see, replacing the generator with a new one according to the above scheme is not difficult.
If you find an error, please select a piece of text and press Ctrl+Enter.