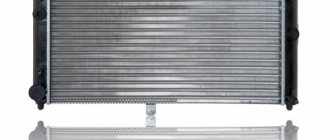
While driving, the car’s power plant necessarily heats up, therefore, to prevent overheating, cars, including the Lada Priora, have a cooling system. The main element of this system is, if anyone doesn’t know, the radiator; it is in it that the liquid is cooled to an acceptable temperature, which prevents overheating of engine parts. If there is a malfunction in the cooling system and it does not fulfill its intended purpose, the power unit will soon overheat, which will lead to its breakdown.
Replacing the cooling radiator on a Lada Priora without air conditioning (+part numbers)
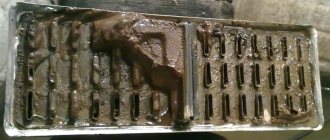
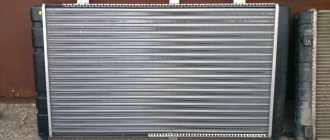
The cooling radiator on the Priora is its sore spot . Anyone who has owned this car for a long time knows that it often starts to leak in a place closer to the pipes.
Traces of smudges are visible on the sides.
A simple and clear video about the replacement.
Another common reason for replacement is a broken steam hose fitting.
Replacing the cooling radiator
To replace you will need:
- head on 10
- keys for 8 and 10
- cross screwdriver _
- a container for draining antifreeze (for me it was a basin and a barbecue jar).
- rags.
Algorithm
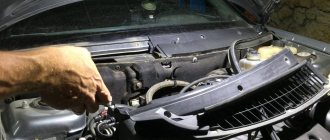
- First you need to disconnect the minus . For any work, I recommend turning off the mass.
- Move the air filter housing aside, or better yet, remove it. To do this, disconnect the MAF chip and unscrew the clamp . The housing is easy to remove.
If you simply move the case to the side, access to the radiator will be difficult.
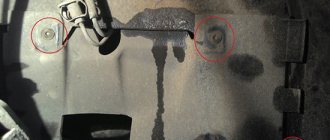
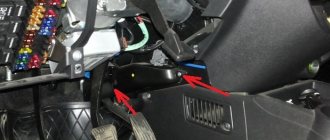
You can't really see it in the photo above, I marked the places on the new radiator.
Location of the drain plug.
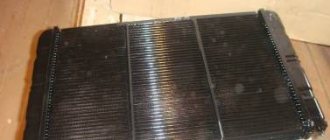
If this leaks, then change the entire cooling system fluid! My friendly advice to you!
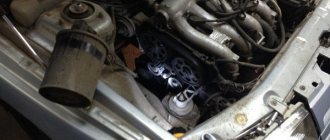
I didn’t take a photo of the fastening under the hood, but I found this.
By the way, the steam outlet pipe broke off. Traces of coolant leakage are visible.
Before “installing” a new radiator, I would recommend installing the old one a couple of times - for training. You must press carefully so as not to damage the honeycomb.
Articles
I bought it for 1820 rubles. Fits perfectly. A native one costs about 2,500 rubles.
Source
What is this?
A radiator is usually understood as a spare part that serves to cool the engine while it is running.
The auto radiator, regardless of the type, has the following design:
- Bottom tank.
- Upper container.
- Pipes.
- Core.
The following may cause damage to this spare part:
- Depressurization of the tank.
- Coking of internal cavities.
- Using low quality coolant.
- Damage to the grille.
- Hose rupture.
The owner of a Priora will understand that the radiator device is broken by the following signs:
- Plumes of smoke appearing from under the hood.
- Motor overheating.
- The car stalls.
- The engine will not start.
If such symptoms appear, you should contact a service station as soon as possible. It happens that it is possible to restore a failed part. But if most of the elements are worn out, the specialist advises changing the spare part. It is better to buy a new product: old ones do not last long.
Replacing the cooling radiator on a Priora
Welcome! Cooling radiator - included in the cooling system, when the engine is running, the coolant runs in a circle and most of it is in the cooling radiator; when driving at speed, the radiator is cooled by the air flow, due to which the liquid cools down and the engine does not heat up much.
Note! To change the radiator in a car, you will need: All the keys that are in your arsenal, and you will also need screwdrivers, containers into which you will drain the coolant (Or one large container), and stock up on new Coolant, because you will need to drain the old one and if If it is in poor condition, it is better to fill the radiator and expansion tank with good fresh fluid after assembly!
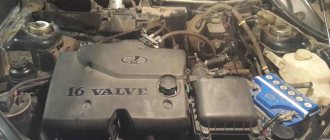
Where is the cooling radiator located? It is located in the front part of the body, secured with nuts, they attach it to the TV (the TV is the very front part, where the headlights are, it also connects the bumper and side members), removing the radiator on Priors is not very difficult, since there is enough space , so that you can crawl with your hands, but still, if you stock up on the right keys, the replacement process will be completed much faster, namely, the wrench and sockets for it will be very useful.
Design of cooling system radiators from LUZAR
LUZAR cooling radiators can be divided into three types:
- Tubular-plate, prefabricated, aluminum. It consists of aluminum plates through which aluminum tubes pass, inside which coolant runs. The tanks on such radiators are made of plastic. Cooling radiators of this type are used for small cubic capacity engines due to limited heat transfer; have the best rigidity and light weight, as well as the lowest cost.
- Tubular-tape, non-assembled (brazed), aluminum. The corrugated aluminum tape in such a radiator is located between aluminum flat-oval tubes. Radiator tanks of this type can be made of either plastic (most common) or metal (most often used for cargo cooling radiators). The design of non-assembled (brazed) aluminum cooling radiators is the most universal, allowing the creation of heat exchangers with any given characteristics. They have low weight and relatively high rigidity, as well as an optimal price.
Tubular-tape, non-assembled (soldered), copper-brass. The design is very close to type 2 - between the copper flat-oval tubes there are copper strips folded in the form of an “accordion”. At the same time, the tanks on such cooling radiators are made of brass - in order to increase the overall rigidity of the structure. Copper cooling radiators - due to the high specific heat capacity of copper - have excellent heat transfer performance. However, due to the high softness of copper, cooling radiators made of this metal are forced to have a narrow tube and a large interval (step) between the tubes, which imposes serious limitations on maximum efficiency. Also, copper cooling radiators have the highest prices and the lowest rigidity to torsion, fracture and internal pressure. In this regard, copper cooling radiators are “outdated” and are gradually falling out of use.
How to replace the cooling radiator on a VAZ 2170-VAZ 2172?
Removal: 1) Before starting work, drain all the coolant from the radiator (How to drain the liquid, read “here”) and proceed to removing the electric fan (If you don’t remove it, you simply won’t pull out the radiator), to do this, remove it first the negative terminal from the battery by loosening the bolt that secures it, then remove the air filter housing because it will get in the way very much (Read “here” how to do this), well, you can start removing the electric fan, first disconnect the wiring from each other , the wiring of the electric fan goes on the side in the form of a connector and block (see photo 1), then unscrew (it’s easiest to use a wrench) two bolts that secure the electric fan to the casing on the left and four nuts, two of which are located on the top and two below (see photos 2 and 3 below) and then remove the electric fan by pulling it to the top and putting it aside.
2) Next, remove the sound signal, because it will not allow you to remove the radiator (For information on how to do this, read the article: “Replacing the signal on the Lada Priora”) and then loosen all the clamps that secure all the supply pipes to the radiator (see. photos 1 and 2, pay attention to photo 1, there is another pipe indicated by an arrow, so don’t miss it) and disconnect them, immediately after which unscrew the two nuts that secure the radiator to the body (see photo 3) and then remove a holder that keeps the hose from dangling from the hole in the cross member of the engine compartment (see photo 4), and that’s it, you can safely then tilt the radiator towards the car engine and then pull it out of the engine compartment.
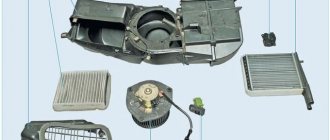
Description of design
Heater parts
:1 - filter cover;2 - heating and ventilation system filter;3 - heater housing;4 - heater damper micromotor-reducer;5 - heater radiator;6 - additional heater fan resistor;7 - heater fan
The car is equipped with a heating and ventilation system, which serves to create the most comfortable conditions for the driver and passengers, regardless of weather conditions. The heating and ventilation system includes: heater, heater fan, cabin air temperature sensor, air distributor housing, air ducts and deflectors. The air from the heater enters the air distributor housing and then into the air ducts. Through them, air is supplied to the windshield and side window vents, to the central and side deflectors on the instrument panel, as well as to the feet of the driver and passengers.
Heating and ventilation control unit
The system is controlled by turning the handles located on the heating and ventilation control unit. The control unit is installed on the instrument panel console.
Interior temperature sensor
To maintain a given air temperature in the car interior at a constant level, there is a cabin air temperature sensor installed in the headliner trim.
Heater assembly
:1 — micromotor-reducer for the heater damper; 2 — heater control damper; 3 — additional resistor for the heater fan; 4 — blowing hose for the fan motor; 5 — heater fan; 6 — filter cover of the heating and ventilation system
The heater is installed in the engine compartment under the right windshield trim and is attached to the front panel. A filter is installed at the heater inlet to clean the air entering the heating and ventilation system.
The heater housing contains a heater fan, a heater radiator, a heating and ventilation system filter, an additional fan resistor and a heater control damper connected to the temperature regulator. The heater radiator is connected by hoses to the engine cooling system. Coolant constantly circulates through the heater radiator. The heater control damper directs outside air to or bypass the heater core. In intermediate positions of the damper, part of the air passes through the radiator, and the rest bypasses the radiator. In the extreme positions of the damper, all air passes through the radiator or bypasses it.
Heater damper micromotor
:1 — micromotor-gearbox; 2 — damper position sensor; 3 — output shaft
The heater control damper is turned by a micromotor-gearbox mounted on the left side of the heater body. The output shaft of the micromotor-gearbox is connected to the damper axis.
Location of the air distributor housing and air ducts on the instrument panel
: 1 — side deflector air duct; 2 — window blower duct; 3 — air distributor housing; 4 — damper; 5 — damper gear motor; 6 — air duct for blowing the feet of the driver and passengers
The air distributor housing and air ducts are fixed on the reverse side of the instrument panel. The air distributor housing contains air flow control flaps, which are controlled by the air flow distribution regulator. The dampers are turned by a gear motor mounted on the air distributor housing. By controlling the flaps, the regulator directs air flows through the air ducts to the central and side deflectors, to the feet of the driver and passengers, as well as to the nozzles located in the instrument panel for blowing the windshield and front door windows. When the car moves, air is forced into the passenger compartment at high speed through the holes in the right facing of the wind window. To increase the air supply to the cabin while the car is moving, as well as when parked, a heater fan is used. The intensity of air supply is determined by the fan rotation speed. The fan motor can rotate at four speeds, depending on the connection of an additional resistor.
Air outlet hole in trunk lining
Air leaves the car interior through valves installed on the rear panel of the trunk, behind the bumper. In the rear part of the trunk lining, opposite the valves, there are holes for air outlet.
Cabin air outlet valves
(with rear bumper removed)
When loading the trunk, do not block the air outlets in the trunk lining.
Replacing the Lada Priora cooling radiator
On a Lada Priora, a radiator replacement is required if a coolant leak is detected. The usual symptoms of this are: insufficient engine cooling, coolant quickly decreases, and traces of antifreeze are observed.
Please note that if you discover a breakdown, then if you repair it yourself, you will need to replace the radiator, since repairs can only be carried out in specialized workshops with special equipment.
It is also not recommended to use sealants and similar products to eliminate leaks on the Priora. When using them, the cooling elements become clogged and further repairs will be more expensive.
— Pliers with long lips
— A basin or any container to drain the coolant.
Radiator malfunctions and their consequences
A broken device poses a great danger to the entire cooling system, since its instability can lead to overheating of the power plant. The Lada Priora uses a standard combined cooling system, when the liquid system is supplemented by an air system. Thanks to this combination, it is possible to more effectively maintain the optimal engine temperature under various loads and operating modes.
There are not many malfunctions of this element as such. The main problem with the radiator is the occurrence of coolant leakage. This happens due to a violation of the integrity of the tubes caused by damage to the radiator. Another common problem is clogging of its inner surface. This can be determined due to the constant operation of the forced cooling fan.
The temperature drops, but rises quickly and causes the ventilation unit to turn on again, even when driving at high speed. This is due to the fact that the oncoming air flow cannot cool the coolant due to dirty plates. Contaminants can also be deposited on the inner walls of the radiator tubes, which will impede the circulation of antifreeze. And, as a result, the engine will begin to heat up excessively.
When the device is broken, the power unit overheats.
Causes of malfunctions
The main factors causing problems with the radiator are the following:
- wear of elements of a natural nature (any part sooner or later wears out and fails);
- mechanical impacts leading to damage and deformation;
- operating the engine in violation of the manufacturer's requirements and recommendations.
Breakdown can be caused, among other things, by the use of low-quality coolant, mixing antifreeze with other types of antifreeze, and the use of all kinds of sealants that can clog the pipes and affect the circulation of the coolant (coolant). At the same time, the human factor cannot be ignored when, due to incompetence in matters of radiator maintenance and repair, a part has to be replaced.
Often, simple dirt and poplar fluff that clog the plates can cause the engine to heat up. Due to systematic overheating, the fuel in the cylinders begins to detonate due to the increased temperature of the coolant. As a result, the cylinder head burns out, the block itself becomes deformed from high temperatures, and cracks appear. And ultimately, the destruction of the piston group and crank mechanism completes the picture. It's not far from a major, expensive engine overhaul.
You need to carefully monitor the condition of the cooling system and the radiator in particular.
Signs of trouble
Even a beginner can determine that there are some problems with the radiator. This does not require special knowledge. It is enough to understand in general terms the principle of operation of the cooling system of the Lada Priora.
Troubleshooting
| Symptoms | What are they related to? |
| On the instrument panel, the arrow of the coolant temperature indicator constantly approaches the red zone. | This provokes the inclusion of forced cooling and indicates engine overheating. |
| Constant overheating can also be determined by the deposit on the spark plugs. | During normal engine operation, the coating is sand-colored; when overheated, it is white. |
| It is necessary to carefully monitor the level of coolant in the expansion tank. | A sharp or gradual decrease in level will indicate the presence of a leak, which may be associated with a leak in the radiator. |
Low coolant levels will also lead to rapid overheating. It is easy to find a leak by characteristic smudges on the surface, as well as by the presence of antifreeze or antifreeze where the car is parked.
Step-by-step instructions for replacing the engine radiator on a VAZ 2170 Priora:
— First of all, drain the antifreeze/antifreeze from the system. To do this, open the expansion tank, then unscrew the drain plug, after placing a container under it.
— Remove and carefully pull out the fan casing, to do this you need to disconnect the wires and unscrew the fasteners.
— We remove the signal
— Next, loosen the clamps and disconnect the compression and outlet pipes.
— Unscrew the radiator mounts to the body...
...then disconnect the fastening element of the expansion tank hose to the front panel.
— Loosen the hose clamp and disconnect it.
— After this, you can pull out the radiator and remove the 2 lower cushions and mounting bushings.
Note: to repair the radiator yourself, rinse it thoroughly and inspect it for cracks in the plastic elements. If they are discovered, it will not be possible to repair it. If not, then plug the pipes and lower them into water. Apply air to detect leaks.
— replacing the radiator on a VAZ 2170 occurs in the reverse order (do not forget to first install the lower mounting pads and the upper mounting bushings).
You can also apply a thin layer of sealant before connecting the hoses to prevent further leaks.
— Install the fan with a casing, fill with antifreeze.
Operating temperature of the Lada Priora engine 8 and 16 valves characteristics
A car engine is equipped with a cooling system that contains liquid. The temperature of this liquid is measured by a sensor. This value that it records is the engine operating temperature (ERT). The data recorded by the sensor is displayed on the dashboard. The average operating temperature of a Priora car engine is 95 degrees. This indicator is optimal when the car is moving at a speed of approximately 70-80 km/h and provided that the ambient temperature is not higher than +20 degrees. When the liquid heats up to 100 degrees, the fan turns on, which is designed for additional cooling. With such indicators, it is time to say that the power plant of the machine is functioning without failures. In winter and summer, the RTD may be different. Which RTD is considered optimal for this car? The average is 85-90 degrees.
If the fan does not turn on
If the RTD has risen to 100 degrees and the indicator needle has entered the red part of the scale, this indicates overheating. Perhaps this phenomenon occurred due to the fact that the fan did not work. If you find that when it overheats, the fan does not start working and the temperature does not drop, you need to check the serviceability of the fan itself. It is necessary to determine whether the switch-on sensor is triggered when the normal RTD is exceeded? First, start the engine and disconnect the wires from the temperature sensor that is installed on the engine. When the wires are disconnected, forced cooling should work. If this does not happen, most likely the fault lies in the electric motor of the device. How to check the operation of the fan, watch the video.
If the fan turns on after disconnecting the wires, it means there is a problem with the fan switch sensor. Perhaps it incorrectly perceives data about the RTD and therefore does not operate at the right time.
This malfunction is quite easy to fix: you just need to replace the sensor. After replacing it, check if the fan turns on. To do this, start the engine. When the RTD reaches normal levels, do not turn off the engine until the temperature exceeds the norm. As soon as this happens, the fan should be activated. If the fan operates at a temperature above 97 degrees, but less than 100 degrees, then the system is functioning properly.
Temperature sensor malfunction
The reason that the liquid in the cooling system, which serves as an air conditioner for the car's power plant, does not heat up or overheats is due to the failure of the temperature sensor.
Often signs of such a malfunction are:
- Stopping the flow of warm air into the car interior, which occurs due to the cessation of fluid flow into the heater.
- Dark, almost black smoke comes out of the exhaust pipe. This indicates engine detonation, which was a result of overheating.
- Engine power drops sharply.
Many drivers quickly stop the car when it overheats and turn off the engine. In fact, an immediate stop of the machine is required only if the tightness of the system is broken and liquid pours out of it. In other situations, the driver must perform the following actions:
- turn on the heating to maximum so that the fluid temperature drops and the engine cools down quickly;
- drive smoothly to the side of the road;
- Let the engine idle for 2-3 minutes with the heating system on.
After this, the engine must be turned off and allowed to cool for 20 minutes. After this, you need to measure the fluid level in the cooling system and add it if necessary. Immediately after the engine is turned off, you cannot open the radiator cap, as you can get burned from contact with the liquid. If the fluid level is normal, then the cause of overheating must be determined by diagnostics. To do this you will have to visit a car service center.
Features of replacing the radiator on a Lada Priora with air conditioning.
There are 3 types of radiators installed on Priora: prefabricated aluminum, for cars without a climate system, and 2 types soldered for Hala and Panasonic air conditioners.
The heat transfer of soldered radiators on a Lada Priora with air conditioning is 1.5 times higher. First, the condenser, which is located in front of the engine cooling radiator, is cooled. So, by installing the wrong type of product, you can create additional problems in the form of engine overheating. It is also worth paying attention to the fact that insufficient cooling may occur due to low pump performance.
Elements of the heating system LADA Priora
1 — filter cover; 2 — heating and ventilation system filter; 3 — heater housing; 4 — micromotor-reducer of the heater damper; 5 — heater radiator; 6 — additional heater fan resistor; 7 - heater fan
Heater parts: 1 - screw 1/76691/01; 2 — heater radiator 2110-8101060; 3 — left heater casing 2111-8101025; 4 — heater control damper 2110-8101538; 5 — right heater casing 2111-8101024; 6 — air duct housing 2111-8119124 intermediate; 7 — screw 1/76692/01; 8 — lower air intake housing 2111-8119026; 9 — bracket 2108-8101110; 10 — bracket 2111-8119102 right; 11 — screw 2114-5325388; 12 — air filter 2111-8122020; 13 — upper air intake housing 2111-8119025; 14 — filter cover 2111-8119116; 15 — screw 1/76702/01; 16 — screw 1/76691/01; 17 — additional resistor 2123-8118022; 18 — screw 2123-6302332; 19 — screw 2114-5325388; 20 — air supply pipe 2123-8118096; 21 — electric fan 2111-8118020 of the heater; 22 — bracket 2108-8101110; 23 — gear motor 2110-8127200 for the heater damper; 24 - screw 1/76691/01