Signs that your car's heating system radiator requires replacement:
- high consumption of coolant (antifreeze or antifreeze) in the vehicle cooling system (antifreeze or antifreeze);
- The heating of the car interior does not work;
- traces of a coolant leak on the asphalt under the heater radiator or leaks in the hoses supplying fluid to the heater;
- the smell of antifreeze in the cabin;
- greasy deposits on car windows, their fogging.
In these cases, first of all, check the tightness of the system hose clamps. Perhaps they are the cause of the leaks.
And now about how to replace the VAZ-2112 heater radiator with 16 valves of different types
How to replace the radiator of a VAZ-2112 heater with 16 valves of different types
Signs that your car's heating system radiator requires replacement:
- high consumption of coolant (antifreeze or antifreeze) in the vehicle cooling system (antifreeze or antifreeze);
- The heating of the car interior does not work;
- traces of a coolant leak on the asphalt under the heater radiator or leaks in the hoses supplying fluid to the heater;
- the smell of antifreeze in the cabin;
- greasy deposits on car windows, their fogging.
In these cases, first of all, check the tightness of the system hose clamps.
Perhaps they are the cause of the leaks. And now about how to replace the VAZ-2112 heater radiator with 16 valves of different types
Causes of engine overheating
VAZ 2115: when the heater radiator needs to be replaced
The reasons for overheating of the VAZ 2110 engine include, first of all, the insufficiently efficient operation of the cooling system. The reasons may be:
- The radiator pipes are clogged. A thing that is rarely seen today, and only when using coolant of extremely low quality. In this case, replacing them will help;
- Low coolant level due to leakage at the attachment points of the pipes or cracks in the pipes themselves. Need to replace fasteners or pipes;
- Housing contamination. Here you should take into account a small detail: the whole car, the radiator in particular, requires care. It should not be allowed to “overgrow” with dirt, fallen leaves, or other debris. Because of this, the efficiency of its work is significantly reduced;
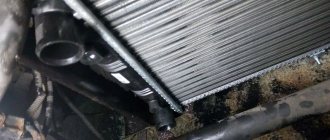
- The radiator is leaking. It is necessary to remove it in order to decide based on the location, size of the leak, and general wear and tear of the unit whether it needs repair or replacement.
New cooling system
The sequence of your actions in this case is as follows:
- First of all, for safety reasons, disconnect the negative terminal of the battery. We drain the cooled antifreeze or antifreeze, first opening the expander cap. To drain the liquid you will need a container with a volume of 4-5 liters.
- Now, after unscrewing the two nuts, remove the wipers from the car.
- Then we dismantle the released protective plastic cover under the windshield, which is secured with 2 nuts and 4 self-tapping screws.
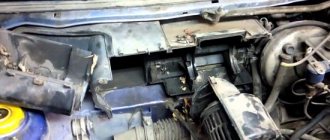
- To access the stove, remove the frill of the car by unscrewing 5 self-tapping screws, 1 screw and 2 nuts located at the bottom, in the middle of the frill, in the area of the steering rack.
- In order to remove the stove, remove the yellow cross brace, if any, as well as the curved bellows of the air filter.
- We pull the chokes off the radiator pipes.
- Then disconnect all electrical wires from the stove terminals.
- At the steering rack, unscrew 2 nuts that secure the heater, 1 nut securing the heater to the body.
- We unscrew the 3 screws connecting the two halves of the stove.
- We take it out by swinging the right side of the stove, first moving it to the right.
- The radiator in the removed half of the stove is secured with 3 screws. We take it out and replace it with a new one, not forgetting to put on the foam seal. We check the operation of the fan and, if necessary, repair it or replace it with a new one.
- Before installing the assembly, it is advisable to rinse the coolant supply hoses with running water.
- Assembly is carried out in reverse order.
Old style cooling system
Such heaters were installed on early 21120 models. You can determine the modification of the system by its appearance, after first removing the frill of the car.
To replace the radiator you need:
- Carry out steps 1, 4-7 for removing the new type cooling system.
- We dismantle the expansion tank of the cooling system.
- We remove the vacuum booster by unscrewing the 2 nuts (17 mm) and carefully (without damaging the brake system pipes) move the brake master cylinder to the side. Remove the vacuum booster pipe.
- Inside the car, unscrew the 4 nuts from the brake pedal studs and, together with the pedal, remove the car's amplifier.
- Thus, we gained access to the heater core, which is secured with three screws. We replace it and reassemble the entire system in the reverse order.
Radiator differences
Heater radiators on the VAZ 2110 have two types: old and new. In order to understand which heater is in your car, you need to rely on several points from this list:
Year of the car. A new type of stove began to be installed on the VAZ 2110 in 2003. therefore, if your car has a more recent year of manufacture, then an N.O. heater is installed there.
Jabot. In new types of heaters, a new frill began to be installed. Using it you can also determine the type of stove on the top ten.
The photo below shows the differences between the frill S.O. and N.O.
Old style radiator
Below are instructions for replacing the heater radiator on an old-style VAZ 2110 and its analogues, such as the VAZ 2111-12. The replacement process is not complicated, but it does involve a lot of work. The replacement process can take almost the whole day, so plan your time.
To start work, you need to prepare the tool:
- Phillips and flat head screwdriver;
- 13mm and 10mm wrench;
- Container for draining coolant;
- Sealant;
- Preferably new radiator pipes;
Step-by-step instruction
Work must be carried out on a cold engine to avoid burns!
Drain the coolant from the car. To do this, unscrew the plug in the block with a 13mm wrench and drain the coolant into a prepared container.
We unscrew the wipers and many screws securing the frill. We dismantle the wipers and frill.
We unscrew the heater insulation from below, a 10mm wrench nut, from above and near the vacuum booster, with a screwdriver. We take out the insulation.
We unscrew the bolts securing the fan housing, remove the metal brackets and dismantle the housing and fan.
Removing the stove damper
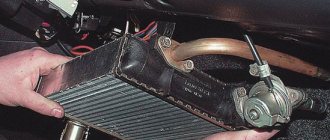
We take out the heater radiator by pulling it towards you from the housing.
Assembly must be done in reverse order.
How to replace the radiator of a VAZ-2112 heater with 16 valves of different types
Signs that your car's heating system radiator requires replacement:
- high consumption of coolant (antifreeze or antifreeze) in the vehicle cooling system (antifreeze or antifreeze);
- The heating of the car interior does not work;
- traces of a coolant leak on the asphalt under the heater radiator or leaks in the hoses supplying fluid to the heater;
- the smell of antifreeze in the cabin;
- greasy deposits on car windows, their fogging.
In these cases, first of all, check the tightness of the system hose clamps. Perhaps they are the cause of the leaks.
And now about how to replace the VAZ-2112 heater radiator with 16 valves of different types
The VAZ-2110 stove does not work: reasons, solutions
Let's consider the main reasons for the failure of the VAZ-2110 heater furnace:
- Antifreeze is leaking from the radiator.
- The temperature control has failed, working only in one position.
- As a result of a malfunction of the controller of the furnace automatic control system.
- The dampers for distributing the warm air flow are broken.
- The temperature sensor in the vehicle interior has failed.
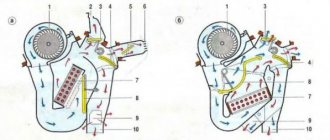
Initially, it is important to know and understand how the stove works, its principles, components and mechanisms. The car interior temperature sensor sends a signal to the automatic heater control system
When purchasing a car, the owner immediately selects the parameters for the stove, which subsequently serve as the standard value for the unit. The data is compared. If their difference is 2 degrees, then the system will give a signal and the gear motor will start the movement of the shutter to release air.
Before repairing or replacing the furnace, it is necessary to carry out diagnostics. This is done quite simply. The first step is to check the vehicle interior temperature sensor. To do this, you need to pull out its ends and pass a voltage of 1.2 watts through them. The automatic heater control system keys must be set to the minimum and maximum values. Finding them is quite simple, they are marked in blue and red, which will turn off the fan. The system itself is diagnosed with a multimeter, passing voltage through the pink and brown harnesses, after turning on the ignition
During the check process, it is important to turn the temperature setting knob
The next step is to inspect the controller board for damage or burnt spots. System controllers can be of different models, and the voltage reading will directly depend on this. However, the test consists of the same thing: the voltage at the outputs must change. If this does not happen, then the system has failed. In this case, the hot and cold air outlet shutter will fail to operate.
Diagnostics of the valves is carried out as follows: the upper valve regulates the processes of suction of external cold air into the furnace, while the lower one passes heated air through the radiator. If the drive or one of the dampers breaks down, the oven stops working completely or partially. These parts break quite often: they jam, fail due to the presence of rust, or simply due to poor-quality drive operation. The damper of the VAZ-2110 car is made of metal or plastic, the latter are of worse quality, since due to hot air flows they are often deformed, which leads to jamming. At the same time, metal dampers suffer from rusting. Simply put, in the case when warm air flows to the side and hot air flows down, this indicates that the damper has partially opened, which has led to incomplete absorption of external air. The dampers are checked using an ohmmeter. Connect the device, set the lowest temperature and wait about 12-15 seconds. If the device does not produce any changes, then the system has failed.
Another common problem is the furnace fan cranking at one speed. In this case, the heater does not need to be disassembled, the reason is immediately clear - the problem is in the resistor. Rotating exclusively at third speed, it is considered burnt out and cannot be repaired; it must be replaced with a new one.
Also very important is checking the micro-gearbox, dampers and resistor. The stove of any vehicle will contain a resistor consisting of two spirals
One of them has a resistance of 0.82 ohms, and the second - 0.023. If both spirals rotate, then the furnace fan operates at the first speed, and if one operates, then the rotation speed is second. To start the third speed, there is no need for a resistor.
To improve the operation of the furnace on the VAZ-2110, the car is equipped with a controller adjustment system with a regulator located on the side of the device itself
It is important to consider that each product model cools the air by a different number of degrees when turning the handle. Simply put, model 812802001 with one turn of the knob in a clockwise direction will cool the air by 0.2 degrees, while model 8128020 with the same rotations will warm the air by 0.3 degrees
In the event of a minor breakdown, of course, you can repair the heater furnace on a VAZ-2110 yourself, but in difficult situations or if you have any doubts, you should contact the service center specialists.
New cooling system
The sequence of your actions in this case is as follows:
- First of all, for safety reasons, disconnect the negative terminal of the battery. We drain the cooled antifreeze or antifreeze, first opening the expander cap. To drain the liquid you will need a container with a volume of 4-5 liters.
- Now, after unscrewing the two nuts, remove the wipers from the car.
- Then we dismantle the released protective plastic cover under the windshield, which is secured with 2 nuts and 4 self-tapping screws.
- To access the stove, remove the frill of the car by unscrewing 5 self-tapping screws, 1 screw and 2 nuts located at the bottom, in the middle of the frill, in the area of the steering rack.
- In order to remove the stove, remove the yellow cross brace, if any, as well as the curved bellows of the air filter.
- We pull the chokes off the radiator pipes.
- Then disconnect all electrical wires from the stove terminals.
- At the steering rack, unscrew 2 nuts that secure the heater, 1 nut securing the heater to the body.
- We unscrew the 3 screws connecting the two halves of the stove.
- We take it out by swinging the right side of the stove, first moving it to the right.
- The radiator in the removed half of the stove is secured with 3 screws. We take it out and replace it with a new one, not forgetting to put on the foam seal. We check the operation of the fan and, if necessary, repair it or replace it with a new one.
- Before installing the assembly, it is advisable to rinse the coolant supply hoses with running water.
- Assembly is carried out in reverse order.
Old style cooling system
Such heaters were installed on early 21120 models. You can determine the modification of the system by its appearance, after first removing the frill of the car.
To replace the radiator you need:
- Carry out steps 1, 4-7 for removing the new type cooling system.
- We dismantle the expansion tank of the cooling system.
- We remove the vacuum booster by unscrewing the 2 nuts (17 mm) and carefully (without damaging the brake system pipes) move the brake master cylinder to the side. Remove the vacuum booster pipe.
- Inside the car, unscrew the 4 nuts from the brake pedal studs and, together with the pedal, remove the car's amplifier.
- Thus, we gained access to the heater core, which is secured with three screws. We replace it and reassemble the entire system in the reverse order.
When is it necessary to replace the heater radiator in a VAZ 2112
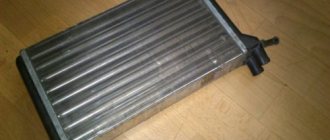
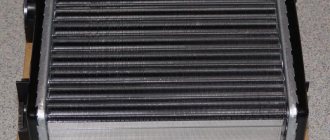
General view of the heater radiator of a VAZ 2112 car
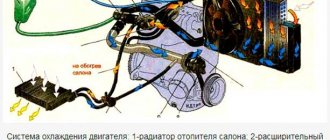
To maintain the desired temperature, a stove or heater is provided in the car interior. The built-in automatic control system controls the required air heating with temperature deviations of no more than two degrees Celsius. The air is heated by a radiator. After air passes through the deflectors of the device, it is distributed in the car depending on the position of the handle that controls its flow. When antifreeze leaks, most often you need to change the heater radiator on a VAZ 2112. This article discusses how to do this work with your own hands.
Important subtleties
- When installing a plastic flap, sometimes you have to grind and adjust the flap into place so that it moves freely. It is also allowed to do a little extra work near the aluminum damper.
- After installing the damper, you should set it by hand to the cold air supply position. In this position, the heater radiator will be covered with a damper.
- Move the temperature sensor to the MIN position and turn on the ignition. The sensor will begin to rotate and take the correct position. This will make it easier for you to insert it into place, since the damper and gearbox will be in the MIN position.
- Buy a double for the washer hose, as this will simplify the installation and removal of the wind cover in the future.
As you can see, there is nothing difficult in removing the heater core if you know what to do.
Video:
Video:
Heating system for VAZ 2112
It is impossible to create coziness and comfort inside a car during the cold season without a working heating system, and an indispensable device in it is a stove. In the interior of the VAZ 2112 car there is supply and exhaust ventilation. Air enters it through special holes located in the windshield trims. Air is supplied forcefully, by a heater fan, or spontaneously. There are gaps between the door panels through which air escapes from the passenger compartment. For the same purposes, there are also holes in the ends of the doors. The valves built into them allow air to pass out and prevent its penetration inside. This improves thermal insulation in the cabin. To heat the air, the VAZ 2112 uses a radiator on the stove, which sets the desired air temperature before entering the cabin. Features of the VAZ 2112 car:
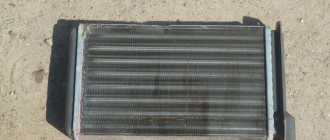
- The heater radiator of the VAZ 2112 car is located in a plastic casing, located horizontally under the dashboard.
- The design consists of two rows of aluminum tubes onto which two plastic tanks are pressed. There are two fittings on the left tank: coolant is drained through one and coolant is supplied to the other.
- To regulate the amount of incoming air, dampers are built into the heating system. Its main part passes by the radiator. When the dampers are positioned in extreme positions, there is no air flow into the cabin.
- There is no valve in the system that would shut off the flow of coolant. Therefore, when the engine is running, the heater radiator is constantly heated, which ensures rapid heating of the interior, and reducing the joints in the system improves its tightness.
How to replace the heater radiator of an old model VAZ 2112 car
An antifreeze leak in a VAZ 2112 car is the reason why the heater radiator needs to be replaced. It is not possible to determine why antifreeze is leaking without disassembling the engine shield, so it is better to immediately install a new model heater radiator on the VAZ 2112. For cars manufactured before 2003, the interior heaters are of the old type; after September of the same year, new devices are installed in the cars. Replacing the heater radiator of the new VAZ 2112 model is carried out with some differences from the old designs. Before installing a new unit, you need to remove the old-style heater radiator on the VAZ 2112. For this:
- Antifreeze drains. It can be drained from the engine block into a container or through an expansion tank installed under the hood. The cap of the expansion tank is unscrewed, which relieves pressure in the system. Then the drain plug is removed, first you need to unscrew and move the ignition module to the side.
When draining antifreeze through the expansion tank, remove the hose from the stove, then the rubber pipe with an L-shaped profile.
Tip: If the drained antifreeze is clean, you can then pour it back.
- The rubber hood seal located near the frill or the windshield is removed.
- The frill fixing screw located under the brake master cylinder is unscrewed.
- Unscrew the four screws of the upper fastening on the right side of the frill.
- The clamps holding the wires and hoses on the frill are disconnected.
- The negative wire and positive terminal of the fan are disconnected from the body.
- On the left, 2 screws are unscrewed in the frill, the part is moved slightly forward.
Tip: There is no need to remove the frill completely.
- After unscrewing five screws and removing two nuts, the plastic trim for the windshield is removed.
- The antifreeze level sensor terminal, if present, is disconnected and the hose for steam removal is removed from the expansion tank.
- The hose used to wash the windshield is disconnected from the mount.
- Four screws are unscrewed, as shown in the photo.
How to remove the heater of a VAZ-21124 car
Drain the coolant.
We remove the windshield trim (see Removing the trim and wing of the wind window VAZ-21114, -21124), the right part of the soundproofing upholstery and the throttle assembly (see How to remove the throttle assembly and its drive of a VAZ-2111 car).
We loosen the fastening of the inlet pipeline: we unscrew the cap nuts of the upper fastening completely, and we do not unscrew the two bolts and three nuts of the lower fastening completely.
We loosen the tightening of the self-tapping screw securing the guide tube of the oil level indicator and lift the tube so that its fastening bracket disengages from the self-tapping screw.
Remove the ignition coil of the first cylinder.
1. Disconnect (can be cut) the clamp securing the heater motor power supply wire block and the additional resistor wires.
2. Disconnect the heater motor power supply wire block.
3. Disconnect the wire block from the additional resistor connector.
4. Use a Phillips screwdriver to loosen the clamp.
5. and disconnect the supply hose from the upper pipe of the heater radiator
6. Use the same tool to loosen the clamp
7. Disconnect the outlet hose from the lower pipe (it has a smaller diameter than the inlet).
We do not disconnect the steam exhaust hose from the heater radiator, since the clamp for its fastening is difficult to access.
It is easier to disconnect this hose from the expansion tank pipe and remove the heater housing along with the hose.
8. Remove the steam exhaust hose from the clamp on the windshield wiper rod.
9. Disconnect the power supply block from the micromotor-gearbox of the damper drive.
10. Disconnect the wiring block from the damper position sensor.
11. Using a “10” socket with an extension, unscrew the nut of the upper fastening of the heater housing to the body on the right side of the engine compartment.
12. Using a socket or an “8” wrench, unscrew the self-tapping screw of the upper fastening of the heater housing, located next to the fastening of the windshield wiper drive rod.
13. Unscrew the nut of the upper fastening of the heat shield of the steering rack cover.
14. Using a high “10” socket with an extension, unscrew the two nuts of the lower fastening of the heater housing (shown by arrows)
15. Remove the heater housing from the engine compartment of the car
Heater parts according to the catalog
When dismantling the heater electric motor assembled with the impeller, remove the cover of the air purification filter entering the interior ventilation and heating system.
You can also dismantle the heater motor in a car, but to do this you will have to perform all the operations necessary to remove the heater housing assembly.
You can only not remove the body from the engine compartment, but only pull it out to a sufficient distance.
16. Disconnect the motor ventilation tube.
17. Using a Phillips screwdriver, unscrew the three self-tapping screws securing the electric motor flange to the housing.
18. We take out the screws and the plastic bushings located under them.
20. ...and remove the electric motor and impeller assembly