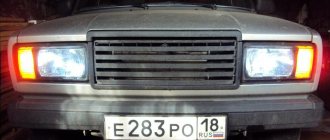
Emergency stop and turn signals are one of the most important signaling and lighting devices in a car. They are necessary for safe movement on the road and coordination of motorists with each other. If it happens that the turn signals and emergency lights of the VAZ 2114 do not work, then you cannot continue driving the car (until the breakdown is fixed).
Below we will analyze the main reasons for the malfunction of the light alarm in a car, and also tell you how to eliminate them.
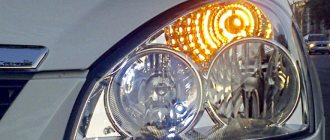
Turn signals VAZ 2114
The emergency lights on the VAZ 2114 do not work, but the turn signals work
Problems with electrical equipment are a common problem in many machines of this model. For example, their owners are often faced with the fact that the emergency lights on a VAZ 2114 do not work, but the turn signals do work. Hazard lights are necessary to warn other drivers that your vehicle is faulty or is in a dangerous situation. Therefore, it must always be operational. This article describes the most likely causes and solutions to this problem. They are quite simple and easy to fix. Many problems can be corrected on the road. And they are not difficult to find. After all, there are only three main reasons for this behavior of light signals.
Fuse
To understand why the emergency lights on the VAZ 2114 do not work, the first thing you need to do is check the fuse responsible for it. It is installed in the mounting block under the hood of the car on the left side. This fusible element is designated F2. To speed up the search, you can use the electrical diagram number fourteen, where its exact location is drawn.
A burnt out or broken part can sometimes be identified visually by the presence of plaque or damaged elements. You can also check the serviceability of the fuse using a multimeter. There are two diagnostic methods.
For the first method, the measuring device must be switched to voltmeter mode and the car's alarm system must be turned on. By connecting the probes of the device to the outputs on the fuse element, determine the presence of voltage on them. If one of them does not have it, the part needs to be replaced. It is inexpensive and can be changed literally with one movement of the hand. You can even make a replacement on the go. Especially if there is an auto parts store nearby.
You can also diagnose the element with this device in ohmmeter mode. To do this, you need to remove it from the car and attach the probes to the outputs. If the resistance is zero, the part should be replaced.
It is worth noting that some motorists with such a breakdown begin to check the K2 relay. But there is no need to waste time diagnosing it, since in this case the turn indicators would not light up either.
Power button
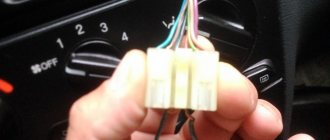
Sometimes the alarm system stops working due to the failure of its activation button. When removed, sometimes its defects are visually visible. In order for the light fixture to function again, the part will need to be replaced.
If trouble happens on the road, you can temporarily restore the functionality of the emergency lights without having to buy a new button. To do this, you will need to remove it and disconnect it from the block. Using a paper clip or wire, make a jumper that will close the contacts of the block. The part must be positioned so that the cutout on one of the faces is at the bottom. Insert the jumper into the middle socket in the left row of contacts. Secure its second end into the lower socket of the adjacent row. If everything is done correctly, the hazard warning lights and turn signals will work as normal.
Track in the mounting block
The alarm will not function when the wiring responsible for its operation has broken. To diagnose this, you need to check the voltage with a multimeter in voltmeter mode on pin X25. It is located under the hood in the mounting block. To quickly find an element, it is advisable to have a car electrical diagram on hand. If there is voltage on it, it means that the black-red wire has broken or rotted. It goes from this contact to the button to turn on this light device. You can also fix this problem yourself. But, if you don’t have enough experience, it’s better to visit an auto electrician.
General information about turn signals
Lada 2107 White Swallow Logbook Camshaft 21214 and split gear
If you read the history of the cars, then initially this part was not included in the package, and drivers installed it additionally for a fee. In modern cars, turn indicators are often placed on the headlight unit or next to it if they are front ones. The rear turn signal is mounted near the headlight. Repeaters of this necessary part can be placed on wings and mirrors. There is a technology for duplicating mirrors using diode lamps. This is now considered the most progressive.
The turn signal consists of the following parts:
- mechanical drive (for starting and shutting down);
- switch (to connect the lamps to the power source);
- relay, for closing and opening a circuit after a certain time.
If you don’t have one, you can install a device that will increase the number of signals.
When the turn signal is activated, you hear a characteristic sound. In modern cars it can be changed to a more pleasant one. This car part gives a bright yellow, sometimes mixed with orange, glow. On American models, they are sometimes made red, which leads to an increase in emergency situations on the road, as they are confused with stop signals.
Traditionally, they are included as an indicator of breakdown - “emergency mode”. A turn signal is a kind of language of communication between drivers on the roads. They can be shown the undesirability of overtaking and other circumstances.
Turn signals fired on time are an indicator of your ability to drive a car and control the situation on the road.
How to check
First of all, see if the indication installed on the dashboard continues to work. If it also does not turn on, then reach into the mounting block - the fuse has probably blown.
When the control is functioning and the protective device is in order, then activate the VAZ emergency lights and see how well the lamps in the headlights glow. Moreover, this must be done both in front and behind. Excessive dullness indicates an incorrect rating or poor ground contact.
When the turn signal does not work, you should look at the relay. Make sure that current is flowing to its terminals.
Proceed like this:
- remove the housing of the electromagnetic device;
- connect one tester probe to its positive contact;
- Place the second probe on ground.
Instead of a measuring device, it is permissible to take a light bulb with wires soldered to it. It is not necessary to activate the ignition at all.
If there is no electricity, then most likely:
- the button that starts the emergency lights is broken;
- there is a break in the circuit;
- the fuse responsible for the turn signal has burned out;
- Somewhere the contact is lost.
When current flows, as evidenced by a glowing lamp or tester readings, it is necessary to close the relay contacts directly. If all other elements of the circuit work, then the turn signal should light up. The absence of a positive result indicates the failure of the mentioned device.
Emergency button
Sometimes the described manipulations do not make the emergency lights function.
In this situation, you should draw an unambiguous conclusion - on your VAZ-2114 it is the button that turns it on that has broken down. Actually, the mechanism itself almost never fails, but the wires soldered to it often come off. If the signal, when the veins are directly closed, is in emergency mode and acts as it should, then there is no need to blame the fuse and relay. Handle the button, inspect its contacts and check whether the cable is securely attached to them.
First, ring the positive wire. Do this with the hazard lights and ignition on. When the tester does not confirm the presence of a positive charge, then it is time to check the cables connected to the button in the area between it and the dashboard.
The presence of current on the positive makes it possible to close the terminals of the control element directly (do not forget to turn on the ignition). After this, try activating the turn signals again. Their performance indicates a failure of the button itself - it cannot be repaired, just install a new one. If there is no power at all, then look for a problem in the relay or wires running from the mounting block to the button.
Types of problems and troubleshooting methods
The turn signal works correctly if the following indicators are met:
- the presence of the ignition on ensures the operating mode;
- moving the steering column switch up and down must be accompanied by turning on the turn signal on the corresponding side;
- The turn signal should flash at a rate of 60 cycles per minute.
Any other turn signal behavior indicates a problem. The most common causes of malfunctions include:
Non-blinking turn signal. The problem requires familiarity with the basic principle of relay operation: the current passing through the lamps leads to heating of the measuring resistor - an element that determines whether a particular lamp needs to be turned on. Consequently, the lamp resistance, different from the nominal one, changes the time the turn signal is turned on: it begins to blink. In this situation, it is recommended to lightly tap the relay (this helps if there is a weak connection or moisture). If you have replaced the relay, but the turn signal does not blink, but is constantly on, then there is poor contact with the fuse block. Replacing a fuse that was found to have a resistance value that does not correspond to the nominal value can also help.
Stopping the operation of one turn signal is incompatible with a relay malfunction (problems of this type cause the operation of both turn signals to malfunction). One of the turn signals may fail due to a burnt-out light bulb (the simplest option) or a faulty wiring or socket. The new tab must not only fit into the turn signal socket, but also correspond to the power indicated on the lamp
If after replacing the light bulb the turn signal still does not start working, you need to pay attention to the socket. If there are traces of oxidation on it, then you should start removing them
Sandpaper or a needle file works well for this. And if the light bulb is in too tight contact with the contacts, then you need to bend them with thin-nose pliers. This must be done as carefully as possible, preventing the contacts from closing, which can lead to another problem - the turn signals working in a checkerboard pattern. The normal state of the cartridge means that the cause of the malfunction lies in the wiring. First you need to make sure that the wire is securely connected to the socket. In this case, it is unacceptable for the wires to be closed to each other or to have a ground short to the metal body of the car. In this case, it is necessary to replace the wires or at least insulate them. If at the same time the hazard lights do not work, then the relay definitely needs to be changed - it is faulty.
Also, the reason for the turn signal not working may be the switch itself. To check it, you need to get to the steering column switch and unmount it. By the way, if a problem occurs in the form of a hazard warning light that does not turn on when there are normally working turn signals, you just need to replace the button responsible for turning on the emergency lights.
A dim turn signal light is a signal to check the suitability of the model and power. If everything is in order, then cleaning the contacts of the light bulbs can correct the situation.
A turn signal relay making a clicking sound is also not normal. The malfunction is hidden in the mounting block, or more precisely, in the relay contacts. Clicking sounds may occur if the contact is oxidized or is too tight. This can also be caused by a defective relay. The problem can be fixed by cleaning the contacts or installing a new relay.
A turn signal that does not work on one side, either front or rear, or in the repeater, indicates that the steering column switch is broken, there is no contact with it, or that the same relay has failed.
The turn signal circuitry is protected by an 8-amp fuse located in the mounting block. If it breaks down, turns will stop working on both the left and right sides of the car.
The light signaling system ensures traffic safety, so the driver should always have at least light bulbs of the required power with him.
Reasons for failure of turn signals and emergency lights
As you know, the circuit of direction indicators and hazard warning lights is tied, since both functions are performed by the same headlights. If for some reason the hazard lights are working, but the turn signals are not, or neither the turns nor the warning lights are on, this can lead to an emergency situation on the road.
For what reasons did these elements stop working:
- Fuse failure is one of the most common problems. If the car is additionally equipped with a relay that is responsible for the operation of these optical elements, then the problem may lie there. Depending on the car model, the relay may be located separately from the main fuse block; use the diagram to find the failed part.
- Short circuit in the system. Because of this, when turning on the turning lights, the emergency lights turn on or the optics do not respond to the driver’s commands at all. To diagnose the problem, you will need a tester, as well as the skills of an electrician.
- Failure of the lighting source. In other words, the light bulb has burned out.
- Open circuit. This problem is relevant for many car owners of older cars. If the wires are laid in a place where there are moving elements, then over time it will fray and lose its insulation, which will generally lead to damage to the electrical circuit.
- Failure of a button or steering column switch. In this case, it is necessary to carry out more thorough diagnostics of the switch, as well as the connection button.
Device
The following are involved in the operation of turn signals:
- steering column turn switch. Its function is to close the power contact of the light bulbs. For example, when you turn the switch up, one of the contacts of the light bulbs on the right side closes to the “+” of the battery. The “minus” of the light bulb is the connection point to “ground” (the common point for all headlight bulbs);
- turn signal relay. There is a regular electromagnetic relay inside the case, but it is controlled by a microcircuit. It is thanks to this element that an intermittent power supply to the coil is ensured. The second important function is monitoring the health of the lamps. The microcircuit has a feedback function, so when a light bulb burns out, it registers a decrease in the power of consumers and begins to supply power to the coil at double the frequency. If the turn signals are working properly, the lights blink approximately once per second. Most modern cars, including VAZ models, use a 3-pin turn signal relay. Accordingly, 1 contact is “ground”, 2 – power supply from the battery, 3 – output to the steering column switch;
- light indication on the dashboard. One or two light bulbs (one on each side) are connected in parallel to the electrical circuit of the main lamps. The turn signals will work without a light indication, so the system should not be considered among the possible causes of the malfunction.
Connection diagram
The simplest turn signal connection diagram.
The video discusses in detail the principle of turning on the direction indicators, as well as the role of the hazard warning button in the operation of the system.
We are looking for a breakdown with our own hands
Primary diagnostics can be carried out with a test light, but a tester is required to check the condition of the circuit. If you know, then in the resistance measurement mode you can independently “ring” the wiring for a break.
If you clearly hear the relay clicking when you turn on the right/left turn signal, check the resistance of the section of the circuit with the steering column switch. If only the left or right side does not work, the reason is definitely in the switch or in the wiring of the circuit from it to the light bulbs.
If the turn signal relay does not click at all, check the condition of the contacts, the positive wire and ground. If, after turning on the ignition, “+” does not come to the relay, the problem is most likely in the section of the circuit from the mounting block to the relay.
Understeering's shifter
The cause of the malfunction can be either mechanical damage to plastic or contact elements, or the formation of carbon deposits. During operation of the turn signals, the contacts may burn out, which increases the resistance and reduces the current in the circuit. It is typical that in the case of oxides and carbon deposits, the indicator relay may click, but the lamps will not light up.
To repair the steering column switch, you will need to remove it from the steering column and disassemble it. There are many contact pads inside the case, so for trouble-free assembly, remember the location of all moving elements.
Where is it located and how to check the turn signal relay
The turn signal relay is located in the fuse box in the passenger compartment or under the hood. You can find out the exact location from the repair and operation manual of your car. Often on the inside of the mounting block the purpose of the relays and fuses is graphically depicted.
Soldering of elements from the circuit, microcracks in solder joints, failure of the main microcircuit are the most common causes of turn signal failure.
Emergency crew
The hazard warning button imitates the steering column turn switch, but closes both contacts at once (on the right and left sides). The video shows the design and operating principle of a simple system, analogues of which are used not only on VAZ cars.
Either one turn signal (“turn signal”) or two may not work, or all at once, etc., in different combinations.
Causes of turn signal failure
1. One turn signal (front or rear) does not work.
Burnt out light bulb
When a bulb burns out in one or more direction indicators on VAZ 2108, 2109, 21099 vehicles, the remaining ones begin to blink at double frequency. We visually determine where the light bulb has burned out, turning on the direction indicators one by one. We replace the light bulb with a working one.
Light bulb socket oxidized
We turn the light bulb in the socket several times to restore contact.
Wire connections are oxidized or loose
We check the cartridges and blocks of the front turn signals (in the front headlights and on the wings) and the connecting blocks of the rear lights of the car.
The “mass” is missing
All lights and lamps of VAZ 2108, 2109, 21099 cars have a negative wire, so you should check its contact with ground.
Burnt out track in the rear light circuit boards
2. Two rear repeaters or two front repeaters do not work.
The first four reasons
the light bulbs burned out, their sockets oxidized, the contacts in the connecting blocks of the direction indicators oxidized (on the headlight unit and the turn signals on the wings), the ground was lost.
Break in the wires going from the mounting block to the rear lights
— In some cases, at the same time, all direction indicators can be lit with a constant light without blinking. In this case, it is necessary to replace the turn signal breaker relay in the mounting block.
The following queries from newbies very often pop up on the Internet: “why don’t the turn signals work?” – we have an answer to this question. Today we will look at the main faults due to which the turn signals on your car do not work.
Often, repairing turn signals is very simple; the main thing is to find the true cause of the malfunction. First of all, I recommend that you watch a video where they tell you how to determine the malfunction.
Video. Turn signals don't work
Let us recall that in the previous article we looked at it with our own hands. This operation can be performed in a garage; do not forget to prepare a large number of containers for antifreeze or antifreeze.
Basic turn signal malfunctions
Turn signals don't blink
When the turn signals on your car stop flashing, most likely the reason lies in the turn signal relay itself. The cause of the malfunction may be simple water that has flooded it or the contact has been interrupted somewhere. We recommend replacing it.
Checking the turn signal switch
Fixing a faulty turn signal switch is quite simple. Typically, depending on your specific model, accessing the switch's electrical connector is the most difficult task.
For this test, it is recommended to consult the vehicle repair manual for your specific model. You will need to identify the wires and the best way to access the electrical connector of the signal switch. Additionally, if your model has airbags, you may need to disable the system to prevent the bags from accidentally inflating.
Find the wiring diagram for the turn signal lights on your car model using the repair manual.
- Identify the wires that carry power from the flasher to the switch, and the wires that carry power from the switch to the turn signal lights. Check the color code of these wires and, if necessary, the terminal number on the turn signal switch electrical connector.
- Gain access to the turn switch electrical connector. You may have to remove the instrument panel or steering column cover to see the electrical connector.
- Find the wires you identified in step 2.
- Turn the ignition key to the on position, but do not start the engine.
- At the switch connector, locate the wire that supplies power to the turn signal switch.
- Connect the test light to a good ground under the dash - a metal bracket or bolt will provide a good ground.
- Press the switch to turn on the left turn signal.
- If the warning light does not blink, then there is a problem with the turn signal unit or an open or short circuit between the switch and the power source.
- The rear probe has a wire in the connector that supplies power to the left turn signal; the indicator light should flash. If the indicator light does not blink, the switch is faulty. Replace the switch.
- Rear probe wire that supplies power to the right turn signals; the control lamp should not light up. If the warning light comes on, replace the switch.
- Repeat the test, but this time press the switch so that the right turn indicators come on. The only difference in your results this time is that your indicator light should flash when reverse probing the terminal, which supplies power to the right turn signals but not the left turn signals. Otherwise you will need to replace the switch.
Differences between starter and relay failure
In order not to confuse what exactly has failed - the starter or the solenoid relay, there is an excellent method for recognizing the “culprit”.
- Remove the starter, connect the negative terminal of the battery to ground;
- The design of the device has copper bolts and a tongue-shaped element;
- The positive wire from the battery is connected to this “tongue”;
- If there is contact, the solenoid relay clicks and starts working;
- If not, then you will have to go to the store for a new relay.
But there is one more very important point. Even if all the facts indicate that the starter or retractor relay is not working, another unit - the ignition switch - may still be the cause of ignition problems. Take the time to check its serviceability before buying new parts.
Where is the turn signal relay on the VAZ 2114 location, replacement and repair
Current traffic rules require drivers to notify other road users before performing any maneuver by turning on the appropriate turn signal. A special relay-breaker for the turn signals, emergency lights and headlights is responsible for the proper operation of these warning lamps.
This device must operate without interruption, providing timely warning to other drivers about a change in direction of the vehicle, and if problems arise, they must be corrected immediately.
Problems associated with the operation of turn signals on a VAZ 2114: the main reasons
The main reason why the turn signals stop working or do not work correctly is a breakdown of the VAZ 2114 turn signal relay. However, there are situations that should lead one to believe that the problems are caused by problems with other elements.
Eg:
- a burnt out/failure of one or more light bulbs will make itself known by excessively rapid blinking when the turn signal is turned on;
- problems with the switch, contacts or wiring should be looked for if the turn lamps do not work when turned on, and the hazard warning lights function properly;
- oxidation of the wires of the contact group directly in the headlight or on the approaches to it is manifested by unstable operation of the turn signals.
Before starting repairs, you should identify the real cause and only then begin to eliminate it
It is important to know where the turn relay is located on the VAZ 2114, since replacing this particular device in most cases solves the problem
Turn signal relay VAZ 2114: where is it located
The VAZ 2114 turn signal relay is an electronic element that is located in the mounting block. Such a relay (usually an electromagnetic type) is responsible for the uninterrupted operation of the direction indicators, as well as for the blinking of the turn signals when the emergency lights are on. The device has several contacts at once, which makes it possible to control various electrical circuits.
To find the turn signal relay under the hood of a VAZ 2114, you need to pay attention to the block located on the driver’s side almost under the windshield. Such a block is a dark-colored box, inside of which all kinds of relays and fuses are located. Among them you need to find a device marked K2
This will be the turn signal relay
Among them you need to find a device marked K2. This will be the turn signal relay.
How to replace the turn signal relay on a VAZ 2114
A sign that the relay should be changed is a situation where the emergency stop signals and turn signals fail at the same time.
Replacing the device is quite simple. To do this, perform the following steps sequentially:
- The hood opens.
- Under it you should find the mounting block in which the relay is located (on the right directly above the driver's shock absorber strut).
- The mounting block opens (you can remove the protective cover by unlatching the two side latches).
- In order to easily remove the relay marked K2 (turn signal relay) from the mounting block, it is better to use plastic tweezers specially designed for this purpose (it lies in the block itself).
- After this, a new one is installed in place of the failed turn signal relay. It is placed in the seat so that the metal contacts (3 pieces) are inserted into the socket.
- After installing the new relay in the mounting block, you need to check whether the turn signals are working in the desired mode. If everything is in order, you can close the block cover and close the hood.
How to eliminate other causes of turn signal failure
There are several other malfunctions that lead to incorrect operation of turn signals, namely:
- The turn signal does not turn off automatically when you turn the steering wheel - the switch will need to be replaced;
- the turn signal blinks very quickly - most likely one of the lamps has burned out (you will need to check and, if necessary, replace it with a new one), however, the reason may be oxidation of the tracks inside the mounting block or oxidation of the chip in the rear lights;
- The turn signals burn very dimly - you will need to clear the ground on the turn signals and also check the installed lamps to ensure that their power corresponds to the required indicators;
- the appearance of clicking sounds when the turn signal is turned on - the cause may be a defective relay or in the relay contacts (they may oxidize or simply not fit tightly).
As can be seen from the information above, eliminating any of the causes of failure of the turn signal relay on a VAZ 2114 is not difficult
It is important to do this in a timely manner, then any trip will be safe, both for you and for other road users
The turn signal light is constantly on: opinions of car owners
- The signaling is to blame
“After three years of owning the car, an incident occurred with the turn signal. The turn signal light is constantly on and the arrow on the dashboard does not go out. I got home, turned off the car, the light was still on. I tapped the relay, moved the contacts in the fuse block - it was on again. I had to take the bulbs out because they were already overheating. The next morning I put them back in place and they still burn. And along the way everything worked as it should. In the end, I shook up all the wiring, checked and tightened all the contacts, but the malfunction still appeared periodically. I consulted with specialists and they told me to check the alarm system. It turned out to be her. I removed the control unit and sent it for repair. After this, the defect disappeared, the turn signals light up as usual. If there is non-standard equipment in the car, then it may cause a malfunction.”
Most often it's a relay problem.
“If the turn signal light is constantly on, then the problem is in the relay. There was such a problem - I took it off, cleaned the contacts - it went away. A week later it happened again. Cleaned it again. It's burning again. Then I got tired of it, bought a new one, replaced it and forgot about it for a long time. The price of the issue is pennies, and repairing the old one is just a waste of time. If the spring in the relay is weakened, it cannot be cured.”
I just cut the wires
“The turn signal light is constantly on. I knocked on the relay - to no avail. Actually, I pulled out the relay and it still lights up. Then I decided to check the wires from the signaling, they are just connected to the turn signals, sometimes to the headlights (green wire with a yellow stripe and green wire with a black stripe). I disconnected the wires and everything worked fine. After that, I simply cut them off, and the problem went away forever.”
Rarely, but it happens!
“The relay is not always the cause of malfunctioning turn signals. I once had a short circuit in my brake light bulb. When you press the brake, the entire instrument panel turns on. The defect was floating. It shakes on a bump, the spiral jumps off, and the light bulb works normally. Then it closes again, and try to find out what happened. Until you replace the light bulb and realize what's going on. A rare case that is difficult to diagnose.”
We recommend
“There are more complicated breakdowns, you’ll break your head, and the relay has nothing to do with it. The cooling radiator leaves the BSK processor, and it pulls the contact block with it, the contacts weaken and the resistance increases. The sensor stops producing correct pulses in 0.5 seconds. This happens all the time. You need to start figuring it out with the rear lights; from them comes a trail of wires, which is laid under the rear fender trim and goes to the fuse box. A wiring harness already goes from it to the ECU. It passes through the entire interior and becomes thinner over time. The ECU perceives most signals based on the resistance value, which greatly depends on the quality of the wiring and contacts. If the resistance is different from the nominal value, then it misunderstands this signal. In some cases, it even issues a command to perform another function. This is the hardest problem to find. Here you need to connect a scanner to troubleshoot the control unit, and then carefully study its readings and look for the cause.”
I had to turn off the alarm
“The turn signal light was constantly on. There was no relay clicking or flashing on the instrument panel. I changed the relay - it didn't help. But when the signaling was turned off, everything started working normally. I had to turn it off completely and drive like that. Now we need to remove the alarm control unit and figure out what’s wrong with it.”
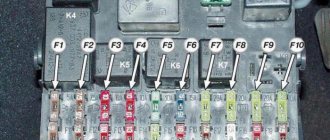
Decoding fuses and relays of block 2114-3722010-18
VAZ-2114, 2115, 2113 cars of the first models with a carburetor have certain differences in the fuse module.
Old style block fuse and relay diagram
Table 2. Decoding of fuses and relays of block 2114-3722010-18
| № | Current, A | Explanation of fuses |
| F9 | 7,5 | Right rear fog lamp |
| F8 | 7,5 | Left rear fog lamp |
| F1 | 10 | Front headlight cleaners at the moment of switching on, wiper contacts, headlight washer switch valve, headlight wiper switch relay contacts |
| F7 | 30 | Front headlight wipers during operation, winding of the relay for turning on the wipers, fuse for the interior heater, windshield washer, gearbox and timing controller for the rear window wiper, valves for turning on the front and rear washer, relay (winding) for turning on the engine cooling system, relay for turning on the rear window heating, glove box lighting, rear window heating control lamp |
| F16 | 15 | Turn signal indicators and activation of hazard warning lights in turn mode, indicator control lamp, reversing lights, gearbox and relay for activation of windshield washers, generator winding (at startup), control lamps for brake fluid, oil pressure, carburetor flap, hand brake. "STOP" display lamp, voltmeter and coolant temperature indicator |
| F3 | 10 | Interior lighting and rear brake light |
| F6 | 30 | Power windows, power windows on/off relay |
| F10 | 7,5 | License plate lights, engine compartment lamp, warning light on the dashboard (exterior lighting), instrument panel lights, cigarette lighter light, heating lever lights |
| F5 | 20 | Relay for turning on the cooling system fan (electric motor), sound signal. |
| F10 | 7,5 | Left front marker light Left rear marker light |
| F11 | 7,5 | Right front headlight, right rear |
| F2 | 10 | Hazard warning lamp, turn signals and hazard warning relay. |
| F4 | 20 | Rear heated glass, heating on, portable socket, cigarette lighter in the cabin |
| F15 | 7,5 | Front right high beam |
| F14 | 7,5 | Front left high beam Light switch |
| F13 | 7,5 | Left low beam |
| F12 | 7,5 | Right low beam |
| № | Relay circuit | |
| K1 | Headlight washers | |
| K2 | Hazard and turn signals | |
| K3 | Windshield wipers | |
| K4 | Monitoring the health of lamps | |
| K5 | Windows | |
| K6 | Sound signal | |
| K7 | Heated rear window | |
| K8 | High beam headlights | |
| K9 | Low beam headlights |
Causes and symptoms of malfunction of hazard and turn signals
p, blockquote 5,0,0,0,0 —>
All manufacturers pay due attention to the quality and reliability of turn signal and emergency flasher systems for the following reasons:
p, blockquote 6,0,0,0,0 —>
- road safety largely depends on the performance of these signals;
- light signals, especially when turning in urban traffic, switch from one mode to another most often compared to other systems;
- systems must be built in such a way that the driver knows in real time about their performance (so-called feedback, light and sound).
adsp-pro-1 —>
Depending on the circuit design of the emergency and turn signal systems, the following malfunctions are possible:
p, blockquote 7,0,0,0,0 —>
- burnout of lamps (main and turn signals);
- malfunction of the LED bars if they are used in the turn signal system;
- turn relay failure;
- malfunction of the turn switch on the steering column (oars, dragonfly - in the slang of car enthusiasts);
- malfunction of indicator lamps on the dashboard and hazard warning switch;
- damage to electrical wiring;
- Malfunction of the body control unit during electronic control of the hazard and light signaling modes.
Video - the hazard lights and turn signals stopped working on the Volkswagen Passat B5:
p, blockquote 8,0,0,0,0 —>
p, blockquote 9,0,0,0,0 —>
Considering the importance of the system, manufacturers organize light and sound monitoring to indicate signs of malfunction of emergency lights and turn signals. These include:
p, blockquote 10,0,1,0,0 —>
- no blinking indicator lights or turn signal LEDs on the dashboard;
- increasing the frequency of blinking of the direction lamps on the dashboard and sound signals in the steering column area;
- absence of sound signals (clicks) in the area of the steering column;
- no blinking of the lamp on the hazard warning indicator.
Relay mounting block
The mounting block is located under the hood, near the windshield.
K1 – headlight cleaner relay. If the headlight cleaners do not turn on, check fuses F1 and F7. Inspect the wiper mechanism; dust may have gotten into it or a stone has flown in, damaging or jamming its operation.
K2 – relay-interrupter for direction indicators and hazard warning lights. If your turn signals or hazard lights stop working, check fuses F2 and F16, this is a relay. If the hazard lights work but the turn signals do not, check the power handle, its contacts and connector. If only the emergency lights do not work, check the power button, contacts and wiring. Don't forget to check the turn signal bulbs. There may be a short circuit in one of the headlights. Carefully inspect the connectors and wiring for insulation damage.
If the turn signals work unstably or intermittently, this may be caused by poor contacts in the mounting block, as well as burnout or damage to its tracks. Contact may disappear not only in the block, but also in the headlights themselves, as well as on the way to them. If the wiring has been changed or something has been done to the wires, check them first.
K3 – windshield wiper relay.
If your wipers stop working, first check the relays and contacts. The steering column switch could also stop working or its contacts could oxidize. Inspect the wiper mechanism; due to poor tightening, the nuts securing the mechanism slats may have become loose, or a foreign object may have gotten in, interfering with their normal operation.
The motor could burn out, you can check its performance by applying voltage directly to it from the 12 V battery. Near the motor there is another fuse that protects it from overheating. It is located either on the trapezoid bracket or in the motor itself, depending on its type.
K4 – lamp performance monitoring relay.
K5 – power window relay. If your power window does not go up or down, check fuse F6 and this relay. If the window lifting mechanism is of a cable type, it lowers normally but rises with difficulty, it is necessary to lubricate the cables and glass guides with silicone grease. To do this, you need to remove the door trim and get to the mechanism. The motor may have stopped working, in which case it needs to be replaced.
Sometimes it helps to close the glass by hitting the door to temporarily revive the motor. To disassemble the window lifter mechanism, you need to unscrew the bolts securing the brackets and disconnect the glass itself from the mechanism.
If only one window regulator does not work, the problem may be in the power button and its contacts.
K6 – sound signal relay. If your horn stops working, check fuse F5, relay. The signal may not work due to a lack of contact in the steering wheel. Remove the steering column housing and look at the serviceability of the plates and contacts. Turn the steering wheel left and right; when turning, the mechanism may jam or the contacts may move. One bolt on the casing secures the position of the switch mounting bracket, the second secures the casing.
For the signal to work, you need to securely fix them, setting them in such a way that the contacts close when the switch is pressed. The contacts are located above the steering shaft. The design of the contacts in the steering wheel could also be damaged. Inspect the mechanism; the 3 screws and springs should reliably open and close the circuit.
K7 – rear window heating relay.
If the rear window fogs up and the heating stops working, check fuses F4 and F7, relays, contacts of the heating elements on the glass that may have been burnt or oxidized, as well as the switch button. The heating uses a high current; it would be a good idea to check the tracks on the mounting block board near the specified fuses and relays. The wire going from the switch to the rear window could have frayed and become one of the reasons.
K8 – high beam relay. If only one high beam headlight stops working, check one of the fuses F14 or F15 and the bulb in the problem headlight. Inspect the headlight connector and its contacts. It’s better to call them, then the problem will be easier to find. Check the steering column high beam switch and its contacts. When moving towards you, the headlights should flash with high beams, when switching away from you, switch the low beam to high beam. If the distant one blinks but does not switch, it is most likely the problem.
K9 – low beam relay.
If the low beam in one of your headlights stops working, check one of the fuses F12 or F13, and the lamp in the problem headlight. Check the headlight and low beam switch buttons if both headlights do not light. Contacts in the headlight sockets can also cause the lack of light.
Turn signals don't work
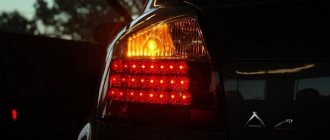
Rear light
In this article we will look at the main reasons why turn signals do not work on such VAZ models as: 2108, 2109,21099, 2113, 2114, 2115. All these models belong to the SAMARA family and have similar electronics. And in general, this article is suitable for all cars, because... The reasons for the malfunction are the same for everyone.
Repairing turn signals in many cases is a simple task. The main thing is to find the cause of the problem.
Turn signals don't blink
If your turn signals do not blink, then most likely the problem is in the turn signal relay. Try knocking on the relay or replacing it; there may be poor contact or water has gotten in there. If, after replacing the relay, the turn signals do not blink, but light up, then the relay has poor contact with the fuse block.
Where is the turn signal relay located?
In the fuse box. See the article Fuses. The relay is marked K2. Also check the fuse marked F2 and its contacts with the block. Perhaps the malfunction also lies in the hazard warning button or in the turn switch
Pay attention to them too, perhaps the contact has oxidized again
The turn signal does not turn on
If your turn signals do not light up, or one turn signal has stopped working, there are several reasons:
- Check the lamp for functionality and replace it if necessary. Replacing the turn signal lamp.
- Check all connection contacts (in the block, in the turn signal, on the switches).
- Check the switches.
- Fuses and relays. Replace, check contacts. If your turn signals and emergency lights do not work at the same time, then the problem 99% lies again in the relay.
Turn signal flashes quickly
If the turn signal blinks quickly, then most likely one of the lamps from all the turn signals has burned out. Check and replace. Also, frequent blinking/blinking of the turn signal may indicate oxidation of the chips on the rear lights or oxidation of the tracks in the Mounting block.
Turn signal relay clicks
Some owners experience constant clicking of their turn signals. The problem lies in the mounting block, namely in the relay contacts. Either they do not fit tightly or they have oxidized. It is also possible that the relay is defective. Try installing the required factory relay.
Turn signal relay diagram
Turn signal relay diagram
The photo shows a diagram of the turn signal relay. The red cross indicates the place where you need to break the circuit for normal operation of the LEDs in the turn signals
If you are interested in the original relay chain, then simply do not pay attention to the red mark
Turn signal closes
See the rear headlight unit. The taillight board is the weak point of our cars. Most likely the problem again lies in the oxide of the tracks. As a result of corrosion, different tracks come into contact and short circuit, as a result of which the fuse then blows.
Video
How to diagnose a faulty turn signal, see below:
Let's look at the main causes of the malfunction and how to eliminate them:
- If there is no turn indicator signal, then in 90% of cases you need to replace the electrical relay or check how the contacts are connected to it. The relay is indicated by the symbol K1. Possible depressurization and liquid ingress. If after replacing the relay with a new one, the malfunction remains, then you need to carefully inspect the fuses. Perhaps one of them has burned out and needs to be replaced; it is better to check the entire unit.
- Don't forget to check the quality of fuse F12, as well as how it functions with everyone. Check the functionality of the switch itself, there may well be a malfunction there.
- Sometimes the emergency warning button fails. If this is the case, we can easily replace it with another one that works normally.
- If the turn signal lamp does not turn on, check the functionality of the device. She could simply burn out.
- If it is impossible to turn off the turn signal, a simple action is taken: the switch is replaced.
- Frequent blinking indicates problems with the lamp; it is better to replace it. If after replacement the result is the same, then the contacts have probably deteriorated (oxidized) and need to be replaced or cleaned. Sometimes it is a matter of failure of the tracks on the block.
- Dim glow. There are several reasons for this phenomenon: a mismatch in the power of the lamp required for a given turn signal. In this case, it is enough to purchase a lamp with the required parameters and replace it.
- Atypical relay sounds. With such a malfunction, the turn signals do not turn on according to your wishes. In such a situation, as a rule, the electrical relay should be replaced. It would be ideal if you purchase an original car from the factory that matches the model, so you will achieve long-term good performance.
- If the right turn signal does not work, then you need to carefully examine the right headlight. Its electrical board often malfunctions due to oxidation, therefore, the supply of electric current is disrupted. As a result, problems are possible with both the relays and fuses, and accordingly the turn signals stop working.
How to remove the turn signal relay
As we mentioned above, on cars with a carburetor engine, disassembling the dashboard may be required to remove the turn relay. This is a rather lengthy procedure that requires appropriate experience. On modifications of the VAZ-2107 with more modern injection engines, removing the turn signal relay is much easier:
- open the hood and get to the mounting block;
- we find the relay;
- we pry up the device and pull it upward;
- disconnect the wires connecting the relay to the vehicle's on-board network.
After this, you can quickly install the new part and securely fix it in the mounting block.