In the design of a car, the ball joint plays a very important role, since it bears all the load that the vehicle experiences. Also an important function is the level of inclination of the wheels. On the Lada Kalina, the factory ball joint is not very reliable, so many car enthusiasts replace the standard part with an analogue one.
Video on replacing a ball joint
The video material talks about replacing the ball joint of the Lada Kalina and the features of the process.
Replacing ball joints on Kalina: safety and comfort without extra costs
November 3, 2016
Over time, every owner of a Lada Kalina car is faced with the need to change ball joints. This operation is quite accessible for independent execution. Read about in what cases it is necessary to change ball joints, and how to replace ball joints on Lada Kalina cars.
Signs of faulty ball joints on Lada Kalina
The front suspension of Lada Kalina cars is made according to the MacPherson scheme, in which the upper support is a shock-absorbing strut, the lower is a wishbone connected to the steering knuckle by means of one ball joint. This scheme is quite simple and reliable, however, this assembly contains several moving parts, so it can be difficult to reliably identify a faulty ball joint.
In general, the following signs indicate a malfunction of the ball joint:
- Knock from the front suspension when overcoming uneven roads at low speed;
- Increased effort on the steering wheel when turning;
- Creaking from the front suspension when turning the steering wheel;
- Uneven tire wear;
- Unstable trajectory of the car with a straight steering wheel.
These signs should be treated with caution, as they may indicate problems with the wheel bearing, shock absorber and fastening of suspension parts (levers). To diagnose, you can follow a few simple steps
First, rock the car and listen to the sounds arising in the suspension - although this method helps to localize the cause of extraneous creaks and knocks, it, unfortunately, can provide little information to inexperienced car enthusiasts.
Secondly, you can check the ball for play by shaking the wheel with your hands, grasping it at the top and bottom points. In this case, you need an assistant to depress the brake pedal. There should be no noticeable play when the wheel rocks, although play may again indicate problems with the wheel bearing and suspension parts.
Finally, thirdly, you can check the ball joint for play tactilely. To do this, you need to place your palm directly on the support so as to simultaneously touch its body and finger. When rocking the wheel (which is best left to an assistant), you can clearly feel whether there is play in the ball joint and how big it is.
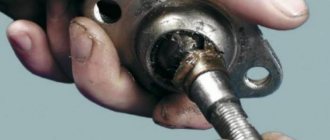
You should also pay attention to the condition of the protective rubber boot (boot) - you need to periodically inspect it for cracks and tears. Even a small crack will lead to squeezing out the lubricant and getting dirt inside the cover, and, as a result, to intense wear of the ball joint and a sharp reduction in its service life
If a malfunction is suspected or a clear sign of failure is detected, the ball joint must be replaced as soon as possible.
Choosing the right new ball joints
The chassis of Lada Kalina cars of both generations (models 1117, 1118, 1119, 2192 and 2194) is built on a complete base, which is for the most part unified with earlier and later cars of the Volzhsky Automobile Plant.
Diagnostics of ball joints and reasons for their failure
Like all budget front-wheel drive cars, the Lada Kalina is equipped with a MacPherson-type front suspension. Briefly, the design consists of an upper support in the form of a strut with a shock absorber and a spring, and a lower support in the form of a wishbone. This lever is connected to the wheel hub (via the steering knuckle) using a ball joint. The design is elementary and therefore reliable, but the presence of moving elements makes diagnostics a difficult task, requiring certain skills and knowledge.
Signs of a ball joint malfunction
The most common symptoms of problems with this unit include the following:
- when driving at low speed over uneven surfaces, a knock is heard from the front suspension;
- when turning the steering wheel, a slightly greater force is required;
- when turning the steering wheel, the front suspension begins to creak;
- Tires wear out differently;
- The car pulls to the side when driving in a straight line.
But it is impossible to diagnose only a ball joint based on these signs, since these same symptoms may indicate problems with the shock absorber strut, wheel bearing or suspension arms. There are a number of methods for independently identifying faults that are not very complicated.
Diagnostic methods
| Options | Performance |
| The first and most accessible is a hearing test. | To do this, it is better to use the help of a second person. The engine must be turned off and the vehicle placed on a level surface. Have a helper rock the car. At this time, you need to listen to identify any extraneous sounds coming from the ball joint. Unfortunately, despite the simplicity of the method, it will not be informative for inexperienced car enthusiasts, since it is difficult for a beginner to localize the source of knocking and squeaking. |
| The second method is similar to determining whether a wheel bearing is faulty. | To do this, you need to check the wheel play using the rolling method. First you need to hang the desired wheel using a jack. Next, holding the lower and upper points of the wheel, you need to swing it in different directions with your hands. Ideally there should be no backlash. If there is play, this may indicate trouble with the ball. On the other hand, play may indicate problems with the wheel bearing. |
| The third method involves diagnosis by touch. | To do this, you need to place your palm on the support so that your palm simultaneously rests on both the body and the ball-shaped tip. At this time, the assistant should swing the wheel hanging on the jack; in this situation, you can easily feel the degree of play of the ball joint. |
It should be taken into account that on non-original supports there are special diagnostic holes that allow you to determine how worn the tip is. In addition, you can find out about problems with the ball by looking at the condition of the protective boot. Even small cracks can cause grease to leak and dirt and dust to enter. As a result, this results in accelerated wear of the unit and a significant reduction in service life.
Causes of ball joint malfunctions
Among the most common are mechanical damage and natural wear and tear, which can be significantly accelerated by a number of factors.
Boot rupture
This is one of the most common reasons for ball joint failure. A working boot should protect internal working elements from moisture, dirt, dust, etc. As a result, the lubricant ceases to perform its functions and increased wear of parts begins. The boot is made of rubber. This means that in the summer and at low temperatures in winter, the protective boot is susceptible to destruction.
Off-road
When driving on uneven surfaces most of the time, the ball joint wears out much more intensely. This is especially true for Russia, where the problem with roads is familiar to every motorist. Based on this, you should not rely on the service life indicated by European auto parts manufacturers. Usually it is better to change much earlier, because foreign brands do not take into account the condition of our roads.
Inadequate or absent lubrication
If there is heavy wear, it should be added in a timely manner, otherwise increased friction of the metal parts will lead to heating and rapid wear of the ball. Typically, this situation leads to severe grinding of the ball-tip pin, resulting in an increased gap and the pin dangling in the socket.
When the car starts to move off-road or on uneven surfaces, the pin may jump out of the housing (clip) with increased clearance. This is usually accompanied by a characteristic knock (knocking from one of the wheels) in the front suspension.
Price list for basic VAZ suspension repair work
Check with our managers by phone. They will be happy to answer all your questions.
The reasons for contacting the service center may be:
- extraneous sounds when the car is moving, such as knocking or grinding;
- vehicle vibration;
- large body roll when cornering;
- uneven wear of wheel tires.
Diagnostics of your car for suspension health will include checking the shock absorbers
tors, springs and struts, ball joints, CV joints, degree of wear of brake pads.
Diagnostics and repair of the VAZ front suspension, as well as repair of the VAZ rear suspension, is carried out at our car service center using special equipment. The car is located on a special stand, which provides unhindered access to all parts of the car. If during diagnostics malfunctions in the operation of the shock absorbers are discovered, they will be replaced, followed by wheel balancing.
Sources
- https://mylada.net/remont/zamena-sharovyx-opor-na-kaline.html
- https://www.zr.ru/content/articles/118912-kalina_neladnaja_lada/
- https://remontvaz.spb.ru/remont-podveski/
Lada Kalina Station Wagon 2008, 81 l. With. - spare parts
Cars for sale
Lada Kalina, 2012
Lada Kalina, 2009
Lada Kalina, 2011
Lada Kalina, 2012
Comments 30
which ball joints did you choose and how were they diagnosed, thank you
So far I’ve been driving the Samarazapchast ball joints, they rattle at low speeds on uneven surfaces. I’ll probably install a Lemferder - the reviews about them are more positive.
I installed cedar, the lemferder had to be ordered, the price was the same, I bought the ones that were in the store
factory ones passed 62tk removed in excellent condition. replaced it with a bzak factory.
I installed lemforder balls on my last Kalinka, they performed excellently)
Try to remember where they were made? Nowadays only China makes it, but before it was made in Germany.
Yes, I didn’t look too closely) there were all sorts of German words on the box) I didn’t even buy them myself) they were in the store from the craftsmen) they said they were good) they didn’t deceive me)
Try to remember where they were made? Nowadays only China makes it, but before it was made in Germany.
So why is China confusing?
Same garbage, enough for 20,000 miles! I installed it, I don’t remember which ones. All front-wheel drive vehicles had at least 100,000 miles on them before. Although I sold two viburnums for 65,000.
what they put on the conveyor belt is not at all what they sell and they walk normally
At my last viburnum, there were conveyor belts. Result: 20,000 km and the bells have become like bells. I'm surprised myself.
So, just like me, I was unlucky.
I drove the car 35t after purchase, I haven’t changed the ball joints yet. Mileage is only 123t. The mechanic I sometimes get serviced by says it’s still relatives.
Relatives go for a long time, if you're lucky. But I was unlucky - the mileage is 127, and the ball joints have already been changed 5 times.
I had no luck with the tie rod ends; I changed them twice in 35 tons of mileage.
Kedr, Belmag run fine. If imported, then lymphedore so that the catalog number ends in 01, they are fine if other numbers are better not to take and TRW is good
They also advised me to use lymphders, they say there are no problems with them.
Kedr, Belmag run fine. If imported, then lymphedore so that the catalog number ends in 01, they are fine if other numbers are better not to take and TRW is good
I just looked through the catalogs and didn’t find a limper with 01 at the end, only 02 is there
I don’t have them since 01, now I installed them in 02 that summer, now they say they need to change them (I also don’t know what to install... apparently a consumable)
Hello!
Somehow, almost immediately after purchasing Kalina 2, my left (driver’s) ball joint creaked.
It was NOT replaced under warranty
.
We installed a ball joint from AvtoVAZ. At almost 60,000 km, the right ball joint began to knock (especially after a long period of inactivity). Self-diagnosis revealed play in the right (passenger) ball joint. After choosing for a long time, I decided to install TRACK ball joints of the “TRS” 2108 series on the Lada Kalina 2 (2194)
.
From the manufacturer of TRS series ball joints:
“The TRS series ball joints are intended for those who are interested in motorsports, for professional racers, as well as for those whose car is used in professional activities. The developed new design of the liner has greater rigidity and has grooves for lubrication and removal of wear products, which significantly increases the service life of the product.
The use of a solid forged body eliminates the possibility of its deformation and the appearance of fatigue cracks, unlike a body made of thin-sheet stamped parts. The ball joint is assembled by plastically deforming the upper part of the housing. As a result, high values of force to pull the ball pin out of the body are achieved (2.5 times higher than the standard), and high safety during operation is ensured. The original design of the liner is more rigid (compared to serial products); it is equipped with grooves for lubrication and removal of wear products. Lubricating molybdenum disulfide on the ball pin sphere also helps reduce wear on the assembly. The sealing rings of the protective cover ensure complete sealing of the unit. The material of the protective cover made of polyurethane provides strength 3-4 times higher than that of rubber, while fully maintaining elasticity. Operable at temperatures from -65°C to +110°C. The housing coating protects the product from corrosion during operation. The actual mileage reaches 100,000 km.
Change ball joints on a viburnum with your own hands
Lada Priora Sedan Snezhka Logbook Replacing the support bearing
Hello. Today we’ll talk about how to replace ball and tie rod ends on a Lada Kalina with your own hands. Why ball and tie rod ends fail and how to diagnose their malfunction is written here
Before starting work, you need to prepare: a set of keys, a universal puller, a jack, WD-40 fluid, as well as new spare parts.
How to replace ball joints on a Lada Kalina - step-by-step instructions
1. Before starting work, apply a few drops of WD-40 to threaded connections that you think may have problems. They will be different for everyone, it all depends on the condition of the car, the roads on which it drives, and the attitude of the owner towards this car...
2. Unscrew the ball joints. There are two TORX bolts that are attached to the hub; for this we take an E12 head.
3. Afterwards, we proceed to the stabilizer strut, it must be unscrewed.
4. Bend down the lever with the ball joint.
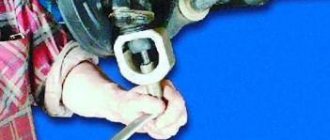
5. Using a universal puller, press the ball joint out of the lever. If you don’t have a puller, you can use a crowbar, but in this case there is a high probability of damage to the CV joint boot if the crowbar comes off.
6. When the old ball is removed, take the new ball and attach it to the hub and lever.
7. Jack up the lever, using a jack to place it under the ball. This will compress the spring of the shock absorber strut and screw on the stabilizer bar.
Step-by-step instructions - how to replace tie rod ends on a Lada Kalina
- We unscrew the steering wheel in the direction opposite to replacing the steering tip.
- We remove the locking pin and unscrew the nut securing the tip to the stand.
- Now you need to “release” the tip mounting bolt.
- Using a puller, press the tip out of the stand. Some people use a hammer and simply knock out the tip.
- Next we unscrew the tip, this is done clockwise. If the adjusting sleeve starts to rotate, fix it using a wrench.
6
I draw your attention to the number of turns, it must be counted, this will save you from the need to go to a service station and do a wheel alignment
7. Assembly is performed in reverse order. If the car pulls to the side and the “trick” with counting the turns didn’t work, don’t be lazy and do a wheel alignment.
The result of the work done should be the disappearance of play and knocking, which are an integral part of chassis malfunctions.
That's all for me, thank you all for your attention, I hope everything worked out for you!? Until we meet again, take care of yourself and your car! Text belongs to: VAZ Do-it-yourself repair. Text belongs to: VAZ DIY repair
Text belongs to: VAZ DIY repair
L-shaped screw puller
Replacing the outer CV joint on a viburnum with your own hands.
What cars can this ball joint puller be used for? 2107, 2105 and 2106 - these are the VAZ cars for which it is best suited. The tool is quite versatile. To make it, you will need a metal rod - its diameter must be at least 10 mm, and its length - 15-17 cm. An L-shaped blank is made from this rod, the arm length of which must be at least 5 cm. So, take a rod, measure 5 cm on it, clamp it in a vice and bend it at a right angle. A thread is cut on the long part of the element. Find a suitable nut.
Now you need to make a thrust bar. It is made according to the wedge principle. A plate with a thickness of at least 5 mm is suitable for the workpiece. On one side of the plate a slot is made that fits the support pin. On the other hand, they make a hole for the diameter of the rod. Next, put the plate on the long part of the rod and clamp it with a hook.
Video review on replacing ball joints on Grant
For those who are too lazy to understand photo reports, everything can be shown clearly and easily using the example of a video review, which was taken from open sources.
This concludes this repair report.
Before starting work, you need to prepare: a set of keys, a universal puller, a jack, WD-40 fluid, as well as new spare parts.
1. Before starting work, apply a few drops of WD-40 to threaded connections that you think may have problems. They will be different for everyone, it all depends on the condition of the car, the roads on which it drives, and the attitude of the owner towards this car...
2. Unscrew the ball joints. There are two TORX bolts that are attached to the hub; for this we take an E12 head.
5. Using a universal puller, press the ball joint out of the lever. If you don’t have a puller, you can use a crowbar, but in this case there is a high probability of damage to the CV joint boot if the crowbar comes off.
- We unscrew the steering wheel in the direction opposite to replacing the steering tip.
- We remove the locking pin and unscrew the nut securing the tip to the stand.
- Now you need to “release” the tip mounting bolt.
- Using a puller, press the tip out of the stand. Some people use a hammer and simply knock out the tip.
- Next we unscrew the tip, this is done clockwise. If the adjusting sleeve starts to rotate, fix it using a wrench.
6
I draw your attention to the number of turns, it must be counted, this will save you from the need to go to a service station and do a wheel alignment
Text belongs to: VAZ DIY repair
In the design of a car, the ball joint plays a very important role, since it bears all the load that the vehicle experiences
Also an important function is the level of inclination of the wheels. On the Lada Kalina, the factory ball joint is not very reliable, so many car enthusiasts replace the standard part with an analogue
Video on replacing a ball joint
The video material talks about replacing the ball joint of the Lada Kalina and the features of the process.
Replacement
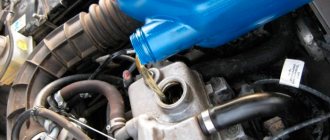
- The first step is to soak the fasteners in WD-40 engine oil for a day to make the boiled parts easier to remove. It is advisable to do the impregnation twice, one and a half to two hours apart, and leave until the next day.
- Now we begin the most difficult dismantling work. Raise the front of the car and remove the wheel.
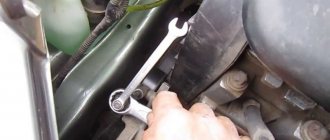
- Unscrew the fasteners holding the supports. There are two bolts in total, which can be removed with a 12 key.
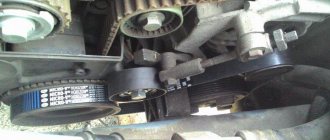
- We dismantle the stabilizer strut.
- To remove the supports, you must first bend the lever down a little.
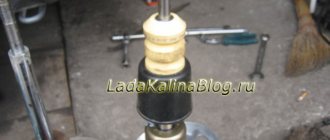
- We arm ourselves with a puller and press the part out of the lever. An analogue of a puller can be an ordinary crowbar, which is likely to be found in every home of the real owner.
- But when pressing out the support, you need to be extremely careful: you can damage the boot, which is quite fragile, especially on the Lada Kalina.
- After dismantling, we install a new support and reassemble in the reverse order.
Now we do the same with the rear supports.
Of course, repair work on the suspension is not as simple as, for example, replacing a steering rack or muffler, but if you use competent instructions and patience, everything will work out. We wish you good luck and good roads!
Selection of ball joints for Lada Kalina
Its front suspension is not much different from previous VAZ models, for example, Priora, Samara, etc. The chassis of different generations of Kalina itself does not stand out fundamentally. On the first generation and on Lada Kalina cars of 2 different modifications, ball joints with catalog number 21100-2904192-82 are installed, and for supports with a set of fasteners, catalog number 21100-2904192-86.
The modern auto parts market offers customers different types of supports. The first are original (welded from several parts), and the second are stamped and reinforced. Structurally, all these hinges are arranged identically. The only differences are in the manufacturing technology and quality of the steel used, as well as its thickness. This determines the strength of the products, their durability and, of course, cost. In terms of size and principle of operation, they are no different from each other. From this we can conclude that the question of choice is not fundamental and depends on the personal preferences of the car owner.
Experienced car enthusiasts, as well as auto mechanics, recommend using exclusively original components. Only by choosing the original, you can be guaranteed to obtain the declared quality, reliability and long service life. However, as practice shows, original spare parts are sometimes much more expensive than analogues, so most car enthusiasts prefer to use the second option.
When choosing analogues, you need to approach the issue carefully and responsibly. You should not choose very cheap spare parts from an unknown manufacturer, and you should also not take components from markets, unknown points, or simply from your hands. Before purchasing, you should carefully inspect the components. There should be no visible welds on them; the surface should be gray, which indicates heat treatment of the part.
The components must have an emblem and a quality mark. As a rule, fakes do not have this.
Indirectly, quality is indicated by holograms on the case or packaging of components, as well as an additional set of fasteners. The cost of a ball joint for Kalina usually does not exceed 500 rubles. It's inexpensive, but it's worth considering that purchasing units for tuning can be significantly more expensive. For example, those from Pasker are valued tens of times higher.
How to choose the right one
Professionals say that it is better to give preference to original spare parts, since only they can guarantee impeccable quality, reliability and durability.
But this option is expensive, which is why a significant part of motorists pay attention to analogues of original spare parts
But here you need to be very careful: do not trust unknown manufacturing companies and do not buy components from unverified points on the market.
Before buying a product, it is necessary to conduct a thorough visual inspection: there should be no traces of welding on the body. Also, the parts should not undergo heat treatment, as can be seen from the dirty gray color of the surface.
But that’s not all: manufacturers of fakes sell products with a perfectly smooth surface, but! There is no emblem or quality mark here.
Quality can be determined by the hologram on the case and packaging in steel or red shades, with a mandatory set of fasteners.
The optimal price for VAZ supports is 500 rubles. True, not so expensive, but if you want to purchase tuning parts, then the price will be two zeros more - in the region of 20,000 to 48,000 rubles, from Pasker.
Changing the ball joint on a Lada Kalina: photos and video
In the design of a car, the ball joint plays a very important role, since it bears all the load that the vehicle experiences
Also an important function is the level of inclination of the wheels. On the Lada Kalina, the factory ball joint is not very reliable, so many car enthusiasts replace the standard part with an analogue
to replace the ball joint
The material talks about replacing the ball joint of the Lada Kalina and the features of the process.
Ball joint replacement process
When you have decided on a spare part, you can carry out the replacement operation. So, let's look at the step-by-step process of changing the ball joint on Kalina:
- We dismantle the wheel.
- We clean the ball joint and all surfaces that connect to it.
- Unscrew the fastening of the ball joints.
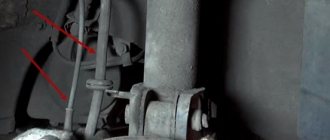
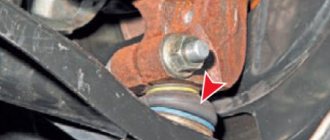
The ball mount is marked with an arrow. - The stabilizer link also needs to be unscrewed for easy replacement.
We unscrew the stabilizer mount for easy replacement of the Kalina ball joint - We bend the lever down.
- We take a special puller for balls and press it out of the lever seat.
- Installation is carried out in reverse order. Using a jack, raise the lever and tighten the stabilizer mount Installed a new ball joint on Kalina
Peculiarities
Consequences of untimely replacement of the ball joint
Harsh operating conditions, poor road surfaces, loads and passengers place a lot of stress and responsibility on the ball joint. Therefore, the condition of this node must be monitored regularly.
The entire load does not go to the ball joint itself, but to a small ball, which can fall out if worn out and worn out. If you remember, not so long ago you could see a Lada car on the road with a fallen ball joint.
Reasons for failure
There are several reasons why a ball joint may fall out. Let's consider the main ones:
- Wear. The most common malfunction that occurs on cars.
- Insufficient lubrication in the boot leads to the fact that the finger begins to creak and may eventually simply break.
- The penetration of dirt and water into the ball contributes to the development of corrosion, which can affect the operation of the vehicle. At best, a wedge and the inability to turn the wheels; at worst, the car will fall onto the asphalt.
To avoid consequences, it is necessary to regularly diagnose and maintain ball joints.
Diagnostic operations
How can you diagnose the condition of ball joints on a Lada Kalina:
The first thing you need to pay attention to is the condition of the boot. If it has cracks or is torn, then it must be removed and the ball should be inspected. We hang the wheel a little and swing it up and down with our hands.
If there is play, then it’s time to replace the ball. The presence of a squeak, as well as heavy turning of the steering wheel, can also be signs that the ball joints are in critical condition. Instability in control, namely departure from the trajectory of movement to the left or right, with the steering wheel in a level position, indicates that the ball joint has failed.
It is almost impossible to determine the exact condition of the ball joint, but the above facts indirectly indicate the condition of the supports.
Ball selection, articles
The choice of ball joints for the Lada Kalina should be treated carefully, since it determines what loads the car can withstand:
Original
If you believe the spare parts catalog, then the original catalog number of the Lada Kalina ball joint is 2108-2904185. The average cost is 1000 rubles per piece.
Original Kalina ball joint produced by AvtoVAZ
Analogs
Belmag ball joint is an excellent option for replacing original spare parts
Let's consider possible options for replacing the original spare part:
| Weber | SS 2108-4185 | 500 |
| Master-sport | 1545601/E-PCS-MS | 500 |
| SCT | RM 485 | 500 |
| Denckermann | D110112 | 500 |
| Monroe | L70003 | 550 |
| Ruville | 917210 | 600 |
| Delphi | TC583 | 600 |
| Patron | PS3101 | 600 |
| Pekar | 2108-2904185 | 600 |
| Moog | LA-BJ-0063 | 650 |
| Pilenga | TS-P 3142 | 700 |
| TRW | JBJ 156 | 800 |
| Optimal | G3-199 | 1000 |
As you can see from the table, you can buy an analogue cheaper than the original. But don’t go to extremes and buy the cheapest.
TRW ball joint recommended for installation on Kalina
conclusions
The process of replacing ball joints on the Lada Kalina is quite simple and easy
But, it is worth paying attention to the choice of part, since it depends on its quality how long and the quality it will hold the suspension
How to check a ball joint? Several ways + useful information
At home, I don’t know how to check the ball joint for functionality. Today, few people understand in detail the structure of a car, the interaction of components and assemblies. Many people think that it’s easier to take the car to a service station and let the specialists take care of it. Not all motorists treat their pets this way; some consider it their duty to sort out some breakdowns themselves.
As a rule, the lion's share of attention is always paid to the chassis, since this is the safety of the driver and passengers while driving. The speed of movement, the amount of cargo transported, and the performance of other components such as the transmission, motor, and braking system directly depend on how this unit operates. Often, breakdowns occur when the vehicle is operated on a poor road surface, a significant violation of the technical inspection deadlines, or the installation of a low-quality part.
Of course, this is not a complete list; there may be other factors, such as mechanical damage or an accident.
- Verification methods
- Signs of wear
- DIY replacement algorithm
Verification methods
How to check a ball joint? In fact, testing is much easier than replacing. So, for diagnostics at home we need:
- Drive the car onto an inspection hole or overpass. A flat surface is possible, but access to the bottom of the car is desirable;
- Squeeze the handbrake, turn on neutral speed, jam the rear wheels with special shoes;
- Jack up the left and right front wheels alternately, holding one hand at the top of the tire and the other at the bottom. With some effort, try to shake the wheel up and down. If you hear a slight knock and play, then it is necessary to urgently replace the ball joint. Otherwise, driving onto the highway is extremely dangerous. If there is no play, then you can proceed further.
There is another way to check:
Climbing under the front of the car, armed with a caliper or depth gauge, take measurements in the middle of the ball joint between the end of the pin and the hole in the middle of the ball joint.
For example, for VAZ models, the depth should not be more than 12 mm; for other brands, the indicators are written in the instruction manual. If you don’t have instructions at hand, you can always download them from the Internet.
Factors affecting wear:
- Natural wear and tear of vehicle chassis components;
- Exceeding the maximum permissible loads;
- Exposure to the negative effects of water, cold, dust, dirt due to damage to the protective boot on the ball joint;
- The actual absence of lubrication inside the product, which leads to a wedge.
Signs of wear
- A characteristic and distinct knocking sound when driving over uneven surfaces and potholes;
- When turning the steering wheel, a grinding noise is heard and the force with which the turn is performed is increased;
- The car doesn't handle the road well. It feels like it's fluttering rather than moving;
- Uneven and rapid wear of car tires.
Procedure for replacing ball joints
Before performing work, you should put the car on the parking brake, jack it up and remove the wheel.
Dismantling the ball joint is carried out as follows:
- Using a 19mm wrench, unscrew the nut securing the support pin to the lever
- Using a puller, press the pin out of the lever.
- Using a 17 mm wrench or a TORX E12 socket, unscrew the two bolts securing the ball to the steering knuckle
- Using a pry bar, press the lever down and remove the ball joint.
The nut and bolts can be pre-treated with WD-40 or similar, but in most cases the fasteners can be removed without special preparation.
If you don’t have a ball joint remover on hand, you can proceed as follows:
- Partially unscrew the nut, leaving it on the finger;
- Use a pry bar to apply force to the lever from top to bottom;
- Press out the finger with confident hammer blows on the lever.
The ball joint can now be inspected and tested for proper performance. The support must be clamped in a vice and the finger must be checked by hand for play in the axial and radial directions. Normally, a play of up to 0.7 mm is allowed; if there is even slight movement of the finger, the entire support must be replaced. If there is no play, the support is suitable for further use.
Often, the ball joint is in normal condition, but its rubber protective cover (boot) is torn and deformed - in this case, you can install a new cover. To do this, the boot is dismantled, the hinge is cleaned of old grease, the new cover is filled to half the volume with grease, and installed on the support.
The boot of the new ball joint must also be filled with lubricant. By forgetting to do this, you dramatically reduce the life of the entire part.
The new ball joint is mounted in the reverse order. Moreover, there are two possible ways:
- First install the support on the steering knuckle, then move the lever and screw the nut onto the pin;
- First, install the support on the lever, then bring this entire structure to the steering knuckle and fasten the support with two bolts.
The second method is less convenient in that it is quite difficult to bring the support to the steering knuckle so that the mounting holes of both parts coincide, so it is better to resort to the first method.
During installation, it is recommended to use a torque wrench, the nuts securing the support to the steering knuckle are screwed with a force of 50-63 Nm, the nut on the pin is screwed with a force of 80-96 Nm.
A car with a new ball joint can be operated in normal mode; after about 100 km, it is recommended to check the fastening of the support and, if necessary, tighten the bolts and nut with the force specified above. The part does not require any further maintenance.
It's hard to find a child who doesn't like active play outside, and every child has dreamed of one thing since childhood - a bicycle. Choosing children's bicycles is a responsible task, the solution of which determines the joy and health of the child. Types, features and selection of a children's bicycle is the topic of this article.
The warm season, especially spring and summer, is the season for cycling, nature walks and family holidays. But the bike will be comfortable and bring pleasure only if it is chosen correctly. Read the article about the choice and features of buying a bicycle for adults (men and women).
Swedish Husqvarna tools are known all over the world and are a symbol of true quality and reliability. Among other things, chainsaws are also produced under this brand - read all about Husqvarna saws, their current model range, features and characteristics, as well as the issue of choice in this article.
Heaters and pre-heaters from the German company Eberspächer are world-famous devices that increase the comfort and safety of winter operation of equipment. Read the article about the products of this brand, their types and main characteristics, as well as the selection of heaters and preheaters.
Many adults do not like winter, considering it a cold, depressing time of year. However, children have a completely different opinion. For them, winter is an opportunity to roll around in the snow, ride the slides, i.e. have fun. And one of the best helpers for children in their non-boring pastime is, for example, all kinds of sleds. The range of children's sleds on the market is very extensive. Let's look at some types of them.
Replacement
- The first step is to soak the fasteners in WD-40 engine oil for a day to make the boiled parts easier to remove. It is advisable to do the impregnation twice, one and a half to two hours apart, and leave until the next day.
- Now we begin the most difficult dismantling work. Raise the front of the car and remove the wheel.
- Unscrew the fasteners holding the supports. There are two bolts in total, which can be removed with a 12 key.
We dismantle the stabilizer strut. To remove the supports, you must first bend the lever down a little. We arm ourselves with a puller and press the part out of the lever. An analogue of a puller can be an ordinary crowbar, which is likely to be found in every home of the real owner. But when pressing out the support, you need to be extremely careful: you can damage the boot, which is quite fragile, especially on the Lada Kalina. After dismantling, we install a new support and reassemble in the reverse order.
Now we do the same with the rear supports.
Of course, repair work on the suspension is not as simple as, for example, replacing a steering rack or muffler, but if you use competent instructions and patience, everything will work out. We wish you good luck and good roads!
Somewhere at the end of 18 thousand, I began to notice a knocking sound from the right front wheel when driving over bumps. An inspection from below on the lift revealed a malfunction of the right ball joint. And this is for 19,000 km! Our roads, like everywhere else in Russia, are a hole on a hole, and the quality of the ball joint has probably let us down.
I made the replacement myself (I have experience from the previous car).
I won’t describe the process, because... You can find many articles about replacement on the Internet. I'll tell you some of the nuances.
That's all, good roads and quality spare parts to everyone.
Price tag: 330 ₽ Mileage 19000 km
Comments 21
bullshit, I changed it to 42,000:
1. Both ball joints (the left one was knocking hard, I changed both at once);
2. Lever bushings (dried out and cracked. There was play on the levers);
3. Both crabs have arrived (the end of silent blocks has come);
4. Both strut supports with bearings have arrived. Moreover, after replacement, two days later they started knocking again (an autopsy showed that the new bearing had shattered). The supports are Grant-made, but you need to take into account the specifics of the car (with or without an amplifier);
5. At the same time I changed the clutch (I installed Valeo. Let's see, maybe it lasts longer). With a squeeze ass, he is on grants and K2 is his own, special (I barely found it, no one really knows anything either on the market or in services). I bought a clutch kit, the release one didn’t fit, I had to buy it separately.
Well, the rear hubs hum as long as I don’t touch them.
In general, the car is not bad, passable. But such a scope of work for 42,000 is overkill! And this is in St. Petersburg with more or less smooth roads))
In terms of money, everything cost about 25 thousand
Good luck, bro. But it’s really sad that everything is somehow with you (((Let’s say it has fallen apart globally.
I replaced both ball joints at 18 t.km, the roads take their toll (One is completely dead, the other is still ok, but I’m used to it. If we change it, then change both
I'll see how long the second one lasts, for comparison.
Father has a grant. Drives carefully. We also changed 1 left ball joint at 29 thousand km. The car is 3.5 years old. The other right ball joint is normal. And this one is dangling broken. Such quality of details.
Yes, the quality is let down. That's why they don't take our cars.
79,500 relatives left.
Also, when I screwed the ball to the knuckle for the first time, I fiddled with it for a very long time, constantly breaking it... The next time I ground off the thread a little so that the bolt would first get into the holes and only then go along the thread, it almost turned out to be a magazine bolt, as in the photo) Advice for future ))
A good suggestion, I'll take note for the future. Thank you.
Strangely strange. On viburnums the balls seem to be a reliable unit.
I'm surprised myself. It seems to be a reliable unit, but it flew out unexpectedly quickly.
Strangely strange. On viburnums the balls seem to be a reliable unit.
I have 24000 for both replacements
Brachin apparently. I’m 65, while my relatives are still standing. There are no backlashes or knocks yet. The brother has over 70 miles, his relatives are still standing (((
Strangely strange. On viburnums the balls seem to be a reliable unit.
No, lately they've been going around so much.
A-fi-get, well, how sad it is (((After the classics, I was really glad there was such a resource...
On the classic, it’s been 2 months since I changed the top one (one) and less than a year ago the second one - that’s it, both are already knocking(
The last Kalina lasted 1 year or 20,000. Changed it.
Have you tried the track? After a bunch of tried shit, it took me two years. Well, the Belebey ones were also quite good.
I tried, but back when I had an A, and that was 15 years ago. Super. I can't find it now. Or didn't try :-)
I also had a knock, I decided it was ball bearings. It turned out to be the steering column driveshaft
- Dollar – 58.85 rubles.
- Euro – 62.68 rub.
- Posted by: admin;
- Read: 4097;
- Date: 05/29/2014, 15:49;
Characteristics of the ball joint on the Lada Kalina
This unit holds the wheel in a certain position, while at the same time allowing the hub to rotate and maintain horizontal stability. The ball joint is called because of the ball-shaped tip. Structurally, it is a cone-shaped unit.
The Lada Kalina uses a modern collapsible element, although the first VAZ models had stamped assemblies from several parts, and then cast structures. The ball joint installed on a Lada Kalina car, regardless of modification and generation, has a standard device that includes several main components:
- frame;
- a part in the form of a cone (another name is “finger”);
- rubber protective boot (prevents dirt and dust from entering).
The main elements are made of high quality steel. This is due to the fact that during operation the working parts are constantly exposed to load, friction and, as a result, high temperatures. The only exception is the hollow part of the body, which is covered with polymer materials. Plastic is mainly used for these purposes.
The main advantage of the Kalina ball joint is the extreme simplicity and efficiency of the design, which allows the contacting parts to move freely at equal angles.
Looking at the structure of the ball in more detail, it can be noted that it is actually a steel finger, which on one side ends with a tip in the form of a small ball. The tip rests on a plastic (or polyurethane) gasket. The bushing and ball end are located in the body and are rolled to prevent flyout. The body is additionally galvanized against corrosion. It is fixed to the upper or lower control arm and the threaded part is secured with a knuckle nut. Thanks to this, the fist is not fixed too tightly, which allows it to rotate along with the wheel hub, and the vertical position is maintained when the vehicle’s suspension is operating.
The ball joint is a fairly reliable and durable unit if you follow the operating rules. The long service life of the ball joint is possible thanks to the lubricant located in the part of the housing where it comes into contact with the working part. Insufficient lubrication, its leakage and moisture entering the internal cavity can cause premature failure of the entire assembly. To protect the working parts, a special boot made of rubber that is resistant to aggressive environments is used.
In order for the ball joint to last as long as possible, every car enthusiast should check the condition of the suspension from time to time, paying special attention to the rubber boots. There should be no cracks or other visible damage on their surface. If there are defects, it is recommended to check the condition of the entire assembly for wear.
If there are defects, it is recommended to check the condition of the entire assembly for wear.
What can cause ball joints to become unusable?
There are only two factors that worsen the condition of ball joints, but both of them can be attributed to mechanical stress.
First
– this is dust and dirt that penetrates through a torn boot. When driving over uneven surfaces, the rubber boot that protects the unit's lubrication can easily be damaged. When dirt or moisture gets in, the lubrication properties deteriorate and sand gets into the smooth part of the hinge. After that, it gets scratched and starts to play.
Second factor
- These are shock loads. Although the product can withstand a wide range of impacts, it still has its limits. With frequent impacts and horizontal displacements, the product may break off or gaps may appear in the smooth part of the hinge. This also leads to backlash and subsequent destruction of the support.