The Opel Astra J first debuted at the motor show in Frankfurt am Main (Germany) in 2009. The production of the Opel Astra J in Russia began in 2010, respectively, it was produced here in 2010, 2011, 2012, 2013, 2014 and 2015- s years.
The Opel Astra J was presented in three body variations: hatchback (GTC, OPC), station wagon and sedan. This model could have a gasoline or diesel engine with a volume of 1.3 l CDTI, 1.4 l (A 14 XER), 1.4 l (A 14 NET, turbo), 1.6 l (A 16 XER), 1.6 l (A 16 LET, turbo) , 1.7 CDTI, 1.8 l, 2.0 l.
From our article you will learn where the fuse and relay blocks are located with their diagrams, descriptions and purposes. We especially note the washer and cigarette lighter fuses.
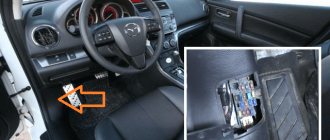
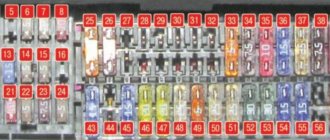
Fuse box in the passenger compartment
The module is hidden under the storage shelf on the left side of the steering rack.
To gain access you will need to remove the plastic. This can be done using a flat-head screwdriver. It is necessary to release the fasteners and pull out the shelf towards you. The module contains inserts responsible for auxiliary equipment that is not related to the operation of the power plant.
Adjustment of maintenance period
How to reset the Opel Astra G (Opel Astra Classic II) service light. By year: 1998, 1999, 2000, 2001, 2002, 2003, 2004, 2005, 2006:
- The ignition is turned off.
- Press and hold the trip odometer reset button.
- Turn on the ignition one position before starting the engine.
- The INSP technical symbols will appear on the display for approximately 2 seconds.
- Hold down the trip odometer button until the display shows "- - -".
If the above procedure for resetting the Opel Astra G service indicator does not work, try this:
- Get into the car and close the door.
- Press and hold the brake pedal.
- Press and hold the trip reset button with the brake still applied.
- Turn on the ignition one position before starting the engine.
- The display will show "InSP" and under InSP it will be "- - - -".
- Continue holding the release button and the brake pedal for about 15 seconds.
At this point, InSP should flash, and then the computer will reset the mileage to 19,000 (in some cases, instead of 19,000, another number will appear, for example, 15,000 or 30,000). You can release the off button and brake pedal and the indicator will be reset.
Service interval reset button
How do you reset the Opel Astra H (Opel Astra Classic III) service indicator? By year: 2004, 2005, 2006, 2007, 2008, 2009, 2010, 2011, 2012:
- Get into the car and close the door.
- Press and hold the brake pedal.
- Press and hold the shutdown reset button with the brake still depressed.
- Turn on the ignition one position before starting the engine.
- The display will show "InSP" and under InSP it will be "- - - -".
- Continue holding the release button and the brake pedal for about 15 seconds.
At this point, InSP should flash and then reset the mileage to 19,000 (in some cases, instead of 19,000, another number will appear, for example, 15,000 or 30,000). You can release the off button and brake pedal and the indicator will be reset.
If the above procedure for resetting the Opel Astra H service indicator does not work, try this:
- The ignition is turned off.
- Press and hold the trip odometer reset button.
- Turn on the ignition one position before starting the engine.
- The INSP symbols will light up on the display for approximately 2 seconds.
- Hold down the trip odometer button until the display shows "- - -".
- You can release the power off button, the indicator is now reset.
How can you reset the service interval on Opel Astra J 2009, 2010, 2011, 2012:
- Turn on the ignition one position before starting the engine.
- Press the MENU button until the vehicle information and settings menu appears on the display.
- Rotate the two arrow button located next to the MENU button up and down until the message “Oil Life Remaining” appears.
- Press and hold the SET/CLR button and press the brake pedal.
- Release the SET/CLR button and brake pedal, turn off the ignition.
The choice of service is always yours, although many motorists seek a full MOT, knowing that checking all routine aspects beforehand can ultimately improve performance and extend the life of the car. A mechanical review of features including tires, brakes, filters, and fluids can also help prevent any long-term problems from occurring and avoid unpleasant costs!
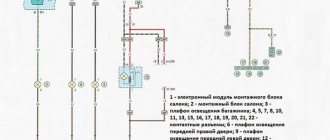
Fuse and relay diagram
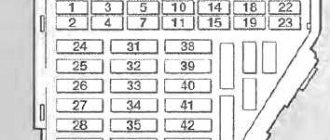
Schematic symbol for blocks. In the cabin:
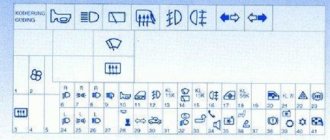
Under the hood:
Luggage compartment:
Above is the location of the elements relevant for cars 2011-2014 in the JTC version. Fuse links and relays do not differ from similar competitors' vehicles. Universal parts are designed to ensure the safety of electronic equipment in the event of an overload or short circuit in the device circuit.
Relays have a different purpose. The switches are designed to power highly loaded devices whose operating rating significantly exceeds the tolerances of fuse links.
A complete breakdown of the individual elements is given below.
Air conditioning fuses and relays
The KR29 relay installed under the hood is responsible for powering the compressor clutch. Inserts 17 and 29 of the cabin module are responsible for the operation of control panels and small electronics.
Astra J: cigarette lighter fuse
Providing electricity to the device lies entirely with the insert F6 of the interior part. In rare configurations, its role is played by a separate element, numbered 22.
Astra J fan fuse and relay: where is it located?
Relays K11/12/13 of the engine compartment unit for low/medium/high rotation speeds are responsible for turning on the cooling system rotor. They are powered by F42/45/48, which are responsible for the module control equipment.
Fuel pump relay and fuse
The power line of the device passes through switch K7 in the engine compartment. The control line is protected by insert 49, and the fuel pump control module in the turbo version is blocked by No. 54.
Starter
The launcher is powered through relay K2 of the motor module. The control part is output through fuse F16.
Turn signals
Cannot be found in standard blocks. To save space in the module, the elements are placed separately under the dashboard. You can find where they are located by following the characteristic clicks.
Window lifters
Operation is controlled by fuses F19/20 for front and rear doors. The role of the relay is performed by a switch on the comfort panel.
Sound signal
The main power to the device is supplied from relay KR3. The control line is protected by F47. All structural elements are located in the engine compartment.
Stop signal
Exited through fuse link F14 of the cabin module.
Charger
The car battery is protected from overcharging. A special device is located on the positive terminal of the battery or on the front fender on the corresponding side.
Low beam
Relay K6 and fuses F 24 and 25 for the left and right headlights are responsible for the operation of the optics.
Wipers
The rear one is powered via relay KR7. Here the control signal passes through insert 14. The front wipers are protected by element 43 of the interior module.
Signaling
The standard system is designed in a special way. Here, all relays and fuses are hidden in the housing of the module itself. A specific design is a necessity - turning off the alarm in such an arrangement is problematic.
DRL fuse
Daytime running lights are allocated as a separate link in the on-board network. They are turned on from relay K6/8. The inserts are mounted inside the engine compartment.
Trunk
The trunk lid lock in the raised state is powered from element 11 of the interior module. There is also a blocking relay mounted under the number KR 95A.
Reverse
The system is powered by an individual fuse installed near the gear lever. The sensor itself is installed nearby.
Heated seats
The module is powered from part F21 of the interior mounting panel.
central locking
The central locking power relay passes from element K3. The control signal is supplied from F10.
ABS
Two elements are responsible for the electronics of the anti-lock system: 21 and 30.
Radio tape recorder
The standard tape recorder is powered only from fuse 31 of the interior part. If the speaker system on the car is not serial, you should look elsewhere. Often, drivers run a separate line directly to the battery and cut a separate insert into it.
Parktronics
The parking assistance system is protected by element F3. The fusible link is installed in the main panel inside the trunk.
Fog lights
There is one mode activation relay on the machine - KR 46. The power lines are routed to F26.
Automatic transmission fuse
A complex module - an automatic transmission, protected from F53 in the car interior.
Opel J size fuse
Activation is done via the DRL inserts mentioned above.
Washer fuse
Element 23 is responsible for the operation of the motor. Washer for the windshield and rear windows is supplied thanks to element 40 in the cabin unit.
Stove
The head unit is powered from element 54 of the engine compartment. Separate inserts 11 and 17 are provided for the controls.
Generator voltage regulator relay
Installed near the generator in the engine compartment. This is due to the dimensions and design of the device.
You can find a part at a price from 1600 to 2000 rubles.
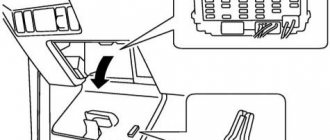
Luggage compartment
There is a small hatch on the wall inside the trunk. If you turn its fastening, the hatch will open and the third safety block will be visible.
| Number | What is he responsible for? |
| 1, 2 | Trailer electrical connection / socket |
| 3 | Parking sensors |
| 8 | Sound and light alarm |
| 11 | Trailer connector |
| 19 | Steering wheel heater |
| 20 | Electric sunroof on the roof of a car |
| 21 | Heated front and rear seats |
| 31 | Sound notification in the cabin |
| 32 | Warning of crossing the road median |
Engine immobilization system
Damage to the microchip may result in loss of the ability to start the engine! Do not allow the keys to heat up excessively, do not leave them in direct sunlight for a long time; try not to drop the keys or place heavy objects on them; Avoid exposure to moisture; carefully wipe the wet set dry with a soft cloth. No replaceable batteries are provided for the microchip; under no circumstances should you attempt to disassemble the key head on your own! Instrument panel Engine preheater indicator lamp (diesel models)
There is a possibility that the system will not recognize the code of the key located in the ignition switch if there is any other key with a built-in microchip nearby. To reliably identify the code, we recommend keeping each key in a separate keychain.
Enabling/disabling the anti-theft alarm
Inclusion
Make sure the hood and trunk lid are also locked. When the alarm is triggered, an acoustic signal is activated (3 signals from the volume sensors, a maximum of 10 signals from other sensors) and the direction indicators begin to flash. The maximum duration of the siren operation is 30 seconds, the blinking of the direction indicators continues for up to 5 minutes. During the first 10 seconds after the alarm is activated:
- LED lights up continuously: Monitoring, switch-on delay
- LED flashes: Any of the controlled locks is not locked, or the system is faulty
10 seconds after the alarm is activated:
- LED flashes: Anti-theft alarm activated
- LED lights up continuously for 1 second: Function deactivated.
Unlocking and locking doors using a key from outside the vehicle
Opel Astra J Cigarette Lighter Fuse Where Is Located
How to change the cigarette lighter fuse on an Opel Astra H
For some reason, the cigarette lighter fuse on an Opel Astra H burns out is a common occurrence. We have prepared step-by-step instructions for changing it.
Step 1. Looking for a hatch in the trunk
- First you need to find the fuse box
in the trunk. Usually it looks like this: - The fuse hatch in an Opel Astra
H car usually looks like this: - If your hatch differs from the outside from the one shown in the picture, it means you have a rare configuration, it happens, nothing extravagant, no need to panic.
Step 2.7. Determining the type of fuse box
Now we need to understand what kind of fuse assembly your Astra
It is known that most of the cars of this brand were equipped with a “full mounting block”; alas, some cars, especially the basic ones, were equipped with a “simple mounting block”.
A regular mounting block is significantly smaller in size and is very rarely found. Alas, anything can happen.
This is what a “full mounting block” of fuses looks like:
This is what a “simple mounting block” of fuses looks like:
Step 3: Changing the cigarette lighter fuse
If you have a regular mounting block (this happens VERY Occasionally), then you can safely close the trunk; there is no suitable fuse in your personal computer. Open the hood and change fuse FE36, rated 7.5A (if the cigarette lighter backlight is covered, you can change it too - FE33, 5A). Alas, as we wrote above, this is a great uniqueness.
Description of the fuse
in the trunk of an Astra J
on all websites with the same photo.
How to change the cigarette lighter fuse on an Opel Astra N / Opel Astra H
Cigarette lighter fuse blown
Opel Astra N has a frequent malfunction.
In this case, you have a regular complete mounting block in the trunk, then you need to change fuse FR29, rated 15A (FR18, 5A - backlight):
What to do if the cigarette lighter is stuck?
In most cases, this happens because the fuse has blown. Just change it and the fuse will shoot back.
Instead of replacing the entire cigarette lighter, buy a 3.5 socket splitter and insert it into the cigarette lighter
his.
What to do if the wheel pump is very powerful and the fuse blows because of it?
Instead of taking a new pump, it is better to cut off the cigarette lighter plug and solder a couple of alligators for the battery. Connect the pump directly to the battery.
Where is the socket in the trunk of the Opel Astra H?
The socket in the trunk is located on the right wall of the trunk, but of course it is not available on all trim levels. Those who have it are lucky - you can easily connect a vacuum cleaner to it when cleaning the trunk or a car refrigerator on long trips.
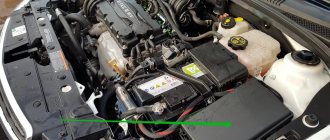
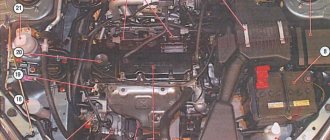
Common Opel Astra ECU malfunctions
Common Opel Astra ECU malfunctions occur for the following reasons:
- mechanical damage. The engine control unit is damaged by shocks and strong vibrations, which contribute to the appearance of microcracks in its circuits and housing;
- sudden temperature changes, as a result of which the engine control unit itself overheats;
- corrosion;
- depressurization and moisture ingress into the ECU housing;
- interference in the work of a block of people who do not have the necessary skills;
- the so-called “lighting up” from a car with the engine running;
- rearranging the terminals when connecting the battery;
- turning on the starter without a connected power bus.
All of the above factors have different effects on the performance of the engine control unit. Some of them cause minor damage to the “brains” of the car, while others can instantly break the unit. Fortunately, there is still a way to prevent the complete breakdown of the unit - ECU diagnostics, which should be performed at least once a year. This is the only way to save on expensive repairs of a part or its complete replacement.
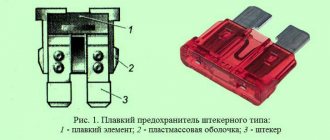
How to properly replace a burnt out element
You need to pull the fuses out of the corresponding sockets using special plastic tweezers, which can be found here, in the upper right corner of the VAZ 2114 mounting block. You cannot pry fuses on non-energized circuits with any metal objects due to the risk of a short circuit. It should be taken into account that the electrical circuits of the sound signal, alarm, etc. are always energized. To ensure safety when repairing the circuits, the circuit must be de-energized - you just need to disconnect the wire from the “negative” terminal.
It is not always possible to visually accurately determine the performance of fuses. It will be possible to make a clear decision only after the “ringing”. To do this, you will need a regular tester, which will need to be set in advance to the “dialing” mode. After this, it will be enough to simply attach two terminals of the tester to the terminals of the suspicious fuses. If a characteristic sound is heard, the fuse is good - the cause of the malfunction of the car’s equipment is not in it, but probably somewhere further in the wiring or in the device itself.
Lastly, never use copper “inserts” or fuses that are not rated for amperage. Using an inadequate replacement designed for a higher current, there is a risk of damage to the “track” of the unit’s printed circuit board and even failure of the electrical appliance. Insufficiently powerful fuses will not be able to ensure long-term and uninterrupted operation of the current consumer in the vehicle's electrical network.
Opel Astra h how to reset errors – Autognostics
Good day, dear astrologers! I drive an Opel astra H Z16XEP 2007. Tell me, who has encountered what kind of breakdown could produce the following errors? 23002 malfunction of the primary control circuit. fuel pump 30400 Misfire in cylinder 4 160030A -? 210300 There is no connection with CAN-BUS 210400 is full The CAN-BUS reset counter I hope I deciphered the errors correctly. There is no way to take the car to the service station (I am too far from civilization) If the errors don’t say much, then I will list the symptoms: it feels like the car is running on half the engine, but no no twitching, just a feeling that instead of 1.6 somewhere around 0.5, it’s not realistic to overclock the car over 60! The car starts as before just fine with half a turn. If anyone can tell me where to rummage around in the car I would be very grateful.
Sergey (Zebediah) Sergey, Thank you very much, I am also leaning towards the ignition module.
Sergey (Zebediah) Sergey, Unfortunately not, but I made an appointment with a friend for the service, I’ll go and see and call.
Sergey (Zebediah) Sergey, no, my module looked like new.
Sergey (Zebediah) Sergey, parts don’t have to melt through to fail.
How to replace it yourself?
To replace elements in the interior mounting block, no special tools are required. All you need is a slotted screwdriver and a set of new fuses.
Replacing fuses
Guidelines for replacing failed fuses, for example those responsible for the operation of a stove or cigarette lighter, are as follows:
- Turn off the vehicle's ignition system.
- Open the small folding box on the instrument panel, located near the knee of the driver's left leg.
- Press the plastic clips located on the sides and remove the drawer body from the frame.
- Unscrew the four slotted screws securing the frame.
- Remove the mounting block from its place by pulling the bottom part.
- Replace the faulty fuse. To do this, the damaged fuse element must be removed from the socket. The mounting block comes with small plastic pliers. They need to clamp the fuse body, pull it out of its seat and insert a new part.
- Visually check the condition of the remaining fusible links.
- Reassemble.
It is important to note that the new fuse must have the same rating as the failed one. If such a detail is missing, you can use an element of slightly larger value
Just first you need to check the working condition of the circuit; for this you should install a fuse from any other socket with the required rating. If the fuse remains intact, then a part with a higher rating should be installed instead. But at the first opportunity it should be replaced with a part with a standard rating. Since long-term use of an inappropriate fuse can lead to damage to the vehicle's electrical systems and fire. If after replacing the fuse it immediately fails, then it is necessary to find out the cause of the overload in the electrical circuit.
The process of changing fuses on more modern Opel Astra H 2008 or Opel GTC 2012 is identical to the above.
Replacing parts in the engine compartment is even simpler. To do this, you need to unfasten the plastic covers of the blocks and replace damaged fuses or relays.
Removing the relay box cover Removing the fuse box cover